
Subscribe to Our Youtube Channel
Related Manuals for ATEN Altusen KA8270


Summary of Contents for ATEN Altusen KA8270
- Page 1 ATEN Altusen™ KA8270 / KA8278 KA8280 / KA8288 KVM over IP Console Station User Manual...
- Page 2 User Manual Compliance Statements FEDERAL COMMUNICATIONS COMMISSION INTERFERENCE STATEMENT This equipment has been tested and found to comply with the limits for a Class A digital device, pursuant to Part 15 of the FCC Rules. These limits are designed to provide reasonable protection against harmful interference when the equipment is operated in a commercial environment.
-
Page 3: User Information
This product is RoHS compliant. User Information Online Registration Be sure to register your product at our online support center: International http://eservice.aten.com Telephone Support For telephone support, call this number: International 886-2-8692-6959 China 86-400-810-0-810 Japan 81-3-5615-5811 Korea 82-2-467-6789 North America 1-888-999-ATEN ext 4988 1-949-428-1111... -
Page 4: User Notice
For information about all ATEN products and how they can help you connect without limits, visit ATEN on the Web or contact an ATEN Authorized Reseller. Visit ATEN on the Web for a list of locations and telephone numbers: International http://www.aten.com... -
Page 5: Package Contents
User Manual Package Contents Check to make sure that all components are in working order. If you encounter any problem, please contact your dealer. 1 KVM over IP Console Station (KA8270 / KA8278 / KA8280 / KA8288) 1 power adapter 1 power cord 1 mounting kit 1 foot pad set (4 pcs) -
Page 6: Table Of Contents
User Manual Contents Compliance Statements ........ii User Information . - Page 7 User Manual Device Options ......... . 23 Device Display .
- Page 8 User Manual AD / LDAP Settings ........58 Finishing Up .
- Page 9 User Manual International..........98 North America .
-
Page 10: About This Manual
User Manual About This Manual This manual is provided to help you get the most out of your KVM over IP Console Station. It covers all aspects of the device, including installation, configuration, and operation. The models covered in this manual include: Model Product Name KA8270... -
Page 11: Conventions
User Manual ATEN regularly updates its product documentation for new features and fixes. For an up-to-date KVM over IP Console Station documentation, visit http://www.aten.com/global/en/ Conventions This manual uses the following conventions: Monospaced Indicates text that you should key in. - Page 12 User Manual This Page Intentionally Left Blank...
-
Page 13: Chapter 1. Introduction
KA8278 and KA8288, users can multitask across two displays with a single keyboard and mouse. The KVM over IP Console Station is compatible with ATEN’s KN KVM over IP Switch series. The KN KVM over IP Switches series are IP-based KVM control units that allow both local and remote operators to monitor and access multiple servers from a single console (refer to ATEN’s website to get more... -
Page 14: Features
ATEN’s KVM over IP switches Impenetrable security against virus threats with impervious data protection Single sign-on to consolidate the management of multiple ATEN KVM over IP switches Advanced FPGA graphics processor — with a Full HD resolution of 1920 x 1200 ... -
Page 15: Requirements
Chapter 1. Introduction Supports Boundless Switching in Cascade with another KA8270 / KA8278 / KA8280 / KA8288 Extended desktop — supports extended display for remotely connected PCs on the dual screens of KA8278 / KA8288 Share screen — shares screen content from one console station to another for real-time collaboration ... -
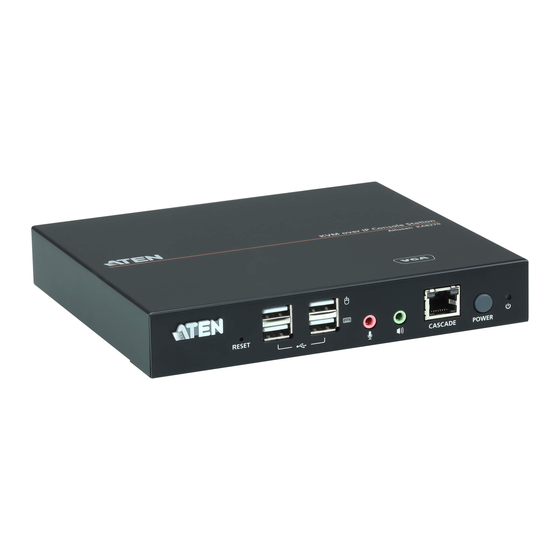
Page 16: Components
KVM over IP Console Station User Manual Components Front View Component reset button USB ports (peripherals) USB ports (keyboard and mouse) audio ports cascade port power pushbutton (press to stop video outputs; press again to resume video outputs) power LED (power on: blue; video outputs off: orange) -
Page 17: Rear View
Chapter 1. Introduction Rear View Component grounding terminal power jack LAN port COM port VGA port (KA8270 and KA8278 only) HDMI port(s) (KA8278, KA8280 and KA8288 only) - Page 18 KVM over IP Console Station User Manual This Page Intentionally Left Blank...
-
Page 19: Chapter 2. Hardware Setup
Chapter 2. Hardware Setup Chapter 2 Hardware Setup Overview This chapter outlines different ways of mounting your KVM over IP Console Station as well as a quick hardware connection summary for single-stage installation. Before You Begin 1. Important safety information regarding the placement and grounding of this device is provided on page 95 and onwards. -
Page 20: Mounting
KVM over IP Console Station User Manual Mounting The KVM over IP Console Station can be rack mounted or wall mounted. The following sections take you through the procedures for each method. Rack Mount The KVM over IP Console Station is designed to be mounted at the rear of a rack, where it occupies 0U to save space. -
Page 21: Wall Mount
Chapter 2. Hardware Setup Wall Mount 1. Remove two screws from the bottom of the unit and use them to attach the mounting bracket to the unit as shown in the diagram below: 2. Use the mounting bracket’s center screw hole to mount the unit onto a wall. -
Page 22: Single-Stage Installation
KVM over IP Console Station User Manual Single-Stage Installation For single-stage installation, refer to the installation diagram and proceduresbelow (KA8278 is used as an example): Note: The numbers shown in the diagram correspond to the installation procedure step numbers. 1. Plug the connectors of your USB mouse, USB keyboard, microphone, and speakers into their respective ports on the front of the KVM over IP Console Station. -
Page 23: Hot Plugging
Chapter 2. Hardware Setup 7. Plug the power adapter into an AC source with the power cord; then plug the other end into the KVM over IP Console Station’s power jack. Hot Plugging KVM over IP console stations support hot plugging — components can be removed and added back into the installation by unplugging and replugging cables from the ports without the need to shut the unit down. -
Page 24: Powering Off And Restarting
KVM over IP Console Station User Manual Powering Off and Restarting If it becomes necessary to power off the console station, please use the shut down function (see Shutdown on page 75), disconnect the power adapter and wait for 30 seconds before reconnecting it back. -
Page 25: Chapter 3. Operation
Chapter 3. Operation Chapter 3 Operation Overview The KVM over IP console station can be used as a central control station to monitor several KVM switches. Available interfaces are described in the sections that follow. Logging In A valid Username and Password are required for login. Note: If the number of invalid login attempts exceeds a specified number of times, a timeout period is invoked. - Page 26 KVM over IP Console Station User Manual Note: 1. Please use the KVM credentials to login. 2. Click on “Clear History” to remove the history of all connected devices. Follow the steps below to log in: 1. If you wish to log into a KVM device directly, select “KVM over-IP Switch”...
-
Page 27: Upgrading Kvm Over Ip Switch Via Console Station
Check the website regularly to find the latest information and packages for KVM over IP Switch. To upgrade the KVM over IP Switch’s firmware: 1. Get the newest firmware by downloading it from ATEN’s website to a computer. 2. Transfer the downloaded file to a USB flash drive. - Page 28 KVM over IP Console Station User Manual 6. Click Browse to select the downloaded firmware file and click Open. 7. Click Upgrade Firmware.
- Page 29 Chapter 3. Operation 8. The KVM over IP Switch will reboot after the firmware upgrade is complete.
-
Page 30: Dashboard
KVM over IP Console Station User Manual Dashboard Once you have successfully logged in, the KVM over IP console station’s user interface dashboard appears: Note: The screen depicts an Administrator’s page. Depending on the user’s account type and permissions, not all of these elements will appear. Page Components The page components of the dashboard are described in the table below: Item... - Page 31 Chapter 3. Operation Item Description Manage Manage Device View allows users to separate KVM over IP Device View switches currently being monitored into different device views to be displayed. Note: The maximum number of devices that can be displayed within a device view (including All Devices) is 16. If you have more than 16 devices added, make sure to create additional device views for displaying devices beyond 16.
-
Page 32: Dashboard Operation
KVM over IP Console Station User Manual Dashboard Operation The dashboard of the console station usually displays the connected devices in an array of monitor units. Each of the unit corresponds to a connected device. The unit will continuously alternate between all connected ports. Double-clicking a monitor will bring you to the port’s page. -
Page 33: Monitor Unit Option
Chapter 3. Operation Monitor Unit Option Clicking the Menu icon displays available options: Primary / Secondary Display Depending on your console station model (whether you have one or two display ports), the menu may show a Primary Display option or both a Primary Display option and a Secondary Display option, for displaying a port on the primary or secondary display: 1. -
Page 34: Gui
KVM over IP Console Station User Manual For controlling the server, the KVM over IP console station’s interface provides a toolbar to help you with the remote control operations. Please refer to Toolbar Interface on page 77. If you wish to use the KVM over IP switch’s GUI, click Open GUI. Please refer to the KVM switch’s user manual for the GUI’s operation. -
Page 35: Device / Panel Array Display And Management
Chapter 3. Operation Device / Panel Array Display and Management Manage Device View allows users to separate KVM over IP switches currently being monitored into different groups or select which device group is to be displayed on the dashboard. Manage Panel Array View allows users to separate available ports into different groups or select which panel array group is to be displayed on the panel array page. -
Page 36: Device Display
KVM over IP Console Station User Manual Device Display An example showing the KVM over IP switches in a device display is shown on the dashboard below (device 1 is the selected device): Panel Array Options Click the Panel Array icon to display the panel array options: Option Description Manage Panel... -
Page 37: Panel Array Display
Chapter 3. Operation Panel Array Display An example showing the ports of connected KVM over IP switches in a panel array is displayed (array1 selected): Press the + icon to display more device ports (up to 64 ports) on a smaller scale. -
Page 38: Manage Device / Panel Array View
KVM over IP Console Station User Manual Manage Device / Panel Array View Click the Device or Panel Array icon to show their corresponding options. Due to their similarity, Manage Device View is used as the example below. Click Manage Device View (or Manage Panel Array View) for the following page: This page allows you to add / edit / delete device views. - Page 39 Chapter 3. Operation 2. Enter a name for the new device / panel array view. Note: The maximum number of character can be entered is 32. 3. Under Available Devices, select the devices you wish to add in this device / panel array view and click the >...
-
Page 40: Adding Another Device View
KVM over IP Console Station User Manual Adding another Device View If you wish to add another device view, click the + icon again and go through the steps outlined in Adding a Device / Panel Array View. -
Page 41: Editing A Device View
Chapter 3. Operation Editing a Device View If you wish to edit a device view, click the pen icon beside the Device View. The Tab Device Configuration window is displayed, as in Adding a Device / Panel Array View. Edit its name, shift the devices around using the > or < icons and click OK when done. -
Page 42: Boundless Switching With Cascade
KVM over IP Console Station User Manual Boundless Switching with Cascade Boundless Switching with cascade allows users to move mouse cursor across screens between two console stations. In boundless switching, the cascaded unit is controlled by the parent unit, and does not operate independently. Keyboard and mouse are required to connect to the parent unit for boundless switch to work. -
Page 43: Selecting A Display
Chapter 3. Operation Selecting a Display To select a display, click on and the below page appears. Stopping the Cascade To stop the cascade, simply mouse over the cascaded screen and click Stop Cascading. Note: If the cascade is disconnected, or one of the unit is powered off. The boundless switching will resume to the previous settings whenever the connection or power is reestablished. -
Page 44: Extended Desktop
KVM over IP Console Station User Manual Extended Desktop Extended Desktop allows any remote servers connected via KN2116VA / KN4116VA / KN2124VA / KN4124VA / KN2132VA / KN4132VA / KN8132V / KN2140VA / KN4140VA / KN4164V / KN8164V that are configured as 2 video sources, in horizontal layout under Multi-View, to be displayed onto the dual screens of the KVM over IP console station as extended desktop upon access. - Page 45 Chapter 3. Operation 4. When the mouse pointers are out of sync, between the remote servers and the KVM over IP console station, users can move the pointers to the toolbar section for resynchronization. First, make sure the remote server’s two video sources have been properly connected to and configured on the KN device, as illustrated below.
- Page 46 KVM over IP Console Station User Manual This Page Intentionally Left Blank...
-
Page 47: Chapter 4. Device Management
Chapter 4. Device Management Chapter 4 Device Management Overview Device management allows users with administrative authority to add devices to or remove devices from the console station. The KVM over IP console station can manage up to 256 KVM over-IP switches and simultaneously display previews for up to 16 devices. -
Page 48: Device List
KVM over IP Console Station User Manual Device List The device list is displayed at the center of the Device Management page. Search The rectangular field at the top of the device list is the search box. Enter the IP address of the device you wish to search for to find that device. - Page 49 Chapter 4. Device Management Option Description Click to add serial console devices via SSH protocol for remote management. Telnet Click to add serial console devices via Telnet protocol for remote management.
-
Page 50: Adding Kvm Over-Ip Devices
KVM over IP Console Station User Manual Adding KVM over-IP Devices Mouse over the search button (magnifying glass). A list of KVM device(s) within the same local area network (LAN) will be shown, as exemplified below: Select the desired device or simply enter the IP address of a known device; enter its Username and Password, and click Save to add the device to the system. -
Page 51: Changing Connection Information
Chapter 4. Device Management Changing Connection Information If you wish to change the login account accessing an added device, for different access rights, you will need to change to a user with the desired access rights. Follow the steps below: 1. - Page 52 KVM over IP Console Station User Manual This Page Intentionally Left Blank...
-
Page 53: Chapter 5. System Configuration
Chapter 5. System Configuration Chapter 5 System Configuration Overview System configuration allows users with administrative authority to manage users and groups, display device information, configure network, advanced network management (ANMS), security settings, manage firmware upgrade, system backup / restore, push / pull configurations to or from other devices, access terminal, and reset system to factory default settings. -
Page 54: User Management
KVM over IP Console Station User Manual User Management This section allows you to manage users and groups. Users and Groups Groups allow administrators to easily and efficiently manage users and devices. Since device access rights apply to anyone who is a member of the group, administrators only need to set them once per group, instead of having to set them for each user individually. -
Page 55: Add User
Chapter 5. System Configuration Group Page Add User Since the management of users and groups are very similar, User is the example used for the operations below. Note:1. The maximum number of user can be created is 64. 2. The maximum number of group can be created is 16. To add a user: 1. - Page 56 KVM over IP Console Station User Manual Field Description Username 1 to 32 characters are allowed depending on the Account Policy settings. See Account Policy on page 61. Password 0 to 32 characters are allowed depending on the Account Policy settings.
- Page 57 Chapter 5. System Configuration A description of the required fields are given in the table below: Field Description Group Name Up to 32 characters are allowed. Description Additional information about the user that you may wish to include. A maximum of 45 characters is allowed. 3.
-
Page 58: Copy User
KVM over IP Console Station User Manual Copy User To save time creating a user with similar settings / information, you may use the Copy User function. A “Copy User” button is shown on the upper-right corner of the configuration body. Select the user you wish to copy and click the “Copy User”... -
Page 59: Managing (Assigning) Users And Groups
Chapter 5. System Configuration Managing (Assigning) Users and Groups There are two ways to assign users to groups: from the Users configuration page; and from the Group configuration page. Note: Before you can assign users to groups, you must first create them. See Add User on page 43 for details. -
Page 60: Using Group Configuration Page
KVM over IP Console Station User Manual Remove Users from a Group 1. In the Selected column, select the group that you want the user to be removed from. 2. Click the << icon button to remove the group’s name from the Selected column to remove the user from the group. - Page 61 Chapter 5. System Configuration 2. Click the >> icon button to put the members into the Selected column (thereby adding into the group). 3. Repeat the above to assign members to each group. 4. Click Save when you are done. Remove Users from a Group 1.
-
Page 62: Device Assignment
KVM over IP Console Station User Manual Device Assignment This function assigns access rights to users or groups and can be achieved from Device configuration page. Administrators can assign users to a particular user’s privileges of an added KVM over IP Switch and access ports. Using Device Configuration Page Follow the steps below to go to the User’s configuration page: 1. - Page 63 Chapter 5. System Configuration After selecting a device, the Available column (left column) lists the available users (of the device). The Selected column (right column) shows the selected user (of the device). Click the >> or << icon buttons to shift between Available and Selected. ...
-
Page 64: Assigning Ssh / Telnet Device Access To Users
KVM over IP Console Station User Manual Assigning SSH / Telnet Device Access to Users By default, any devices added via SSH / Telnet can only be accessed by Administrator accounts. To allow access of a such devices for a User, select the device under the Privilege tab as shown below. -
Page 65: System Management
Chapter 5. System Configuration System Management This page shows device information and allows you to configure network, ANMS and security settings. Note: Whenever a new setting is saved, the system will reboot. System Information Click “System Information” under “System Management” in the side menu to bring out the information page. -
Page 66: Ip Installer
KVM over IP Console Station User Manual Each of the elements on this page is described below. IP Installer The IP Installer is an external Windows-based utility for assigning IP addresses to the KVM over IP switch. Click one of the radio buttons to select Enable, View Only, or Disabled for the IP Installer utility. -
Page 67: Ipv4 Settings
Chapter 5. System Configuration Note: 1. If you select View Only, you will be able to see the KVM over IP switch in the IP Installer’s Device List, but you will not be able to change the IP address. 2. For security, we strongly recommend that you set this to View Only or Disable after each use. -
Page 68: Ipv6 Settings
KVM over IP Console Station User Manual IPv6 Settings At present, the KVM over IP console station supports three IPv6 address protocols: Link Local IPv6 Address, IPv6 Stateless Autoconfiguration, and Stateful Autoconfiguration (DHCPv6). IP Address: IPv6 is the new (128-bit) format for specifying IP addresses. The KVM over IP console station can either have its IPv6 address assigned dynamically (DHCP), or it can be given a fixed IP address. -
Page 69: Radius Settings
Chapter 5. System Configuration RADIUS Settings To allow authentication and authorization for the KVM over IP Console Station through a RADIUS server, do the following: 1. Check Enable. 2. Select Preferred or Alternate RADIUS server. 3. Fill in the IP addresses and service port numbers for the Preferred and Alternate RADIUS servers. -
Page 70: Ad / Ldap Settings
KVM over IP Console Station User Manual 5. In the Timeout field, set the time in seconds that the KVM over IP console station waits for a RADIUS server reply before it times out. 6. In the Retries field, set the number of allowed RADIUS retries. 7. -
Page 71: Finishing Up
Item Action Admin DN Consult the AD / LDAP administrator to ascertain the appropriate entry for this field. For example, the entry might look like this: ou=kn8132,dc=aten,dc=com Admin Name Key in the administrator username. Password Key in the administrator password. -
Page 72: Security
KVM over IP Console Station User Manual Security The Security page is divided into 3 main panels, as described in the sections that follow. Click “Security” under “System Management” in the side menu to bring out the information page. Login Failures For increased security, the Login Failures section allows administrators to set policies governing what happens when a user fails to log in successfully. -
Page 73: Account Policy
Chapter 5. System Configuration Entry Explanation Allowed Sets the number of consecutive failed login attempts that are permitted from a remote computer. The default is 5 times. Timeout Sets the amount of time a remote computer must wait before attempting to login again after it has exceeded the number of allowed failures. -
Page 74: Working Mode
KVM over IP Console Station User Manual Working Mode An explanation of the Working Mode items is given in the table below: Item Explanation Enable ICMP Check / uncheck to allow / disallow the KVM over IP console station to be pinged. The default is Enabled. Allow Push Check / uncheck to allow / disallow another KVM over IP console Request from... -
Page 75: Cascade
Chapter 5. System Configuration Cascade The Cascade page is used to set up the boundless switching with Cascade. Click “Cascade” under “System Management” in the side menu to bring out the information page. The meanings of the Cascade entries are explained in the table below: Entry Explanation Enable cascade... -
Page 76: Maintenance
To upgrade the main firmware: 1. Gett the newest firmware by downloading the firmware from ATEN’s website to a computer. 2. Unzip the .zip file for the .csf file and transfer it to a USB flash drive. - Page 77 Chapter 5. System Configuration 5. Navigate to the directory that the new firmware file is in, click to select the file and click “Open”. The file will be displayed in the Filename field of the configuration page as shown below: 6.
-
Page 78: Firmware Upgrade Recovery
KVM over IP Console Station User Manual Note: To recover from a “failed upgrade” situation, see Firmware Upgrade Recovery on page 66. Firmware Upgrade Recovery Should the console station’s main firmware upgrade procedure fail, and the console station becomes unusable, follow the firmware upgrade recovery procedure below to recover the console station to its original firmware version: 1. -
Page 79: Backup
Chapter 5. System Configuration Backup To backup the device’s settings: Note: A USB flash drive is required to be connected to the console station to store the backup file. 1. (Optional) In the Password field, key in a password for the file. Note: 1. -
Page 80: Restore
KVM over IP Console Station User Manual 3. In the File name field, enter a backup file name and click “Save”. The system will display a success message to indicate successful backup. Restore To restore a previously-saved settings: Note: A USB flash drive with the previously backed-up file is required to be connected to the console station for backup file retrieval. -
Page 81: Push / Pull Configuration
Chapter 5. System Configuration 3. If you set a password when you created the file, key it in the Password field. 4. Select as many of the options that are presented as you wish to restore. 5. Click “Restore”. The system will display a success message to indicate the restoration was successful. -
Page 82: Pull Configuration
KVM over IP Console Station User Manual Pull Configuration To pull (retrieve) a configuration to your console station: 1. Enter the device’s IP address or IPv6 Address you wish to retrieve the con- figuration from. Alternatively, you can mouse over the magnifying glass to find a list of the devices on the same LAN and click the device’s IP or IPv6 address: 2. -
Page 83: Terminal
Chapter 5. System Configuration 2. Enter the administrative username and password of the selected device(s). 3. Select the information you would like to deploy from your console station by checking the checkbox(es). Note: If you checked the Firmware checkbox, please remember to click the Choose button to select a firmware from a USB flash drive. - Page 84 KVM over IP Console Station User Manual GET => Gets current configuration. HELP => Provides Help information for commands. CLEAR => Clears the screen. PING => Displays ping host information. SETLDAPMEMBER => Sets new value for ldap member. ...
-
Page 85: System Operation
Chapter 5. System Configuration System Operation The System Operation page lets you restore certain configuration changes that were made to the KVM over IP console station back to their original factory default values. Reset Default Values Clicking this button undoes all Customization page changes that have been made to the KVM over IP console station and returns the parameters to the original factory default settings. -
Page 86: Switch Video Output
KVM over IP Console Station User Manual Click Yes to go ahead with the reset (the system will also reboot). Click No if you do not want the system to be reset. If you change the console station’s IP Address (see Network on page 53), the checkbox is automatically checked and the console station will reset when you exit the page. -
Page 87: Quick User Configuration
Chapter 5. System Configuration Quick User Configuration The user icon allows quick access to password change, configure preferences, logout, restart the system, shut down the system, or display quick information about the console station. Click the User icon for its menu: Option Description Change... - Page 88 KVM over IP Console Station User Manual This Page Intentionally Left Blank...
-
Page 89: Chapter 6. Toolbar Interface
Chapter 6. Toolbar Interface Chapter 6 Toolbar Interface Overview The KVM over IP console station’s interface provides a toolbar to help you with the remote control operations on the captured port. The toolbar is usually hidden. To bring up the toolbar, locate a down arrow symbol as shown: Mouse over the down arrow symbol to bring up the toolbar. -
Page 90: Exit Remote Location
KVM over IP Console Station User Manual Icon Purpose Mouse Sync Mode icon This provides automatic locked-in synching of the remote and local mouse pointers – eliminating the need to constantly resync the two movements. Click the icon to toggle between Auto Mouse Sync Mode (mouse icon with an A) and Manual Mouse Sync Mode (mouse icon with an Please see Mouse Sync Mode on page 93 for more details. -
Page 91: Video Settings
Chapter 6. Toolbar Interface Video Settings Click the Video icon on the toolbar to bring up the Video Settings dialog box. The options in the basic dialog box allow you to adjust the Screen Position, set Auto Sync, slide-to-adjust Performance bar setting, Enhanced Text Mode, slide-to-adjust Video Quality bar, and Set to Grayscale. - Page 92 KVM over IP Console Station User Manual Options Description / Operation Video Auto-Sync Click Video Auto Sync to have the vertical and horizontal offset values of the remote screen detected and automatically synchronized with the local screen. Note: 1. If the local and console station mouse pointers are out of sync, in most cases, performing this function will bring them back into sync.
-
Page 93: Macros
Chapter 6. Toolbar Interface Macros The Macros icon provides access to three functions found in the Macros dialog box: Hotkeys, User Macros, and System Macros. Each of these functions is described in the following sections. Hotkeys Various actions related to manipulating the remote server can be accomplished with hotkeys. - Page 94 KVM over IP Console Station User Manual 3. Press your selected Function keys (one at a time). The key names will appear in the Hotkeys field as you press them. You can use the same function keys for more than one action, as long as the key sequence is not the same.
-
Page 95: User Macros
Chapter 6. Toolbar Interface Action Explanation Show / Hide Toggles off and on: hides local cursor and locks the mouse pointer Local Cursor and keyboard use within the Windows/Java Client AP window, plus hides the control panel. This is equivalent to selecting the Single pointer type from the Mouse Pointer option under the Configuration icon of the toolbar. - Page 96 KVM over IP Console Station User Manual 3. In the dialog box, you can choose to replace the “New Macro” text with a name of your choice for the macro. 4. Click Set Macro followed by Record. The dialog box disappears as a small panel appears at the top left of the screen: 5.
- Page 97 Chapter 6. Toolbar Interface 6. When finished, click Stop. You will return to the Macros dialog box with your macro key presses displayed in the Macro column: 7. If you want to change any of the keystrokes, select the macro, click Set Macro followed by Edit.
-
Page 98: Import / Export Macros
KVM over IP Console Station User Manual 8. Click Save to save the changes, or click Cancel to cancel the changes. Both option will return you to the Macros dialog box. 9. Repeat the procedure for any other macros you wish to create. After creating your macros, you can run them in any of three ways: 1. -
Page 99: Delete Macros
Chapter 6. Toolbar Interface Click the import symbol to search through the USB flash drive to import the macros. Click the export symbol and enter a name to save the macros to the USB flash drive. Delete Macros To delete a macro, click to select the macro and click the trash can symbol to delete a macro. -
Page 100: Further Configuration
KVM over IP Console Station User Manual Ways to create, delete or search for macros are the same as User Macros, please refer to User Macros on page 83. System macros cannot be imported or exported. For more information on system macros for different KVM over IP switches, please refer to their user manuals. -
Page 101: Virtual Media
Chapter 6. Toolbar Interface Options Description Message Board Click to bring up the Message Board (see Message Board on page 91). Speaker Click to toggle sound from the remote server to be heard on the client computer’s speakers on or off. The option is grayed out when the speaker is toggled Off. - Page 102 KVM over IP Console Station User Manual 2. Click the + symbol and select the media source. 3. If your device only supports full speed USB, check the Disable High Speed USB Operation Mode checkbox. 4. To add additional media sources, click the + symbol, and select the source as many times as you require.
-
Page 103: Message Board
Chapter 6. Toolbar Interface 5. Read refers to the redirected device being able to send data to the remote server; Write refers to the redirected device being able to have data from the remote server written to it. For the redirected device to be writable as well as readable, click to put a check in the Enable Write checkbox: Note: If a redirected device cannot be written to, it appears in gray. - Page 104 KVM over IP Console Station User Manual Buttons The buttons in the dialogue box toggles actions and are described in the table below: Button Action Enable/Disable Chat. When disabled, messages posted to the board are not displayed. The button is shadowed when Chat is disabled.
-
Page 105: Mouse Sync Mode
Chapter 6. Toolbar Interface If a user has disabled Chat, the disable chat icon will be displayed on the left of user's name. If a user has occupied the KVM or the KM, the corresponding icon will be displayed on the left of the user’s name. - Page 106 KVM over IP Console Station User Manual If the local mouse pointer goes out of sync with the remote system's mouse pointer there are a number of methods to bring them back into sync: 1. Perform an Auto Sync with the Video Adjustment function (see Video Set- tings, page 79, for details).
-
Page 107: Appendix
Appendix Safety Instructions General This product is for indoor use only. Read all of these instructions. Save them for future reference. Follow all warnings and instructions marked on the device. Do not place the device on any unstable surface (cart, stand, table, etc.). If the device falls, serious damage will result. -
Page 108: Rack Mounting
User Manual When connecting or disconnecting power to hot-pluggable power supplies, observe the following guidelines: Install the power supply before connecting the power cable to the power supply. Unplug the power cable before removing the power supply. ... - Page 109 Appendix Always load the rack from the bottom up, and load the heaviest item in the rack first. Make sure that the rack is level and stable before extending a device from the rack. Use caution when pressing the device rail release latches and sliding a device into or out of a rack;...
-
Page 110: Technical Support
User Manual Technical Support International For online technical support – including troubleshooting, documentation, and software updates: http://eservice.aten.com For telephone support, see Telephone Support on page iii. North America Email Support support@aten-usa.com Online Troubleshooting http://eservice.aten.com Technical Documentation Support Software Updates... -
Page 111: Specifications
Appendix Specifications Function KA8270 KA8278 KA8280 KA8288 Connectors Video 1 x HDB-15 1 x HDB-15 Female 1 x HDMI Female 2 x HDMI Female Female 1 x HDMI Female RS-232 1 x DB-9 Male Power 1 x DC Jack Audio 2 x Audio Jack Female LAN Ports 1 x RJ-45 Female... -
Page 112: Troubleshooting
Make sure to turn off your firewall and/or antivirus software temporarily in order for the audio- discover to work properly. Make sure the ATEN over IP unit and the PC are under same network segment. -
Page 113: Mouse Problems
Appendix Mouse Problems Problem Resolution Mouse and/or Keyboard not Unplug the cable(s) from the console port(s), then plug it/ responding. them back in. Mouse movement There is too much data being transferred for your extremely slow connection to keep up with. Lower the video quality (Video Settings on page 79) so that less video data is transmitted. -
Page 114: Virtual Media
User Manual Virtual Media Problem Resolution Virtual Media doesn’t The remote server’s mainboard does not support USB. If work. there is a newer firmware and BIOS version for the remote server’s mainboard – one that supports USB – get it from the manufacturer and upgrade the server’s mainboard firmware and BIOS. -
Page 115: Supported Kvm Switches
Appendix Supported KVM Switches Please visit our official web site for the fully supported KVM over IP switches that the console station is able to remotely access, monitor, and control. Note: The aforementioned KVM over IP switches require firmware version v1.6.151 or above to support the KVM over IP Console Station. -
Page 116: Limited Warranty
© Copyright 2021 ATEN® International Co., Ltd. Released: 2021-12-16 ATEN and the ATEN logo are registered trademarks of ATEN International Co., Ltd. All rights reserved. All other brand names and trademarks are the registered property of their respective owners.
Need help?
Do you have a question about the Altusen KA8270 and is the answer not in the manual?
Questions and answers