Table of Contents
Advertisement
Available languages
Available languages
Quick Links
π
H-4455
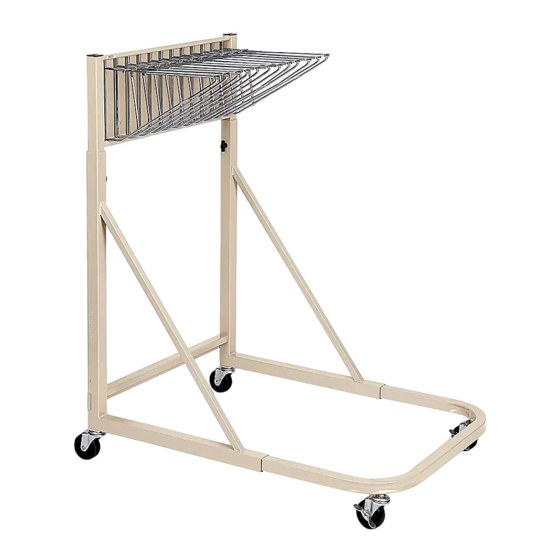
MOBILE BLUEPRINT RACK
TOOLS NEEDED
11mm Wrench
Pivot Hanger x 12
Upper Rack x 1
Lower Spreader
PAGE 1 OF 6
1-800-295-5510
uline.com
Allen Wrench (Included)
Side Frame x 2
Bar x 1
ASSEMBLY
Figure 1
PARTS
End Cap x 2
Frame
Extension x 1
1.
Position Frame Extension with holes toward the floor.
Insert Frame Extension into the short end of the Side
Frame tubes. (See Figure 1)
2. Slide posts of Upper Rack into the long end of the
Side Frame tubes. (See Figure 1)
3. Insert Knobs into upper part of Side Frames and
adjust to desired height. Insert Set Screws into lower
part of Side Frames and adjust to desired depth. Use
Allen Wrench to lock in position. (See Figure 1)
4. Attach Lower Spreader Bar to Side Frames using two
Screws. Fully tighten screws to secure bar in position.
(See Figure 1)
5. Install Casters to underside of frame by carefully
screwing them in. Position both Locking Casters at
the front of the frame by inserting into the frame
extension. (See Figure 1)
6. Insert End Caps into the Upper Rack. (See Figure 1)
Para Español, vea páginas 3-4.
Pour le français, consulter les pages 5-6.
Knob x 2
Swivel
Caster x 2
Screw x 2
Locking Swivel
Set Screw x 2
Caster x 2
0521 IH-4455
Advertisement
Table of Contents

Related Manuals for U-Line H-4455


Summary of Contents for U-Line H-4455
- Page 1 Para Español, vea páginas 3-4. Pour le français, consulter les pages 5-6. π H-4455 1-800-295-5510 uline.com MOBILE BLUEPRINT RACK TOOLS NEEDED 11mm Wrench Allen Wrench (Included) PARTS End Cap x 2 Knob x 2 Swivel Pivot Hanger x 12 Caster x 2...
- Page 2 ASSEMBLY CONTINUED ATTACHING THE PIVOT HANGERS MOUNTING CLAMPS TO HANGERS 7. Attach pivot hangers to frame by inserting spring- 8. Attach clamps by sliding clamp hanger over raised loaded top post into top hole of Upper Rack, part of mounting plate with rear end of clamp then inserting bottom post into bottom hole.
- Page 3 π H-4455 800-295-5510 uline.mx RACK MÓVIL PARA PLANOS HERRAMIENTAS NECESARIAS Llave de 11 mm Llave Allen (Incluida) PARTES 2 Tapas 2 Perillas 2 Ruedas 12 Ganchos Giratorias Colgantes 2 Tornillos 1 Rack Superior 2 Armazones 1 Extensión 2 Ruedas 1 Barra...
- Page 4 CONTINUACIÓN DE ENSAMBLE FIJAR LOS GANCHOS COLGANTES INSTALAR LOS SOPORTES A LOS GANCHOS Fije los ganchos colgantes al armazon insertando el 8. Fije los soportes deslizando el soporte del gancho poste superior con resorte en el orificio superior del sobre la parte elevada de la placa para instalación Rack Superior, luego inserte el poste inferior en el con el extremo posterior del soporte ligeramente agujero inferior.
- Page 5 π H-4455 1-800-295-5510 uline.ca SUPPORT MOBILE POUR BLEUS OUTILS REQUIS Clé 11 mm Clé Allen (incluse) PIÈCES Capuchon Bouton x 2 d'extrémité x 2 Roulette Support pivotante x 2 pivotant x 12 Vis x 2 Support Barre d'écartement Cadre latéral x 2 Rallonge de Roulette pivotante Vis de réglage x 4 supérieur x 1...
- Page 6 MONTAGE SUITE FIXATION DES SUPPORT PIVOTANTS MONTAGE DE PINCES SUR LES SUPPORTS Fixez les supports pivotants au cadre en insérant la 8. Fixez les pinces en faisant glisser le support sur la tige supérieure à ressort dans le trou supérieur de la partie surélevée de la plaque de montage avec partie supérieure du cadre, puis en insérant le bas l'extrémité...
Need help?
Do you have a question about the H-4455 and is the answer not in the manual?
Questions and answers