
Related Manuals for Purkeys SELECT


Summary of Contents for Purkeys SELECT
- Page 1 A MISSION CRITICAL ELECTRONICS BRAND SELECT™& DIRECT™NOSEBOX INSTALLATION GUIDE 300-18 R4.00...
-
Page 3: Table Of Contents
Interior Light Installation without Severe Service ........11 Installation Connections Outside the Nosebox ........11 Interior Light Installation with Severe Service ..........12 Momentary Switch (optional).................13 LED Logic ......................14 Interior Light Control ................18 Limited Commercial Warranty Policy ............21 P: 479.419.4800 | F: 479.419.4801 | www.purkeys.net... -
Page 4: General Information
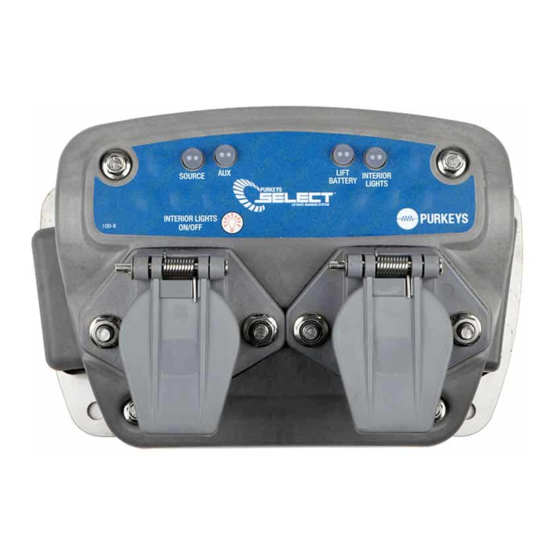
GENERAL INFORMATION The Purkeys Select™ and Direct™ nosebox systems improve liftgate battery charging by utilizing a DC/DC converter to boost the voltage for optimal charging. The boost in voltage overcomes the normal voltage drop caused by the extended distance between the liftgate batteries and the vehicle charging system. -
Page 5: Dual/Single Nosebox Installation
Green Solid Charging Green Blink Good Voltage Note: Do not block the LED status Orange Blink Low Voltage decal on the side of the Select/ Orange Rapid Fault Direct when mounting the Orange Solid Over-Temp Prot. Nosebox. This product is patented. Includes 3-year warranty. -
Page 6: Aux Harness Installation
AUX HARNESS INSTALLATION Step 1: Route the jacketed aux and ground 2-conductor from the nosebox controller over to the 7-way nosebox. Note: Place the cable clamps along the 7-way aux harness every 6 inches to ensure proper support for the cable. Avoid sharp edges and possible chaffing points. - Page 7 2 terminals. Note: Place the cable clamps along the 7-way aux harness every 6 inches to ensure proper support for the cable. Avoid sharp edges and possible chaffing points. Aux Harness Installation Complete. P: 479.419.4800 | F: 479.419.4801 | www.purkeys.net...
-
Page 8: 7-Way Nosebox Tips
Figure 1: 7-Way Nosebox SERVICE TIP - Purkeys offers the Liftgate Double Check tool, which can simplify the diagnosis of liftgate charging system problems caused by excessive voltage drop. For more information on the tool,... -
Page 9: Main Harness Installation
Note: Ensure that the 4-conductor jacketed wire enters the liftgate battery box through a dome nut or rubber grommet to prevent chaffing the wire, which could result in possible electrical short in the system. P: 479.419.4800 | F: 479.419.4801 | www.purkeys.net... - Page 10 Step 4: Position the 4-conductor main harness so it will reach the 2-stud strip and all the slack has been taken up. Mark the wire so it can be taken back out of the battery box to be terminated. Note: If your battery box includes a slide-out tray, include enough slack to allow the tray to fully extend without tugging the wire connections.
- Page 11 3/8 ring terminals, and the orange 14-gauge wire and yellow 16-gauge wire use the #10 ring terminals. Step 11: Position the heat shrink over the crimps and apply heat to the 4 terminals. P: 479.419.4800 | F: 479.419.4801 | www.purkeys.net...
- Page 12 Step 12: Re-route the jacketed wire back into the battery box. • Connect the 8-gauge black wire to the red positive Input Stud. • Connect the 8-gauge white wire to the black ground stud. • Connect the 14-gauge orange wire to the Liftgate (+) stud. •...
-
Page 13: Interior Light Installation Without Severe Service
INTERIOR LIGHT INSTALLATION WITHOUT SEVERE SERVICE These interior light instructions apply if you are installing the Purkeys interior light harness (Purkeys Part Number H-00522: 50 ft Interior Light Harness) to power interior lights off of the liftgate or auxiliary battery. -
Page 14: Interior Light Installation With Severe Service
INTERIOR LIGHT INSTALLATION WITH SEVERE SERVICE These interior light instructions apply if you are installing the Purkeys severe service kit (Direct Max only). Step 1: Inside the nosebox, connect the severe service positive terminal to the interior light input power terminal (see Figure 2) using a 10 gauge wire. -
Page 15: Momentary Switch (Optional)
If your trailer is being spec’ d with a momentary switch at the back of the trailer (the momentary switch is not included in the Purkeys kit), wire the circuit as shown below using the supplied pigtail harness shown in the drawing below (Purkeys Part Number 800-196). -
Page 16: Led Logic
LED LOGIC Source LED STATUS LOGIC Charging State – Source voltage is greater than 13.8 volts. DC/ DC converter is on. Tractor must be running and alternator good to achieve 13.8 volts. A battery’s surface charge cannot reach this value. Applies to all charging sources. - Page 17 The DIRECT will then look for next available source. No Source Static State – No tractor Lift Battery connected to the trailer and the LED Slow liftgate batteries are more than Flashing 12.4 volts. Green P: 479.419.4800 | F: 479.419.4801 | www.purkeys.net...
- Page 18 LED STATUS LOGIC No Source LED Static State – No tractor Lift Battery LED connected to the trailer and Slow Flashing the liftgate batteries are less Orange than 12.4 volts. Off State – Source voltage below 13.8 volts and extend period is over.
- Page 19 (which can Solid White on be set to 15, 30, 60, or 90 Interior Lights minutes) or if the liftgate batteries drop to a low state of charge. P: 479.419.4800 | F: 479.419.4801 | www.purkeys.net...
-
Page 20: Interior Light Control
Interior Light Control The interior light timer defaults to 60 minutes. However, it can be changed to 15, 30, 60, or 90 minutes. To change the timer length: Press the “ON/OFF” button 10 times within 10 seconds All LEDs will flash white once, then display current timer setting (see table below) Press the “ON/OFF”... - Page 21 SELECT/DIRECT INSTALLATION GUIDE NOTES P: 479.419.4800 | F: 479.419.4801 | www.purkeys.net...
- Page 22 NOTES...
-
Page 23: Limited Commercial Warranty Policy
Product or failure of a part not manufactured by Purkeys. This warranty shall not apply if any Purkeys product is used for a purpose for which it is not designed or is in any way altered without the specific prior written consent of Purkeys. ANY...
Need help?
Do you have a question about the SELECT and is the answer not in the manual?
Questions and answers