TC-Helicon VoiceLive 3 Getting Started
Hide thumbs
Also See for VoiceLive 3:
- Reference manual (127 pages) ,
- Quick manual (118 pages) ,
- Quick start manual (65 pages)
Table of Contents
Advertisement
Advertisement
Table of Contents

Related Manuals for TC-Helicon VoiceLive 3


Summary of Contents for TC-Helicon VoiceLive 3
- Page 1 Getting started – English quick guide VoiceLive 3...
-
Page 3: Table Of Contents
Important safety instructions Before you begin Introduction Making connections Inputs Outputs 1. Vocals and guitar using guitar/headphone cable 2. Stereo vocal and stereo guitar (2 channels) 3. Stereo vocals and stereo guitar (4 channels) 4. Mono vocals and mono guitar (dual mono mode) 5. - Page 4 VoiceLive 3 Getting started – English quick guide VoiceLive 3...
-
Page 5: Important Safety Instructions
Important safety instructions Caution Important safety instructions You are cautioned that any change or modifi- cations not expressly approved in this manual 1. Read these instructions. could void your authority to operate this equip- 2. Keep these instructions. ment. 3. Heed all warnings. Service 4. - Page 6 Important safety instructions EMC / EMI Explanation of graphic symbols Electromagnetic compatibility / The lightning bolt triangle is used to Electromagnetic interference alert the user to the presence of unin- sulated “dangerous voltages” within This equipment has been tested and found to the unit’s chassis that may be of suffi- comply with the limits for a Class B digital de- cient magnitude to constitute a risk of...
-
Page 7: Before You Begin
This quick guide will help you learn understand- VoiceSupport is the application that allows you ing and operating your VoiceLive 3. to fully unlock the potential of your TC-Helicon product and stay in touch with the latest news, You can download the most current version tips and tricks. - Page 8 Before you begin Live 3 in a particular setup. This means the “what Diagrams you hear” section in the lower right corner does not show guitar sounds coming from the PA – even though they might at a gig. Legend The following symbols are used in the setup ex- amples section of this quick guide: Microphone XLR Male...
-
Page 9: Introduction
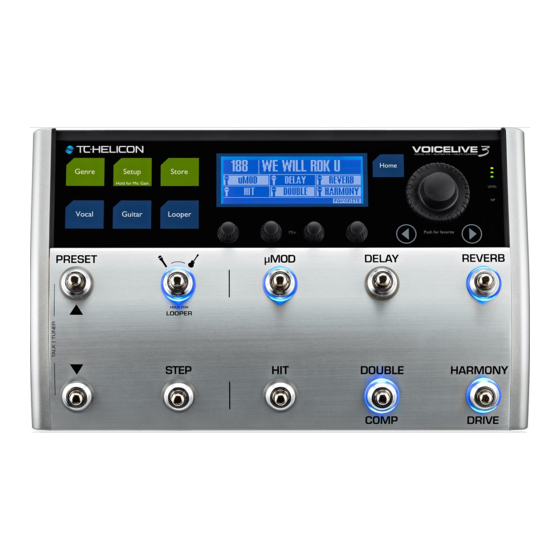
Introduction VoiceLive 3 key features Introduction Just to whet your appetite, here is a basic over- view of VoiceLive 3’s many exciting features! Thank you for purchasing VoiceLive 3! Vocal Effects Suite Your new Vocal, Guitar and Loop processor is – Adaptive Tone quite an amazing piece of technology. -
Page 10: Making Connections
Making connections Making connections SWITCH-3 Inputs 1. Connect the supplied power adapter to the ! Do you have a condenser, MP-75 or e835FX 12 V DC jack of your VoiceLive 3 and plug the microphone? When the unit is powered up adapter into a wall outlet. -
Page 11: Vocals And Guitar Using Guitar/Headphone Cable
Making connections 1. Vocals and guitar using guitar/headphone cable This setup utilizes the included guitar/headphone cable, which is perfect for personal monitoring in any setup. You will see that the two smaller ends of the cable are different. One end has a male headphone jack beside the guitar jack. -
Page 12: Stereo Vocal And Stereo Guitar (2 Channels)
Making connections 2. Stereo vocal and stereo guitar (2 channels) This is a very common setup for both live per- formances with a stereo PA (double-check that the venue PA system is actually in stereo!) or for basic 2 channel recording. VoiceLive 3... -
Page 13: Stereo Vocals And Stereo Guitar (4 Channels)
Making connections 3. Stereo vocals and stereo guitar (4 channels) VoiceLive 3 features “jack sensing” on several inputs and outputs. With this connection setup, all guitar signals are removed from the XLR sig- nal path when ¼” Guitar OUT connections are made. -
Page 14: Mono Vocals And Mono Guitar (Dual Mono Mode)
Making connections 4. Mono vocals and mono guitar (dual mono mode) If you are not using a guitar amplifier, this is a common connection setup for most live venues, since the PA is typically in mono. It also allows a sound tech to control the overall balance be- tween your vocals and guitar. -
Page 15: Stereo Vocals And Guitar Amplifier
Making connections 5. Stereo vocals and guitar amplifier Keep in mind that your guitar amp may be miked and come out through the PA. That part of the signal flow isn’t shown in this setup example. Guitar output is automatically muted in the XLR signal path when a 1/4”... -
Page 16: Mono Vocals And Guitar Amplifier
Making connections 6. Mono vocals and guitar amplifier Keep in mind that your guitar amp may be miked and come out through the PA. That part of the signal flow isn’t shown in this setup example. Guitar output is automatically muted in the XLR signal path when a 1/4”... -
Page 17: Stereo Vocals And Midi Keyboard
Making connections 7. Stereo vocals and MIDI keyboard VoiceLive 3 is not a synthesizer and cannot con- vert MIDI note messages to audio. The MIDI con- nection is only used for NaturalPlay chord detec- tion and other control data. You will still need to connect your keyboard to the PA or an amplifier for it to be heard! Getting started –... -
Page 18: Let's Get Going
Let’s get going! Let’s get going! Make all connections as seen in “Making con- nections” (page 6). Before you power up VoiceLive 3, make sure that For additional information on input trim, the amplifier or PA it is connected to is muted or please refer to your PA or mixer’s instruction turned all the way down! manual. -
Page 19: Voicelive 3 For Acoustic Guitar Players
Let’s get going! To browse presets, press the footswitches with Editing HIT settings is covered in the reference the up and down arrows on the far left. manual. Are we there yet? Frankly, we haven’t even started… Note which presets you enjoy the most – you can By now, you have probably realized that we have use them as a starting point for creating your merely scratched the surface of what you can... -
Page 20: Technical Specifications
Technical specifications D to A conversion 24 Bit, 128 x oversampling Technical specifications bitstream, 106 dB SNR A-weighted Headphone out Inputs Headphone out 1/8” Mini stereo jack, 50 Voice connector Combo Balanced XLR/ connector Ohm, +14 dBu max Balanced TRS ¼”phone jack Guitar thru Input impedance 3.08 kOhm...
Need help?
Do you have a question about the VoiceLive 3 and is the answer not in the manual?
Questions and answers