Table of Contents
Advertisement
Quick Links
Advertisement
Table of Contents

Related Manuals for Kapro Prolaser 897


Summary of Contents for Kapro Prolaser 897
- Page 1 897 Prolaser Self-Leveling ® Electronic Rotary Laser User Manual...
- Page 2 Thank you for purchasing the Prolaser 897 Self-Leveling Rota-Line, ® Electronic Rotary Laser. You are now the owner of one of our innovative range of state of the art tools. These tools incorporate new laser tech- nology, enabling the professional user and the serious D.I.Y enthusiast to achieve accurate results and reduce valuable work time.
-
Page 3: Table Of Contents
Contents Features Safety Instructions Overview Operating Instructions 8-16 Horizontal Plane (Automatic Mode) Vertical Plane (Automatic Mode) Inclined Plane (Manual Mode) Plumb Down Changing Rotating Speed Scan Function Laser Detector Using the Remote Control Power Supply Care and Maintenance Field Calibration Test 20-21 Specifications 22-23... -
Page 4: Features
Features • Self-leveling electronic mechanism on slopes of ±4° • 360° rotation generates a horizontal or vertical level plane • Generates an inclined plane of any angle in both the X and Y planes (manual mode) • Four variable speeds (0 - 600 rpm) •... -
Page 5: Safety Instructions
Safety Instructions WARNING The Prolaser 897 Self-Leveling Rota-Line is a Class II Laser. ® It is manufactured to comply with IEC international rules of safety. Do not deface or remove warning labels from the laser level. Read this user guide thoroughly before using your Prolaser ®... -
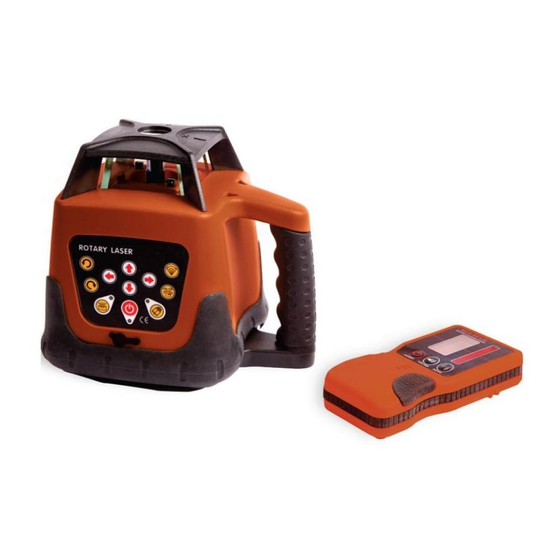
Page 6: Overview
Overview Laser Level 1. Laser output window 2. Keypad 3. Battery cover 4. Battery charger jack 5. 5/8" tripod thread 6. Handle... - Page 7 Keypad 1. Power Key 7. Scan Mode/Scan Width 8. Speed Key 2. Power Indicator 3. Clockwise Rotation Key 9. Auto-Drift Key 4. Counterclockwise Rotation Key Auto-Drift Indicator 5. Auto/Manual Key X-Axis arrows 6. Manual Indicator Y-Axis arrows...
-
Page 8: Operating Instructions
Operating Instructions To get the most out of your Prolaser 897 Self-Leveling Rota-Line, ® please adhere carefully to the following instructions. Note Avoid setting up the laser near heavy machinery or sources of vibration that may adversely affect the leveling of the Laser. Horizontal Plane (Automatic Mode) Place the Rotary Laser on firm and dry ground or on a standard 5/8"... -
Page 9: Vertical Plane (Automatic Mode)
5. To make the beam more visible, change the rotating speed using the speed key, or use the Laser Detector to detect the laser beam (see Laser Detector). 6. Change the rotation direction by pressing the Clockwise Rotation or Counterclockwise Rotation key. 7. - Page 10 3. Verify that the Rotary Laser is in automatic mode – the Manual Indicator must be unlit. 4. The Rotary Laser is ready for work when the Power Indicator is lit, the Manual Indicator has stopped blinking, and the laser beams are projected.
-
Page 11: Inclined Plane (Manual Mode)
Inclined Plane (Manual Mode) The Rotary Las er can be set up to create a single or dual directional incline plane at any angle. This is very helpful for laying inclined concrete surfaces, ensuring run-off from pathways, and laying water and sewage lines. -
Page 12: Plumb Down
Plumb Down The Plumb Down feature enables you to center the Rotary Laser onto a selected point. It is much easier to use this feature if you set up the Rotary Laser on a tripod with a hollow connecting bolt. 1. -
Page 13: Scan Function
Scan Function The Scan function is used to limit the area covered by the laser beam, for safety reasons or to improve visibility and sensitivity. A smaller scan segment will be more visible than a larger one. The default mode is 360° rotation, which provides a horizontal or inclined beam throughout the work area or room. - Page 14 Using the Laser Detector 1. Press the Power key to turn on the detector. 2. Press to select the fine or coarse detection mode: a symbol appears on the top of the LCD displaying which mode has been selected (course mode – top left, fine mode –...
-
Page 15: Using The Remote Control
Using the Remote Control The laser can be operated by an infra-red remote control. The remote control will only work if there is an uninterrupted line of sight between the infra-red control and the remote control sensor on the control panel. The effective range of the remote control is 65 ft (20m). -
Page 16: Power Supply
Power Supply Rotary Laser The Prolaser 897 Self-Leveling Rota-Line is supplied with on-board ® internal rechargeable batteries and battery charger (AC/DC Converter). Warning: Non-rechargeable”C” batteries are not to be used! 1. Recharge the batteries when the Power Indicator on the keypad flashes. - Page 17 4. The indicator lamp on the battery charger illuminates when charging. The indicator lamp will flash when the battery is fully charged. 5. The batteries can be removed from the Rotary Laser by unscrewing the screws holding the battery compartment cover in place Laser Detector 1.
-
Page 18: Care And Maintenance
Care and Maintenance Preventative Maintenance • Store in a clean dry place, between 5°F – 131°F (-15°C – 55°C) • Before moving or transporting the unit, ensure that it is turned off/ locked. • If the Laser Level is wet, dry off with a dry cloth. Do not seal the laser in the carrying case until completely dry. - Page 19 Repairs • See the Warranty section at the end of this manual. • Do not take the Laser Level apart or permit any unqualified person to take the laser level apart. Unauthorized servicing may cause bodily injury, irreparably damage the Laser Level, and invalidate the war ranty.
-
Page 20: Field Calibration Test
Field Calibration Test The Rotary Laser leaves the factory fully calibrated. Kapro recommends that the level is checked regularly, and after the unit has been dropped or mishandled. Horizontal Plane Calibration Test 1. Set up the Rotary Laser approximately 150ft (50m) from a wall or a measuring staff. - Page 21 Horizontal Line Calibration Test 1. Set up the Rotary Laser on a level surface, next to an unobstructed 100ft (30m) long wall. 2. Level the Rotary Laser as accurately as possible. 3. Turn on the Rotary Laser, mark the position of the beam next to the laser, and mark the position of the beam at a point approximately 100ft (30m) away.
-
Page 22: Specifications
Specifications Product Prolaser 897 Self-Leveling Rota-Line ® Electronic Rotary Laser Horizontal/Vertical ± 0.1mm/m Beam Accuracy ±1/8" at 100' Plumb Down/ Up Point ±1.5mm/1.5m Accuracy ±5/8" at 50' Self Leveling Range ±4° Water & dust-proof Indoor/outdoor IP 54 (International Electrotechnical Commission) Recommended Indoor 160 ft (50m), Outdoor 500 ft (150m) Working Range... - Page 23 Effective Working -14°F – 113°F (-10°C – 45°C) Temperature Remote Control Approx. 65 ft (20m) Distance Remote Control Power 2 x “AAA” batteries Supply Laser Power Supply DC 4.8-6V 4x1.2V (Ni-MH Rechargeable) Laser Battery Life Approx. 20 hours of continuous use Laser Detector Power One 9V alkaline battery Supply...
-
Page 24: Warranty
Warranty This product is covered by a two-year limited warranty against defects in materials and workmanship. It does not cover products that are used improperly, altered, or repaired. In the event of a problem with the laser level you have purchased, please return the product to the place of purchase with proof of purchase. - Page 28 ©2011 Kapro Industries Ltd.
Need help?
Do you have a question about the Prolaser 897 and is the answer not in the manual?
Questions and answers