
Related Manuals for Kapro Prolaser Electrota 8991


Summary of Contents for Kapro Prolaser Electrota 8991
- Page 1 PROLASER ELECTROTA ® ™ Self-leveling Rotary Laser Level Model No. 8991 User Manual Rechargeable 4 x C type batteries Up to 300m/980' 165'/50m included included with detector...
- Page 2 Thank you for purchasing the Prolaser Electrota 8991 Self- ® ™ Leveling Rotary Laser Level. You are now the owner of one of our innovative, state of the art tools. These tools incorporate new laser technology, enabling the professional user and the serious DIY enthusiast to achieve accurate results and reduce valuable work time.
-
Page 3: Table Of Contents
CONTENTS • Features • Safety instructions • Overview • Operating Instructions 9-16 Horizontal Plane (Automatic Mode) Inclined Plane Manual Mode Vertical Setup Plumb Down Scan Function Manual Rotation Automatic Drift System Laser Detector Using the Laser Detector Using the Remote Control •... -
Page 4: Features
FEATURES • Self-leveling electronic mechanism on slopes of ±5° • 360° rotation generates a horizontal or vertical level plane • Generates an inclined plane of up to ±5° in both the X and Y planes • Five variable speeds (0, 60,120, 300, 600 rpm) •... -
Page 5: Safety Instructions
SAFETY INSTRUCTIONS WARNING This product is emitting radiation that is classified as class II according to EN 60825 -1 The laser radiation can cause serious eye injury • Do not stare into the laser beam • Do not position the laser beam so that it unintentionally blinds you or others. - Page 6 • Do not remove or deface warning labels on the laser level. • Do not disassemble the laser level. • Do not drop the laser. • Do not use solvents to clean the laser. • Do not use in temperatures below -20°C or above 50°C (-4°F / 122°F) •...
-
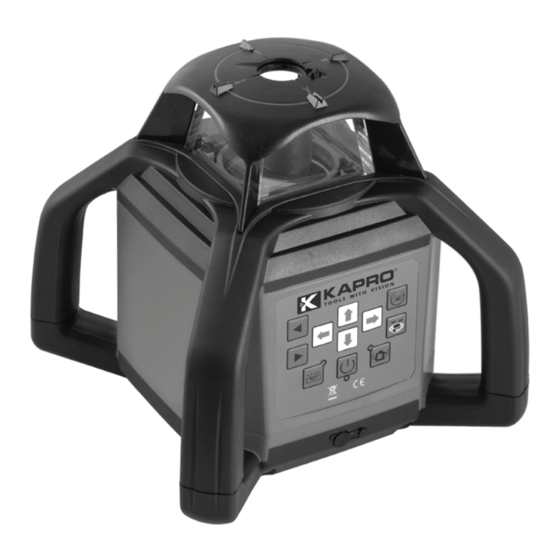
Page 7: Overview
OVERVIEW Main body 1. Laser Diode. 2. Plumb Up Beam window. 3. Control Panel. 4. Carrying Handle. 5. Charger socket. - Page 8 Control Panel 1. Rotation left 2. Rotation right 3. Manual/Auto (in manual mode the self leveling is disabled) 4. Power On/Off 5. Automatic drift system 6. Rotation Speed Control 7. Direction Scanning 8. Y-AXIS 9. X-AXIS...
-
Page 9: Operating Instructions
OPERATING INSTRUCTIONS To get the most out of your Prolaser Electrota 8991, please ® ™ adhere carefully to the following instructions. Note: Avoid setting up the laser near heavy machinery or sources of vibration that may adversely affect the leveling of the laser. Horizontal Plane (Automatic Mode) Place the Rotary Laser on a dry, flat, vibration free surface or or on a standard 5/8"... -
Page 10: Inclined Plane
Inclined Plane The Rotary Laser can be set up to create a single or dual directional inclined planed at ±5° from the horizontal plane. This is very helpful for laying inclined concrete surfaces, ensuring run- off pathways as well as laying water and sewage lines. 1. -
Page 11: Manual Mode
7. To make the beam more visible, change the rotating speed (see page 13), change scanning mode (see page 14), or use the Laser Detector to detect the laser beam (see page 15). 8. You can use the remote control to control the Rotary Laser (see page 16). -
Page 12: Vertical Setup
Vertical Setup The Rotary Laser can be set up to create a vertical laser line, to check the vertical alignment of a wall or fence pole. 1. Position the Rotary Laser on its side on a dry, flat, vibration free surface or on a standard 5/8"... -
Page 13: Plumb Down
Plumb Down The Plumb Down feature enables you to center the Rotary Laser onto a selected point. It is much easier to use this feature if you set up the Rotary Laser on a tripod with a hollow connecting bolt. 1. -
Page 14: Scan Function
Scan Function The Scan function is used to limit the area covered by the laser beam, for safety reasons or to improve visibility and sensitivity. A smaller scan segment will be more visible than a larger one. The default mode is a 360° rotation, which provides a horizontal or inclined beam throughout the work area or room. -
Page 15: Laser Detector
Laser Detector The Prolaser Electrota 8991 is effective up to 300m (980ft) ® ™ when used together with the Laser Detector. Use the Laser Detector when it is hard to see the light beam, such as outdoors or in bright rooms. Attach the Laser Detector to a rod if the laser unit is positioned above head height. -
Page 16: Using The Remote Control
Using the Remote Control The laser can be operated by an infra-red remote control. The remote control will only work if there is an uninterrupted line of sight between the infra-red control and the remote control sensor, on the control panel. The effective range of the remote control is 20m. -
Page 17: Power Supply
POWER SUPPLY Rotary Laser The Prolaser Electrota 8991 is supplied with on-board internal ® ™ rechargeable batteries and a battery charger (AC/DC Converter). Note: A bracket and a set of four regular type C batteries are also supplied for optional use. 1. -
Page 18: Power Supply
Laser Detector 1. Press the battery compartment lock and open the battery compartment cover. 2. Remove the 9V alkaline battery. 3. Replace with a new 9V alkaline battery. 4. Re-close the cover. Remote Control 1. Slide off the battery compartment cover. 2. -
Page 19: Care And Maintenance
CARE AND MAINTENANCE Preventative Maintenance • Store in a clean dry place. • If the Rotary Laser is wet, dry off with a dry cloth. • Do not seal the laser in the carrying case until completely dry. • Do not attempt to dry the Rotary Laser by fire or with an electric dryer. •... -
Page 20: Field Calibration Test
FIELD CALIBRATION TEST The Rotary Laser leaves the factory fully calibrated. Kapro recommends that the level be checked regularly and especially after the unit has been dropped or mishandled. Horizontal Plane Calibration Test 1. Set up the Rotary Laser approximately 50m (165ft) from a wall or measuring staff. - Page 21 Horizontal Line Calibration Test 1.Set up the Rotary Laser on a level surface, between two walls or measuring staffs that are about 100ft (30m) apart. 2. Position the laser about 0.5m (1.5ft) from 1st wall/staff. 3. Position the laser on vertical leveling side. 4.
-
Page 22: Specifications
SPECIFICATIONS Horizontal/Vertical Beam ± 0.1mm/m (0.0001"/") Accuracy Self Leveling Range ±5° Waterproof / Dustproof Standard IP 65 (International Electrotechnical Commission) Recommended Working Indoor 50m (160 ft) Range Outdoor 300m (980 ft) with Laser Detector Laser Source 635 ± 5nm laser diode Plumb down point 650 ±5nm laser diode Classification Laser Class II... -
Page 23: Warranty
The warranty does not cover products that are used improperly, altered or repaired without Kapro Tool's approval. In the event of a problem with the laser level, please return the product to the place of purchase with proof of purchase. - Page 24 Rev. 1.0 © 2019 Kapro Industries Ltd.
Need help?
Do you have a question about the Prolaser Electrota 8991 and is the answer not in the manual?
Questions and answers