
Related Manuals for Electrolux EKM11340KN


Summary of Contents for Electrolux EKM11340KN
- Page 1 All manuals and user guides at all-guides.com notice d’utilisation gerbruiksaannwijzing benutzerinformation user manual EKM11340KN EKM11340CN...
- Page 2 All manuals and user guides at all-guides.com...
-
Page 3: Table Of Contents
All manuals and user guides at all-guides.com Contents User’s Section ............About your cooker . -
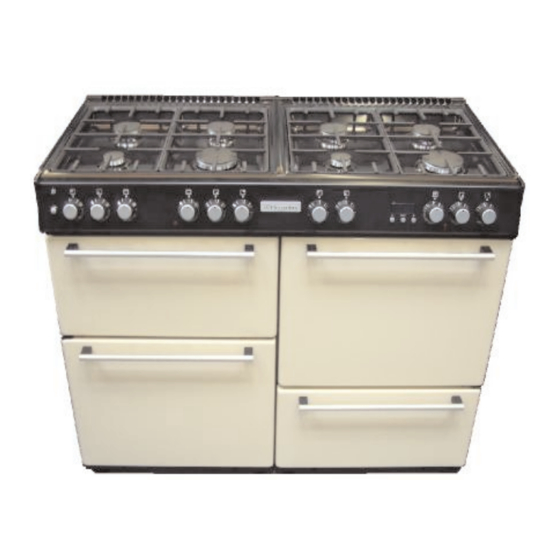
Page 4: About Your Cooker
All manuals and user guides at all-guides.com About Your Cooker The illustrations below show the cavity and hob layout available. Medium Medium Fascia burner burner panel Medium Medium burner burner Grill Fanned oven Small Conventioal Storage burner oven drawer Large Small Large burner... -
Page 5: Before Using Your Cooker
Always use a registered installer for this appliance. ! ! ! Environmental protection: Electrolux are committed to protecting the environment and operates and Environmental Management System which complies with BS EN ISO 14001. All packaging with this appliance is recyclable and environmentally friendly. -
Page 6: Hob And Cooker Safety
All manuals and user guides at all-guides.com Hob & Cooker Safety WARNING: Parts of ! ! ! Always ensure that pan bases are dry, and flat before the appliance may using them on the hob. become hot while in use, always make sure Always position pans over the centre of the burner, and that children are turn the handles to a safe position so they cannot be... -
Page 7: Using Your Gas Hob
All manuals and user guides at all-guides.com Using Your Gas Hob Hob Ignition To turn on , place your pan onto the pansupports above the burner you wish to use. Push in and turn the selected control knob anticlockwise, to the full on symbol. If your hob has an ignition button or switch on the How can I tell if my hob fascia, press it in until your burner lights. -
Page 8: Using Your Grill
All manuals and user guides at all-guides.com Using Your Grill Warning: Accessible Before you start grilling..parts may become hot Before you use the grill, make sure you have placed the when the grill is in use. grill shelf in the position you need as once the grill is on Children should be kept away. -
Page 9: Using Your Main Oven
All manuals and user guides at all-guides.com Using Your Main Oven Important: Never Switching on the fan oven place food, or dishes on the base of the main Use the main oven control to turn your oven on, and oven, the element is select your temperature. - Page 10 All manuals and user guides at all-guides.com Using Your Main Oven Important: Never Switching on the conventional oven place food, or dishes on the base of the main As this is a conventional oven, you may need to pre-heat oven, the element is in order to achieve the results you want.
-
Page 11: Cooking Guides
All manuals and user guides at all-guides.com Fan Oven Guide Some adjustment will have to be made to conventional cooking temperatures. table below shows conventional cooking temperatures, fanned temperatures and gas marks. For optimum results using the fanned oven setting, conventional temperatures need to be converted to the fanned oven temperatures. - Page 12 All manuals and user guides at all-guides.com Cooking Guide Pre-heating When using the conventional oven, we recommend pre-heating for around 5 to 15 minutes before placing your dishes in. This is especially important for items which are chilled, frozen, batter based, yeast based or whisked sponges.
- Page 13 All manuals and user guides at all-guides.com Roasting Guide Roasting times depend on the weight, shape and texture of the meat and personal preference. In order to calculate the roasting time, weigh the meat or poultry, including the stuffing, and follow the times given below.
- Page 14 All manuals and user guides at all-guides.com Roasting Guide Roast turkey Roasting turkey perfectly involves cooking two different types of meat - the delicate light breast meat, which must not be allowed to dry out, and the darker leg meat, which takes longer to cook.
- Page 15 All manuals and user guides at all-guides.com General Baking Guide Trouble-shooting - Fruit Cakes PROBLEM POSSIBLE CAUSE Fruit sinking to the bottom Low oven temperature which may cause the cake to take longer to set, allowing the fruit to sink. Or, too much liquid, or raising agent.
-
Page 16: Your Led Clock And Minute Minder
All manuals and user guides at all-guides.com Your LED Clock & Minute Minder Through your minute minder you will be able to set the time of day and set the minute minder. Reading this section will help you to get the most out of this function. Minute Minder Symbols Symbol Symbol... -
Page 17: Setting The Minute Minder
All manuals and user guides at all-guides.com Your LED Clock & Minute Minder Setting the Minute Minder Press and release the Plus button. This will change the display from clock to Minute Minder. Use the Plus and Minus buttons to set the length of Minus Function Plus... -
Page 18: Cleaning Your Ovens
All manuals and user guides at all-guides.com Cleaning your Ovens Always allow your Cleaning the oven cavities ! ! ! appliance to cool Some foods can cause fat to spit, especially if you have down, and switch off open roasted, this leaves the inside of the cavity the electricity before you clean any part of greasy. -
Page 19: Cleaning Your Gas Hob
All manuals and user guides at all-guides.com Cleaning your Gas Hob Always allow your Sometimes when a hob is not working well, it is because appliance to cool it needs cleaning. down, and switch off the electricity before you clean any part of Enamel parts Use a mild cream cleaner for example ‘Cif’. -
Page 20: Cleaning Your Applaince
All manuals and user guides at all-guides.com Cleaning your Appliance Always allow your Painted & Plastic parts appliance to cool Only use a clean cloth wrung out in hot soapy water. down, and switch off Do not use abrasive cleaners, such as “Cif”, wire or nylon the electricity before you clean any part of cleaning pads on these parts. -
Page 21: Before You Call
All manuals and user guides at all-guides.com Before you call. . Please carry out the following checks on your appliance before calling for a service engineer. It may be that the problem is a simple one which you can solve without the expense of a service call. In guarantee customers should make sure tat the checks have been made as an engineer will make a charge if the fault is not a mechanical or electrical breakdown. -
Page 22: Before You Start
All manuals and user guides at all-guides.com Installing Your Cooker Always make sure that your appliance is fitted correctly, by a competent installer. This is a Class 1 appliance regarding installation requirements. Before you start Always make sure that you have carefully read through the installation pages of this book - careful planning at the beginning will ensure a quick and easy installation. -
Page 23: Clearances
All manuals and user guides at all-guides.com Installing Your Cooker Clearances This cooker may be fitted flush to the base units of your kitchen. No shelf, overhang, cupboard, or cooker hood should be less than 650mm above the hob top, but please check this with the hood manufacturers instructions. -
Page 24: Requirements And Regulations
All manuals and user guides at all-guides.com Installing Your Cooker The information below is crucial to installing this appliance correctly and safely. Ventilation Requirements The room containing the appliance should have an air supply in accordance with BS 5440:Part 2. All rooms require an openable window, or equivalent, and some will require a permanent vent as well. - Page 25 All manuals and user guides at all-guides.com Installing Your Cooker The information below is crucial to installing this appliance correctly and safely. UK Regulations & Standards always refer to the most recent issue of the standards Gas Safety Regulations. Building Regulations - issued by the DEFRA. Building Standards (Scotland) (Consolidated) - issued by the Scottish Development Department.
-
Page 26: Installing Your Cooker - Levelling
All manuals and user guides at all-guides.com Installing Your Cooker Your stability bracket You can buy a stability bracket from your supplier and it can fitted as follows: Place the cooker in position and draw a pencil line level with the front edge. Remove the cooker and mark off 450mm from the pencil line to locate the front edge of the lower bracket. -
Page 27: Installing Your Cooker - Connecting The Electricity Supply
All manuals and user guides at all-guides.com Installing Your Cooker Connecting the electricity supply Warning: This appliance must be earthed! This appliance must be fitted using a double pole unit of 30 ampere minimum capacity with 3mm minimum contact at all poles. Access to the mains terminal is gained by opening the terminal block cover at the rear of the appliance - use a flat bladed screw driver for this. -
Page 28: Installing Your Cooker - Connecting The Gas Supply
If in doubt, contact your supplier. For conversion to LPG, a conversion kit can be purchased. Contact the Electrolux helpline, quoting kit reference 012860201. After installation make sure all connections are gas sound. -
Page 29: Technical Data
All manuals and user guides at all-guides.com Technical Data - Notes Type of gas: Natural Gas II 2H3+* Please see data badge your for specified gas type. * Can be converted from Natural gas to LP Gas Never attempt to convert an appliance - unless the data badge states that you can. - Page 30 All manuals and user guides at all-guides.com Technical Data - Notes Fuel Type Hotplate Burner / kW Rating Element Hob - Small x 2 1.0kW Hob - Medium x 4 2.0kW Hob - Large x 2 3.0kW Total heat input 16kW Fuel Type Conventional...
- Page 31 All manuals and user guides at all-guides.com...
- Page 32 All manuals and user guides at all-guides.com...
- Page 33 All manuals and user guides at all-guides.com...
-
Page 34: Customer Care
All manuals and user guides at all-guides.com Contact Us Should you need to get in touch with us (UK and Northern Ireland only), please call Electrolux Helpline on: 0870 444 5866 08 27291 00 © 08.2006 Dual Fuel Range Model Names: Electrolux EKM11340CN / KN... - Page 35 All manuals and user guides at all-guides.com...
- Page 36 All manuals and user guides at all-guides.com...
Need help?
Do you have a question about the EKM11340KN and is the answer not in the manual?
Questions and answers