Table of Contents
Advertisement
Available languages
Available languages
Quick Links
Advertisement
Table of Contents

Related Manuals for PNI B5500 PRO


Summary of Contents for PNI B5500 PRO
- Page 1 PNI B5500 PRO Audio Baby Monitor/ Аудио бебе монитор/Audio- Babyphone/Monitor de audio para bebés/Moniteur audio pour bébé/Audio baba monitor/Audio Baby Monitor/Audio-babyfoon/Elektroniczna niania audio/ Audio Baby Monitor...
-
Page 2: Table Of Contents
User manual ________________________________ _____________________ Ръководство за употреба Benutzerhandbuch __________________________ Manual de usuario ___________________________ Manuel utilisateur ___________________________ Használati utasítás ___________________________ Manuale utente _____________________________ Handleiding ________________________________ Instrukcja obsługi ____________________________ Manual de utilizare __________________________... -
Page 3: User Manual
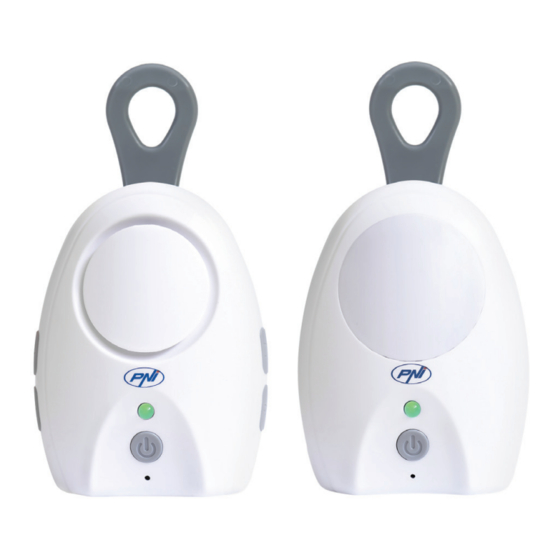
Safety warnings PNI B5500 PRO is a safe to use product that meets the relevant standards related to electromagnetic fields. • Before using this product, read the instruction manual carefully. • The product should only be assembled by adults. •... - Page 4 1. Baby unit A - LED indicator B - On /off button (long press the button to turn the unit on /off) C - Night light D - Microphone Power supply Insert one end of the included power cord into the Micro-USB port on the back of the unit and the other end into a 230V USB adapter (not included).
- Page 5 2. Parent unit E - LED indicator F - PTT button (press and hold to talk to the child remotely) G - Turn the night light on /off on the child unit H - Volume control I - On /off button (long press the button to turn the unit on /off) J - Microphone User manual - 5...
- Page 6 Power supply Insert one end of the included power cord into the Micro-USB port on the back of the unit and the other end into a 230V USB adapter (not included). Optionally, the unit can also be powered by batteries. Insert 3 AAA batteries into the battery compartment (not included).
- Page 7 triggered: the parent unit will emit a continuous beep, and the LED on both units will flash red /green. Discharged battery When the batteries installed in any of the units are discharged, the unit will beep every 30 seconds and the LED will flash red. Pager (unit location) Briefly press the on /off button on the child unit to send a signal to the parent unit to locate it.
- Page 8 continuously. Approximately 30 seconds after the interruption of any noise, the unit will enter standby mode (no longer emits). When the unit detects noise again, it starts emitting. The time when it starts emitting depends on the set sensitivity. Microphone sensitivity control K - Microphone sensitivity adjustment (Hi/Lo) •...
- Page 9 microphone, setting suitable for quiet environments or when the child unit is further away from the child. The child unit starts emitting when the sound reaches 50dB. Note: Position the child unit 1 - 3 meters away from the child. Technical specifications Power supply 5V (via Micro-USB port)
- Page 10 Simplified EU declaration of conformity SC ONLINESHOP SRL declares that Audio Baby Monitor PNI B5500 PRO is in accordance with the EMC Directive 2014/30/ EU and the RED Directive 2014/53 /EU. The full text of the EU Declaration of Conformity is available at the following website: https://www.mypni.eu/products/8335/download/certifications...
-
Page 11: Ръководство За Употреба
Предупреждения за безопасност PNI B5500 PRO е безопасен за употреба продукт, който отговаря на съответните стандарти, свързани с електромагнитни полета. • Преди да използвате този продукт, прочетете внимателно ръководството за употреба. • Продуктът трябва да се сглобява само от възрастни. - Page 12 1. Бебешка единица A - LED индикатор B - Бутон за включване /изключване (дълго натискане на бутона за включване /изключване на устройството) C - Нощна светлина D - Микрофон Захранване Поставете единия край на включения захранващ кабел в Micro-USB порта на гърба на устройството, а другия край в 230V USB адаптер...
- Page 13 Поставете 3 батерии AAA в отделението за батерии (не са включени в комплекта). 2. Родителска единица E - LED индикатор F - бутон PTT (натиснете и задръжте, за да говорите дистанционно с детето) G - Включете /изключете нощната лампа на детското устройство...
- Page 14 бутона за включване /изключване на устройството) J - Микрофон Захранване Поставете единия край на включения захранващ кабел в Micro-USB порта на гърба на устройството, а другия край в 230V USB адаптер (не е включен в комплекта). По избор устройството може да се захранва и от батерии. Поставете...
- Page 15 Функции Извън обхват Когато двете устройства са твърде далеч един от друг, се задейства аларма: родителското устройство ще издава непрекъснат звуков сигнал, а светодиодът и на двата блока ще мига в червено /зелено. Разредена батерия Когато батериите, инсталирани в някое от устройствата, се разредят, устройството...
- Page 16 Нощна светлина Можете да включите или изключите нощната лампа по 3 начина: 1. Натиснете за кратко бутона за захранване на родителското устройство веднъж. 2. Натиснете за кратко страничния бутон (C-нощна лампа) на родителското устройство. 3. Натиснете за кратко бутона за включване /изключване на детското...
- Page 17 Контрол на чувствителността на микрофона K - Регулиране на чувствителността на микрофона (Hi/Lo) • Преместете копчето надясно, за да активирате ниската чувствителност на микрофона, настройка, подходяща за шумна среда или когато детското устройство е близо до детето. Детското устройство започва да излъчва, когато...
- Page 18 Забележка: Поставете детското устройство на 1 - 3 метра от детето. Технически спецификации Захранване 5V (Micro-USB порт) 4.5V (3 x AAA батерии, не са включени) Честота на 2,4 GHz комуникация Емисионна мощност 0.1W Комуникационно До 100 метра (на открито) разстояние Двупосочно...
- Page 19 Опростена декларация на ЕС за съответствие SC ONLINESHOP SRL декларира, че Audio Baby Monitor PNI B5500 PRO е в съответствие с Директивата EMC 2014/30/ ЕС и Директивата RED 2014/53/ЕС. Пълният текст на Декларацията за съответствие на ЕС е достъпен на следния...
-
Page 20: Benutzerhandbuch
Sicherheitswarnungen PNI B5500 PRO ist ein sicher zu verwendendes Produkt, das die relevanten Normen in Bezug auf elektromagnetische Felder erfüllt. • Lesen Sie die Bedienungsanleitung sorgfältig durch, bevor Sie dieses Produkt verwenden. • Das Produkt sollte nur von Erwachsenen zusammengebaut werden. - Page 21 1. Babyeinheit A - LED-Anzeige B - Ein /Aus-Taste (langen Sie die Taste gedrückt, um das Gerät ein- /auszuschalten) C - Nachtlicht D - Mikrofon Energieversorgung Stecken Sie ein Ende des mitgelieferten Netzkabels in den Micro- USB-Anschluss auf der Rückseite des Geräts und das andere Ende in einen 230-V-USB-Adapter (nicht im Lieferumfang enthalten).
- Page 22 Legen Sie 3 AAA-Batterien in das Batteriefach ein (nicht im Lieferumfang enthalten). 2. Elterneinheit E - LED-Anzeige F - PTT-Taste (gedrückt halten, um mit dem Kind aus der Ferne zu sprechen) G - Schalten Sie das Nachtlicht an der Kindereinheit ein/aus H - Lautstärkeregler I - Ein-/Aus-Taste (langer Druck auf die Taste, um das Gerät ein- / auszuschalten)
- Page 23 Stecken Sie ein Ende des mitgelieferten Netzkabels in den Micro- USB-Anschluss auf der Rückseite des Geräts und das andere Ende in einen 230-V-USB-Adapter (nicht im Lieferumfang enthalten). Optional kann das Gerät auch mit Batterien betrieben werden. Legen Sie 3 AAA-Batterien in das Batteriefach ein (nicht im Lieferumfang enthalten).
- Page 24 Außer Reichweite Wenn die beiden Einheiten zu weit voneinander entfernt sind, wird ein Alarm ausgelöst: Die Elterneinheit gibt einen Dauerton aus und die LED an beiden Einheiten blinkt rot /grün. Entladene Batterie Wenn die in einem der Geräte eingelegten Batterien entladen sind, piept das Gerät alle 30 Sekunden und die LED blinkt rot.
- Page 25 3. Drücken Sie dreimal kurz die Ein-/Aus-Taste an der Kindereinheit. Solange im Kinderzimmer Geräusche zu hören sind, gibt die Kindereinheit kontinuierlich ab. Ungefähr 30 Sekunden nach der Unterbrechung eines Geräuschs geht das Gerät in den Standby- Modus (es gibt nichts mehr aus). Wenn das Gerät wieder Geräusche erkennt, beginnt es zu emittieren.
- Page 26 Empfindlichkeit des Mikrofons zu aktivieren, eine Einstellung, die für laute Umgebungen geeignet ist oder wenn sich die Kindereinheit in der Nähe des Kindes befindet. Die untergeordnete Einheit beginnt zu emittieren, wenn der Ton 60 dB erreicht. • Bewegen Sie den Knopf nach links, um die hohe Empfindlichkeit des Mikrofons zu aktivieren, eine geeignete Einstellung für ruhige Umgebungen oder wenn die Kindereinheit weiter vom Kind entfernt ist.
- Page 27 70 x 40 x 100 mm Arbeitstemperatur 0°C ~ +50°C Vereinfachte EU-Konformitätserklärung SC ONLINESHOP SRL erklärt, dass das Audio Babyphone PNI B5500 PRO der EMV-Richtlinie 2014/30/EU und der RED- Richtlinie 2014/53/EU entspricht. Der vollständige Text der EU- Konformitätserklärung ist auf der folgenden Website verfügbar: https://www.mypni.eu/products/8335/download/certifications...
-
Page 28: Manual De Usuario
Advertencias de seguridad PNI B5500 PRO es un producto seguro de usar que cumple con los estándares relevantes relacionados con los campos electromagnéticos. • Antes de utilizar este producto, lea atentamente el manual de instrucciones. • El producto solo debe ser ensamblado por adultos. - Page 29 1. Unidad de bebé A - indicador LED B - Botón de encendido /apagado (mantenga presionado el botón para encender /apagar la unidad) C - Luz nocturna D - Micrófono Alimentación Inserte un extremo del cable de alimentación incluido en el puerto Micro-USB en la parte posterior de la unidad y el otro extremo en un adaptador USB de 230 V (no incluido).
- Page 30 Inserte 3 pilas AAA en el compartimento de las pilas (no incluidas).2. 2. Unidad para padres E - indicador LED F - Botón PTT (manténgalo presionado para hablar con el niño de forma remota) G - Enciende /apaga la luz nocturna en la unidad para niños H - Control de volumen I - Botón de encendido /apagado (mantenga presionado el botón para encender /apagar la unidad)
- Page 31 Alimentación Inserte un extremo del cable de alimentación incluido en el puerto Micro-USB en la parte posterior de la unidad y el otro extremo en un adaptador USB de 230 V (no incluido). Opcionalmente, la unidad también puede funcionar con baterías. Inserte 3 pilas AAA en el compartimento de las pilas (no incluidas).
- Page 32 activa una alarma: la unidad para padres emitirá un pitido continuo y el LED de ambas unidades parpadeará en rojo /verde. Batería descargada Cuando las baterías instaladas en cualquiera de las unidades se descargan, la unidad emitirá un pitido cada 30 segundos y el LED parpadeará...
- Page 33 unidad para niños 3 veces. Mientras haya ruidos en la habitación del niño, la unidad infantil emitirá continuamente. Aproximadamente 30 segundos después de la interrupción de cualquier ruido, la unidad entrará en modo de espera (ya no emite). Cuando la unidad detecta ruido nuevamente, comienza a emitir.
- Page 34 K - Ajuste de la sensibilidad del micrófono (Hi /Lo) • Mueva el mando hacia la derecha para activar la baja sensibilidad del micrófono, un ajuste adecuado para entornos ruidosos o cuando la unidad infantil está cerca del niño. La unidad infantil comienza a emitir cuando el sonido alcanza los 60dB.
- Page 35 Declaración de conformidad de la UE simplificada SC ONLINESHOP SRL declara que Audio Baby Monitor PNI B5500 PRO cumple con la Directiva EMC 2014/30 /EU y la Directiva RED 2014/53 /EU. El texto completo de la Declaración de conformidad de la UE está disponible en el siguiente sitio web: https://www.mypni.eu/products/8335/download/certifications...
-
Page 36: Manuel Utilisateur
Avertissements de sécurité Le PNI B5500 PRO est un produit sûr à utiliser qui répond aux normes pertinentes relatives aux champs électromagnétiques. • Avant d’utiliser ce produit, lisez attentivement le manuel d’instructions. • Le produit ne doit être assemblé que par des adultes. - Page 37 1. Unité bébé A - Indicateur LED B - Bouton marche/arrêt (appuyez longuement sur le bouton pour allumer/éteindre l’appareil) C - Veilleuse D - Micro Source de courant Insérez une extrémité du cordon d’alimentation inclus dans le port Micro-USB à l’arrière de l’appareil et l’autre extrémité dans un adaptateur USB 230 V (non inclus).
- Page 38 Insérez 3 piles AAA dans le compartiment à piles (non incluses). 2. Unité parents E - Indicateur LED F - Bouton PTT (appuyez et maintenez pour parler à l’enfant à distance) G - Allumer/éteindre la veilleuse sur l’unité enfant H - Contrôle du volume I - Bouton marche/arrêt (appuyez longuement sur le bouton pour allumer/éteindre l’appareil) J - Micro...
- Page 39 Source de courant Insérez une extrémité du cordon d’alimentation inclus dans le port Micro-USB à l’arrière de l’appareil et l’autre extrémité dans un adaptateur USB 230 V (non inclus). En option, l’unité peut également être alimentée par des batteries. Insérez 3 piles AAA dans le compartiment à piles (non incluses). Jumelage des deux unités Remarque : les deux unités sont appairées en usine.
- Page 40 alarme se déclenche : l’unité parents émet un bip continu, et la LED des deux unités clignote en rouge/vert. Batterie déchargée Lorsque les batteries installées dans l’une des unités sont déchargées, l’unité émet un bip toutes les 30 secondes et la LED clignote en rouge.
- Page 41 enfant. Tant qu’il y aura des bruits dans la chambre de l’enfant, l’unité enfant émettra en continu. Environ 30 secondes après l’interruption de tout bruit, l’appareil entrera en mode veille (n’émet plus). Lorsque l’appareil détecte à nouveau du bruit, il commence à émettre. Le moment où...
- Page 42 • Mozgassa a gombot jobbra a mikrofon alacsony érzékenységének aktiválásához, amely beállítás zajos környezetben megfelelő, vagy ha a gyermekegység a gyermek közelében van. A gyermekegység akkor kezd kibocsátani, amikor a hang eléri a 60 dB -t. • Mozgassa a gombot balra a mikrofon nagy érzékenységének aktiválásához, amely beállítás csendes környezetben megfelelő, vagy ha a gyermekegység távolabb van a gyermektől.
- Page 43 Déclaration UE simplifiée de conformité SC ONLINESHOP SRL déclare que le moniteur audio pour bébé PNI B5500 PRO est conforme à la directive EMC 2014/30/UE et à la directive RED 2014/53/UE. Le texte intégral de la déclaration de conformité UE est disponible sur le site Web suivant: https://www.mypni.eu/products/8335/download/certifications...
-
Page 44: Használati Utasítás
Biztonsági figyelmeztetések A PNI B5500 PRO biztonságos használatú termék, amely megfelel az elektromágneses mezőkre vonatkozó vonatkozó szabványoknak. • A termék használata előtt figyelmesen olvassa el a használati útmutatót. • A terméket csak felnőttek szerelhetik össze. • Ne engedje, hogy gyermekek hozzáférjenek a tápkábelekhez. - Page 45 1. Baba egység A - LED kijelző B - Be /ki gomb (hosszan nyomja meg a gombot a készülék be- / kikapcsolásához) C - Éjszakai fény D - Mikrofon Tápegység Csatlakoztassa a mellékelt tápkábel egyik végét a készülék hátoldalán lévő Micro-USB porthoz, a másik végét pedig egy 230 V -os USB adapterhez (nem tartozék).
- Page 46 3 AAA elemet az elemtartóba (nem tartozék). 2. Szülői egység E - LED kijelző F - PTT gomb (tartsa lenyomva, hogy távolról beszéljen a gyermekkel) G - Kapcsolja be /ki az éjszakai lámpát a gyermekegységen H - Hangerőszabályzó I - Be /ki gomb (hosszan nyomja meg a gombot a készülék be- / kikapcsolásához) J - Mikrofon 46 - Használati utasítás...
- Page 47 Tápegység Csatlakoztassa a mellékelt tápkábel egyik végét a készülék hátoldalán lévő Micro-USB porthoz, a másik végét pedig egy 230 V -os USB adapterhez (nem tartozék). Opcionálisan a készülék akkumulátorról is táplálható. Helyezzen be 3 AAA elemet az elemtartóba (nem tartozék). A két egység párosítása Megjegyzés: a két egység gyárilag párosítva van.
- Page 48 egység folyamatos hangjelzést ad, és a LED mindkét készüléken pirosan /zölden villog. Lemerült akkumulátor Ha az egyik egységbe telepített elemek lemerülnek, az egység 30 másodpercenként sípol, és a LED pirosan villog. Pager (egység helye) Nyomja meg röviden a gyermekegység be /ki gombját, hogy jelet küldjön a szülői egységnek, hogy megtalálja azt.
- Page 49 Amíg zajok vannak a gyermekszobában, a gyermekegység folyamatosan bocsát ki. Körülbelül 30 másodperccel a zaj megszakítása után a készülék készenléti üzemmódba lép (már nem bocsát ki). Amikor a készülék ismét zajt észlel, akkor elkezd kibocsátani. A kibocsátás időpontja a beállított érzékenységtől függ. A mikrofon érzékenységének szabályozása •...
- Page 50 és amikor a gyermekegység a gyermek közelében van. A gyermekegység akkor kezd kibocsátani, amikor a hang eléri a 60 dB -t. • Mozgassa a gombot balra a mikrofon magas érzékenységének aktiválásához, amely beállítás zajos környezetben megfelelő, és amikor a gyermekegység távolabb van a gyermektől. A gyermekegység akkor kezd kibocsátani, amikor a hang eléri az 50 dB -t.
- Page 51 Üzemhőmérséklet 0°C ~ +50°C Egyszerűsített EU -megfelelőségi nyilatkozat Az SC ONLINESHOP SRL kijelenti, hogy a PNI B5500 PRO Baby Baby Monitor megfelel a 2014/30/EU EMC irányelvnek és a 2014/53/EU RED irányelvnek. Az EU megfelelőségi nyilatkozat teljes szövege elérhető az alábbi weboldalon: https://www.mypni.eu/products/8335/download/certifications...
-
Page 52: Manuale Utente
Avvertenze di sicurezza PNI B5500 PRO è un prodotto sicuro da usare che soddisfa gli standard pertinenti relativi ai campi elettromagnetici. • Prima di utilizzare questo prodotto, leggere attentamente il manuale di istruzioni. • Il prodotto deve essere assemblato solo da adulti. - Page 53 1. Unità bambino A - Indicatore LED B - Pulsante di accensione/spegnimento (premere a lungo il pulsante per accendere/spegnere l’unità) C - Luce notturna D - Microfono Alimentazione Inserire un’estremità del cavo di alimentazione incluso nella porta Micro-USB sul retro dell’unità e l’altra estremità in un adattatore USB da 230 V (non incluso).
- Page 54 Inserire 3 batterie AAA nel vano batterie (non incluse). 2. Unità genitore E - Indicatore LED F - Pulsante PTT (premere e tenere premuto per parlare con il bambino a distanza) G - Accendere/spegnere la luce notturna dell’unità bambino H - Controllo del volume I - Pulsante di accensione/spegnimento (premere a lungo il pulsante per accendere/spegnere l’unità) J - Microfono...
- Page 55 Alimentazione Inserire un’estremità del cavo di alimentazione incluso nella porta Micro-USB sul retro dell’unità e l’altra estremità in un adattatore USB da 230 V (non incluso). Facoltativamente, l’unità può anche essere alimentata da batterie. Inserire 3 batterie AAA nel vano batterie (non incluse). Associazione delle due unità...
- Page 56 continuo e il LED su entrambe le unità lampeggerà in rosso/verde. Batteria scarica Quando le batterie installate in una delle unità sono scariche, l’unità emetterà un segnale acustico ogni 30 secondi e il LED lampeggerà in rosso. Pager (posizione dell’unità) Premere brevemente il pulsante di accensione/spegnimento sull’unità...
- Page 57 Finché ci sono rumori nella stanza del bambino, l’unità bambino emetterà continuamente. Circa 30 secondi dopo l’interruzione di qualsiasi rumore, l’unità entrerà in modalità standby (non emette più). Quando l’unità rileva di nuovo il rumore, inizia a emettere. L’ora in cui inizia ad emettere dipende dalla sensibilità impostata. Controllo della sensibilità...
- Page 58 quando l’unità bambino è vicina al bambino. L’unità bambino inizia a emettere quando il suono raggiunge i 60 dB. • Spostare la manopola verso sinistra per attivare l’alta sensibilità del microfono, impostazione adatta ad ambienti silenziosi o quando l’unità bambino è più lontana dal bambino. L’unità bambino inizia a emettere quando il suono raggiunge i 50 dB.
- Page 59 Dichiarazione di conformità UE semplificata SC ONLINESHOP SRL dichiara che Audio Baby Monitor PNI B5500 PRO è conforme alla Direttiva EMC 2014/30/UE e alla Direttiva RED 2014/53/UE. Il testo completo della Dichiarazione di Conformità UE è disponibile al seguente sito web: https://www.mypni.eu/products/8335/download/certifications...
-
Page 60: Handleiding
Veiligheidswaarschuwingen PNI B5500 PRO is een veilig te gebruiken product dat voldoet aan de relevante normen met betrekking tot elektromagnetische velden. • Lees voor gebruik van dit product de gebruiksaanwijzing aandachtig door. • Het product mag alleen door volwassenen worden gemonteerd. - Page 61 1. Baby unit A - LED-indicator B - Aan /uit-knop (druk lang op de knop om het apparaat aan /uit te zetten) C - Nachtlampje D - Microfoon Stroomvoorziening Steek het ene uiteinde van het meegeleverde netsnoer in de Micro- USB-poort aan de achterkant van het apparaat en het andere uiteinde in een 230V USB-adapter (niet meegeleverd).
- Page 62 AAA-batterijen in het batterijcompartiment (niet inbegrepen). 2. Ouderunit E - LED-indicator F - PTT-knop (ingedrukt houden om op afstand met het kind te praten) G - Zet het nachtlampje aan/uit op de kinderunit H - Volumeregeling I - Aan /uit-knop (druk lang op de knop om het apparaat aan /uit te zetten) J - Microfoon 62 - Handleiding...
- Page 63 Stroomvoorziening Steek het ene uiteinde van het meegeleverde netsnoer in de Micro- USB-poort aan de achterkant van het apparaat en het andere uiteinde in een 230V USB-adapter (niet meegeleverd). Optioneel kan het apparaat ook op batterijen werken. Plaats 3 AAA-batterijen in het batterijcompartiment (niet inbegrepen). De twee eenheden koppelen Opmerking: de twee units zijn in de fabriek gekoppeld.
- Page 64 een alarm geactiveerd: de ouderunit laat een continue pieptoon horen en de LED op beide units knippert rood/groen. Ontladen batterij Wanneer de batterijen die in een van de units zijn geplaatst leeg zijn, piept de unit elke 30 seconden en knippert de LED rood. Pager (eenheid locatie) Druk kort op de aan/uit-knop op de kinderunit om een signaal naar de ouderunit te sturen om deze te lokaliseren.
- Page 65 Zolang er geluiden in de kinderkamer zijn, zendt de kinderunit continu uit. Ongeveer 30 seconden nadat de ruis is onderbroken, gaat het apparaat naar de stand-bymodus (zendt niet meer uit). Wanneer het apparaat weer ruis detecteert, begint het te zenden. Het tijdstip waarop deze begint te zenden, is afhankelijk van de ingestelde gevoeligheid.
- Page 66 de microfoon te activeren, een instelling die geschikt is voor lawaaierige omgevingen of wanneer de kinderunit dicht bij het kind is. De kinderunit begint te zenden wanneer het geluid 60 dB bereikt. • Beweeg de knop naar links om de hoge gevoeligheid van de microfoon te activeren, een instelling die geschikt is voor stille omgevingen of wanneer de kinderunit verder weg is van het kind.
- Page 67 Werktemperatuur 0°C ~ +50°C Vereenvoudigde EU-conformiteitsverklaring SC ONLINESHOP SRL verklaart dat de audiobabyfoon PNI B5500 PRO in overeenstemming is met de EMC-richtlijn 2014/30/EU en de RED-richtlijn 2014/53/EU. De volledige tekst van de EU-conformiteitsverklaring is beschikbaar op de volgende website: https://www.mypni.eu/products/8335/download/certifications...
-
Page 68: Instrukcja Obsługi
Ostrzeżenia dotyczące bezpieczeństwa PNI B5500 PRO to produkt bezpieczny w użytkowaniu, spełniający odpowiednie normy związane z polami elektromagnetycznymi. • Przed użyciem tego produktu należy uważnie przeczytać instrukcję obsługi. • Produkt powinien być montowany wyłącznie przez osoby pełnoletnie. • Nie pozwalaj dzieciom na dostęp do przewodów zasilających. - Page 69 1. Jednostka dziecka A-wskaźnik LED B-przycisk włączania/wyłączania (długie naciśnięcie przycisku włącza/wyłącza urządzenie) C - Lampka nocna D - Mikrofon Zasilacz Włóż jeden koniec dołączonego przewodu zasilającego do portu Micro-USB z tyłu urządzenia, a drugi koniec do zasilacza USB 230 V (brak w zestawie). Opcjonalnie urządzenie może być...
- Page 70 3 baterie AAA do komory baterii (brak w zestawie). 2. Jednostka rodzicielska E-wskaźnik LED F - przycisk PTT (naciśnij i przytrzymaj, aby porozmawiać z dzieckiem zdalnie) G-włącz/wyłącz lampkę nocną na jednostce dziecięcej; H - Regulacja głośności I - przycisk włączania/wyłączania (długie naciśnięcie przycisku włącza/wyłącza urządzenie) J - Mikrofon 70 - Instrukcja obsługi...
- Page 71 Zasilacz Włóż jeden koniec dołączonego przewodu zasilającego do portu Micro-USB z tyłu urządzenia, a drugi koniec do zasilacza USB 230 V (brak w zestawie). Opcjonalnie urządzenie może być również zasilane bateriami. Włóż 3 baterie AAA do komory baterii (brak w zestawie). Parowanie dwóch jednostek Uwaga: oba urządzenia są...
- Page 72 jednostka rodzica wyemituje ciągły sygnał dźwiękowy, a diody LED obu jednostek będą migać na czerwono/zielono. Rozładowany akumulator Gdy baterie zainstalowane w którejkolwiek jednostce są rozładowane, jednostka będzie wydawać sygnał dźwiękowy co 30 sekund, a dioda LED będzie migać na czerwono. Pager (lokalizacja jednostki) Krótko naciśnij przycisk włączania /wyłączania na jednostce dziecka, aby wysłać...
- Page 73 dziecięcej Dopóki w pokoju dziecka występują odgłosy, jednostka dziecięca będzie emitować dźwięk w sposób ciągły. Około 30 sekund po przerwaniu jakiegokolwiek dźwięku urządzenie przejdzie w tryb czuwania (przestanie emitować). Gdy urządzenie ponownie wykryje hałas, zaczyna emitować. Czas rozpoczęcia emisji zależy od ustawionej czułości.
- Page 74 K - Regulacja czułości mikrofonu (Hi/Lo) • Przesuń pokrętło w prawo, aby aktywować niską czułość mikrofonu, ustawienie odpowiednie do hałaśliwego otoczenia lub gdy jednostka dziecięca jest blisko dziecka. Jednostka dziecięca zaczyna emitować, gdy dźwięk osiągnie 60 dB. • Przesuń pokrętło w lewo, aby aktywować wysoką czułość mikrofonu, ustawienie odpowiednie do cichych środowisk lub gdy jednostka dziecięca znajduje się...
- Page 75 0°C ~ +50°C Uproszczona deklaracja zgodności UE SC ONLINESHOP SRL oświadcza, że Audio Baby Monitor PNI B5500 PRO jest zgodny z Dyrektywą EMC 2014/30/UE i Dyrektywą RED 2014/53/UE. Pełny tekst deklaracji zgodności UE jest dostępny na następującej stronie internetowej: https://www.mypni.eu/products/8335/download/certifications...
-
Page 76: Manual De Utilizare
Atentionari de siguranta PNI B5500 PRO este un produs sigur de utilizat ce respecta standardele relevante legate de campurile electromagnetice. • Inainte de a folosi acest produs, cititi cu atentie manualul de instructiuni. • Produsul trebuie asamblat doar de persoane adulte. - Page 77 1. Unitate copil A - Indicator LED B - Buton pornire/oprire (apasati lung butonul pentru a porni/opri unitatea) C - Lampa de veghe D - Microfon Alimentare Introduceti un capat al cablului de alimentare inclus in portul Micro-USB de pe spatele unitatii si celalalt capat intr-un adaptor USB 230V (nu este inclus).
- Page 78 compartimentul pentru baterii 3 baterii AAA (nu sunt incluse). 2. Unitate parinte E - Indicator LED F - Buton PTT (tineti apasat pentru a vorbi copilului de la distanta) G - Buton aprindere/stingere lumina de veghe de pe unitatea copil H - Control volum I - Buton pornire/oprire (apasati lung butonul pentru a porni/opri unitatea)
- Page 79 Alimentare Introduceti un capat al cablului de alimentare inclus in portul Micro-USB de pe spatele unitatii si celalalt capat intr-un adaptor USB 230V (nu este inclus). Optional, unitatea poate fi alimentata si prin baterii. Introduceti in compartimentul pentru baterii 3 baterii AAA (nu sunt incluse). Imperechere unitati Nota: cele doua unitati sunt imperecheate din fabrica.
- Page 80 declanseaza o alarma: unitatea parinte va emite un beep continuu, iar LED-ul de pe ambele unitati se va aprinde intermitent rosu/ verde. Baterie descarcata Cand bateriile instalate in oricare dintre unitati sunt descarcate, unitatea va emite un beep la fiecare 30 de secunde, iar LED-ul se va aprinde rosu intermitent.
- Page 81 3. Apasati scurt de 3 ori butonul pornire/oprire de pe unitatea copil. Cat timp sunt zgomote in camera copilului, unitatea copil va emite in continuu. La aproximativ 30 de secunde dupa intreruperea oricarui zgomot, unitatea va intra in standby (nu mai emite). Cand unitatea detecteaza din nou zgomot, incepe sa emita.
- Page 82 Mutati butonul spre dreapta pentru a activa sensibilitatea redusa • (Low) a microfonului, setare potrivita mediilor zgomotoase sau atunci cand unitatea copil este aproape de copil. Unitatea copil incepe sa emita cand sunetul atinge 60dB. • Mutati butonul spre stanga pentru a activa sensibilitatea mare (High) a microfonului, setare potrivita mediilor silentioase sau atunci cand unitatea copil este mai departe de copil.
- Page 83 Declaratie UE de conformitate simplificata SC ONLINESHOP SRL declara ca Audio Baby Monitor PNI B5500 PRO este in conformitate cu Directiva EMC 2014/30/EU si Directiva RED 2014/53/UE. Textul integral al declaratiei UE de conformitate este disponibil la urmatoarea adresa de internet: https://www.mypni.eu/products/8335/download/certifications...
Need help?
Do you have a question about the B5500 PRO and is the answer not in the manual?
Questions and answers