Table of Contents
Advertisement
Quick Links
Advertisement
Table of Contents

Related Manuals for Kolibri Bishop


Summary of Contents for Kolibri Bishop
- Page 2 This manual contains important information on safety measures and operational features of the Kolibri Bishop. Please read it carefully before operating your counterfeit detector and keep it handy for future reference.
-
Page 3: Table Of Contents
Table of Contents: 1. INTRODUCTION 1.1 About the Kolibri Bishop ________________________________________________________ 2 1.2 Box Contents __________________________________________________________________ 2 1.3 Front and Rear Views ___________________________________________________________ 3 1.4 Specifications _________________________________________________________________ 4 1.5 Important Safety Notes _________________________________________________________ 4 2. OPERATION 2.1 Powering Up ___________________________________________________________________ 5 2.2 Inserting the Bill ________________________________________________________________ 5... -
Page 4: About The Kolibri Bishop
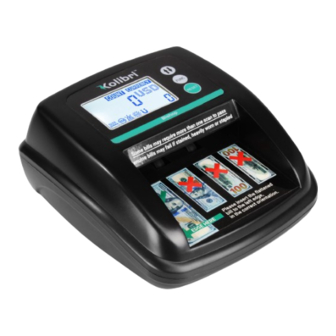
1.1 About the Kolibri Bishop Thank you for purchasing the Kolibri Bishop, a powerful tool for identifying counterfeit bills. The Kolibri Bishop verifies infrared security marks, the most reliable anti counterfeit protection available for paper currency. With its advanced sensors, the Kolibri Bishop also verifies magnetic marks and UV signatures. -
Page 5: Front And Rear Views
Front and Rear Views 1. Front Slot 2. Display 3. Bill Ejection Button 4. Function Button 5. Reset Button 1. Rear Slot 2. PC Connection Jack 3. AC Adapter Power Jack 4. ON/OFF Power Switch... -
Page 6: Specifications
1.4 Specifications Weight 1.2 lbs. Dimensions 6.3” x 5.7” x 2.7” Sensors Internal IR, UV and MG Sensors Power Consumption >10W Power Supply AC/DC Adapter, 12V 650mA Applicable Currency United State Dollar 1.5 Important Safety Notes When operating this unit, please observe the following basic safety procedures: •... -
Page 7: Operation
Connect the AC/DC adapter to the Kolibri Bishop and plug the adapter plug into the power outlet. Turn the Kolibri Bishop on by flipping the ON/OFF switch on the rear of the unit. The unit will beep and conduct a short self-test. The screen will display the default value screen, indicating it is ready to operate. -
Page 9: Maintenance And Warranty
¹/4 of an inch of the duster nozzle through the front bill insertion slot to blow away any debris that may have accumulated inside the unit. Do not insert the nozzle more than ¹/4 of an inch into the unit as it may damage the sensor mechanisms inside the Kolibri Bishop unit. -
Page 11: Warranty
3.3 Warranty The Bishop is warrantied for a period of oner year from the date of purchase. In most cases a unit malfunction can easily be corrected by performing a thorough cleaning. • Customer should allow the manufacturer the time an opportunity to test and diagnose the machine to determine warranty and non-warranty claims. -
Page 12: Contact Information
3.4 Contact Information Technical Support contact information: • http://kolibriusa.com/contact/ When contacting Technical Support, please have the following available: • Product Model - Located on the back side of the machine. • Serial Number - Located on the bottom of the machine. •... - Page 13 Kolibri™ ©2021 Printed in PRC. Specifications subject to change without notice. www.KolibriUSA.com FNBISHOP072021...
Need help?
Do you have a question about the Bishop and is the answer not in the manual?
Questions and answers