
Related Manuals for Canon VC-C50iR


Summary of Contents for Canon VC-C50iR
- Page 1 使用説明書 INSTRUCTION MANUAL MODE D’EMPLOI MANUAL DE INSTRUCCIONES GEBRAUCHSANLEITUNG MANUALE DI ISTRUZIONI...
- Page 2 はじめに このたびは、キヤノンコミュニケーションカメラ VC-C50i/VC-C50iR(以下、本機)をお買 い上げいただき、誠にありがとうございます。 本機を正しく安全にお使いいただくために、必ずこの使用説明書をお読みください。また、 「a 安全にお使いいただくために」を最初によくお読みになった上、記載事項を必ずお守りくださ い。 主な特長 ■ 26 倍光学ズーム、12 倍電子ズームによる高倍率撮影 ■ 1 ルクスの低照度下で可視光撮影が可能 ■ 内蔵赤外光照明により 0 ルクス撮影可能(ナイトモード) ■ 高速/高精度カメラヘッド駆動 ■ ノイズリダクションによるクリアーな映像 著作権について お客様が撮影した映像や画像は、個人で利用するほかは著作権法上、権利者に無断で使用 することはできませんのでご注意ください。 ご注意 1. 本書のすべての著作権はキヤノン株式会社にあります。本書の内容の一部、または全部 を無断で転載することは禁止されています。 2. 本書の内容について、将来予告無しに変更することがあります。 3. 本書の内容については万全を期して作成しましたが、お気づきの点がございましたらご 連絡くださるようお願い申しあげます。 4. 運用した結果の影響につきましては、3. 項に関わらず責任を負いかねますのでご了承く ださい。...
-
Page 3: Table Of Contents
もくじ a 安全にお使いいただくために ... 4 本書で使用しているマークについて ... 4 日常のお手入れ ... 7 ご使用の前に ... 8 本機および付属品を確認してください ... 8 各部の名称 ... 8 設置する ... 9 接続する ... 10 電源の ON/OFF ... 14 LED の表示と本機の状態について ... リモコンで操作する ... 15 各部の名称 ... 15 リモコンに電池を入れる ... 16 リモコンの届く範囲... -
Page 4: A 安全にお使いいただくために
a 安全にお使いいただくために 本機をお使いいただくにあたり、必ず守っていただかなければならない注意事項について説明し ます。守られない場合、 お読みになった上、必ずお守りください。 本書で使用しているマークについて 本書では特にお読みいただきたい説明に、次のマークを使用しています。 マーク この表示を無視して取扱いを誤った場合に、死亡または重傷を負う可 警告 能性が想定される内容を示しています。安全にお使いいただくため に、必ずこの注意事項をお守りください。 この表示を無視して取扱いを誤った場合に、傷害または物的損害が発 注意 生する可能性が想定される内容を示しています。安全にお使いいただ くために、必ずこの注意事項をお守りください。 これらの表示を無視して取扱いを誤った場合に、火災の発生や感電、 破裂の可能性が想定される内容を示しています。 火災注意 感電注意 破裂注意 これらの表示は火気を近づけることや分解すること、またその他の行 為の禁止を示しています。 禁止 火気禁止 分解禁止 この表示は必ずプラグをコンセントから抜かなければならないことを 示しています。 プラグをコンセ ントから抜く 操作上必ず守っていただきたい重要事項や禁止事項が書かれていま す。機械の故障や損傷を防ぐために、必ずお読みください。 操作の参考となることや補足説明が書かれています。お読みになるこ とをおすすめします。 本機を記憶装置(ビデオデッキなど)に接続して映像を記録する場合、内部的、外部的要因の如 何にかかわらず、記録内容や映像の欠損およびそれにともなう経済損失が生じても、当社は一切 の責任を負いかねますのであらかじめご了承ください。 けが 死亡事故 物的損害 や... - Page 5 ● 直射日光の当たるところ 禁止 火気禁止 ● 潮風の当たるところ ● 引火性溶剤の近く (アルコールやシンナーなど) 設置は確実に行ってください。 警告 天井への設置は、本体と取付け金具を含む重量に充分 耐えられる強度があることをお確かめください。充分 な強度がないと、落下して大けがの原因となります。 また、1 年に 1 度は、必ず取付け部(およびオプショ ンのワイドコンバータ使用時はワイドコンバータ取付 け部)がゆるんでいないか点検してください。 (ワイドコンバータ WL-37 は VC-C50iR に取付けて 使用することはできません。 ) 注意 不安定なところや傾斜したところには設置しな いでください。 落下などによるけがの原因になることがあります。 禁止 a 使用上の注意 次のような場合はただちに使用を中止し、電源プラグをコンセントから 警告 抜いて、最寄りの販売店にご連絡ください。 そのまま使用すると火災や感電の原因になります。 ● 発煙、異音、発熱、異臭などの異常を発見したと...
- Page 6 a 安全にお使いいただくために a 電源に関する注意 警告 ご使用の際は次のことをお守りください。 守られない場合、火災や感電の原因になります。 ● 必ず付属の専用 AC アダプタを使用してください。 火災注意 感電注意 ● 電源コードに重いものを載せる、引っ張る、無理に 禁止 ● AC アダプタを布や布団でおおったり、つつんだり ● 濡れた手で操作しないでください。 ● プラグは奥まで確実に差し込んでください。 プラグをコンセントから抜くときは、プラグを持って 注意 抜いてください。 守られない場合、コードが傷つくなどして火災や感電の原因と なることがあります。 火災注意 感電注意 a 電池の取扱いに関する注意[リモコン使用時] 電池を取扱う際は次のことをお守りください。 警告 守られない場合、破裂、発熱、発火、漏液の原因になります。 ● 火の中に入れたり、加熱、ショート、分解したりしないでください。 ● 乾電池は充電しないでください。 火災注意...
-
Page 7: 日常のお手入れ
a 持ち運ぶときの注意 持ち運ぶときは、次の点に注意してください。 注意 ● 電源プラグをコンセントから抜いてください。 ● 接続コードやケーブルなどを外してください。 コードやケーブルが傷つき、火災や感電の原因にな 火災注意 感電注意 ることがあります。 ● カメラヘッド部を持たないでください。 禁止 プラグをコンセ カメラヘッド部をパン方向、チルト方向に手でまわ ントから抜く すと故障の原因になります。 a お手入れに関する注意 お手入れの際は次のことをお守りください。 警告 守られない場合、火災や感電の原因になります。 ● 電源プラグをコンセントから抜いてください。 ● アルコールやシンナー、ベンジンなどの引火性溶剤 火災注意 感電注意 は使用しないでください。 禁止 プラグをコンセ ントから抜く 日常のお手入れ 外装のお手入れ 1. 電源プラグをコンセントから抜く 2. -
Page 8: ご使用の前に
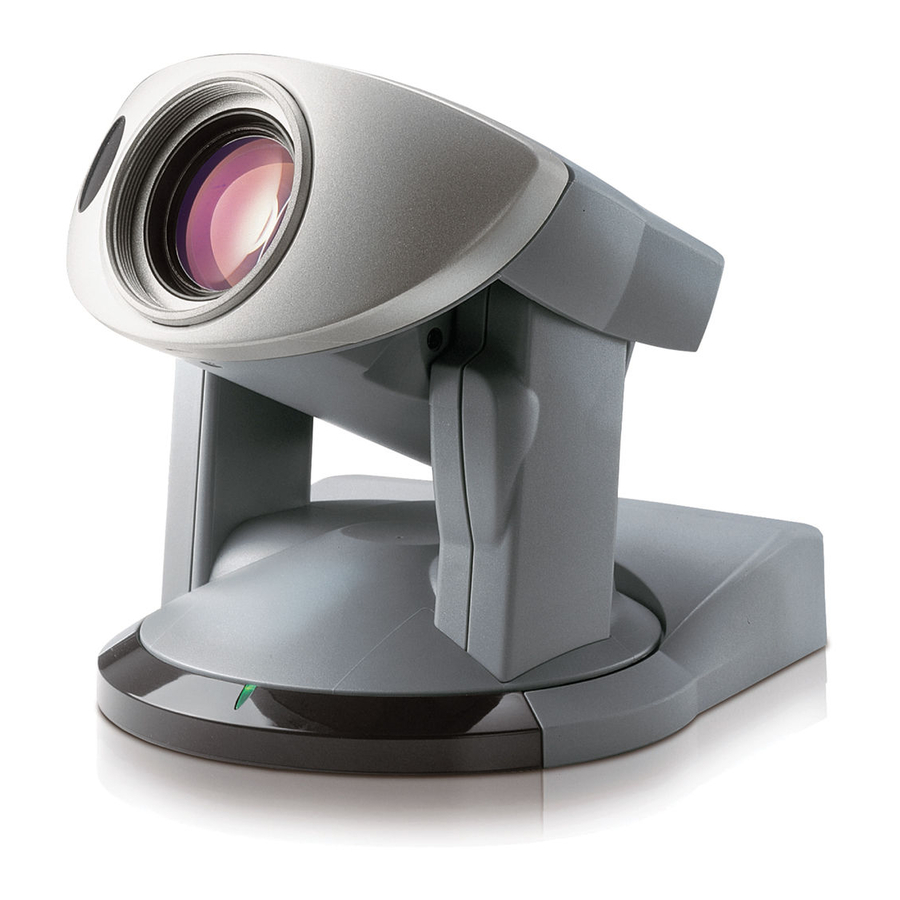
ご使用の前に 本機および付属品を確認してください 本機を設置する前に、パッケージに以下に示すものがすべて揃っているかどうかをお確かめく ださい。万が一不足しているものがある場合は、お買い上げの販売店までご連絡ください。 VC-C50i 本体 BNC-RCA 変換 コネクタ ● 単三乾電池(2 本) ● VC-C50i/VC-C50iR 使用説明書 ● インターフェースアダプタ VC-EX3 使用説明書 ● 保証書 各部の名称 カメラヘッド (→ P.17) 雲台(→ P.9) 赤外光照明窓 (→ P.29) (→ P.14) リモコン受光部 (→ P.16) DC IN 13V 端子(→ P.10) ビデオ出力端子(→... -
Page 9: 設置する
本体の設置角度は水平に対して± 20°(オプションのワイドコンバータ使用時 は± 15°)です。 三脚を使う 三脚取付け用のネジ穴は、本機底面の中央にあります。 ● 取付けネジを強く締め付けないでください。 ネジを強く締め付けすぎると、カメラヘッド が動かなくなるなどの故障の原因になります。 ● 三脚は、必ず取付けネジの長さが 6.0mm 未 満のものを使用してください。6.0mm 以上 のものを使用すると、本体が破損することが あります。また、三脚の台座は直径 30mm 以上のものを使用してください。 VC-C50iR の設置 ネジ 2ヶ(付属されていません)で しっかり固定してください。 取付け板 ネジ (取付け寸法) • ネジ穴間 :114mm • ネジ穴径 :直径 6mm • 取付け板厚 :1mm 30mm 以上... -
Page 10: 接続する
ご使用の前に ワイドコンバータを使う オプションのワイドコンバータ WL-37 を使用すると、広角撮影(焦点距離約 0.74 倍)がで きます。 ワイドコンバータは水平に、正しく装着し、しっかり締めてください。正しく装着すると、ワ イドコンバータは約 3 回転して止まります。 ワイドコンバータ ワイドコンバータ WL-37 は VC-C50iR に取付けて使用するこ 警告 とはできません。使用すると、次第に取付け部がゆるみ、落下し てけがの原因になります。 ● ワイドコンバータ WL-37 以外のものを使用すると、正しく動作しない場合 があります。 ● ワイドコンバータ WL-37 をご使用の際は、ズームのワイド側でご使用くだ さい。ズームのテレ側では、解像感が落ちたりオートフォーカスが合わない ことがあります。 ● ワイドコンバータ取付け時の本体の設置角度は、水平に対して± 15°です。 ● ナイトモード時はワイドコンバータの使用はできません。 (→ P.29) 接続する... - Page 11 マルチコネクタで接続する マルチコネクタ用プラグにリード線(AWG No.28 ∼ 18)を取り付ける 1. リード線取り付け穴に隣接しているスロットへ、マ イナスドライバーを奥まで差し込む ■ リード線取り付け穴の内部が開きます。 2. マイナスドライバーを差し込んだまま、リード線取 り付け穴にリード線を差し込む 3. リード線が穴から抜けないように押さえながら、マ イナスドライバーを引き抜く ■ リード線が取り付け穴に固定されます。 同様の手順で、必要なリード線をすべて接続します。 マルチコネクタで接続する場合は、お買い上げの販売店にご相談ください。 マルチコネクタを本機に取りつける 1. マルチコネクタ用プラグのレバーを上げる 2. マルチコネクタ用プラグをマルチコネクタに差し込 む 3. マルチコネクタ用プラグを押し込む ■ マルチコネクタ用プラグが、本体背面のポートに固 定されます。 取り外すときは、両側のレバーを同時に押し下げます。 ご使用の前に リード線 B 1 0 A 1 0 B 1 0 A 1 0 B 1 0...
- Page 12 ご使用の前に マルチコネクタのピン配列 項目 ピン NO S 映像出力 RS-232C (カスケード接 続の次のカメラ 側に接続) RS-232C (カスケード接 続の PC 側に接 続) Y GND C GND RTS OUT TX OUT RTS IN TX IN Light_ON/OFF- Alarm_- Sensor_- ピン名称 入出力 信号方向 Y GND 出力 ⇒ MONITOR Y OUT 出力...
- Page 13 項目 ピン NO ピン名称 外部照明の制御 Light_ON/OFF- 信号 Light_ON/OFF+ アラーム制御信 Alarm_- 号 Alarm_+ Sensor_- 外部センサー入 力 Sensor_+ 外部デバイス入出力端子 外部デバイス入力端子 SENSOR 端子は 2 個の端子(+端子、−端子)で構成されています。−端子は本機内部の GND に接続されており、+端子は保護ダイオードを介して 10K Ωで +5V にプルアップされ ています。+端子と−端子にそれぞれリード線を取り付けて両端子間を電気的に短絡(ON) または開放(OFF)することにより、内部コントローラに対して割り込みを発生させます。 なお接続するセンサーやスイッチは、それぞれの電源や GND と電気的に分離された端子を接 続してください。ON を検知するとホスト PC に対してイベント発行を通知します。 外部デバイス出力端子 ALARM 端子及び LIGHT ON/OFF 端子は各々 2 個の端子で構成されており、それぞれの組 において双方の端子は対等です。内部コントローラの制御により、2 個の端子間を導通状態と...
-
Page 14: 電源の On/Off
ご使用の前に 電源の ON/OFF 本機には電源スイッチがありません。AC アダプタの電源プラグを差し込むことで電源 ON と なります。電源を ON にすると、本機の LED が緑色に点灯します。また、モニタの電源が ON になっていれば映像が映ります。 AC100V 50/60Hz AC ケーブル ● 電源を OFF から ON にした後で、最初にパソコンまたはリモコンを操作する と、カメラヘッド位置の初期化が行われます(数秒で終わります) 。なお初期 化中は、本機の LED が緑色で点滅(1 秒間隔)します。 ● 初期化動作中は絶対にカメラヘッドに触らないでください。正しく初期化さ れなかったり、故障の原因になります。 ● 電源を OFF にした後、再度 ON にする場合は、5 秒以上の間隔をあけてくだ さい。間隔が短いと動作不良の原因となります。また、電源プラグを抜き差... -
Page 15: リモコンで操作する
リモコンで操作する リモコンのボタン操作中は、本機の LED は緑色で点滅(0.1 秒間隔)します。 各部の名称 BRIGHT ボタン(→ P.20) モニタの映像の明るさを調節 します。 • +:明るくします。 • −:暗くします。 SET/OK ボタン (→ P.21、23、31) プリセットの登録操作で使用 します。また、設定画面では 項目を設定して次の階層に進 めます。 FOCUS ボタン (→ P.19、20) ピントを調節します。 • AF :ピント合わせを自動に します。 • MF:ピントを固定します。 • ▲ :ピントを遠くに合わせ ます。 • ▼ :ピントを近くに合わせ ます。... -
Page 16: リモコンに電池を入れる
リモコンで操作する リモコンに電池を入れる 単 3 乾電池 2 本が必要です。 1. 電池カバーを取りはずす 2. 電池を入れる ■ +と−の向きに注意して入れてください。 3. 電池カバーを取付ける リモコンの届く範囲 図に示す範囲内で、リモコンをカメラのリモコン受光部に向けて操作してください。ただし、 電池の残量や障害物などによって、リモコンの届く範囲は変わります。 (VC-C50iR も同様で す。 ) 90° 30° 30° 90°... -
Page 17: カメラヘッドの動作範囲
たりしてカメラヘッドが直接動いてしまった場合は、必ず h ボタンを押してください。カメラが記憶しているパン / チルト 位置と、実際のパン / チルト位置のずれがなくなり、正常に動 作するようになります。 カメラヘッドの動作範囲 カメラヘッドの水平位置からの動作範囲を示します。VC-C50i の上方向の初期設定は 30°ですが、90°まで設定することができます(→ P.27) 。 30° 100° 100° 30° (パン / チルト / ホーム) 像は押されたボタンの矢印と同じ方向に動き、カメラヘッド は矢印と逆の方向に動きます。 DIRECTION MIRROR(→ P.26)を[ON]に設定すると、 カメラヘッドは押されたボタンの矢印と同じ方向に動きま す。 低速→中速→高速 低速→中速→高速 10° 170° VC-C50i 90° リモコンで操作する 170° VC-C50iR... -
Page 18: ズームイン / ズームアウト(テレ / ワイド
リモコンで操作する ズームイン / ズームアウト モニタの画面上の被写体を大きく(ズームイン)したり、小さく(ズームアウト)したりしま す。 BRIGHT ZOOM HOME SET/OK CANCEL ∞ ON SCREEN MENU ピントの合う範囲 ズームの位置によっては、ピントが合わない場合があります。 ズームのワイド端 約 1cm まで(ナイトモード時は約 2cm まで) (テレ / ワイド) ズームインするとき(テレ) t 側を押す ■ ボタンを押し続けるとズーム速度が次のように変化します。 低速 高速 ズームアウトするとき(ワイド) w 側を押す ■ ボタンを押し続けるとズーム速度が次のように変化します。 低速 高速 カメラが近づける距離の変化... - Page 19 ピントを調節する 被写体にピントを合わせます。ピントを自動で合わせるオートフォーカスと、手動で合わせる マニュアルフォーカスがあります。 (初期設定はオートフォーカスです。 ) オートフォーカスにするとき a ボタンを押す BRIGHT ZOOM ■ ピントは自動的に合います。 HOME SET/OK CANCEL ∞ ON SCREEN MENU オートフォーカスではピントの合いにくい被写体 次のような被写体は、オートフォーカスではピントが合いにくいことがあります。そのよう なときは、マニュアルフォーカス(→ P.20)でピントを合わせてください。 白い壁など明暗の差が ないもの 横じまのあるもの (フォーカス) 斜めになっているもの 炎や煙などの実体のな いもの リモコンで操作する 強い光が反射している もの ガラス越しのもの...
- Page 20 リモコンで操作する BRIGHT ZOOM HOME SET/OK CANCEL ∞ ON SCREEN MENU 明るさを調節する 映像を明るくしたり、暗くしたりします。電源を ON にしたときは標準の明るさになります。 BRIGHT ZOOM HOME SET/OK CANCEL ∞ ON SCREEN MENU ピントを固定にするとき n ボタンを押す ■ オートフォーカスを解除し、ピントが固定になります。 近くにピントを合わせるとき r ボタンを押す ■ マニュアルフォーカスになり、近くにピントを合わせること ができます。 ■ ボタンを押し続けると、ピントの合う位置が近くに移動し続 けます。 遠くにピントを合わせるとき e ボタンを押す ■...
- Page 21 カメラの状態を記憶させる カメラヘッドの向き、ズームの位置および明るさの状態を登録します。最大 9 件(1 ∼ 9)ま で登録でき、電源を OFF またはカメラを OFF にしても登録内容は消えません。 状態を登録するとき 1. カメラヘッドの向き、ズームの位置および明るさを決め BRIGHT ZOOM る ■ フォーカスの情報は登録されません。 HOME 2. s ボタンを押す SET/OK CANCEL ■ 本機の LED が緑色で点滅(0.5 秒間隔)します。 ■ 操作を中止するときは c ボタンを押してください。 ∞ 3. 1 ∼ 9 ボタンを押す ON SCREEN MENU ■...
-
Page 22: カメラを On/Off する
リモコンで操作する カメラを ON/OFF する カメラの ON/OFF は p(カメラ ON/OFF)ボタンで行います。カメラを OFF にしてもプリ セット、日付、時刻、ID 番号はクリアされません。 BRIGHT ZOOM HOME SET/OK CANCEL ∞ ON SCREEN MENU ● カメラを OFF にしてもカメラへの通電はされており、本機の電源は OFF(→ P.14)さ れません。従って、カメラを OFF にしてもプリセット、日付、時刻、ID 番号はクリア されません。 ● ナイトモード状態において、リモコンでカメラを OFF にすると、内蔵赤外照明は消灯し ますが、ナイトモードは保持されます。 この状態でリモコンにより再度カメラを ON にしても、内蔵赤外照明は点灯しません。 設定画面よりナイトモードを一旦... -
Page 23: いろいろな設定
いろいろな設定 設定画面を表示して、時計や文字の設定および表示、カメラの動作などを設定することができ ます。 設定操作に使用するボタン 設定は、以下に示すリモコンのボタンを使って行います。 58 ボタン BRIGHT ZOOM 6 ボタン 4 ボタン HOME SET/OK CANCEL c ボタン ∞ s ボタン ON SCREEN MENU m ボタン o ボタン 設定画面の説明 m ボタンを押すと設定画面が表示できます。 カーソル MA I N MENU SET MENU D I SP MENU CA E MENU... -
Page 24: 時計を合わせる
いろいろな設定 時計を合わせる 日付、 時刻を設定します。 好みに応じて TIME STYLE および DATE STYLE を決めてください。 MA I N SET MENU D I SP MENU CA E MENU NEXT SET D TE& I ME TT I NGS SET DATE . JA N ’ SET T I ME T I ME STYLE STYLE DATE... -
Page 25: 文字の設定
文字の設定 設定できる文字は、英文字(A ∼ Z) 、数字(0 ∼ 9) 、および記号(< > - / . : (スペース)) です。文字候補領域以外の場所ならどこにでも設定することができます。設定は w と e を繰 り返して 1 文字ずつ行います。複数行にわたる場合は 1 行ごとに q から t を繰り返します。 文字を削除したいときはカーソルを l(バックスペース)に置き、s ボタンを押して 1 文 字ずつ消します。 MA I N MENU SET MENU DATE T I ME D I SP... -
Page 26: カメラヘッドの動作スピードおよびパン動作の設定
いろいろな設定 カメラヘッドの動作スピードおよびパン動作の設定 カメラヘッドのパン / チルトの動作スピード、および DIRECTION MIRROR(カメラヘッド のパン方向の動作)を設定します。 MA I N MENU SET MENU D I SP MENU CA E MENU NEXT SET BACK CANCEL ● DIRECTION MIRROR を[ON]に設定すると、カメラヘッドはリモコンの 46 ボタンの矢印と同じ方向に動きます(→ P.17) 。 ● ここで設定されたパン / チルトの動作速度は、プリセット動作時(→ P.21)の パン / チルトの動作速度になります。また、 [AUTO]のときは最高速になります。 RA MENU RA MENU SPEED... -
Page 27: カメラヘッドの動作範囲の設定
NEXT SET [YES] を選択すると保存して 終了 [NO] を選択すると保存せずに 終了 SAVE SETT I NGS? カメラヘッドの動作範囲は以下に示す範囲で設定できます。 VC-C50i : 左右方向 ± 100°上方向 90°下方向 30° VC-C50iR : 左右方向 ± 170°上方向 10°下方向 90° RA MENU RA MENU SPEED AUTO SPEE AUTO MO A RANGE DEFAULT RANGE... -
Page 28: Ae、フリッカ防止の設定
いろいろな設定 AE、フリッカ防止の設定 AE(明るさの調節) 、およびフリッカ(画面のちらつき)防止を設定します。 MA I N MENU SET MENU D I SP MENU CA E MENU NEXT SET BACK CANCEL TT NG E REFERENCE FL I CKERLESS AE NEXT SET BACK CANCEL TT NG E REFERENCE FL I CKERLESS AE NEXT SET BACK CANCEL 屋外での連続昼夜撮影など、光源が徐々に変化する場所で、被写体に変化が少な... -
Page 29: ナイトモードの設定
ナイトモードの設定 ナイトモードにすると、赤外光撮影により、暗闇でも白黒映像として被写体を確認できます。 ナイトモードに切り替えるとき、ナイトモード用の内蔵赤外光照明(赤外線 LED)が自動点 灯します。なお照明は、30 分後に自動消灯します。 MENU NEXT SET BACK CANCEL ● ナイトモードでは、オートフォーカスでピントが合いにくくなったり、ピントが合って いないように見える場合があります。そのようなときは、マニュアルフォーカスでピン トを合わせてください。 ● ナイトモード状態において、リモコンでカメラを OFF にすると、内蔵赤外照明は消灯し ますが、ナイトモードは保持されます。 この状態でリモコンにより再度カメラを ON にしても、内蔵赤外照明は点灯しません。 設定画面よりナイトモードを一旦 OFF にし て、再度 ON すると、内蔵赤外照明が点灯 します。 ● ナイトモード状態で電源を OFF にし、再度 ON にすると、ナイトモードは解除されま す。 ● RS-232C 制御(→ P.30)の場合、ナイトモードと内蔵赤外光照明は、別々に操作す ることができます。また照明を... -
Page 30: Rs-232C の設定
いろいろな設定 RS-232C の設定 本機をパソコンやその他の装置で制御するための設定です。DATA 8 BIT と NON PARITY は設定値を確認するためのもので、固定です。 MA I N MENU SET MENU D I SP MENU CA E MENU NEXT SET BACK CANCEL ● SET MENU 画面の RS-232C SETTINGS 以外の項目については、以下を参照してく ださい。 (1)REMOTE CONTROLLER ID の設定については 31 ページを参照してください。 (2)COMMAND は、本機をキヤノンコミュニケーションカメラ... -
Page 31: 複数のカメラを個別に操作する
複数のカメラを個別に操作する カメラ(VC-C50i または VC-C50iR)が複数台隣接して設置してある場合、リモコンで操作 をすると、受信したカメラはすべて一斉に同じ動作をします。このような場合、各カメラにあ らかじめ ID 番号を設定しておくと、リモコンから ID 番号を指定することで個別にカメラを操 作することができます。 ID 番号を設定する 各カメラ(VC-C50i または VC-C50iR)それぞれに ID 番号(1 ∼ 9)を設定します。ID 番 号を設定しないときは[0]にします。隣接するカメラすべてに ID 番号を設定してください。ま た、同じ ID 番号を複数のカメラに設定すると、それらは同一の動作をします。 1. ID 番号を設定するカメラだけ電源を ON にする。隣接す BRIGHT ZOOM 2. リモコンの m ボタンを押して MAIN MENU 画面を表示... -
Page 32: 個別に操作したいカメラを選択する
複数のカメラを個別に操作する 個別に操作したいカメラを選択する <例> 下図のような 4 台のカメラ(ID1 ∼ ID3)のうち、ID2(2 台)のカメラだけ個別に 操作できるようにします。通常の使用時は、カメラの LED は緑色で点灯しています。 ● 操作は、隣接するすべてのカメラの LED を確認しながら行ってください。リ モコンの信号がすべてのカメラに届いているかどうか確認できます。 ● ID 番号が設定されていないカメラ(ID:0)は、ステップ 2 で ON になります。 ● カメラが OFF のときでも、i ボタンを押すとすべてのカメラの LED はオレ ンジ色に点滅して個別操作が開始できます。ただし、ステップ 2 で番号ボタ ンを押したとき、ID 番号が一致しないカメラは OFF になります。 BRIGHT ZOOM HOME SET/OK CANCEL... -
Page 33: 個別操作を解除する
個別操作を解除する <例> 前ページで選択した ID2 のカメラの個別操作を解除します。各カメラの LED は下図 のようになっています。 オレンジ色で点灯 操作は、隣接するすべてのカメラの LED を確認しながら行ってください。リモ コンの信号がすべてのカメラに届いているかどうか確認できます。 1.i ボタンを押す BRIGHT ZOOM HOME SET/OK CANCEL オレンジ色で点滅 ∞ ON SCREEN MENU 2.0 ボタンを押す 緑色で点灯 以上で解除操作は終了です。すべてのカメラのリモコン操作が可能 になります。 緑色で点灯 緑色で点灯 隣接するすべてのカメラの LED がオレンジ色の点滅(0.5 秒間隔)に変わります。 オレンジ色で点滅 オレンジ色で点滅 操作を中止したいときは c ボタンまたは i ボタンを押し てください。ID2 のカメラの... -
Page 34: 故障かなと思ったら
故障かなと思ったら もう一度以下のことを確認してから販売店にご連絡ください。 リモコン操作ができない 確認 1. LED が消灯していませんか? 対処 電源プラグをコンセントに正しく奥まで差し込んでください。→ P.14 確認 2. LED が赤色で点灯していませんか? カメラが OFF になっています。リモコンの p ボタンを押してカメラを 対処 ON にしてください。→ P.22 確認 3. LED がオレンジ色で点灯をしていませんか? 対処 ID 設定機能による動作制限を受けています。ID を正しく設定し直すか、個 別操作を解除してください。→ P.31 ∼ 33 確認 4. リモコンを操作したときに、LED が緑色で点滅していますか? 対処 ・... - Page 35 プリセットで登録した位置にカメラヘッドが向かない 確認 1. カメラヘッドが動作範囲まで動きますか? 何らかの原因でカメラヘッドが直接動いてしまいました。リモコンの h 対処 ボタンを押してください。→ P.17 確認 2. プリセット登録後にパン / チルトの動作範囲を変更していませんか? 対処 プリセットを登録し直してください。→ P.21 ピントが合わない 確認 1. マニュアルフォーカスになっていませんか? マニュアルでピントを調節するか、リモコンの a ボタンを押してオート 対処 フォーカスにしてください。→ P.19 ∼ 20 確認 2. レンズが汚れていませんか? 対処 レンズの清掃をしてください。→ P.7 確認 3. プリセットの実行をしましたか? 対処 マニュアルフォーカスの時にプリセットの実行をすると、実行後ピントが 合わない場合があります。マニュアルでピントを調節するか、リモコンの...
-
Page 36: 工場出荷時の初期設定
工場出荷時の初期設定 工場出荷時および RESTORE DEFAULT を[YES]にしたとき(→ P.30) 、各項目は以下に 示す設定になります。 (本機の初期設定) 項 目 フォーカス ブライト (設定画面の初期設定) SET MENU DISPLAY MENU CAMERA MENU ※ 1)電源を OFF から ON(→ P.14)にしたとき、工場出荷時の初期設定になります。そ れ以外の項目は、電源を OFF にしたときの値が保持されます。 ※ 2)RESTORE DEFAULT 後は 00:00:00AM となります。 ※ 3)RESTORE DEFAULT 後は AM/PM 表示となります。 (→ P.24) 初期設定... -
Page 37: 主な仕様
最大約 12.5W(専用 AC アダプタ含む) 使用環境 温度:0℃∼ 40℃ 湿度:20% ∼ 85%RH(結露なきこと) 設置角度 水平に対して± 20°(オプションのワイドコンバータ使用時は± 15°) 本体サイズ VC-C50i:100mm(W)× 117mm(D)× 96mm(H) (突起物は含まず) VC-C50iR:100mm(W)× 117mm(D)× 97.6mm(H) (突起物は含まず) 本体質量 VC-C50i:約 420g / VC-C50iR:約 490g リモコン 型式 WL-V5 方式 赤外線パルス方式 電源 DC3V(単 3 乾電池× 2) サイズ 50mm(W)× 175mm(D)× 24.5mm(H) (突起物は含まず) 質量... - Page 38 製品に関するお問い合せは、お客様相談センターをご利用ください。 キヤノンお客様相談センター TV 会議システム・ビジュアルコミュニケーション 050-555-90074 [受付時間] < 平日 > 9:00 ∼ 12:00 / 13:00 ∼ 17:00 (土・日・祝日及び年末年始弊社休業日は休ませていただきます) ※ 上記番号をご利用いただけない方は 043-211-9622 をご利用ください。 ※ IP 電話をご利用の場合、プロバイダーのサービスによってつながらない場 合があります。 ※ 受付時間は予告なく変更する場合があります。 あらかじめご了承ください。 補修用性能部品について 保守サービスのために必要な保守用性能部品の最低保有期間は、 製品の製造打 ち切り後 7 年間です。 (補修用性能部品とは、その製品の機能を維持するために必要な部品です) お問い合せ先...
- Page 39 INSTRUCTION MANUAL...
- Page 40 Product. Features of the VC-C50i/VC-C50iR Communication Camera ■ Genuine Canon 26× optical zoom and 12× digital zoom for high- magnification imaging ■ Capable of shooting at low light levels down to 1 lux ■...
-
Page 41: Exclusion Of Liability
This product uses a microcomputer. External radio frequency energy, may cause picture interference, avoid using this product in such a location. If the Product is connected to a recording device (for example a VCR), Canon Inc. accepts no responsibility whatsoever for any financial losses that may be incurred as a result of the loss of recorded information or images, regardless of the internal or external cause of the loss. -
Page 42: A Important Warnings
When replacing the fuse only a correctly rated approved type should be used and be sure to re-fit the fuse cover. The AC adapter can be connected to the VC-C50i/VC-C50iR from a standard AC power outlet. Please check your instruction manual to make sure that your VC-C50i/VC-C50iR is compatible with this adapter. -
Page 43: A Important Operational Instructions
50 and following of Italian legislative decree 22/97. For more information regarding return and recycling of WEEE products, please visit www.canon-europe.com/environment. (EEA: Norway, Iceland and Liechtenstein) a Safe Use of Equipment FDA regulation... -
Page 44: Fcc Notice
If such changes or modifications should be made, you could be required to stop operation of the equipment. Canon U.S.A. Inc. One Canon Plaza, Lake Success, NY 11042, U.S.A. Tel No. (516) 328-5600 This Class B digital apparatus complies with Canadian ICES-003. -
Page 45: Important Safety Instructions
IMPORTANT SAFETY INSTRUCTIONS In these safety instructions, the word “equipment” refers to the Canon communication camera VC-C50i/VC-C50iR and all its accessories. 1. Read Instructions - All the safety and operating instructions should be read before the equipment is operated. - Page 46 19. Replacement Parts - When replacement parts are required, be sure the service technician has used replacement parts that are specified by Canon or that have the same characteristics as the original part. Unauthorized substitutions may result in fire, electric shock or other hazards.
- Page 47 22. When any of the following occurs, immediately switch OFF the equipment, unplug it from the main power supply and contact your nearest Canon supplier. Do not continue to use the equipment as this can cause a fire or electric shock.
-
Page 48: Maintenance
a Safe Use of Equipment Maintenance Cleaning the Equipment 1. Unplug the AC adapter from the wall outlet. 2. Carefully wipe the equipment with a soft cloth that has been moistened with water or a mild detergent. WARNING Do not use flammable solvents such as alcohol, benzene or thinners. The use of such substances can cause a fire or electric shock. - Page 49 CONTENTS a Safe Use of Equipment ... 4 a Important Warnings ... 4 a Important Operational Instructions ... 5 a IMPORTANT SAFETY INSTRUCTIONS ... 7 Maintenance ... 10 Icons Used in This Instruction Manual ... 10 Before You Use the Product ... 12 Checking the Camera and Its Accessories ...
-
Page 50: Before You Use The Product
Before You Use the Product Checking the Camera and Its Accessories Before you install the Product, check that all the items shown below are included in your product package. If any of these items is missing, contact your Canon dealer. VC-C50i camera BNC-RCA connector ●... -
Page 51: Using A Tripod
WARNING Install the camera securely. ● When installing the camera on the ceiling, contact your Canon dealer. ● When installing the camera on the ceiling, check that the ceiling is strong enough to bear the weight of the camera including the installation bracket. Installation in a weak location could result in the camera falling and causing serious injury. -
Page 52: Connecting The Components
WARNING The Wide-angle Converter WL-37 cannot be used on the VC-C50iR. If the converter is used on the VC-C50iR, the mount will gradually loosen and the converter will fall off the camera. ● The camera may not operate correctly if a wide-angle converter other than the WL-37 is used. - Page 53 Connecting to the Multiconnector Use the procedure below to plug leads (AWG No.28-18) into the multiconnector plug. 1. Insert a flat-bladed screwdriver all the way into the slot next to the lead fastening hole. ■ The inside of the lead fastening hole opens. 2.
- Page 54 Before You Use the Product Multiconnector Pin Layout Item Pin No. S-video out RS-232C (connects to cascade- connection camera) RS-232C (connects to cascade- connection PCs) Y GND C GND RTS OUT TX OUT RTS IN TX IN Light_ON/OFF- Alarm_- Sensor_- Input/ Pin name Signal direction...
-
Page 55: External Device I/O Terminals
Item Pin No. External lighting control signal Alarm control signal External sensor input External Device I/O Terminals External device input terminals These comprise 2 sensor terminals (positive (+) and negative (–)). The negative terminal is connected to the camera’s own internal ground and the positive terminal is pulled up to 5 volts at 10 kohm via a protection diode. -
Page 56: Turning The Power On And Off
Before You Use the Product Turning the Power ON and OFF The VC-C50i/VC-C50iR camera does not have a power switch. You can switch the camera on by plugging the AC adapter into a wall outlet. When power to the camera is switched on, the LED on the camera turns green. -
Page 57: Controlling The Camera From The Wireless Controller
Controlling the Camera from the Wireless Controller While the wireless controller buttons are being used, the LED on the camera blinks green (at 0.1-second intervals). Nomenclature BRIGHT button (→ P.24) Adjusts the brightness of the image on the monitor. • + : Brightens the image. •... -
Page 58: Loading The Batteries Into The Wireless Controller
Use the wireless controller within the range described below, facing it toward the sensor for the wireless controller. The operable range of the wireless controller varies depending on the amount of charge remaining in the batteries and interference from other objects. (This applies equally to the VC-C50iR.) (16.4 ft.) 30°... -
Page 59: Changing The Camera Head Angle (Pan/Tilt/Home Position)
Low speed → Medium speed → High speed head movement as shown below. Low speed → Medium speed → High speed speed. 10° 170° 170° VC-C50iR 90°... -
Page 60: Zooming In/Out (Tele/Wide)
Controlling the Camera from the Wireless Controller Zooming In/Out The zoom function increases (zoom in) and decreases (zoom out) the size of the subject on the monitor screen. BRIGHT ZOOM HOME SET/OK CANCEL ∞ ON SCREEN MENU Focusing Range At some zoom settings, the camera may not be able to focus on the subject. MEMO Changes in the distance from the camera to the subject Wide end of zoom... -
Page 61: Focusing (Focus)
Focusing (FOCUS) This section describes how to focus on the subject. The VC-C50i/VC-C50iR has an auto-focus mode, in which the camera automatically focuses on the subject, and a manual focus mode, in which the operator can adjust the focus by hand. (The default setting is auto-focus.) To use autofocus mode Press the a button. -
Page 62: Adjusting The Brightness (Bright)
Controlling the Camera from the Wireless Controller BRIGHT ZOOM HOME SET/OK CANCEL ∞ ON SCREEN MENU Adjusting the Brightness This function brightens or darkens the image. When the camera is switched on, the brightness is set to the Normal level. BRIGHT ZOOM HOME... -
Page 63: Storing A Preset Camera Position (Preset)
To restore a preset position Press a button from 1 to 9. ■ The VC-C50i/VC-C50iR returns to the stored camera head ● During preset operations, the camera pans and tilts at the speeds set for pan/ tilt operation in the setting menu. When the [AUTO] setting is selected, the MEMO head moves at the maximum speed (→... -
Page 64: Switching The Camera On And Off
Controlling the Camera from the Wireless Controller Switching the Camera ON and OFF The camera is switched on and off by using the p (camera ON/OFF) button on the wireless controller. Even if you switch the camera OFF, the stored preset positions, the date, the time and the ID number are not cleared. -
Page 65: Camera Settings
Camera Settings Set and display the clock and text, and specify camera operation settings. Buttons Used to Specify the Settings The wireless controller buttons shown below are used for the setting. 58 buttons 6 button BRIGHT ZOOM 4 button HOME c button SET/OK CANCEL... -
Page 66: Setting The Clock
Camera Settings Setting the Clock Use the procedure below to set the date and time. You can also select your preferred TIME STYLE and DATE STYLE settings. MA I N SET MENU D I SP MENU CA E MENU NEXT SET D TE&... -
Page 67: Entering Characters
Entering Characters The characters that can be specified are uppercase letters (A to Z), numbers (0 to 9) and some symbols (<, >, -, /,., : and spaces). Text can be entered anywhere on the screen outside the character area. Repeat steps w and e in the procedure below for each character entered. -
Page 68: Setting The Camera Head Movement Speed And Pan Operation
Camera Settings Setting the Camera Head Movement Speed and Pan Operation Use the procedure below to set the speed at which the camera head pans and tilts and to select the DIRECTION MIRROR setting (direction of camera head panning). MA I N MENU SET MENU D I SP... -
Page 69: Setting The Range Of Camera Head Movement
SETT I NGS? The limits for the range of camera head movement are as follows: ±100° left and right, 90° upward and 30° downward VC-C50i: MEMO VC-C50iR: ±170° left and right, 10° upward and 90° downward RA MENU RA MENU AUTO AUTO... -
Page 70: Setting The Ae
Camera Settings Setting the AE Use the procedure below to specify the AE (brightness adjustment) setting. FLICKERLESS AE is unnecessary to set. MA I N MENU SET MENU D I SP MENU CA E MENU NEXT SET BACK CANCEL TT NG E REFERENCE FL I CKERLESS AE NEXT SET... -
Page 71: Night Mode Settings
Night Mode Settings Selecting night mode allows you to check the subject in the dark using black and white images provided by infrared photography. When you switch to night mode, the built-in infrared lighting (infrared LED) for night mode automatically switches on. This lighting automatically switches off after 30 minutes. -
Page 72: Rs-232C Settings
Camera Settings RS-232C Settings These settings are used for controlling the VC-C50i/VC-C50iR from a PC or other device. The DATA 8 BIT and NON PARITY settings are fixed, and the menu is used to check them only. DATA 8 BIT and NON PARITY are to be read only. -
Page 73: Id Mode
Use the procedure below to assign an ID number (1 to 9) to each camera (VC-C50i/ VC-C50iR). If you do not want to assign an ID number to a camera, select [0] for that camera. Assigning the same ID number to multiple cameras allows you to control those cameras simultaneously. -
Page 74: Selecting The Camera To Be Controlled
ID Mode Selecting the Camera to be Controlled <Example> As shown in the figure below, of 4 cameras (ID1 to ID3) only the cameras with ID number 2 (2 cameras) are selected for ID mode operation. In normal operation, the camera LEDs turn green. ●... -
Page 75: Cancelling Id Mode
Cancelling ID Mode <Example> In this example, the selection made in the previous section of the cameras with ID number 2 is cancelled. The camera LEDs are as shown below. Check the LEDs on all the adjacent connected cameras to ensure that all the cameras are receiving the signals from the wireless controller. -
Page 76: Troubleshooting
Troubleshooting Check the following before contacting your Canon supplier. The wireless controller does not work. Check 1: The LED is not lit. Response: Check that the plug is inserted into the main power outlet correctly and pushed in all the way. → P.18 Check 2: The LED is red. - Page 77 The camera will not move to a preset position. Check 1: The camera head will not move to the limit of its range of movement. Response: Something has directly moved the camera head. Press the h button on the wireless controller. → P.21 Check 2: The range of pan/tilt movement has been changed since the preset position was stored.
-
Page 78: Factory Default Settings
Factory Default Settings When the Product is shipped from the factory or when RESTORE DEFAULT has been set to [YES] (→ P.34), the settings are set to the default values shown below. (Camera Default Settings) Item Focus Brightness (Setting Screen Default Settings) SET MENU DISPLAY MENU CAMERA MENU... -
Page 79: Specifications
VC-C50i: 100 × 117 × 96 mm (3.9 × 4.6 × 3.8 in.) (W × D × H) Dimensions (excluding attachments) VC-C50iR: 100 × 117 × 97.6 mm (3.9 × 4.6 × 3.8 in.) (W × D × H) (excluding attachments) Weight VC-C50i: Approx. - Page 80 Specifications Item Wireless Model Controller System Power Supply 3 V DC (2 AA-type batteries) Dimensions Weight Model AC Adapter Input (PAL model optional) Output Polarity Dimensions Weight ● These specifications are subject to change without notice. ● For the AC adapter, use the PA-V16 dedicated unit. Also, do not use the PA-V16 AC adapter with any other product.
- Page 81 MODE D’EMPLOI...
-
Page 82: Caractéristiques
Introduction Nous vous remercions d’avoir choisi la Caméra de Communication Canon VC-C50i/ VC-C50iR. Veuillez lire attentivement ce mode d’emploi pour assurer le bon fonctionnement de cet appareil. Consultez tout d’abord la section “a Utilisation en toute sécurité de l’appareil” et veillez à observer ces instructions lorsque vous utilisez la caméra. - Page 83 Si la caméra est connectée à un appareil enregistreur (un magnétoscope, par exemple) pour enregistrer des images et le son, Canon Inc. ne peut en aucun cas être responsable de tout préjudice pouvant être causé par la perte des images enregistrées, que la cause soit interne ou externe.
-
Page 84: A Utilisation En Toute Sécurité De L'appareil
Numéro de téléphone du distributeur Numéro de modèle VC-C50i ou VC-C50iR Numéro de série L’adaptateur secteur peut être raccordé au VC-C50i/VC-C50iR à partir d’une prise secteur normale. S’assurer dans le mode d’emploi que le VC-C50i/ VC-C50iR est compatible avec cet adaptaeur. -
Page 85: A Instructions D'utilisation Importantes
DEEE approuvé ou le service d'enlèvement des ordures ménagères. Pour plus d'informations sur le dépôt et le recyclage des produits DEEE, consultez le site www.canon-europe.com/environment. (EEE : Norvège, Islande et Liechtenstein) a Utilisation en toute sécurité de l’appareil... -
Page 86: A Instructions De Sécurité Importantes
Utilisation en toute sécurité de l’appareil a INSTRUCTIONS DE SÉCURITÉ IMPORTANTES Dans ces instructions, le mot “équipement” fait référence à la caméra de communication CANON VC-C50i/VC-C50iR et tous ses accessoires. 1. Lisez ces instructions - Avant d’utiliser cet équipement, lisez toutes les instructions de sécurité... - Page 87 19. Remplacement des pièces - Quand il faut remplacer des pièces, assurez-vous que le technicien utilise bien les pièces préconisées par Canon ou des pièces qui sont dotées des mêmes caractéristiques que celles d’origine. Des substitutions non autorisées peuvent provoquer un incendie, une électrocution ou d’autres...
- Page 88 22. Quand l’un des problèmes suivants se produit, éteignez immédiatement la caméra, débranchez la fiche de la prise murale et prenez contact avec votre revendeur Canon le plus proche. Ne continuez pas à utiliser la caméra car vous pourriez provoquer un incendie ou vous électrocuter.
-
Page 89: Icônes Utilisées Dans Ce Mode D'emploi
Entretien Nettoyage de l’appareil 1. Débranchez l’adaptateur secteur de la prise murale. 2. Essuyez soigneusement l’appareil avec un chiffon doux imbibé d’eau ou d’un produit de nettoyage à faible concentration. AVERTISSEMENT: Ne pas utiliser de dissolvants, tels que l’alcool, le benzène ou des diluants. L’emploi de ces produits risque de provoquer un incendie ou une décharge électrique. - Page 90 Table des matières a Utilisation en toute sécurité de l’appareil ... 4 a Avertissements importants ... 4 a Instructions d’utilisation importantes ... 5 a INSTRUCTIONS DE SÉCURITÉ IMPORTANTES ... 6 Entretien ... 9 Icônes utilisées dans ce mode d’emploi ... 9 Avant d’utiliser la caméra ...
-
Page 91: Avant D'utiliser La Caméra
Caméra VC-C50iR sans fil WL-V5 Fiche Adaptateur secteur PA-V16 (Modèle NTSC uniquement) ■ Accessoire en option ● Convertisseur grand angle WL-37 ( Ne peut pas être utilisé avec la VC-C50iR. (Avant) (Arrière) Adaptateur d’interface VC-EX3 Câble secteur (Modèle NTSC uniquement) →... -
Page 92: Installation De La Caméra
également la monture du convertisseur.) * Le convertisseur grand angle WL-37 ne peut pas être utilisé sur la VC-C50iR. Les angles acceptables pour l’installation de la caméra sont de ±20° par rapport à... -
Page 93: Connexion Des Composants
Convertisseur grand angle AVERTISSEMENT: Le convertisseur grand angle WL-37 ne peut pas être utilisé sur la VC-C50iR. Si le convertisseur est utilisé sur la VC-C50iR, la monture se desserrera progressivement et le convertisseur risque de se détacher de la caméra. - Page 94 Avant d’utiliser la caméra Branchement au multiconnecteur Procédez de la manière suivante pour brancher les conducteurs (AWG N° 28-18) dans la fiche multiconnecteur. 1. Introduisez à fond un tournevis à lame plate dans la fente à côté de l’orifice de serrage du conducteur.
- Page 95 Configuration des broches du multiconnecteur N° de Rubrique Désignation broche broche Sortie S-vidéo RS-232C (se branche sur la caméra par connexion en cascade) RS-232C (se branche sur les ordinateurs par connexion en cascade) Y GND C GND RTS OUT TX OUT RTS IN TX IN Light_ON/OFF-...
- Page 96 Avant d’utiliser la caméra N° de Rubrique broche Signal de commande de l’éclairage externe Signal de commande de l’alarme Entrée du capteur externe Bornes E/S pour appareil externe Bornes d’entrée pour appareil externe Elles comprennent 2 bornes de capteur (positive (+) et négative (–)). La borne négative est branchée à...
-
Page 97: Mise Sous Et Hors Tension
Mise sous et hors tension Les caméras VC-C50i/VC-C50iR n’ont pas d’interrupteur d’alimentation. Vous pouvez mettre la caméra sous tension en branchant l’adaptateur secteur dans une prise murale. Lorsque la caméra est mise sous tension, la DEL sur la caméra passe au vert. Si le moniteur est allumé, une image apparaît à l’écran. -
Page 98: Commande De La Caméra Avec La Télécommande Sans Fil
Commande de la caméra avec la télécommande sans fil Lorsque les touches de la télécommande sans fil sont utilisées, la DEL de la caméra clignote en vert (à des intervalles de 0,1 seconde). Nomenclature Touche BRIGHT (→ P.23) Pour régler la luminosité de l’image sur le moniteur. -
Page 99: Mise En Place Des Piles Dans La Télécommande Sans Fil
Utilisez la télécommande sans fil dans le rayon d’action indiqué ci-dessous, en la dirigeant face au capteur de télécommande. Le rayon d’action de la télécommande sans fil varie en fonction de la charge restante dans les piles et des interférences produites par d’autres objets. (Ceci s’applique également à la VC-C50iR.) (16,4 pieds) 90°... -
Page 100: Modification De L'angle De La Tête De La Caméra (Panorama/Inclinaison/Position De Départ)
Pour déplacer la tête de la caméra en position de départ Appuyez sur la touche h. ■ Ceci permet de déplacer à grande vitesse la tête de la caméra vers la position centrale. 30° 100° 170° 30° VC-C50i (panorama/inclinaison/position de départ) 10° 170° VC-C50iR 90°... -
Page 101: Zoom Avant/Arrière (Tele/Wide)
Zoom avant/arrière Le zoom permet d’augmenter (zoom avant) ou de réduire (zoom arrière) la taille du sujet sur l’écran du moniteur. Pour faire un zoom avant (TELE): Appuyez sur le côté t de la touche. BRIGHT ZOOM ■ Maintenez la touche enfoncée pour modifier le rapport du HOME SET/OK CANCEL... -
Page 102: Mise Au Point (Focus)
Cette section décrit comment faire la mise au point sur le sujet. Les caméras VC-C50i/ VC-C50iR sont dotées d’un mode de mise au point automatique dans lequel la caméra fait automatiquement la mise au point, et d’un mode manuel dans lequel l’opérateur peut la régler manuellement. -
Page 103: Réglage De La Luminosité (Bright)
Pour fixer la mise au point Appuyez sur la touche n. BRIGHT ZOOM ■ Ceci désactive la mise au point automatique et fixe la mise Pour la mise au point de sujets à proximité HOME SET/OK CANCEL Appuyez sur la touche r. ■... -
Page 104: Sauvegarde D'une Position Préréglée De La Caméra (Preset)
Pour remettre à la position initiale Appuyez sur une touche numérotée de 1 à 9. ■ Les réglages en mémoire dans les caméras VC-C50i/ VC-C50iR pour l’angle de la tête, la position du zoom et le niveau de luminosité sont rétablis. (PRESET) -
Page 105: Marche Et Arrêt De La Caméra
Marche et arrêt de la caméra La caméra est mise en marche ou à l’arrêt à l’aide de la touche p (caméra ON/OFF) de la télécommande sans fil. Les positions de préréglage mémorisées, la date, l’heure et le numéro d’identification ne sont pas annulés lorsque la caméra est mise à l’arrêt. Pour mettre la caméra à... -
Page 106: Réglages De La Caméra
Réglages de la caméra Pour régler et afficher l’horloge et le texte et spécifier les réglages de fonctionnement de la caméra. Touches utilisées pour spécifier les réglages Les touches de la télécommande sans fil indiquées ci-dessous sont utilisées pour le réglage. BRIGHT ZOOM HOME... -
Page 107: Réglage De L'horloge
Réglage de l’horloge Utilisez la procédure suivante pour régler la date et l’heure. Vous pouvez également sélectionner vos réglages préférés pour TIME STYLE et DATE STYLE. MA I N MENU SET MENU D I SP MENU CA E MENU NEXT SET BACK CANCEL D TE&... -
Page 108: Saisie De Caractères
Réglages de la caméra Saisie de caractères Les caractères pouvant être spécifiés sont les lettres majuscules (A à Z), les chiffres (0 à 9) et certains symboles (<, >, -, /,., : et les espaces). Le texte peut être saisi n’importe où sur l’écran en dehors de la zone des caractères. -
Page 109: Réglage De La Vitesse Du Mouvement De La Tête De La Caméra Et Du Mouvement Panorama
Réglage de la vitesse du mouvement de la tête de la caméra et du mouvement panorama Utilisez la procédure ci-dessous pour régler la vitesse à laquelle la tête de la caméra se déplace à l’horizontale et à la verticale et pour sélectionner le réglage DIRECTION MIRROR (direction du mouvement panorama de la caméra). MA I N MENU SET MENU... -
Page 110: Réglage De La Portée Du Mouvement De La Tête De La Caméra
SAVE Les limites pour la portée du mouvement de la tête de la caméra sont les suivantes: VC-C50i: MÉMO VC-C50iR: ±170° à gauche et à droite, 10° vers le haut et 90° vers le bas RA MENU SPEED AUTO SPEE... -
Page 111: Réglage De L'exposition Automatique Ae
Réglage de l’exposition automatique AE Utilisez la procédure ci-dessous pour spécifier le réglage AE (réglage de luminosité). Il est inutile de régler FLICKERLESS AE. MA I N MENU SET MENU D I SP MENU MO A CA E MENU SETT I N D I RECT I O N I GHT NEXT SET... -
Page 112: Réglage Du Mode Nocturne
Réglages de la caméra Réglage du mode nocturne La sélection du mode nocturne vous permet de vérifier le sujet dans l’obscurité à l’aide d’images en noir et blanc, fournies par photographie infrarouge. Lorsque vous passez au mode nocturne, l’éclairage infrarouge intégré (DEL infrarouge) du mode nocturne se met automatiquement en marche. -
Page 113: Réglages Rs-232C
Réglages RS-232C Ces réglages sont utilisés pour contrôler les caméras VC-C50i/VC-C50iR à partir d’un ordinateur ou d’un autre périphérique. Les réglages DATA 8 BIT et NON PARITY sont fixes et le menu est utilisé uniquement pour les vérifier. DATA 8 BIT et NON PARITY sont destinés uniquement à... -
Page 114: Mode Id
Utilisez la procédure ci-dessous pour attribuer un numéro ID (1 à 9) à chaque caméra (VC-C50i/VC-C50iR). Si vous ne souhaitez pas attribuer un numéro d’identification à une caméra, sélectionnez [0] pour cette caméra. En attribuant le même numéro d’identification à... -
Page 115: Sélection De La Caméra À Contrôler
Sélection de la caméra à contrôler <Exemple> Comme indiqué sur l’illustration ci-dessous, parmi les 4 caméras (ID1 à ID3) seules les caméras ayant le numéro 2 (2 caméras) sont sélectionnées pour le fonctionnement en mode ID. En temps normal, les DEL des caméras passent au vert. ●... -
Page 116: Annulation Du Mode Id
Mode ID Annulation du mode ID <Exemple> Dans cet exemple, la sélection effectuée dans la section précédente pour les caméras avec le numéro ID2 est annulée. Les DEL des caméras sont indiquées ci-dessous. Vérifiez les DEL sur toutes les caméras branchées adjacentes pour vous assurer que toutes les caméras reçoivent les signaux de la télécommande sans NOTE fil. -
Page 117: Dépannage
Dépannage Procédez aux contrôles suivants avant de contacter votre revendeur Canon. La télécommande sans fil ne fonctionne pas. Contrôle 1: The DEL is not lit. Réponse: Vérifiez si la fiche est bien branchée et bien enfoncée dans la prise secteur. → P.17 Contrôle 2: La DEL est rouge. - Page 118 Dépannage La caméra ne se déplace pas sur une position préréglée. Contrôle 1: La tête de la caméra ne se déplace pas jusqu’à la limite de la portée de son mouvement. Réponse: La tête de la caméra a été déplacée accidentellement. Appuyez sur la touche h de la télécommande sans fil.
-
Page 119: Réglages Par Défaut D'usine
Réglages par défaut d’usine Les réglages sont remis aux valeurs par défaut indiquées ci-dessous lorsque le produit est expédié de l’usine ou lorsque RESTORE DEFAULT a été réglé sur [YES] (→ P.33). (Réglages par défaut de la caméra) Fonction Réglage par défaut Mise au point Luminosité... -
Page 120: Spécifications
±20° à partir de l’horizontale (±15° avec le convertisseur grand angle en option installé) VC-C50i: 100 × 117 × 96 mm (L × P × H) (sans accessoires) VC-C50iR: 100 × 117 × 97,6 mm (L × P × H) (sans accessoires) VC-C50i: Environ 420 g VC-C50iR: Environ 490 g... - Page 121 Caractéristiques Télécommande Modèle WL-V5 sans fil Système Système à impulsions infrarouges Alimentation 3 V CC (2 piles de type AA) 50 × 175 × 24,5 mm (1,97 × 6,89 × 0,96 pouces) (L × P × H) (sans Dimensions accessoires) Poids Environ 79 g (Environ 0,17 livre) (sans les piles) Modèle...
- Page 123 MANUAL DE INSTRUCCIONES...
- Page 124 Características de la cámara para comunicación VC-C50i/VC-C50iR ■ Zoom óptico 26× y zoom digital 12× legítimos de Canon para imágenes con gran ampliación ■ Capaz de realizar tomas a bajos niveles de iluminación, del orden de 1 ■...
-
Page 125: Exclusión De Responsabilidad
Información sobre derechos de autor Las imágenes fijas o de vídeo grabadas con su VC-C50i/VC-C50iR no se pueden utilizar de forma que puedan infringir las leyes de los derechos de autor, o sin el consentimiento de su propietario, a menos que sea exclusivamente para uso personal. -
Page 126: A Uso Seguro Del Equipo
N° de teléfono del concesionario N° de modelo VC-C50i o VC-C50iR N° de serie El adaptador AC puede conectarse a la VC-C50i/VC-C50iR desde un tomacorriente AC. Se ruega consultar su manual de instrucciones para asegurarse de que su VC-C50i/VC-C50iR es compatible con este adaptador. -
Page 127: A Instrucciones Importantes De Uso
WEEE autorizado o con el servicio de recogida de basuras para hogares. Si desea más información acerca de la devolución y reciclado de productos WEEE, visite la web www.canon-europe.com/environment. (EEA: Noruega, Islandia y Liechtenstein) a Uso seguro del equipo... -
Page 128: A Instrucciones De Seguridad Importantes
En estas instrucciones de seguridad, la palabra “equipo” se refiere a la cámara para comunicación VC-C50i/VC-C50iR Canon y todos sus accesorios. 1. Lea las instrucciones - Deben leerse todas las instrucciones de seguridad y de uso antes de utilizar el equipo. - Page 129 equipo, asegúrese de que la antena sea conectada a tierra para proveer cierta protección contra las sobretensiones y las cargas estáticas acumuladas. La Sección 810 del Código Eléctrico Nacional, ANSI/NFPA N°70-1984, proporciona información con respecto a la correcta conexión a tierra del poste y de la estructura de apoyo, la puesta a tierra del conductor de entrada a una unidad de descarga...
- Page 130 19. Piezas de reemplazo - Cuando se deban utilizar piezas de reemplazo, asegúrese de que el técnico utilice piezas especificadas por Canon o que disponen de las mismas características que las originales. El uso de piezas de reemplazo no autorizadas puede producir incendio, descargas eléctricas...
-
Page 131: Iconos Utilizados En Este Manual De Instrucciones
Mantenimiento Limpieza del equipo 1. Desenchufe el adaptador AC del tomacorriente de la pared. 2. Limpie cuidadosamente el equipo con un paño suave humedecido con agua o un detergente neutro. ADVERTENCIA No utilice solventes inflamables como alcohol, bencina o diluyente. El uso de tales sustancias pueden producir incendio o descargas eléctricas. - Page 132 ÍNDICE a Uso seguro del equipo ... 4 aAdvertencias importantes ... 4 a Instrucciones importantes de uso ... 5 a INSTRUCCIONES DE SEGURIDAD IMPORTANTES ... 6 Mantenimiento ... 9 Iconos utilizados en este manual de instrucciones ... 9 Antes de usar el producto ... 11 Comprobación de la cámara y sus accesorios ...
-
Page 133: Antes De Usar El Producto
Controlador sin hilos WL-V5 Enchufe Adaptador AC PA-V16 (sólo modelo NTSC) ■ Producto opcional ● Convertidor gran angular WL-37 (→ p.13) No se puede utilizar en la VC-C50iR. (Parte delantera) (Parte trasera) Adaptador de interfaz VC-EX3 Cable AC (sólo modelo NTSC) -
Page 134: Instalación Del Producto
ADVERTENCIA Instale firmemente la cámara. ● Para instalar la cámara en el techo, póngase en contacto con su concesionario Canon. ● Si instala la cámara en el techo, compruebe que sea lo suficientemente resistente para soportar el peso de la cámara, incluyendo el soporte de instalación. La instalación en un lugar débil puede provocar la caída de la cámara y causar lesiones de gravedad. -
Page 135: Conexión De Los Componentes
3 vueltas antes de detenerse. Convertidor gran angular ADVERTENCIA El convertidor gran angular WL-37 no se puede utilizar en la VC-C50iR. Si utiliza el convertidor en la VC-C50iR, la montura se aflojará gradualmente y el convertidor se soltará de la cámara. - Page 136 Antes de usar el producto Conexión al multiconector Utilice el siguiente procedimiento para conectar los conductores (AWG N°28-18) en el enchufe multiconector. 1. Inserte a fondo un destornillador de punta plana en la ranura existente junto al orificio de fijación del conductor. ■...
- Page 137 Disposición de las patillas del multiconector N° de Elemento Nombre de la patilla patilla Salida S-vídeo RS-232C (se conecta a la cámara de conexión en cascada) RS-232C (se conecta a los PCs de conexión en cascada) Y GND C GND RTS OUT TX OUT RTS IN...
- Page 138 Antes de usar el producto N° de Elemento patilla Señal de control de iluminación externa Señal de control de alarma Entrada de sensor externo Terminales E/S del dispositivo externo Terminales de entrada del dispositivo externo Se componen de 2 terminales de sensor (positivo (+) y negativo (–)). El terminal negativo se encuentra conectado a la masa interna propia de la cámara y el terminal positivo se encuentra polarizado a 5 voltios en 10 kohm a través del diodo de protección.
-
Page 139: Conexión Y Desconexión De La Alimentación
Conexión y desconexión de la alimentación La cámara VC-C50i/VC-C50iR no dispone de interruptor de alimentación. La cámara se enciende al conectar el adaptador AC en un tomacorriente de pared. Al encenderse la cámara, el LED de la cámara se ilumina en verde. Si el monitor está encendido, aparece una imagen en la pantalla. -
Page 140: Controlando La Cámara Con El Controlador Sin Hilos
Controlando la cámara con el controlador sin hilos El LED de la cámara parpadea en verde (a intervalos de 0,1 segundo) mientras se están usando los botones del controlador sin hilos. Nomenclatura Botón BRIGHT (→ p.23) Ajusta la luminosidad de la imagen del monitor. -
Page 141: Instalación De Las Pilas En El Controlador Sin Hilos
El radio de acción del controlador sin hilos varía según el nivel de carga restante de las pilas y de la interferencia producida por otros objetos. (Esto también se aplica a la VC-C50iR.) (16,4 pies) 90°... -
Page 142: Cambio Del Ángulo Del Cabezal De La Cámara (Giro/Inclinación/Posición Inicial)
Para mover el cabezal de la cámara a la posición inicial Oprima el botón h. ■ El cabezal de la cámara se desplaza a la posición central a alta velocidad. 30° 100° 10° 170° VC-C50i 90° (giro/inclinación/posición inicial) 170° VC-C50iR... -
Page 143: Zoom De Acercamiento/Alejamiento (Tele/Wide)
Zoom de acercamiento/alejamiento La función zoom permite aumentar (zoom de acercamiento) y disminuir (zoom de alejamiento) el tamaño del sujeto en la pantalla del monitor. Para el zoom de acercamiento (TELE): Oprima el lado t del botón. BRIGHT ZOOM ■ Manteniendo oprimido el botón, el régimen del zoom cambia HOME SET/OK CANCEL... -
Page 144: Enfoque (Focus)
Enfoque (FOCUS) Esta sección describe cómo enfocar el sujeto. La VC-C50i/VC-C50iR dispone del modo de enfoque automático, para que la cámara enfoque automáticamente en el sujeto, y de un modo de enfoque manual, en que el usuario puede ajustar el enfoque con la mano. (El ajuste predeterminado es enfoque automático.) -
Page 145: Ajuste De La Luminosidad (Bright)
Para fijar el enfoque Oprima el botón n. BRIGHT ZOOM ■ Se desactiva el enfoque automático y se fija el enfoque. Para enfocar sujetos cercanos Oprima el botón r. HOME SET/OK CANCEL ■ Permite poner la cámara en el modo de enfoque manual ■... -
Page 146: Almacenamiento De Una Posición De Preajuste De La Cámara (Preset)
■ Cualquier información de preajuste existente será sobreescrita. Para restablecer una posición de preajuste Oprima un botón del 1 al 9. ■ La VC-C50i/VC-C50iR restablece los ajustes de ángulo del cabezal de la cámara, posición del zoom y nivel de luminosidad. (PRESET) -
Page 147: Encendido Y Apagado De La Cámara
Encendido y apagado de la cámara La cámara se enciende y apaga con el botón p (cámara encendida/apagada) del controlador sin hilos. Aunque apague la cámara, las posiciones de preajuste almacenadas, la fecha, la hora y el número de identificación no se borrarán. Para apagar la cámara Con la cámara encendida, oprima el botón p. -
Page 148: Ajustes De La Cámara
Ajustes de la cámara Permiten configurar y visualizar el reloj y el texto, y especificar los ajustes de funcionamiento de la cámara. Botones utilizados para especificar los ajustes Los botones del controlador sin hilos mostrados abajo se utilizan para los ajustes. BRIGHT ZOOM HOME... -
Page 149: Ajuste Del Reloj
Ajuste del reloj Utilice el procedimiento de abajo para ajustar la fecha y la hora. También podrá definir sus ajustes preferidos de TIME STYLE y DATE STYLE. MA I N MENU SET MENU D I SP MENU CA E MENU NEXT SET BACK CANCEL D TE&... -
Page 150: Introducción De Caracteres
Ajustes de la cámara Introducción de caracteres Los caracteres que se pueden especificar son letras mayúsculas (A a Z), números (0 a 9) y algunos símbolos (<, >, -, /,., : y espacios). El texto puede insertarse en cualquier lugar de la pantalla fuera del área de caracteres. -
Page 151: Ajuste De La Velocidad Del Movimiento Del Cabezal De La Cámara Y De La Operación De Giro
Ajuste de la velocidad del movimiento del cabezal de la cámara y de la operación de giro Utilice el procedimiento de abajo para ajustar la velocidad en que la cámara efectúa los movimientos de giro e inclinación y para seleccionar el ajuste DIRECTION MIRROR (dirección del giro del cabezal de la cámara). -
Page 152: Ajuste Del Rango De Movimiento Del Cabezal De La Cámara
SAVE Los límites para el rango de movimiento del cabezal de la cámara son como se indica abajo: VC-C50i: MEMO VC-C50iR: ±170° a izquierda y derecha, 10° hacia arriba y 90° hacia abajo RA MENU SPEED AUTO SPEE... -
Page 153: Ajuste De La Exposición Automática Ae
Ajuste de la exposición automática AE Utilice el siguiente procedimiento para especificar el ajuste de AE (ajuste de luminosidad). No es necesario ajustar FLICKERLESS AE. MA I N MENU SET MENU SPEED SPEE D I SP MENU MO A CA E MENU SETT I N D I RECT I O... -
Page 154: Ajustes Del Modo Nocturno
Ajustes de la cámara Ajustes del modo nocturno La selección del modo nocturno le permite comprobar el sujeto en la oscuridad, utilizando imágenes en blanco y negro proporcionadas por la fotografía infrarroja. Al cambiar al modo nocturno, se activa automáticamente la luz infrarroja incorporada (LED infrarrojo) para el modo nocturno. -
Page 155: Ajustes Rs-232C
Ajustes RS-232C Estos ajustes se utilizan para controlar la VC-C50i/VC-C50iR desde un PC u otro dispositivo. Los ajustes DATA 8 BIT y NON PARITY se encuentran fijos, y el menú se utiliza sólo para su verificación. DATA 8 BIT y NON PARITY son sólo para lectura. -
Page 156: Modo Id
ID. Ajuste del número ID Utilice el siguiente procedimiento para asignar un número ID (1 a 9) a cada cámara (VC-C50i/VC-C50iR). Si no desea asignar un número ID a la cámara, seleccione [0] para esa cámara. La asignación del mismo número ID a múltiples cámaras le permitirá... -
Page 157: Selección De La Cámara A Controlar
Selección de la cámara a controlar <Ejemplo> Tal como se observa en la figura de abajo, de las 4 cámaras (ID1 a ID3), sólo están seleccionadas las cámaras con el número ID 2 (2 cámaras). En operación normal, los LEDs de las cámaras se ilumina en verde. ●... -
Page 158: Cancelación Del Modo Id
Modo ID Cancelación del modo ID <Ejemplo> En este ejemplo, la selección realizada en la sección precedente de las cámaras con el número ID 2 se cancela. Los LEDs de las cámaras son como se indica abajo. Compruebe los LEDs de todas las cámaras conectadas adyacentes para asegurarse de que todas las cámaras están recibiendo las señales del NOTA controlador sin hilos. -
Page 159: Problemas Y Solución De Problemas
Problemas y solución de problemas Compruebe lo siguiente antes de ponerse en contacto con su concesionario Canon. El controlador sin hilos no funciona. Comprobación 1: El LED no está iluminado. Solución: Compruebe que la clavija esté insertada en el tomacorriente, correctamente y hasta el fondo. - Page 160 Problemas y solución de problemas La cámara no se mueve a una posición de preajuste. Comprobación 1: El cabezal de la cámara no se mueve hasta el límite de su Solución: Comprobación 2: El rango del movimiento de giro/inclinación ha sido Solución: La cámara no enfoca.
-
Page 161: Ajustes Predeterminados De Fábrica
Ajustes predeterminados de fábrica Cuando el producto se expide de fábrica o cuando se ajusta RESTORE DEFAULT a [YES] (→ p.33), los ajustes se encuentran en los valores predeterminados indicados abajo. (Ajustes predeterminados de la cámara) Elemento Enfoque Luminosidad (Configuración de los ajustes predeterminados en la pantalla) Elemento BAUD RATE STOP BIT... -
Page 162: Especificaciones
±20° de la horizontal (±15° con el convertidor gran angular opcional instalado) VC-C50i: 100 × 117 × 96 mm (An × Pr × Al) (sin accesorios) VC-C50iR: 100 × 117 × 97,6 mm (An × Pr × Al) (sin accesorios) VC-C50i: Aprox. 420 g VC-C50iR: Aprox. 490 g Ángulo de rotación/Izquierda 100°, Derecha... - Page 163 Elemento Controlador Modelo WL-V5 sin hilos Sistema Sistema de pulso infrarrojo Fuente de 3 V CC (2 pilas tipo AA) alimentación 50 × 175 × 24,5 mm (1,97 × 6,89 × 0,96 pulg.) (An × Pr × Al) (sin Dimensiones accesorios) Peso Aprox.
- Page 165 GEBRAUCHSANLEITUNG...
- Page 166 Einführung Wir danken Ihnen für Ihr Vertrauen in die Canon Überwachungskamera VC-C50i/ VC-C50iR. Bitte lesen Sie die Gebrauchsanleitung gut durch, um einen korrekten, sicheren Betrieb des Geräts zu gewährleisten. Lesen Sie vor dem ersten Einsatz vor allem die Hinweise unter “a Wichtige Sicherheitshinweise”, und befolgen Sie alle Anweisungen.
- Page 167 Batterien der betreffenden Art verkauft werden. Die Batterien werden unentgeltlich für den Verbraucher zurückgenommen. Informationen zum Urheberrecht Lauf- und Standbilder, die mit der VC-C50i/VC-C50iR aufgezeichnet wurden, dürfen nicht in einer das Urheberrecht verletzenden Weise verwendet werden bzw. nicht ohne die Genehmigung des Urheberrechtsinhabers, ausgenommen für rein persönliche Zwecke.
- Page 168 NOTE MEMO a Wichtige Warnhinweise Das Netzteil des VC-C50i/VC-C50iR kann an eine gewöhnliche Netzsteckdose angeschlossen werden. Schlagen Sie in der Bedienungsanleitung nach, um sicherzustellen, daß lhr VC-C50i/VC-C50iR für diesen Adapter geeignet ist. – Die Steckdose sollte sich in der Nähe des Geräts befinden und leicht zugänglich sein.
-
Page 169: A Wichtige Hinweise Zur Sicherheit
WICHTIGE HINWEISE ZUR SICHERHEIT Bei den folgenden Sicherheitshinweisen bezeichnet der Ausdruck “Gerät” die Canon Überwachungskamera VC-C50i/VC-C50iR und deren Zubehör. 1. Anweisungen durchlesen - Lesen Sie die Anweisungen zu Sicherheit und Betrieb durch, bevor Sie das Gerät in Betrieb nehmen. - Page 170 a Wichtige Sicherheitshinweise Stoßspannungen und statische Aufladung zu schützen. Abschnitt 810 der Nationalen Vorschriften über elektrische Ausrüstungen (National Electric Code) weist Informationen über die ordnungsgemäße Erdung von Antennenmasten und tragenden Strukturen auf, sowie über die Erdung der Zuleitung zu einer Antennenableiteinheit, die Größe der Erdleiter, die Position der Antennenableiteinheit, den Anschluß...
- Page 171 19. Ersatzteile - Wenn Ersatzteile notwendig sind, sollten Sie sich vergewissern, daß das Kundendienstpersonal nur solche Ersatzteile verwendet hat, die von Canon vorgegeben sind, oder die gleiche Eigenschaften wie die Originalteile aufweisen. Bei nichtzulässigem Ersatz besteht die Gefahr von Brand, Elektroschock und weiteren Schäden.
-
Page 172: Wartung
a Wichtige Sicherheitshinweise Wartung Reinigung des Geräts 1. Ziehen Sie das Netzadapterkabel von der Wandsteckdose ab. 2. Wischen Sie das Gerät sorgfältig mit einem trockenen, weichen Tuch ab, das mit etwas Wasser oder mildem Reinigungsmittel befeuchtet ist. WARNUNG Verwenden Sie keine brennbaren Lösungsmittel, wie z.B. Alkohol, Benzin oder Farbverdünner. - Page 173 INHALT a Wichtige Sicherheitshinweise ... 4 In dieser Anleitung verwendete Symbole ... 4 a Wichtige Warnhinweise ... 4 a WICHTIGE HINWEISE ZUR SICHERHEIT ... 5 Wartung ... 8 Vor der Inbetriebnahme des Geräts ... 10 Überprüfen der Kamera und ihres Zubehörs ... 10 Bezeichnungen ...
-
Page 174: Vor Der Inbetriebnahme Des Geräts
Vor der Inbetriebnahme des Geräts Überprüfen der Kamera und ihres Zubehörs Vergewissern Sie sich vor dem Installieren, daß in der Verpackung alle folgende Gegenstände enthalten sind. Falls etwas fehlen sollte, wenden Sie sich bitte an Ihren Canon- Händler. VC-C50i Kamera... -
Page 175: Installieren Des Geräts
● Überprüfen Sie die Kamerahalterung mindestens einmal jährlich. (Falls Sie den optionalen Weitwinkelkonverter verwenden, ist auch die Konverterhalterung zu überprüfen.) * Der Weitwinkelkonverter WL-37 kann nicht zusammen mit der VC-C50iR verwendet werden. Der zulässige Kameramontagewinkel beträgt ±20° aus der Horizontalen (±15°, wenn der optionale Weitwinkelkonverter verwendet wird). -
Page 176: Anschließen Der Komponenten
WARNUNG Der Weitwinkelkonverter WL-37 kann nicht zusammen mit der VC-C50iR verwendet werden. Falls er mit der VC-C50iR verwendet wird, lockert sich die Halterung im Laufe der Zeit, und der Konverter fällt von der Kamera ab. ● Die Kamera funktioniert eventuell nicht korrekt, wenn statt des WL-37 ein anderer Konverter eingesetzt wird. - Page 177 Verdrahten des Mehrfachsteckverbinder-Steckers Verdrahten Sie Kabeladern (AWG Nr. 28-18) folgendermaßen am Mehrfachsteckverbinder-Stecker. 1. Führen Sie einen Minusschraubendreher bis zum Anschlag in den Schlitz neben dem Klemmenloch ein. ■ Die Klemme im Loch öffnet sich dabei. 2. Belassen Sie den Schraubendreher im Schlitz, und drücken Sie die Drahtader in das Klemmenloch.
- Page 178 Vor der Inbetriebnahme des Geräts Mehrfachsteckverbinder Pinbelegung Gegenstand Pin-Nr. S-Video-Ausgang RS-232C (an Kaskadenanschluss- Kamera) RS-232C (an Kaskadenanschluss- PCs) Y GND C GND RTS OUT TX OUT RTS IN TX IN Light_ON/OFF- Alarm_- Sensor_- Eingang/ Pin-Name Signalrichtung Ausgang ⇒ MONITOR Ausgang Y GND ⇒...
- Page 179 Gegenstand Pin-Nr. Steuersignal für Light_ON/OFF- externe Beleuchtung Light_ON/OFF+ Alarm- Steuersignal Eingang für externen Sensor Ein-/Ausgänge für externe Geräte Eingänge für externe Geräte Dies sind 2 Sensorklemmen (positiv (+) und negativ (–)). Die negative Klemme wird mit der kameraeigenen Masse beschaltet und die positive Klemme wird bei 10 kohm über eine Schutzdiode auf 5 Volt hochgezogen.
-
Page 180: Ein- Und Ausschalten Des Geräts
Vor der Inbetriebnahme des Geräts Ein- und Ausschalten des Geräts Die VC-C50i/VC-C50iR Kamera weist keinen Hauptschalter auf. Schalten Sie die Kamera ein, indem Sie sie über den Netzadapter an der Wandsteckdose anschließen. Wenn die Stromversorgung zur Kamera eingeschaltet wird, leuchtet die LED-Lampe der Kamera grün auf. -
Page 181: Ansteuern Der Kamera Mit Der Fernbedienung
Ansteuern der Kamera mit der Fernbedienung Während Verwendung der Fernbedienungstasten blinkt die LED-Lampe der Kamera grün (in 0,1 s Intervallen). Bezeichnungen BRIGHT-Taste (→ S.22) Zum Einstellen der Helligkeit des Monitorbilds. • + : Macht das Bild dunkler. • – : Macht das Bild heller. SET/OK-Taste (→... -
Page 182: Einlegen Der Batterien In Die Fernbedienung
● Batterien dürfen nicht wiederaufgeladen werden. Steuerbereich der Fernbedienung Richten Sie die Fernbedienung im folgenden Bereich auf den Fernbedienungssensor. Der Steuerbereich der Fernbedienung hängt vom Ladezustand der Batterien und von Interferenzen anderer Objekte ab. (Gleiches gilt für die VC-C50iR.) 30° 90° 30°... -
Page 183: Bewegen Der Kamera (Schwenken/Neigen/Ausgangsposition)
Wenn der Menüpunkt DIRECTION MIRROR (→ S.28) auf ON gestellt ist, bewegt sich der Kamerakopf gemäß der gedrückten Richtungstaste. Kamerakopfbewegung wie folgend. Langsam → Mäßig schnell → Schnell Kamerakopfbewegung wie folgend. Langsam → Mäßig schnell → Schnell 10° 170° VC-C50i 90° 170° VC-C50iR... -
Page 184: Heranzoomen/Wegzoomen (Tele/Weit)
Ansteuern der Kamera mit der Fernbedienung Heranzoomen/Wegzoomen Die Zoomfunktion vergrößert (Heranzoomen) und verkleinert (Wegzoomen) das Objekt des Bildschirms. BRIGHT ZOOM HOME SET/OK CANCEL ∞ ON SCREEN MENU Scharfeinstellbereich Bei manchen Zoomeinstellungen kann die Kamera nicht auf das Objekt MEMO fokussieren. Änderungen der Distanz zwischen Kamera und Objekt Weitwinkel-Ende des Zooms Bis etwa 1 cm... -
Page 185: Scharfeinstellung (Fokus)
Scharfeinstellung Dieser Abschnitt erläutert das Fokussieren. Die VC-C50i/VC-C50iR hat einen Autofokusmodus, womit die Kamera automatisch auf ein Objekt fokussiert, und einen manuellen Fokusmodus, wo die Bedienungsperson manuell scharf einstellt. (Die Standardeinstellung ist Autofokus.) Zum Aktivieren des Autofokusmodus Betätigen Sie die a Taste. -
Page 186: Einstellen Der Helligkeit (Bright)
Ansteuern der Kamera mit der Fernbedienung BRIGHT ZOOM HOME SET/OK CANCEL ∞ ON SCREEN MENU Einstellen der Helligkeit Diese Funktion macht das Bild heller bzw. dunkler. Beim Einschalten der Kamera wird die Helligkeit auf Normal gestellt. BRIGHT ZOOM HOME SET/OK CANCEL ∞... -
Page 187: Speichern Einer Voreingestellten Kameraposition (Preset)
■ Jegliche früheren Voreinstellungen werden überschrieben. Aufrufen einer Voreinstellposition Drücken Sie auf eine Taste 1 bis 9. ■ Die VC-C50i/VC-C50iR stellt sich gemäß der Speicherwerte ● Während des Betriebs entsprechend der Voreinstellungen wird die Kamera gemäß den Geschwindigkeiten geschwenkt und geneigt, die im MEMO Einstellungsmenü... -
Page 188: Ein- Und Ausschalten Der Kamera
Ansteuern der Kamera mit der Fernbedienung Ein- und Ausschalten der Kamera Die Kamera wird mit der p Taste (Kamera EIN/AUS) der Fernbedienung ein- und ausgeschaltet. Auch nach Ausschalten der Kamera bleiben die gespeicherten Voreinstellpositionen, Datum, Uhrzeit und Kennummer erhalten. BRIGHT ZOOM HOME SET/OK... -
Page 189: Kameraeinstellungen
Kameraeinstellungen Zur Einstellung und Anzeige von Zeit und Text sowie zur Voreinstellung der Kamera. Tasten für Vorgabe der Einstellungen Die folgenden Fernbedienungstasten dienen der Einstellung. 58 Tasten 6 Taste BRIGHT ZOOM 4 Taste HOME c Taste SET/OK CANCEL s Taste ∞... -
Page 190: Einstellen Der Zeit
Kameraeinstellungen Einstellen der Zeit Gehen Sie zum Einstellen von Datum und Uhrzeit wie folgend vor. Auch Einstellungen für TIME STYLE und DATE STYLE sind verfügbar. MA I N SET MENU D I SP MENU CA E MENU NEXT SET D TE& I ME TT I NGS SET DATE . -
Page 191: Eingabe Von Zeichen
Eingabe von Zeichen Eingebbar sind Großbuchstaben (A bis Z), Ziffern (0 bis 9) und einige Symbole (<, >, -, /,., : und Leerstelle). Text kann außerhalb des Zeichenbereichs überall auf den Bildschirm gesetzt werden. Wiederholen Sie Schritte w und e der folgenden Prozedur für jedes eingegebene Zeichen. -
Page 192: Einstellen Der Geschwindigkeit Und Schwenkbewegung Des Kamerakopfs
Kameraeinstellungen Einstellen der Geschwindigkeit und Schwenkbewegung des Kamerakopfs Gehen Sie zum Einstellen der Geschwindigkeit der Schwenk- und Neigebewegung des Kamerakopfs sowie zur Wahl der Einstellung DIRECTION MIRROR (Richtung des Kamerakopfschwenks) wie folgend vor. MA I N MENU SET MENU D I SP MENU CA E MENU... -
Page 193: Einstellen Des Bewegungsbereichs Des Kamerakopfs
SETT I NGS? Die Grenzwerte für den Bewegungsbereich des Kamerakopfs sind wie folgend: ±100° links und rechts, 90° nach oben, 30° nach unten VC-C50i: MEMO VC-C50iR: ±170° links und rechts, 10° nach oben, 90° nach unten RA MENU RA MENU AUTO AUTO... -
Page 194: Einstellen Der Helligkeit (Ae)
Kameraeinstellungen Einstellen der Helligkeit (AE) Legen Sie die AE (Helligkeit) wie folgend fest. Bei FLICKERLESS AE brauchen Sie keine Einstellung vorzunehmen. MA I N MENU SET MENU D I SP MENU CA E MENU NEXT SET BACK CANCEL TT NG E REFERENCE FL I CKERLESS AE NEXT SET... -
Page 195: Nachtmodus-Einstellungen
Nachtmodus-Einstellungen Im Nachtmodus können Sie Motive in dunkler Umgebung anhand von Schwarzweißbildern erfassen, die durch Infrarotfotografie abgebildet werden. Beim Aktivieren des Nachtmodus wird das eingebaute Infrarotlicht (Infrarot-LED) automatisch eingeschaltet. Das Licht wird 30 Minuten später automatisch wieder ausgeschaltet. MENU NEXT SET BACK CANCEL ●... -
Page 196: Einstellungen Der Rs-232C-Schnittstelle
Kameraeinstellungen Einstellungen der RS-232C-Schnittstelle Hiermit läßt sich die VC-C50i/VC-C50iR von einem PC oder anderen Gerät her ansteuern. Die Einstellungen DATA 8 BIT und NON PARITY liegen fest, das Menü dient also nur zur Kontrolle. DATA 8 BIT und NON PARITY sind Read-Only. -
Page 197: Id-Modus
Fernbedienung aktiviert. Hiermit erzielen Sie den sogenannten ID-Modus-Betrieb. Vorgabe der Kennummer Weisen Sie wie folgend jeder Kamera (VC-C50i/VC-C50iR) eine Kennummer (1 bis 9) zu. Falls Sie einer Kamera keine Kennummer zuweisen wollen, wählen Sie für die betreffende Kamera [0]. Durch Zuweisen einer einzigen Kennummer für mehrere Kameras können Sie diese Kamera gleichzeitig ansteuern. -
Page 198: Wahl Der Anzusteuernden Kamera
ID-Modus Wahl der anzusteuernden Kamera <Beispiel> Wie folgend gezeigt, werden von den 4 Kameras (ID1 bis ID3) nur die Kameras mit der Kennummer 2 (2 Kameras) für ID-Modus-Betrieb gewählt. Bei normalem Betrieb leuchten die Kamera-LED-Lampen grün. ● Überprüfen Sie die LED-Lampen aller daneben angeschlossenen Kameras, um sicherzustellen, daß... -
Page 199: Aufheben Des Id-Modus
Aufheben des ID-Modus <Beispiel> In diesem Beispiel heben wir die Wahl der Kameras mit Kennummer 2, die im vorigen Abschnitt beschrieben wurde, wieder auf. Die Kamera-LED-Lampen sind zuerst wie folgend. Überprüfen Sie die LED-Lampen aller daneben angeschlossenen Kameras, um sicherzustellen, daß alle Kameras die Signale der Fernbedienung empfangen. NOTE 1. -
Page 200: Fehlersuche
Fehlersuche Kontrollieren Sie folgendes, bevor Sie sich an Ihren Canon-Händler wenden. Die Fernbedienung funktioniert nicht. Prüfung 1: Die LED-Lampe leuchtet nicht. Abhilfe: Vergewissern Sie sich, daß der Stecker an die Wandsteckdose angeschlossen und ganz eingesteckt ist. → S.16 Prüfung 2: Die LED-Lampe ist rot. - Page 201 Die Kamera geht nicht in die Voreinstellposition. Prüfung 1: Der Kamerakopf bewegt sich nicht bis zur eingestellten Grenzposition. Der Kamerakopf wurde etwas verdreht. Drücken Sie die h Taste der Abhilfe: Fernbedienung. → S.19 Prüfung 2: Der Bewegungsbereich für Schwenken/Neigen wurde nach dem Abspeichern der Voreinstellposition verändert.
-
Page 202: Werksvoreinstellungen
Werksvoreinstellungen Wenn das Gerät vom Werk versandt wird, oder wenn RESTORE DEFAULT auf [YES] (→ S.32) gesetzt wurde, sind die folgenden Werksvoreinstellungen aktiv. (Kameragrundeinstellungen) Gegenstand Fokus Helligkeit (Grundwerte des Einstellbildschirms) SET MENU DISPLAY MENU CAMERA MENU 1) Mit Sternchen markierte Einstellungen schalten auf die Werksvoreinstellung zurück, wenn man die Stromversorgung aus- und wieder einschaltet (→... -
Page 203: Technische Daten
Montagewinkel Weitwinkelkonverters) VC-C50i: 100 × 117 × 96 mm (B × T × H) (ausgen. Zusätze) Abmessungen VC-C50iR: 100 × 117 × 97,6 mm (B × T × H) (ausgen. Zusätze) Gewicht VC-C50i: ca. 420 g VC-C50iR: ca. 490 g Falls die Kamera mit einem Computer gesteuert wird, erscheint das Bild eventuell verwackelt, wenn der Kamerakopf langsam bewegt wird. - Page 204 Technische Daten Gegenstand Fernbedienung Modell System Stromversorgung DC 3 V (2 Mignonzellen) Abmessungen 50 × 175 × 24,5 mm (B × T × H) (ausgen. Zusätze) Gewicht Modell Netzadapter (Option) Eingang Ausgang Polarität Abmessungen 58 × 118 × 25 mm (B × T × H) (ausgen. Zusätze) Gewicht ●...
-
Page 205: Manuale Di Istruzioni
MANUALE DI ISTRUZIONI... - Page 206 Caratteristiche della telecamera per comunicazioni VC-C50i/VC-C50iR ■ Zoom ottico 26× e zoom digitale 12× autentici Canon per la ripresa a grande ingrandimento ■ Possibilità di scatto anche a livelli di solo 1 lux ■...
-
Page 207: Esclusione Di Responsabilità
Il contenuto di questo manuale può essere soggetto a modifiche senza preavviso. CANON e il marchio CANON sono marchi registrati di Canon Inc. Altri nomi di prodotti e aziende citati in questo manuale sono marchi o marchi registrati delle rispettive aziende. - Page 208 NOTA MEMO a Avvertimenti importanti L’adattatore a corrente alternata può venire collegato alla VC-C50i/VC-C50iR e ad una presa di corrente alternata di rete. Controllare sul manuale di istruzioni che la VC-C50i/ VC-C50iR utilizzata sia compatibile con questo adattatore. – La presa di corrente deve trovarsi nelle vicinanze dell’apparecchio e deve essere facilmente accessibile.
-
Page 209: A Istruzioni Di Sicurezza Importanti
ISTRUZIONI DI SICUREZZA IMPORTANTI In queste istruzioni di sicurezza, la parola “apparecchio” si riferisce alla telecamera per comunicazioni VC-C50i/VC-C50iR Canon e a tutti i suoi accessori. 1. Leggere le istruzioni - Tutte le istruzioni di sicurezza e di impiego devono essere lette prima di usare l’apparecchio. - Page 210 18. Pezzi di ricambio - Quando sono necessari pezzi di ricambio, assicurarsi che il tecnico riparatore impieghi pezzi di ricambio specificati da Canon o con le stesse caratteristiche del pezzo originale. Sostituzioni non autorizzate possono causare incendi, scosse elettriche o altri rischi.
- Page 211 21. Quando si verifica una delle seguenti condizioni, spegnere immediatamente l’apparecchio, scollegarlo dalla fonte di alimentazione principale e contattare il più vicino rivenditore Canon. Non continuare ad usare l’apparecchio perché questo può causare incendi o scosse elettriche. - L’apparecchio emette fumo, calore, suoni anomali o odori strani.
-
Page 212: Manutenzione
a Uso sicuro dell’apparecchio Manutenzione Pulizia dell’apparecchio 1. Scollegare l’adattatore CA dalla presa di corrente. 2. Pulire bene l’apparecchio con un panno morbido inumidito con acqua o detergente leggero. AVVERTIMENTO Non usare solventi infiammabili come alcool, benzina o diluenti. L’uso di tali sostanze può causare incendi o scosse elettriche. 3. - Page 213 INDICE a Uso sicuro dell’apparecchio ... 4 Icon usate in questo manuale di istruzioni ... 4 a Avvertimenti importanti ... 4 a ISTRUZIONI DI SICUREZZA IMPORTANTI ... 5 Manutenzion ... 8 Prima di usare il prodotto ... 10 Controllo della telecamera e dei suoi accessori ... 10 Nomenclatura ...
-
Page 214: Prima Di Usare Il Prodotto
* L’attacco a vite per un treppiede si trova al centro del fondo della telecamera. Telecamera VC-C50iR Connettore BNC-RCA ■ Prodotto opzionale ● Convertitore grandangolare WL-37 (→ p.12) Non può essere usato sulla VC-C50iR. VC-C50i VC-C50iR (Davanti) (Retro) Telecomando WL-V5... -
Page 215: Installazione Del Prodotto
AVVERTIMENTO Installare saldamente la telecamera. ● Quando si installa la telecamera a soffitto, contattare il proprio rivenditore Canon. ● Quando si installa la videocamera a soffitto, controllare che il soffitto sia abbastanza robusto da reggere il peso della telecamera inclusa la staffa di installazione. L’installazione in luoghi deboli può... -
Page 216: Collegamento Dei Componenti
3 volte prima di bloccarsi. Convertitore grandangolare AVVERTIMENTO Il convertitore grandangolare WL-37 non può essere usato per la VC-C50iR. Se il convertitore viene usato sulla VC-C50iR, l’attacco si allenta gradualmente e il convertitore finisce col cadere dalla telecamera. - Page 217 Collegamento via connettore multiplo Per collegare cavi (AWG N° 28-18) al connettore multiplo, usare la procedura seguente. 1. Inserire un cacciavite a fondo nella fessura accanto al foro di fissaggio del cavo. ■ L’interno del foro di fissaggio del cavo di apre. 2.
- Page 218 Prima di usare il prodotto Disposizione piedini del connettore multiplo N° Voce piedino Uscita S-Video Connettore RS-232C (da collegarsi a telecamere con collegamento a cascata) Connettore RS-232C (da collegarsi a computer con collegamento a cascata) Y GND C GND RTS OUT TX OUT RTS IN TX IN...
- Page 219 N° Voce Nome piedino piedino Segnale di Light_ON/OFF- controllo illuminazione esterna Light_ON/OFF+ Segnale di controllo allarme Ingresso sensore esterno Terminali di ingresso/uscita per dispositivi esterni Terminali di ingresso per dispositivi esterni Questi terminali comprendono due terminali per sensori (positivo (+) e negativo (–)). Il terminale negativo è...
-
Page 220: Accensione E Spegnimento
Prima di usare il prodotto Accensione e spegnimento La telecamera VC-C50i/VC-C50iR non dispone di un interruttore di alimentazione. Si può accendere la telecamera collegando l’adattatore CA ad una presa di corrente. Quando la telecamera è accesa, il LED della telecamera si illumina in verde. Se il monitor è acceso, un’immagine appare sullo schermo. -
Page 221: Controllo Della Telecamera Con Il Telecomando
Controllo della telecamera con il telecomando Mentre si usano i tasti del telecomando, il LED della telecamera lampeggia in verde (a intervalli di 0,1 secondi). Nomenclatura Tasto BRIGHT (→ p.22) Regola la luminosità dell’immagine sul monitor. • + : Schiarisce l’immagine. •... -
Page 222: Inserimento Delle Pile Nel Telecomando
Usare il telecomando all’interno del raggio descritto sotto, puntandolo verso il sensore per telecomando. Il raggio operativo del telecomando varia a seconda della carica rimanente delle pile e delle interferenze da altri oggetti. (Questo vale anche per la VC-C50iR.) 30°... -
Page 223: Cambiamento Dell'angolazione Della Testata Telecamera (Movimento Orizzontale/Movimento Verticale/Posizione Base)
Bassa velocità → Media velocità → Alta velocità testata telecamera aumenta, come spiegato sotto. Bassa velocità → Media velocità → Alta velocità velocità. 10° 170° VC-C50i 90° 170° VC-C50iR... -
Page 224: Zoomata In Avvicinamento/Allontanamento (Tele/Wide)
Controllo della telecamera con il telecomando Zoomata in avvicinamento/allontanamento La funzione zoom aumenta (zoomata in avvicinamento) o diminuisce (zoomata in allontanamento) le dimensioni del soggetto sullo schermo del monitor. BRIGHT ZOOM HOME SET/OK CANCEL ∞ ON SCREEN MENU Gamma di messa a fuoco In alcune posizioni zoom, la telecamera può... -
Page 225: Messa A Fuoco (Focus)
Messa a fuoco (FOCUS) Questa sezione descrive come mettere a fuoco il soggetto. La VC-C50i/VC-C50iR dispone di un modo di messa a fuoco automatica, in cui la telecamera mette a fuoco automaticamente il soggetto e di un modo di messa a fuoco manuale, in cui l’operatore può regolare manualmente la messa a fuoco. -
Page 226: Regolazione Della Luminosità (Bright)
Controllo della telecamera con il telecomando BRIGHT ZOOM HOME SET/OK CANCEL ∞ ON SCREEN MENU Regolazione della luminosità Questa funzione schiarisce o scurisce l’immagine. Quando la telecamera viene accesa, la luminosità viene impostata sul livello normale. BRIGHT ZOOM HOME SET/OK CANCEL ∞... -
Page 227: Memorizzazione Di Una Posizione Telecamera Preselezionata (Preset)
■ Eventuali informazioni di preselezione precedenti sono Per richiamare una posizione preselezionata Premere un tasto da 1 a 9. ■ La VC-C50i/VC-C50iR ritorna alla angolazione testata ● Durante le operazioni preselezionate, la telecamera si muove orizzontalmente e verticalmente alle velocità impostate per le operazioni di MEMO movimento orizzontale/verticale nel menu di impostazione. -
Page 228: Accensione E Spegnimento Della Telecamera
Controllo della telecamera con il telecomando Accensione e spegnimento della telecamera La telecamera viene accesa e spenta con il tasto p (ON/OFF telecamera) del telecomando. Anche se si spegne la telecamera, le posizioni preselezionate memorizzate, la data, l’ora e il numero ID non sono azzerati. -
Page 229: Impostazioni Telecamera
Impostazioni telecamera Impostare e visualizzare orologio e testo e specificare le impostazioni di funzionamento della telecamera. Tasti usati per specificare le impostazioni I tasti del telecomando sotto indicati sono usati per l’impostazione. Tasti 58 Tasto 6 BRIGHT ZOOM Tasto 4 HOME Tasto c SET/OK... -
Page 230: Impostazione Dell'orologio
Impostazioni telecamera Impostazione dell’orologio Usare il seguente procedimento per impostare la data e l’ora. Si possono anche selezionare le impostazioni preferite per TIME STYLE e DATE STYLE. MA I N SET MENU D I SP MENU CA E MENU NEXT SET D TE&... -
Page 231: Inserimento Di Caratteri
Inserimento di caratteri I caratteri che possono essere specificati sono lettere maiuscole (da A a Z), numeri (da 0 a 9) e alcuni simboli (<, >, -, /,., : e spazi). Il testo può essere inserito in qualsiasi punto dello schermo al di fuori dell’area caratteri. -
Page 232: Impostazione Della Velocità Di Movimento Della Testata Telecamera E Del Movimento Orizzontale
Impostazioni telecamera Impostazione della velocità di movimento della testata telecamera e del movimento orizzontale Usare il seguente procedimento per impostare la velocità di movimento orizzontale e verticale della testata telecamera e per selezionare la direzione dell’impostazione DIRECTION MIRROR (direzione di movimento orizzontale della testata telecamera). MA I N MENU SET MENU... -
Page 233: Impostazione Del Raggio Di Movimento Della Testata Telecamera
I limiti per il raggio di movimento della testata telecamera sono come segue: ±100° a sinistra e destra, 90° in alto e 30° in basso VC-C50i: MEMO ±170° a sinistra e destra, 10° in alto e 90° in basso VC-C50iR: RA MENU RA MENU SPEED AUTO... -
Page 234: Impostazione Dell'ae
Impostazioni telecamera Impostazione dell’AE Usare il seguente procedimento per specificare l’impostazione AE (regolazione luminosità). Non è necessario impostare FLICKERLESS AE. MA I N MENU SET MENU D I SP MENU CA E MENU NEXT SET BACK CANCEL TT NG E REFERENCE FL I CKERLESS AE NEXT SET BACK CANCEL... -
Page 235: Impostazioni Della Modalità Notte
Impostazioni della modalità notte L’attivazione della modalità notte permette di controllare un soggetto al buio usando le immagini in bianco e nero permesse dalla fotografia ad infrarossi. Quando si attiva la modalità notte, l’illuminazione ad infrarossi incorporata (LED ad infrarossi) per la modalità notte si accende automaticamente. -
Page 236: Impostazioni Rs-232C
Impostazioni telecamera Impostazioni RS-232C Queste impostazioni sono usate per controllare la VC-C50i/VC-C50iR da un computer o altro dispositivo. Le impostazioni DATA 8 BIT e NON PARITY sono fisse e il menu è usato solo per controllarle. DATA 8 BIT e NON PARITY sono solo per la lettura. -
Page 237: Modo Id
Modo ID Quando più VC-C50i/VC-C50iR sono collegate e installate, tutte le telecamere nel raggio operativo del telecomando eseguono simultaneamente le operazioni specificate. In questa situazione, le telecamere possono essere controllate individualmente assegnando numeri ID diversi a ciascuna telecamera e quindi specificando il numero ID desiderato con il telecomando. -
Page 238: Selezione Della Telecamera Da Controllare
Modo ID Selezione della telecamera da controllare <Esempio> Come mostrato nella figura sotto, di 4 telecamere (da ID1 a ID3) solo le telecamere con il numero ID 2 (2 telecamere) sono selezionate per il funzionamento nel modo ID. Nel funzionamento normale, i LED delle telecamere si illuminano in verde. -
Page 239: Disattivazione Del Modo Id
Disattivazione del modo ID <Esempio> In questo esempio, la selezione compiuta nella sezione precedente delle telecamere con il numero ID 2 viene annullata. I LED delle telecamere appaiono come mostrato sotto. Controllare i LED di tutte le telecamere collegate adiacenti per verificare che tutte le telecamere ricevano i segnali del telecomando. -
Page 240: Soluzione Di Problemi
Soluzione di problemi Controllare quanto segue prima di contattare il proprio rivenditore Canon. Il telecomando non funziona. Controllo 1: Il LED non è illuminato. Rimedio: Controllare che la spina sia inserita correttamente e a fondo nella presa di corrente. → p.16 Controllo 2: Il LED è... - Page 241 La telecamera non si sposta ad una posizione preselezionata. Controllo 1: La testata telecamera non si sposta fino al limite del suo raggio di movimento. Rimedio: Qualcosa ha spostato direttamente la testata telecamera. Premere il tasto h del telecomando. → p.19 Controllo 2: Il raggio di movimento orizzontale/verticale è...
-
Page 242: Impostazioni Default Di Fabbrica
Impostazioni default di fabbrica Quando il prodotto esce dalla fabbrica o quando RESTORE DEFAULT è stato impostato su [YES] (→ p.32), le impostazioni sono regolate sui valori di default sotto indicati. (Impostazioni default della telecamera) Voce Messa a fuoco Luminosità (Impostazioni default della schermata di impostazione) SET MENU DISPLAY MENU... -
Page 243: Dati Tecnici
Angolazione di installazione installato) VC-C50i: 100 × 117 × 96 mm (L × P × H) (esclusi attacchi) Dimensioni VC-C50iR: 100 × 117 × 97,6 mm (L × P × H) (esclusi attacchi) Peso VC-C50i: Circa 420 g VC-C50iR: Circa 490 g Se si usa un computer per controllare la telecamera, l’immagine sullo schermo può... - Page 244 Dati tecnici Voce Telecomando Modello Sistema Alimentazione 3 V CC (2 pile tipo AA) Dimensioni Peso Modello Adattatore Ingresso (Opzionale) Uscita Polarità Dimensioni Peso ● Questi dati tecnici sono soggetti a modifiche senza preavviso. ● Per l’adattatore CA, usare l’unità dedicata PA-V16. Inoltre non usare l’adattatore PA-V16 con qualsiasi altro prodotto.
- Page 246 8801 Trans Canada Hwy. ST. Laurent Québec H4S 1Z6 CANON CANADA INC. CALGARY OFFICE 2828, 16th Street, N.E. Calgary, Alberta T2E 7K7, Canada For all inquiries concerning this product, call toll free in Canada 1-800-OK-CANON EUROPE, AFRICA & MIDDLE EAST CANON EUROPA N.V.
Need help?
Do you have a question about the VC-C50iR and is the answer not in the manual?
Questions and answers