Advertisement
Quick Links
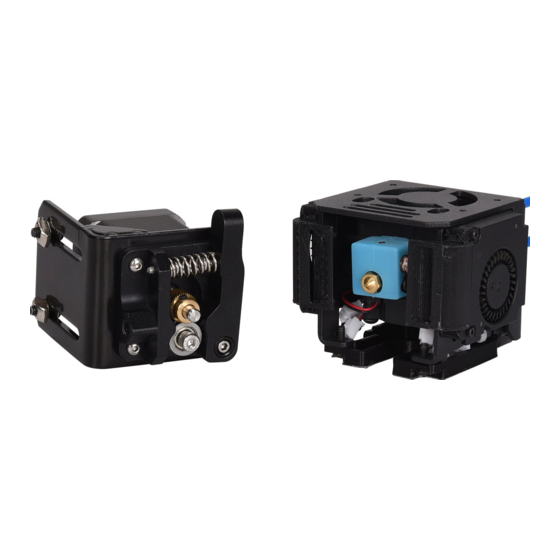
BIQU-B1-Two-in-one-out dual-color printing upgrade kit
Two-in and one-out
dual-color print head
Applicable mdoel
Printing Size
Molding Tech
Nozzle Quantity
Filament quantity
Layer Thickness
Nozzle Diameter
Printing Accuracy
Filament
Slicing Format
Connecting Method
Slicing Compatible
Max Temp of Nozzle
Dual color printing
Bowden extruder
specification
BIQU-B1
235 x 235 x 270mm
FDM
1PCS
2PCS
0.1mm - 0.3mm
Standard 0.4mm
±0.05mm
PLA
STL / OBJ/ AMF
Via data cable / TF card / USB
With Cura / Repetier-Host / Simplify 3D
260℃
support
Filaments bracket
Advertisement

Related Manuals for BIQU UUU001901


Summary of Contents for BIQU UUU001901
- Page 1 BIQU-B1-Two-in-one-out dual-color printing upgrade kit Two-in and one-out Bowden extruder Filaments bracket dual-color print head specification Applicable mdoel BIQU-B1 235 x 235 x 270mm Printing Size Molding Tech 1PCS Nozzle Quantity Filament quantity 2PCS 0.1mm - 0.3mm Layer Thickness Nozzle Diameter Standard 0.4mm...
-
Page 2: Product Specification
Product specification !"#$%&'()*+(,-".%/%.#$%*&0( l Head size 5*20mm l Power: 30w l Cable:70mm 1#&(,-".%/%.#$%*&0( 4010 Hydraulic 4010 Hydraulic 4010 Turbofan! Bearing Bearing "#$%! 6786789733! C78C789733! C78C789733! &'()%! 9:733! D733! 97733! *+),'-%! ;6*! ;6*! ;6*! ./0"! <777=97>! <777=97>! <777=97>! 1%23#4')!3+5%)! ?@/+4,!;A:6B!! ?@/+4,!;A:6B! ?@/+4,!;A:6B! Motor Specifications E,%3F! - Page 3 ②Two-in and one-out dual-color print head ③BIQU-B1-Fixed nozzle slider Align the holes on the two-in and one-out two-color print nozzle with the threaded holes of BIQU-B1-fixed nozzle slider, and fix them with M3x8 hexagon socket head screws. 2、Install remote extruder ①M4 boat nut ②M4x8 Hexagon socket head screw...
- Page 4 Note: The boat nut needs to be placed in the longitudinal direction, and the ship nut is placed horizontally in the gantry profile by rotating the screw to have an effective fixing effect.
- Page 5 3、Install filaments bracket ① filaments bracket sheet metal ② filaments bracket barrel ③ filaments bracket nut Fix the barrel on the sheet metal by the nut ①M4 boat nut ②filaments bracket ③M4x8 Hexagon socket head screw Put the boat nut into the gantry profile, and fix the filaments bracket on the gantry with M4x8 hexagon socket head screws Note: The ship nut needs to be placed in the longitudinal direction, and the ship nut is placed horizontally in the gantry profile by rotating the screw to have an effective fixing...
- Page 6 4、Connect the data cable and Teflon tube ①Teflon tube ②Fitting The nozzle is a two-in and one-out two-color printing nozzle, so two Teflon tubes and two remote extruders are required. Insert the Teflon tubes into the quick connectors of the extruders to ensure effective fixation.
- Page 7 Installation and connection complete...
- Page 8 二、Print preparation Refresh the firmware Download the firmware from the website to the TF card, then insert the TF card into the TF card slot of the machine, and click the reset button on the machine to refresh the firmware. https://github.com/bigtreetech/BIQU-B1...
- Page 10 三、Model slice 1、Installation of the slicing software plug-in: download the plug-in file from the website, replace the file to the specified location on the slicing software, and find the effective plug-in function on the slicing software. 2、Build new printer...
- Page 12 3、Set the basic parameters of the printer:...
- Page 13 Setting of the printer's start and end code: Download the corresponding start code and stop code of the B2 print head from the website, and replace the code on the slicing software。...
- Page 14 3、Import of printing parameters Download the BIQU-B2 configuration file from the website and import it into Cura.
- Page 15 After the import is successful, the model can be sliced. 4、Model slice Add the model to the Cura slicing software.
- Page 16 Color definition of two models Select the model separately, click 1 or 2 on the left to set two different colors.
- Page 17 After the setting is complete, click the model to be in the highlighted state, the color on the left side is the selected state, and the other model is in the dimmed state. After setting the corresponding color, you can set the printing parameters for the individual output color.
- Page 18 5、Combination model Layout the two models in the center respectively, select the model, click the right mouse button, and lay the model in the center.
- Page 19 Click the right mouse button, click to select all models After the merging is completed, click the right mouse button to merge the models.
- Page 20 6、Slice the model and export the print file Slicing completed...
Need help?
Do you have a question about the UUU001901 and is the answer not in the manual?
Questions and answers