DogWatch SmartFence Dealer Training Manual
Hide thumbs
Also See for SmartFence:
- Owner's manual (38 pages) ,
- Quick start manual (6 pages) ,
- Owner's manual (36 pages)
Advertisement
Quick Links
DOGWATCH DEALER SMARTFENCE
Thank you for purchasing the new DogWatch
not familiar with the SmartFence, please follow this Setup & Test Guide
step-by-step before you do your first SmartFence installation.
We recommend doing a practice installation of the SmartFence
in your own home so you can fully learn about and test the
SmartFence features and functions.
You can do your practice installation using the wire from an existing
system or using a zip clip or dummy wire.
The Test Guide portion of this document explains how you can trigger
alerts, change settings, and watch your pet's activity to be sure the
system is working properly.
Please contact Customer Service if you have any questions.
www.dogwatch.com
-
10 Michigan Drive
TRAINING GUIDE
™
SmartFence
®
Thank you,
The DogWatch Team
-
Natick, MA
-
01760
. If you are
™
-
508-650-0600
Advertisement

Related Manuals for DogWatch SmartFence


Summary of Contents for DogWatch SmartFence
- Page 1 . If you are ® ™ not familiar with the SmartFence, please follow this Setup & Test Guide step-by-step before you do your first SmartFence installation. We recommend doing a practice installation of the SmartFence in your own home so you can fully learn about and test the SmartFence features and functions.
-
Page 3: System Basics
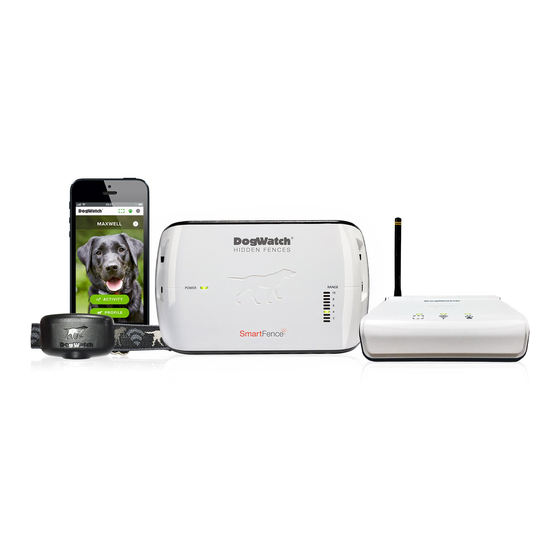
(SmartCollar ™) How the SmartFence Works - Overview The containment components of the SmartFence function independently of the communication components. The containment components continue to work even if the communication components SYSTEM BASICS are turned off. The communication components include:... - Page 4 Transmitter: Training Mode, Rate, Frequency, and Range. SmartFence Notification Options (Alerts) You can choose to receive text message and/or email notifications for the following: Battery Status An alert is sent when it’s time to replace the SmartCollar battery. A notification will appear on the WebApp and will disappear when the battery is replaced.
-
Page 5: Getting Started
If you have previously downloaded and tested the SmartFence WebApp, please delete it and clear your Internet browser history. We want this test to be as if you are a new customer without any saved SmartFence information. Remember to clear the Internet browser history on your phone before reloading the WebApp (see on next page ). - Page 6 - Select “Clear Browsing Data” Other browsers will have variations of the above for clearing the browser history. Opening the SmartFence WebApp. The WebApp can be opened from a desktop or laptop computer, a tablet or a phone from Internet browsers such as Chrome, Safari or Firefox.
- Page 7 STEP Setup can be completed on Smartphone, Tablet, or Computer Tablet Open the WebApp Open your browser. (works best on Chrome or Safari) smartfence.dogwatch.com Go to: Computer Click “NEW ACCOUNT” Fill in the “CREATE ACCOUNT” fields IMPORTANT! Customer email ...
- Page 8 Select Breed from dropdown menu Select your pet’s Size from dropdown menu Your pet’s Date of Birth Click ‘ADD ANOTHER PET’ and repeat steps - Click ‘COMPLETE’ to finish your User Profile CONGRATULATIONS, you have completed the SmartFence Profile!
- Page 9 (PowerPak Lightning or Surge Damage Settings Button This gear button is your menu link to view and manage all SmartFence settings. PETS View and edit pet information and add additional pets ALERTS Set which alerts you want to receive...
- Page 10 STEP Follow the steps below to save the SmartFence WebApp link and icon to your mobile device home screen. Setting up your SmartFence system and your User Profile works best when it is done before you save the icon.
-
Page 11: Hardware Installation
STEP HARDWARE INSTALLATION Setup your SmartFence Communication Portal Re-set Ethernet Power Button Port Supply Port Antenna Rear View Top View Internet Connection Status Boundary Collar Status Status Power Outlet Place the Portal in a location near the home router and a power source. - Page 12 The Transmitter will now connect to the Communication Portal. This usually takes only a few minutes. After it connects, the Boundary Status light on the Portal will turn Green. The SmartFence Transmitter communicates with the Portal once every two minutes. Training Rate...
-
Page 13: Setup Complete
indicator light on the Portal will turn Green. The SmartFence collar communicates with the Portal once an hour. The containment features of the DogWatch Hidden Fence are independent of the communication features of the SmartFence. The containment features will continue to work even if the Portal is turned or the Internet is not working. - Page 15 TEST 1 TRANSMITTER SETTINGS Verify all transmitter settings are properly displayed Follow the steps below to test: Open your WebApp and click on the ‘Settings’ button in top right corner of the WebApp. Click “Systems” Note your “Training Mode”, “Rate”, “Range”, and “Frequency” Now, change the settings on the Transmitter.
- Page 16 TEST 2 SMARTCOLLAR SETTINGS Verify all collar settings are properly displayed Follow the steps below to test: Open your WebApp and click on the “Settings” button (Gear button on top right corner of WebApp) Click “Collars” Note your “Training Level” and collar “Frequency” Now, change the “Training Level”...
- Page 17 TEST 3 ACTIVITY REPORTS Verify all activity is properly displayed The Collar sends a new activity update to the Portal once every hour. The Portal will report new activity updates to your WebApp each hour. You can view your pet’s daily, weekly or monthly activity levels.
- Page 18 TEST 4 ON PowerPak BATTERY BACKUP ALERT - TRANSMITTER Verify ‘On Battery Backup’ is properly displayed Follow the steps below to test: With the PowerPak battery backup plugged into the Transmitter, unplug the power supply. Within approx. 2 minutes, the indicator light on the Portal should turn RED.
- Page 19 TEST 5 WIRE BREAK ALERT - TRANSMITTER Verify ‘Wire Break’ is properly displayed Follow the steps below to test: Unplug the Boundary Loop wire. The “break alarm” will activate on the transmitter. Within approx. 2 minutes, the indicator light on the Portal will turn RED. After 2 minutes, a alert bar should appear on the WebApp.
- Page 20 NO COMMUNICATION ALERT - TRANSMITTER Verify all Communication alerts are properly displayed The SmartFence Transmitter sends updates to the Portal once every 2 minutes. If the Portal does not receive an update from the transmitter for 10 minutes, you should get an alert saying, “There have been no recent updates from your DogWatch Transmitter at (Home).
- Page 21 TEST 7 NO COMMUNICATION ALERT - COLLAR Verify all Communication alerts are properly displayed The SmartCollar sends an update to the Portal once every hour. If the portal does not receive an update from the Collar for 10 hours, you should get an alert saying, “There have been no recent updates from your pet’s collar.
- Page 22 TEST 8 NO INTERNET CONNECTION Verify Internet Indicator Light is working properly Follow the steps below to test: Unplug the Ethernet connector on the Portal Within 2 minutes, the Internet Connection Status light on the Portal should turn RED. Plug the Ethernet connector into the Portal. Within 2 minutes, the indicator light on the Portal should turn GREEN.
- Page 23 Note: Boundary Challenges do not display in the Customer’s WebApp. Follow the steps below to test: Hold the SmartFence Collar near the test wire connected to the Transmitter until it triggers the audible alert. Repeat several times. Record the time of each “challenge”.
-
Page 25: Connectivity Testing
Connectivity Testing Connectivity Testing is a feature used to test how well the Transmitter and the Collar communicate with the Communication Portal from various locations and distances. Connectivity Testing is a useful tool for Dealers during an installation to determine ... - Page 26 CONNECTIVITY TRANSMITTER / PORTAL PLACEMENT CONNECTIVITY EXAMPLES Poor Placement. Limited Connectivity. Improved Connectivity. Place Transmitter close to Portal.
- Page 27 Use this Connectivity Test to find a good location for the Transmitter where it can communicate reliably with the Portal. Follow these steps to put the SmartFence Transmitter into ‘Test Mode’. While the Transmitter is turned OFF, plug it into the power outlet with the 18V power supply.
- Page 28 CONNECTIVITY TEST COLLAR Use this Connectivity Test to determine the communication range of the Collar. Follow these steps to put the SmartFence Collar into Test Mode. Insert battery POSITIVE end down. Power ‘ON’ the Collar by inserting the Battery. Set the Level to “0” (Audible Only) using the magnet.
Need help?
Do you have a question about the SmartFence and is the answer not in the manual?
Questions and answers