Advertisement
Table of Contents
I N S T R U C T I O N S
IN THE BOX
Make sure you have everything shown here.
NOTE: The CR2032 battery comes pre-installed.
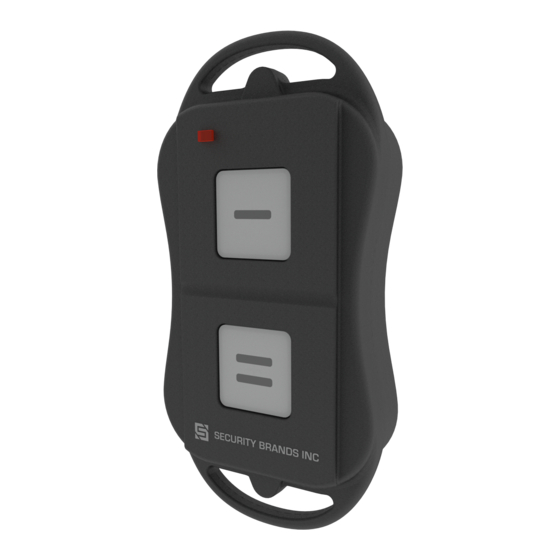
WHAT'S WHAT
The Remote 300 has two programmable buttons and
a status LED. Each button can be paired to a separate
receiver or the same receiver.
SETUP
1. On your 300-MHz receiver, set DIP switches to
desired positions.
NOTE: For best results, we recommend using
the Security Brands Receiver 300 (14-REC300).
NOTE: By default, both sets of DIP switches on
the Remote 300 are matched to the default DIP
switch positions of the Receiver 300 and other
300-MHz receivers. For security reasons, we
recommend using custom DIP switch positions.
NOTE: Some DIP switches may be labeled
differently. The position labeled 10 corresponds
to the position labeled 0 on the remote, and
the DIP switches on some receivers have the off
position labeled as OPEN.
2. Open Remote 300 unit by removing two screws
on bottom side and pulling case apart. Remove
visor clip if needed for easier access.
NOTE: Make sure the circuit board stays
attached to the base of the remote unit and
does not come off with the cover.
REMOTE 300
Button 1
Button 2
1 of 2
Remote 300
LED
ON
1
2
3
4
5
6
7
8
DIP Switches on Receiver 300
(default positions)
Model 14-R300
Visor Clip
9
10
Advertisement
Table of Contents

Related Manuals for Security Brands REMOTE 300


Summary of Contents for Security Brands REMOTE 300
- Page 1 DIP Switches on Receiver 300 (default positions) NOTE: By default, both sets of DIP switches on the Remote 300 are matched to the default DIP switch positions of the Receiver 300 and other 300-MHz receivers. For security reasons, we recommend using custom DIP switch positions.
- Page 2 I N S T R U C T I O N S REMOTE 300 Model 14-R300 3. Find DIP switches on Remote 300 unit corresponding to button you want to program. NOTE: Pay attention to the markings on the circuit board showing which set of DIP switches corresponds to which button.
Need help?
Do you have a question about the REMOTE 300 and is the answer not in the manual?
Questions and answers