Advertisement
INSTRUCTIONS
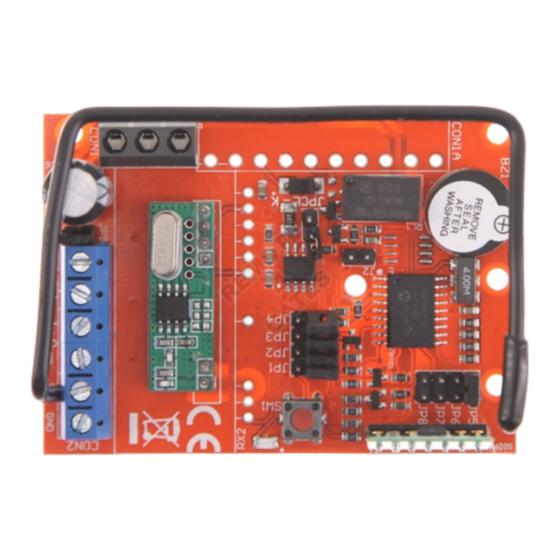
APRIMATIC UNICO RR-SE Receiver
Enabling button (See Fig.4) Using the jumpers JP5-8, you can select which receiver output channel
and, therefore, which remote control button, will enable the output signal. This selection is made by
closing just one of the jumpers present, following the scheme indicated below:
JP5 – Channel 1 - Button 1 / JP6 – Channel 2 - Button 2 JP7 – Channel 3 - Button 3 / JP8 – Channel 4
- Button 4
Enabling button row (See Figures 5 and 6):
The receivers may be used with 2-, 4- or 14-button remote controls. If you use it with a 14-button
remote control, you can use the jumpers JP3 and JP4 to define which row of buttons the receiver must
respond to, following the scheme indicated below:
JP3 – JP4 open: row 1 (Buttons 1-4) JP3 closed: row 2 (Buttons 5-8) JP4 closed: row 3 (Buttons 9-12)
JP3 – JP4 closed: row 4 (Buttons 13-14)
8
Visit our website: www.Alloremotecontrol.com
Advertisement
Table of Contents

Related Manuals for Allo RemoteControl APRIMATIC UNICO RR-SE


Summary of Contents for Allo RemoteControl APRIMATIC UNICO RR-SE
- Page 1 INSTRUCTIONS APRIMATIC UNICO RR-SE Receiver Enabling button (See Fig.4) Using the jumpers JP5-8, you can select which receiver output channel and, therefore, which remote control button, will enable the output signal. This selection is made by closing just one of the jumpers present, following the scheme indicated below: JP5 –...
- Page 2 INFORMATION: The receiver may also receive commands from 2- and 4-button remote controls (TR2 and TR4) but only if JP3 and JP4 are left open Procedure for self-teaching of the first remote control: 1. Power up the receiver. 2. Make sure that the memory is completely free (10 consecutive beeps); if not, delete the memory.
Need help?
Do you have a question about the APRIMATIC UNICO RR-SE and is the answer not in the manual?
Questions and answers