Advertisement
Quick Links
Advertisement

Related Manuals for Totem HOCKEY BOT


Summary of Contents for Totem HOCKEY BOT
- Page 1 v.1.5...
- Page 2 Inserting nuts (1) Inserting nuts (2) Faulty threads Tightening Ruler standoffs It is a good idea to After entering the Totem Some of the nuts first slot, nuts tend start every step in- Wrench Socket are missing threads. to tilt. Use your...
- Page 3 When starting on a building step, the 6mm bolts and 6x10 nuts are coloured RED. It makes it When a new Totem beam is needed in a step, easier to see where the new bolts and nuts are the length is indicated.
- Page 4 When it is helpful, the slot-number is indicated When a connection is a rotating hub, you must in the Totem beam. Starting from #1 and count- not tighten the bolt and nut too much. Test it for a ing slots.
-
Page 5: Parts Needed
Nylon Spacer 4mm Nylon Spacer 8mm DIA24mm bracket M3x8mm 5-7x Rubber Band ZIP Tie Li-Ion 3.7v Battery Totem Screw Driver USB Battery Charger X3 Controller Board 5.5mm Totem Wrench Caster Wheel Kit 3 cm 4 cm 6.5cm/13H Allen hex key... - Page 6 PART 1 3 cm 4 cm Bolt M3x6 Bolt M3x8 Bolt M3x35 3 cm L-Twisted Nut M3 6x10 C-Bracket Yellow DC Motor L-Twisted mirror bracket Yellow DC motor 1:48 3 cm 4 cm NOTE: 2x 8mm 10 cm...
- Page 7 OBS: 2x 35mm NOTE: This tap to this side. 10cm PART 1...
- Page 8 PART 2 12cm Nut M3 6x10 Bolt M3x6 2-hole Simple Single side filler C-Bracket 2-hole 45 simple 3 cm 6 cm 10 cm 12 cm...
- Page 9 TIP: How to insert the 45 de- gree Filler part: 1: First assemble brackets with bolts. 2: Bolts are a bit loose. 3: Insert filler as shown. 4: Tighten bolts again.
- Page 10 10cm...
- Page 11 PART 2...
- Page 12 PART 3 Use the Totem Wrench Socket PART1 Nut M3 6x10 Bolt M3x6 Nylon Standoff Yellow Wheel D 67mm M3x8mm Caster Wheel Kit...
- Page 13 PART2...
- Page 14 Use the Totem Wrench Socket...
- Page 15 Skip Step4, it is not Caster Wheel Kit: Read in the Robotics Kit Booklet in page 30 and 31 about how to needed. build a Caster Wheel set. The colour green and yellow in the instructions are for clarity only, the actual colour may be different. Caster Wheel Kit You can skip putting a beam to the caster wheel...
- Page 16 Put the #3.5 Caster Wheel in the middle. #3.5 means the hole be- tween the #3 and #4 slot. Use the included Allen key to easier tighten the bolt.
- Page 17 PART 3...
- Page 18 PART 4 NOTE: 8mm NOTE: 10mm NOTE: 10mm Bolt M3x6 Bolt M3x8 Bolt M3x10 #5.5 Bolt M3x12 Nut M3 6x10 Lock Nut M3 Metal washer Nylon Spacer 2-hole bracket M3 9x0.8mm Arm for Mini Bolt M2.5x8 Mini Servo Motor For servo arm Servo Motor Strip brackets: View from other...
- Page 20 65mm/13H Use the Totem Wrench Socket 120mm/24H Note: 12mm Note: 10mm Smooth spin...
- Page 21 Register the servo arm. A : Put on the servo arm assembly in any position. Be careful. Don’t use too much force. Gen- tly twist it Coun- ter Clock-wise. B : Manually Twist the arm Counter Clockwise until it stops.
- Page 22 C : Temporarily take off the E : Attach the Servo Arm Index D : Slip on the Servo Arm Index servo arm. Arrow on to the servo arm. Disc on to the servo. H : Take off the disc and arrow. F : Put the Servo Arm with Index G : Here you can see the arrow Arrow back on the servo match-...
- Page 23 Note: M2.5/ J : Fix the servo arm assembly to the ser- vo with the m2.5 / 8mm bolt. Make sure the servo arm has stayed put. PART 4...
- Page 24 PART 5 10cm Note: 25mm Note: 20mm Bolt M3x6 Bolt M3x20 Bolt M3x25 Use the Totem Wrench Socket Nut M3 6x10 Lock Nut M3 C-Bracket Nylon Spacer Nylon Spacer 8mm 2-hole bracket Rubber Band Washer 1mm DIA24mm 4 cm 8 cm...
- Page 25 10cm...
- Page 26 Use the Totem Wrench Socket...
- Page 27 Don’t tighten link too much. There must be a smooth rotation.
- Page 28 Temporarely take off the 2-hole bracket on the arm. First loop the rubber band to the C-bracket as shown. Loop the rubber band to the 2-hole bracket as shown. Again attach the 2-hole bracket to the arm.
- Page 29 Loop the rubber band to the release arm as shown. Stretch the rubber band AROUND the whole arm. Rubber bands The included rubber band may vary in colour. This is the main rubber band that accumulates energy when pulled back, and releases it to shoot.
- Page 30 PART 6 Mount the X3 controller. Bolt M3x6 X3 Controller Board PART 6...
- Page 31 PART 7 Cabling and connections. 5-7x ZIP Tie Integrated controller that has Bluetooth connection, 4 DC motor channels and 2 Servo motor channels. Li-Ion 3.7v Battery More info here: https://totemmaker.net/wiki/x3-fbi-board-set-up/...
- Page 32 Note: Observe the orientation: Brown, Red and Yellow.
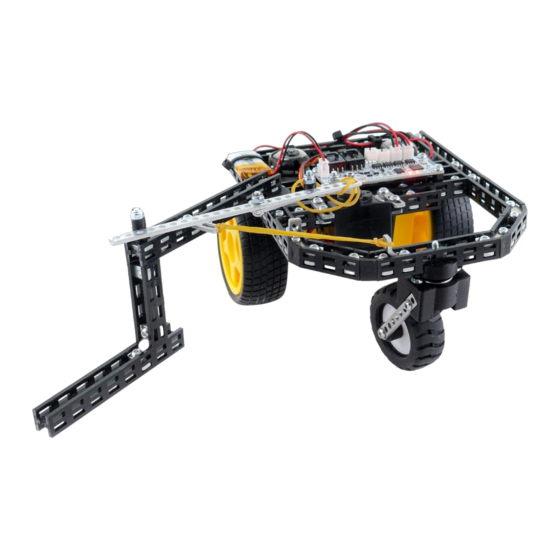
- Page 33 Building is finished ! Now it is time to test your model. PART 7...
-
Page 34: How To Control
HOW TO CONTROL Download Totem app on your smartphone or tablet via App Store or Google Play. To slow down the rotation speed, press two buttons at the same time. I. e. press both Forward and Right buttons. Follow the step by step guide to connect your... -
Page 35: Safety Warnings
PRECAUTIONS: ELECTRONICALLY OPERATED PRODUCT Do not give this product to children aged 8 or below. As with all electronic products, precautions should be observed during handling and use to prevent electric chock. Adult supervision required. Note to adults: to ensure that the child’s play is both safe and fun, please review all operating instructions and safety rules with your child. SAFETY WARNINGS: •... -
Page 36: Battery Charging
KEEP THIS INTRUCTION MANUAL AND THE PRODUCT BOX AS IT CONTAIN IMPORTANT INFORMATION FOR FUTURE REFERENCE. Due to the continuous product improvement, the pictures on this manual may differ slightly from the actual product. Please adhere to actual product instead. Totem Maker names and logos are registered trademarks. All rights reserved. WARNING: www.totemmaker.net...
Need help?
Do you have a question about the HOCKEY BOT and is the answer not in the manual?
Questions and answers