
Related Manuals for Gorenje R51M/E


Summary of Contents for Gorenje R51M/E
- Page 1 DALJINSKI UPRAVLJALNIK - NAVODILA ZA UPORABO REMOTE CONTROLLER – USERS MANUAL...
- Page 2 SLOVENŠČINA NAVODILA ZA UPORABO DALJINSKI UPRAVLJALNIK • Pred prvo uporabo najprej skrbno preberite ta navodila za uporabo. • Navodila shranite za kasnejšo uporabo.
- Page 3 Kazalo Tehnične karakteristike daljinskega upravljalnika ............3 Karakteristike delovanja ....................3 Opis tipk daljinskega upravljalnika ................4 Prikaz na zaslonu ....................... 6 Uporaba daljinskega upravljalnika ................7...
- Page 4 Uporaba daljinskega upravljalnika Uporabljajte daljinski upravljalnik v razdalji 8 m od notranje enote obrnjen proti sprejemniku. Sprejem notranje enote je potrjen s piskom. POZOR! • V primeru preprek med notranjo enoto in daljinskim upravljalnikom klimatska naprava ne bo delovala. • Preprečite razlitje tekočin po daljinskem upravljalniku. •...
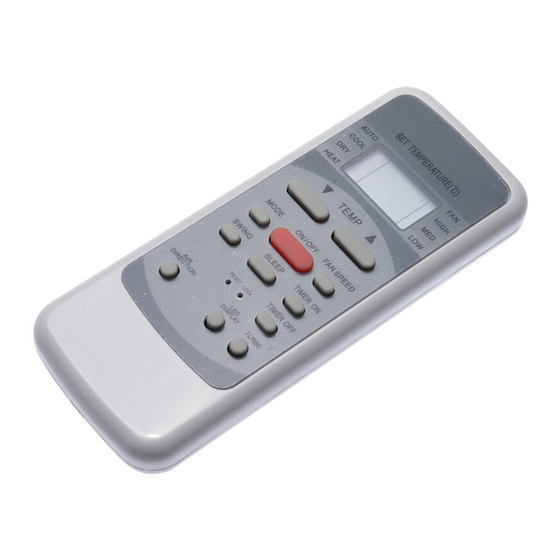
- Page 5 Opis tipk daljinskega upravljalnika 1. Tipka DOL (▼/ -): To tipko pritisnite za zvišanje nastavitve notranje temperature ali za povišanje števila ur v časovnem programu. 2. Tipka GOR (▲ / +): To tipko pritisnite za zvišanje nastavitve notranje temperature ali za povišanje števila ur v časovnem programu.
- Page 6 10. Tipka ECONOMIC: S to tipko vključite ekonomični nrežim delovanja naprave. s ponovnim pritiskom na tipko režim izključite 11. Tipka ČASOVNI PROGRAM IZKLOP (TIMER OFF): Ob pritisku na to tipko aktivirate zaporedje avtomatskega izklopa. Ob vsakem pritisku se nastavitev avtomatskega izklopa poveča za 30 minut. Če nastavljen čas kaže 10:00 se ob vsakem pritisku nastavitev avtomatskega izklopa poveča za 60 minut.
- Page 7 Prikaz na zaslonu Prikaz načina delovanja: AVTOMATSKO HLAJENJE RAZVLAŽEVANJE OGREVANJE VENTILATOR. Prikaz PRENOSA: Pokazatelj enkrat utripne med prenosom signalov iz daljinskega upravljalnika v notranjo enoto. Prikaz temperature / Časovnega programa: To področje prikazuje nastavljeno temperaturo in v načinu ČASOVNI PROGRAM (TIMER) prikazuje nastavitev vklopa/izklopa ČASOVNEGA Prikaz delovanja klimatske naprave.
- Page 8 Kako uporabljati tipke NAČIN DELOVANJA AVTOMATSKO Prepričajte se, da je naprava priključena na napajanje. Simbol za prikaz delovanja klimatske naprave začne utripati. 1. Pritisnite tipko NAČIN DELOVANJA in izberite AUTO. 2. Pritisnite tipki GOR / DOL (+ / -), da nastavite želeno temperaturo med 17°C in 30°C.
- Page 9 NAČIN DELOVANJA RAZVLAŽEVANJE Prepričajte se, da je naprava priključena na napajanje. Simbol za prikaz delovanja klimatske naprave začne utripati. 1. Pritisnite tipko NAČIN DELOVANJA in izberite DRY. 2. Pritisnite tipki GOR / DOL (+ / -), da nastavite želeno temperaturo med 17°C in 30°C. 3.
- Page 10 NAČIN DELOVANJA ČASOVNI PROGRAM Pritisnite tipko TIMER ON za nastavitev časa avtomatskega vklopa klimatske naprave. 1. Pritisnite tipko TIMER ON. Na daljinskem upravljalniku se prikaže ikona TIMER ON, na prikazovalniku se prikaže zadnji nastavljeni čas avtomatskega vklopa in znak 'h'. Sedaj lahko ponastavite čas avtomatskega vklopa.
- Page 11 Primer nastavitve časovnega programa VKLOP Način delovanja ČASOVNI PROGRAM VKLOP (TIMER ON) je uporaben v primeru, da želite vključiti klimatsko napravo, preden se vrnete domov. Klimatska naprava se bo avtomatsko vključila in pričela z delovanjem po preteku nastavljenega časa. Primer: Klimatsko napravo želite vključiti čez 6 ur.
- Page 12 Vstavitev/zamenjava baterij V daljinskem upravljalniku sta dve suhi alkalni bateriji AAA(LR03x2). 1. Pritisnite pokrov ležišča baterij, ga odstranite in vstavite bateriji v skladu z oznakami (+ in -) na daljinskem upravljalniku in namestite pokrov. 2. Stari bateriji zamenjajte na enak način, kot vstavite novi. OPOMBE 1.
- Page 13 ENGLISH OWNER’S MANUAL REMOTE CONTROLLER • Please read this owner’s manual before operation. • Save this manual in a safe place for future reference.
-
Page 14: Table Of Contents
Contents Remote controller specifications .................. 3 Performance features ....................3 Features of the remote controller buttons ..............4 Indicators on display ....................6 Operating the remote controller .................. 7... -
Page 15: Remote Controller Specifications
Handling the remote controller Us the remote controller within 8m distance from the appliance, pointing it towards the receiver. Reception i confirmed by a beep. CAUTION! • The air conditioner will not operate if curtains doors or other materials block the signal from the remote controller to the indoor unit. -
Page 16: Features Of The Remote Controller Buttons
Features of the remote controller buttons 1. DOWN button (▼ / -): Push this button to decrease the indoor temperature setting or to decrease hour on the timer setting. 2. UP button (▲ / +): Push this button to increase the indoor temperature setting or to increase hour on the timer setting. - Page 17 When the setting time displays 10:00, each press will increase the auto-timed setting 60 minutes increments. To cancel the auto-timed program, simply adjust the auto-off time to 0:00. LOCK Button: When you press the recessed LOCK button, all current settings are locked in and the remote controller does not accept any operation except that of the LOCK.
-
Page 18: Indicators On Display
Indicators on display OPERATION MODE Indicator: When press the MODE button, it shows the current operating mode – AUTO, COOL, DRY, HEAT, FAN. TRANSMISSION Indicator: This indicator flashes one time when remote controller transmits signals to the indoor unit 1DIGITAL DISPLAY area: This area will show the set temperature and, if in the TIMER mode, will show the ON and OFF settings of the TIMER. -
Page 19: Operating The Remote Controller
Operating the remote controller AUTO operation Switch on the power and the OPERATION indication lamp on the display panel of the indoor unit starts flashing. 1. Use the MODE button to select AUTO. 2. Push the TEMP button to set the desired room temperature. - Page 20 DRY operation Ensure that unit is plugged in and power is available. 1. Push the MODE button to select DRY. 2. Push the TEMP button to set the desired temperature from 17°C to 30°C. 3. Push the ON/OFF button to start the air conditioner.
- Page 21 TIMER operation Push TIMER ON button to set the auto- on time and TIMER OFF button to set the auto-off time. TIMER ON: Push the TIMER ON button, then the remote controller shows TIMER ON, the last set time for the starting operation and the signal "h"...
- Page 22 Example of TIMER setting TIMER ON feature is useful for you when you want the unit to turn on automatically before you return home. Air conditioner will automatically start operating at the set time. Example: How to start the air conditioner in 6 hours. Press the TIMER ON button, the last setting of starting operation time and the signal 'h' will show on the display area.
- Page 23 Insert / replace batteries In the remote controller are two dry alkaline batteries AAA(LR03x2). 1. Press the cover of the batteries, remove it, insert the batteries in accordance to the + / - signs and put back the plastic cover. 2.
Need help?
Do you have a question about the R51M/E and is the answer not in the manual?
Questions and answers