Table of Contents
Advertisement
Available languages
Available languages
Quick Links
Advertisement
Chapters
Table of Contents

Related Manuals for Rocket Espresso MACINATORE SUPER FAUSTO


Summary of Contents for Rocket Espresso MACINATORE SUPER FAUSTO
- Page 1 USER MANUAL...
- Page 2 Conti Valerio for Rocket Espresso ROCKET ESPRESSO - WARRANTY AND REGISTRATION Warranty is with the dealer from whom you purchased the machine. To register your purchase with Rocket Espresso, please go to www.rocket-espresso.com/register.html and enter the following details: • Name: •...
-
Page 3: Table Of Contents
CONTENTS • SAFETY INSTRUCTIONS • PRESERVATION OF THE MANUAL • REMOVING MACHINE FROM PACKAGING • GENERAL INFORMATION • SUPER FAUSTO TECHNICAL DATA • OTHER INFORMATION • APPLIANCE DESCRIPTION • SETTING UP YOUR SUPER FAUSTO • LOCKING THE CONTAINER • INTRODUCTION •... -
Page 4: Safety Instructions
SAFETY INSTRUCTIONS The design of this machine has taken into account all reasonable user safety precautions. Nevertheless particular conditions of installations and handling may create unforeseen situations beyond the installers control. 1. Check to see that the data on the rating plate corresponds to that of the main electrical supply to which the machine will be attached. - Page 5 internal parts get in contact with liquid. b. Prevent the power cable from being stretched or pulled tight. c. Do not use the machine with wet hands. d. Do not allow children or untrained persons to use the machine. e. Do not operate the machine when bare foot. f.
-
Page 6: Preservation Of The Manual
Do not remove, tear out or rewrite any part of the manual for any reason. In case of loss or for further information please contact Rocket Espresso or Conti Valerio. REMOVING MACHINE FROM PACKAGING 1. Ensure that there are no signs of damage to the machine by checking the external cladding of the packaging. -
Page 7: General Information
has been carefully removed. Keep the packaging ( boxes, foam, plastic bags) well away from the reach of children. 4. If there is evidence of defect or damage to the machine, the authorised dealer from whom you purchased the machine should be notifi... - Page 8 Please keep this manual in a safe place where it can be made available to all users. Rocket Espresso can not be held liable for any damage to people or property resulting from failure to respect the instructions concerning safety, installations and maintenance contained in this manual.
-
Page 9: Super Fausto Technical Data
SUPER FAUSTO TECHNICAL DATA DESCRIPTION VOLTAGE (V) FREQUENCY (Hz) POWER CONSUMPTION 10 A 900 W 900 W 900 W MOTOR POWER (W)* 1700 1400 1400 1400 PRODUCTIVITY (g/s) WEIGHT WHEN EMPTY (Kg) 10,5 10,5 10,5 10,5 HEIGHT (mm) WIDTH (mm) DEPTH (mm) *The value given is for the actual revolutions of the burrs Activation times:... -
Page 10: Other Information
OTHER INFORMATION MANUFACTURER CONTI VALERIO S.R.L. Via Luigi Longo, 39/41 50019 SESTO FIORENTINO Firenze Italy For Rocket Espresso COFFEE GRINDER MODEL RS75E Pg 10... -
Page 11: Appliance Description
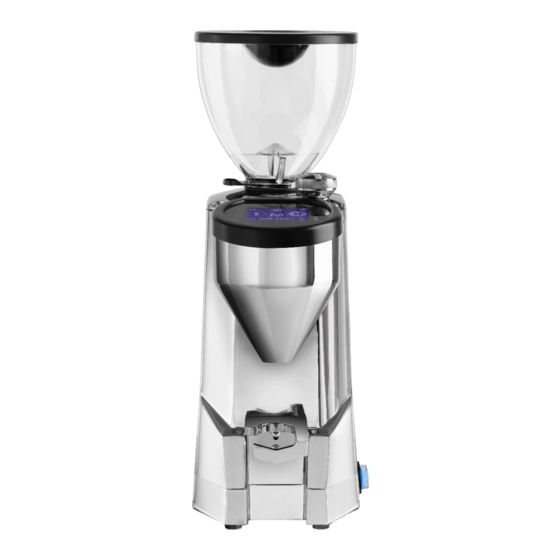
APPLIANCE DESCRIPTION 1. Touchscreen Display 2. Container cover 3. Coffee bean container 4. Coffee bean container opening/closing tab 5. Grinding adjusting knob 6. Dispensing funnel 7. Filter holder fork 8. Power ON switch 04.00 Pg 11... - Page 12 Pg 12...
-
Page 13: Setting Up Your Super Fausto
SETTING UP YOUR SUPER FAUSTO MACHINE UNLOCK Before starting the grinder operation, unscrew and remove the white lock screw under the machine (turn anti-clockwise). Pg 13... -
Page 14: Locking The Container
LOCKING THE CONTAINER Before starting the appliance it is necessary to fi t the coffee bean container (3) and fi t the portafi lter holder fork (7). • Insert the bean container (3) into its seat positioning so that the hole lines up. •... -
Page 15: Introduction
INTRODUCTION It is necessary to set up the appliance before operating by determining the correct grind required to create a perfect extraction. An espresso grind is a very fi ne grind yet still granular. Coffee loses its fl avour rapidly once ground and therefore only grind as much as is needed for the espresso you are about to prepare. -
Page 16: Instructions For Use
INSTRUCTIONS FOR USE Plug in the machine and close the push tab at the bottom of the bean container. Fill the bean container with coffee beans. Press the power on button (8) that must light up. Pull the tab (4) out a little to permit the passage of the beans. Place the portafi... -
Page 17: Grind Setting
GRIND SETTING Set the grinder by means of the adjusting knob (5) by rotating it clockwise to make powder fi ner or anticlockwise to make it coarser. To start, grind some coffee off into portafi lter and make a coffee. This will give you the initial understanding of what the setting is like in relation to the coffee. -
Page 18: Appliance Setting
APPLIANCE SETTING 10. Key for single coffee dose Key for triple coffee dose 12. Key for double coffee dose 13. Key for continuous dispensing mode 14. Key to access the menu 15. Padlock (locked/unlocked programming) 16. Decreasing key 17. Increasing key 18. -
Page 19: Switching On Your Super Fausto
SWITCHING ON YOUR SUPER FAUSTO When switching the appliance on for the fi rst time, it is confi gured in the mode set by the factory and it will maintain the last mode previous to switch off. When switching the appliance on, the screen will display the “R” graphic, pressing it displays the main screen. -
Page 20: Dose Dispensing And Setting Display
DOSE DISPENSING AND SETTING DISPLAY • Place the portafi lter on the fi lter hold fork. • Press the dose key. • The key will illuminate and the coffee will be ground and dispensed into the portafi lter. • Once grinding has been completed, the zero returns to set value. -
Page 21: Function Block
FUNCTION BLOCK By holding the (15) key for a few seconds, the (16) and (17) keys will disappear and all functions are blocked except the dose selection and the dispensing start. The display will show the padlock locked. To unlock press for a few seconds the (15) key and when will appear the (16) and (17) keys all functions will been unlocked. -
Page 22: Technical Menu
TECHNICAL MENU Access the technical menu by pressing the (14) key. 19. Key for previous page. 20. Key for next page. 21. Key for exit to menu. COUNTERS This page allows to show the total counters (that cannot be reset) for any dose that can be dispensed. -
Page 23: Brightness
BRIGHTNESS This page allows to set the display brightness from 0 to 10 via the (22) and (23) keys. BRIGHTNESS Pg 23... -
Page 24: Display Colour
DISPLAY COLOUR By pressing the (23), (24) or (25) key will change the colour of the display. COLOUR WHITE BLUE COPPER Pg 24... -
Page 25: Factory Reset
FACTORY RESET This page allows to restore the factory default setting. By pressing the (26) “Push to reset” key will be asked to confi rm the factory reset. By pressing the (27) or (28) key will cancel or confi rm the factory reset. -
Page 26: Firmware Information
FIRMWARE INFORMATION This page allows to visualise machine information about the version of fi rmware, necessary for any kind of servicing request. FIRMWARE Pg 26... -
Page 27: Cleaning And Maintenance
CLEANING AND MAINTENANCE Unplug the appliance before performing any cleaning and maintenance operation. Do not pull the power cable or the appliance itself to disconnect the plug from the power supply socket. The cleaning of the device must be carried out exclusively by qualifi... - Page 28 repositioned the upper burr holder and screwed the cover, insert the bean hopper. For a complete sanitation use the cleaning tablets, specifi c for coffee grinders, available in the market. All the cleaning and sanitation operations must be carried out with products for food use. MAINTENANCE Maintenance is only to be performed by skilled personnel authorised by the manufacturer.
- Page 29 Pg 29...
- Page 30 MANUALE D’USO...
- Page 31 Per ogni questione riguardante la garanzia del prodotto, si prega di rivolgersi direttamente al distributore da cui è stato acquistato il macinacaffè. Per registrare il tuo acquisto presso Rocket Espresso, ti preghiamo di visitare il sito www.rocket-espresso.com/register. html ed inserire i dati seguenti: •...
- Page 32 INDICE • AVVERTENZE E SICUREZZE • CONSERVAZIONE DEL MANUALE • RIMOZIONE DELL’IMBALLAGGIO • INFORMAZIONI GENERALI • DATI TECNICI SUPER FAUSTO • INFORMAZIONI AGGIUNTIVE • DESCRIZIONE DEL MACINACAFFÈ • INSTALLARE IL TUO SUPER FAUSTO • INSERIRE E BLOCCARE LA CAMPANA • INTRODUZIONE •...
-
Page 33: Avvertenze E Sicurezze
AVVERTENZE E SICUREZZE Il costruttore ha ragionevolmente previsto ogni sicurezza possibile onde garantire l’incolumità degli utilizzatori, ma le svariate condizioni dI installazione e/o movimentazione possono creare situazioni incontrollabili o non prevedibili; per cui è necessario valutare sempre eventuali rischi residui e tenere in considerazione i seguenti suggerimenti: 1. - Page 34 8. Per proteggersi da scosse elettriche quando si utilizza il macinatore Super Fausto è necessario tenere in cosiderazione le seguenti avvertenze: a. Non immergere la macchina, il cavo e le spine in acqua o altri liquidi e non far entrare le parti interne della macchina a contatto con liquidi.
-
Page 35: Conservazione Del Manuale
m. Non esporre la macchina agli agenti atmosferici (sole, pioggia, ecc..). 9. L’apparecchio non può essere utilizzato in condizioni ambientali estreme e comunque non al di fuori dell’intervallo di temperature (-5°C ÷ +25°C). 10. Questo apparecchio può essere utilizzato da bambini di età pari o superiore a 8 anni e da persone con ridotte capacità... -
Page 36: Rimozione Dell'imballaggio
essere conservato in luogo asciutto, pulito e protetto dal calore. Impiegare il manuale in modo tale da non danneggiarne tutto o in parte il contenuto. Non asportare, strappare o riscrivere per alcun motivo parti del manuale. In caso di smarrimento del manuale o di richiesta di ulteriori informazioni, contattare il rivenditore di zona oppure il costruttore. -
Page 37: Informazioni Generali
comunale, il servizio locale di smaltimento rifi uti oppure il rivenditore dove l’avete acquistato. INFORMAZIONI GENERALI Il manuale è destinato all’utilizzatore e/o manutentore della macchina ed è considerato parte integrante della stessa. II presente manuale ha la funzione di fornire informazioni per uso corretto della macchina ed un’appropriata manutenzione, nonché... - Page 38 uso diverso da quelli descritti nelle precauzioni di sicurezza e manutenzione. Pg 38...
-
Page 39: Dati Tecnici Super Fausto
DATI TECNICI SUPER FAUSTO DESCRIZIONE VOLTAGGIO (V) FREQUENZA (Hz) ASSORBIMENTO 10 A 900 W 900 W 900 W POTENZA MOTORE (W)* GIRI AL MINUTO (RPM) 1700 1400 1400 1400 PRODUTTIVITÀ (g/s) PESO A VUOTO (Kg) 10,5 10,5 10,5 10,5 ALTEZZA (mm) LARGHEZZA (mm) PROFONDITÀ... -
Page 40: Informazioni Aggiuntive
INFORMAZIONI AGGIUNTIVE COSTRUTTORE CONTI VALERIO S.R.L. Via Luigi Longo, 39/41 50019 SESTO FIORENTINO Firenze Italy Per Rocket Espresso MODELLO MACINACAFFÈ RS75E Pg 40... -
Page 41: Descrizione Del Macinacaffè
DESCRIZIONE DEL MACINACAFFÈ 1. Display Touchscreen 2. Coperchio della campana 3. Campana 4. Linguetta per l’apertura/chiusura della campana 5. Pomello di regolazione della macinatura 6. Imbuto per erogazione 7. Forcella portafi ltro 8. Tasto di accensione ON 04.00 Pg 41... - Page 42 Pg 42...
-
Page 43: Installare Il Tuo Super Fausto
INSTALLARE IL TUO SUPER FAUSTO SBLOCCA IL MACININO Prima di iniziare a macinare, svita e rimuovi la vite di bloccaggio bianca posizionata sotto il macinino (ruota in senso antiorario). Pg 43... -
Page 44: Inserire E Bloccare La Campana
INSERIRE E BLOCCARE LA CAMPANA Prima di accendere il macinacaffè, è necessario inserire la campana (3) e fi ssare la forcella portafi ltro (7). • Inserire la campana (3) nell’imbocco della camera di macinatura in modo da rendere possibile l’avvitamento della vite di fi... -
Page 45: Introduzione
INTRODUZIONE È necessario installare il macinacaffè prima di poter regolare la macinatura in modo da ottenere un’estrazione perfetta. La macinatura per espresso è particolarmente fi ne, pur rimanendo granulosa. Il caffè perde le proprie fragranze in modo molto veloce una volta macinato, perciò cerca di macinare solo la quantità... -
Page 46: Istruzioni Per L'uso
ISTRUZIONI PER L’USO Attacca il macinino alla corrente e chiudi la campana con l’apposita linguetta. Riempi la campana con i chicchi di caffè. Premi il tasto di accensione (8), che si illuminerà di conseguenza. Tira la linguetta (4) per permettere il passaggio dei chicchi di caffè. -
Page 47: Regolazione Della Macinatura
REGOLAZIONE DELLA MACINATURA Regolare il macinino con l’apposito pomello (5), ruotandolo in senso orario per ottenere un macinato più fi ne oppure antiorario per ottenerlo più grosso. Per iniziare, macina un po’ di caffè sul tuo portafi ltro ed estrai un caffè. Ciò ti darà una prima indicazione su come regolare il macinacaffè. -
Page 48: Impostazioni Del Macinino
IMPOSTAZIONI DEL MACININO 10. Tasto per la dose singola 11. Tasto per la dose tripla 12. Tasto per la doppia dose 13. Tasto per l’erogazione continua 14. Tasto per accedere al menu 15. Tasto di blocco (bloccare/sbloccare le impostazioni) 16. Diminuire (–) 17. -
Page 49: Accendere Il Tuo Super Fausto
ACCENDERE IL TUO SUPER FAUSTO Al momento della prima accensione, il macinino è confi gurato con i dati di fabbrica, mantenendo in ogni caso le impostazioni settate al momento dello spegnimento. All’accensione, sullo schermo comparirà una “R”, premendola si potrà accedere al menù. MODALITÀ... -
Page 50: Erogazione Dose Esettaggio Del Display
EROGAZIONE DOSE E SETTAGGIO DEL DISPLAY • Posiziona il portafi ltro sulla forcella. • Selezionare la dose desiderata. • Il tasto si illuminerà e la dose verrà erogata. • Non appena l’erogazione sarà completata, il timer tornerà al valore preimpostato. •... -
Page 51: Funzione Di Blocco
FUNZIONE DI BLOCCO Premendo il tasto (15) per alcuni secondi, i tasti (16) e (17) scompariranno e le relative funzioni saranno bloccate, ad eccezione della selezione della dose e attivazione della macinatura. Il lucchetto sul display apparirà chiuso. Per sbloccare tali funzioni, premere il tasto (15), di conseguenza i tasti (16) e (17) e le relative funzioni ritorneranno operative. -
Page 52: Menu Avanzato
MENU AVANZATO Per accedere al menu avanzato premere il tasto (14). 19. Tasto per la pagina precedente. CONTROLLA NUMERI 20. Tasto per la pagina seguente CONTROLLA NUMERI 21. Tasto per uscire dal menu. CONTROLLA NUMERI CONTADOSI Questa pagina mostra il contadosi totale (che non può essere resettato), per ciascuna delle dosi selezionabili. -
Page 53: Luminosità
LUMINOSITÀ Questa schermata permette la regolazione della luminosità da 1 a 10, premendo i tasti (22) e (23). BRIGHTNESS Pg 53... -
Page 54: Colore Del Display
COLORE DEL DISPLAY Premendo i tasti (23), (24) o (25) potrai cambiare il colore del display. COLOUR WHITE BLUE COPPER Pg 54... -
Page 55: Dati Fabbrica
DATI FABBRICA Questa pagina permette di poter resettare il macinino con i dati di fabbrica. Premendo il tasto “Push to reset” (26) verrà richiesta la conferma per tornare ai dati di fabbrica. Premere i tasti (27) o (28) cancellerà o confermerà tale richiesta. FACTORY RESET PUSH RESET... -
Page 56: Informazioni Firmware
INFORMAZIONI FIRMWARE Questa pagina permette di visualizzare le informazioni relative alla versione del fi rmware, necessaria per ogni tipo di richiesta di assistenza. FIRMWARE Pg 56... -
Page 57: Pulizia E Manutenzione
PULIZIA E MANUTENZIONE Disinserire l’apparecchio dalla rete di alimentazione elettrica prima di effettuare qualsiasi operazione di pulizia e manutenzione. Non tirare il cavo di alimentazione o l’apparecchio stesso per staccare la spina dalla presa di alimentazione elettrica. Le operazioni di manutenzione e pulizia devono essere effettuate da personale qualifi... - Page 58 compressa. Dopo aver affettuato la pulizia, inserire nuovamente la campana. Per una completa igienizzazione utilizzare delle compresse detergenti per macinacaffè presenti in commercio. Tutte le operazioni di pulizia e igienizzazione, devono essere effettuate con prodotti approvati per uso alimentare. MANUTENZIONE La manutenzione deve essere eseguita solo da personale specializzato autorizzato dal produttore.
- Page 60 CONTI VALERIO S.R.L. ROCKET MILANO S.R.L. VIA CURIEL 13 20060 LISCATE MILAN, ITALY +39 02 953 513 34 WWW.ROCKET-ESPRESSO.COM MR004-2-2A-GD-R01 05-2021...
Need help?
Do you have a question about the MACINATORE SUPER FAUSTO and is the answer not in the manual?
Questions and answers