
Related Manuals for Rocket Espresso R9V Series


Summary of Contents for Rocket Espresso R9V Series
- Page 1 Espresso Machine User Instructions © Rocket Milano s.r.l. - R9V Instructions – Ed. 10.2019 – Subject to change without notice. Page 1 ùù series. User Manual Ed. 02.2016. Specifications subject to change without notice.
- Page 2 © Rocket Milano s.r.l. - R9V Instructions – Ed. 10.2019 – Subject to change without notice. Page 2 ùù series. User Manual Ed. 02.2016. Specifications subject to change without notice.
-
Page 3: Table Of Contents
Index Page General data Introduction Important safeguards Installation Technical data Installation diagram Description of external components Start-up Switching off the machine Proper care and maintenance Disassembling / dismantling of the machine THIS INSTRUCTION BOOKLET INCLUDES ALSO THE ONE GROUP VERSION OF R9 V CALLED “R NINE ONE”... -
Page 4: General Data
Via Curiel 13 20060 Liscate (Milano) Italy Phone +39 02 9535 1334 Email: support@rocket-espresso.com Rocket R9V series espresso machines Rocket Espresso R9V/ 2 2 brewing heads – multiboiler Rocket Espresso R9V/ 3 3 brewing heads – multiboiler All machines come with: •... -
Page 5: Introduction
Rocket Espresso Ltd. authorized technicians. Rocket Espresso Ltd. accepts no liability for injury and damage to person, persons or property caused by incorrect installation, misuse, and user negligence, neglect of the machine or any other circumstances beyond its control. -
Page 6: Important Safeguards
4. The machine should only be operated in accordance with instructions contained in this manual and verbal instructions and training provided by an authorised Rocket Espresso Ltd. dealer. 5. The machine must be operated by responsible adult persons who know the use of the equipment and should not be used by children, minors or untrained persons. - Page 7 23. Do not place on or near a hot gas or electric burner or in a heated oven. 24. Extreme caution must be used when moving an appliance containing hot oil or other hot liquids. 25. Before carrying out any maintenance operations turn the machine to “OFF”, disconnect it from the mains and allow cooling.
-
Page 8: Installation
2. If there is evidence of defect or damage to the machine an authorised Rocket Espresso Ltd. dealer or technician should be notified immediately so that remedial action can be taken. -
Page 9: Technical Data
A build up of mineral deposit may restrict the flow of water within the hydraulic systems causing damage to the machine and risking personal injury. Rocket Espresso recommends installation of an in line filter. Water pressure from the mains Maximum water inlet pressure is 6 Bar (0,6 MPa –... - Page 10 © Rocket Espresso Ltd. R9 series. User Manual Ed. 02.2016. Specifications subject to change without notice. Page 9...
-
Page 11: Description Of External Components
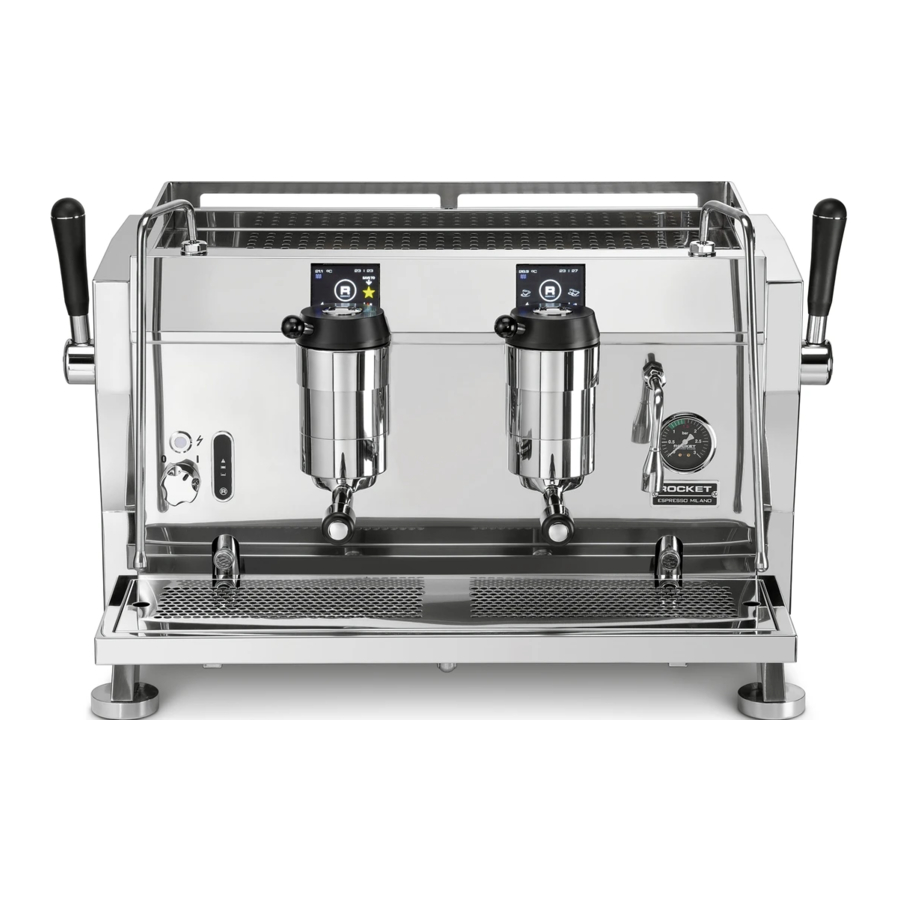
Hot water wand. Caution: Can become hot and cause burns On/Off switch: “0” = Off “1” = On Boiler pressure gauge Filter handle © Rocket Milano s.r.l. R9V series. User Manual Ed. 10.2019. Specifications subject to change without notice. Page 10... -
Page 12: Start-Up
Open the steam handle (Fig. 1 - pos. 1) for some seconds and then close it. This operation avoids milk resuction into the boiler. Wait until the working pressure has been reached again . Your machine is now ready to work. © Rocket Milano s.r.l. R9V series. User Manual Ed. 10.2019. Specifications subject to change without notice. Page 11... -
Page 13: Switching Off The Machine
(i.e. at night). Throughout the day: Wipe the screens inside your group head with a damp clean towel to remove excess grounds. © Rocket Milano s.r.l. R9V series. User Manual Ed. 10.2019. Specifications subject to change without notice. Page 12... - Page 14 R9 V Instruction Manual_v12.indd 1 8/07/19 20:21...
- Page 15 R9 V Instruction Manual_v12.indd 1 8/07/19 20:21...
- Page 16 User instructions of Rocket R9 V (see here below for one group version R NINE ONE) Preliminary instructions From left side group (seen from operator) Set the machine to OFF (= display reads OFF). How to enter the technician’s programming area Press key “19”...
- Page 17 Press the wrench key symbol on the display to access other settings by the technician. 1) Priority of heating (steam / coffee) 2) Time out boiler filling (after how much time the machine turns off if the boiler isn’t filled. 3) Boiler sensivity 4) Change of password These settings are copied automatically to all groups of the machine.
- Page 18 R NINE ONE. Your machine is a Certified Authentic Rocket Espresso machine. This User Manual covers the Rocket Espresso R9 V / R NINE ONE model. ROCKET ESPRESSO - REGISTRATION AND WARRANTY To initiate your warranty and register your machine, please go to www.rocket- espresso.com/register.html and enter the following details:...
- Page 19 CONTENTS THE FOUR ‘M’s MACCHINA How to use your Rocket Espresso machine • General and safety information • Technical specifications • Accessories and parts • Machine description • Machine installation • Digital display glossary • Factory settings of your machine •...
- Page 20 CONTACT DETAILS MANUFACTURER Rocket Milano S.R.L. Via Curiel 20060 Liscate Milano Italy Pg 1 R9 V Instruction Manual_v12.indd 1 8/07/19 20:21...
- Page 21 If you follow our User Manual – How to Use your Rocket and Make Beautiful Espresso for step by step guidance on the four M’s you will have many years of satisfaction with your Rocket Espresso machine. Pg 3 R9 V Instruction Manual_v12.indd 3...
- Page 22 2. The installation and repair must conform to local electrical and plumbing safety codes and regulations. 3. Installation of any Rocket Espresso machine must only be undertaken by duly authorized and properly trained and qualified personnel. 4. This machine is only safe when it has been correctly connected to an efficient earthing/grounding system.
- Page 23 Do not tip liquids on top of the machine. h. The machine should not be exposed to elements such as sunlight, rain, snow, extreme temperatures etc. 10. Always use Rocket Espresso certified and manufactured spare parts and accessories. 11. Before performing any cleaning (other than back-flushing) or maintenance turn the machine ‘off’...
- Page 24 12. This appliance is intended to be used in household and similar applications such as: a. Staff kitchen areas in shops, offices and other working environments. b. Farm houses. c. By clients in hotels ,motels and other residential type environments. d.
- Page 25 17. The appliance is not to be used by persons (including children) with reduced physical, sensory or mental capabilities, or lack of experience and knowledge, unless they have been given supervision or instruction. 18. Unsupervised children should not play with the appliance. 19.
- Page 26 FEATURES DIMENSIONS & WEIGHT • • Programmable pressure 410 x 505 x 430 mm profile system (width x depth x height) • • Digital touch display Weight: 47.4 kg • Brew boiler capacity: 1,9 litre - 1200 W • Service boiler capacity: 3,6 litre - 1400 W •...
- Page 27 R9 V Instruction Manual_v12.indd 9 8/07/19 20:21...
-
Page 28: Accessories And Parts
3. Portafilter - bottomless 4. Back flush cap 5. Tamper 6. Group head cleaning brush 7. Drip tray 8. User manual 9. Water Connection hose 10. Drip tray drain hose 11. Rocket Espresso cleaning tablets R9 V Instruction Manual_v12.indd 9 8/07/19 20:21... -
Page 29: Machine Description
MACHINE DESCRIPTION 1. Steam tap lever. 2. Steam wand for steaming milk: caution can be become and cause burns. 3. On/Off: ‘O‘ = off and ‘1’ = on. 4. Control lamp: machine is on when it is illuminated. 5. Saturated group head. 6. - Page 30 MACHINE DESCRIPTION continued... 9. Cup Tray: do not pour liquid into the tray. It will filter inside the equipment and can cause electrical shocks and serious injuries. 10. Boiler Pressure gauge: boiler pressure should be at one bar when the machine is ready. 11.
-
Page 31: Machine Installation
(to remove the reservoir for cleaning see maintenance instructions). Replace the cover of the water reservoir. Rocket Espresso recommend the use of the Rocket Espresso water filter. 3. Connect the machine to power supply that is rated in accordance with the serial plate on the espresso machine. - Page 32 MACHINE INSTALLATION CONNECTING TO MAIN WATER SUPPLY The R9 V is preset at the factory to use the supplied 1.9 litre water reservoir. To connect the R9 V machine to mains water supply, use the steel braided water hose provided and ensure the following instructions are adhered to: 1.
- Page 33 – DIGITAL DISPLAY GLOSSARY SCREEN 2 1 cup symbol 2 cups symbol Rocket symbol: press to move between screens Hot water symbol: press to switch between on/off symbol indicates the coffee boiler is heating symbol indicates the coffee boiler is not heating NB.
- Page 34 – DIGITAL DISPLAY GLOSSARY SCREEN 2 – DIGITAL DISPLAY GLOSSARY SCREEN 2 symbol indicates the service boiler is turned off/on 11. Press symbol to select language, water source (tank or water supply) and temperature C° or F° symbol changes temperature for coffee and steam boiler symbol sets time/date and auto on/off function symbol changes pressure profile setting symbol displays machine error message...
-
Page 35: Digital Display Glossary
– DIGITAL DISPLAY GLOSSARY SCREEN 2 17. Press symbol to set your single/double coffee volumes 18. Press symbol to put machine on standby symbol is the technician only menu. Pg 17 R9 V Instruction Manual_v12.indd 17 8/07/19 20:21... -
Page 36: Factory Settings Of Your Machine
– DIGITAL DISPLAY GLOSSARY SCREEN 2 FACTORY SETTINGS OF YOUR MACHINE Prior to delivery your Rocket R9 V espresso machine has been tested. The factory settings mean that your machine is set and ready for use. Default settings are as follows: •... -
Page 37: Pressure Profile Settings
PRESSURE PROFILE SETTINGS PROFILE A 6” – 4 Bar 18” - 9 Bar 6” - 5 Bar PROFILE B 8” - 4 Bar 22” – 9 Bar PROFILE C 20” – 9 Bar 10” – 5 Bar All preset programs can be modified. Pressure profile D and E are available for programming. -
Page 38: Personalise Your R9 V
PERSONALISE YOUR R9 V / R NINE ONE 1. Water Source Settings WATER SOURCE TANK Screen 2 - Spanner Symbol Water Source Screen • Go to the second screen menu and press symbol. • Press either to navigate through to the water source screen. •... - Page 39 3. Temperature Settings (units) TEMPERATURE CELSIUS Screen 2 - Spanner Symbol Temperature Screen • Go to the second screen menu and press symbol. • Press either to navigate through to the temperature screen • Press either to select celsius or fahrenheit. •...
- Page 40 5. Change the Temperature of the Service Boiler STEAM TEMP Screen 2 - Temperature Symbol Steam Temp adjust screen • Go to the second screen menu and press symbol. • Press either to navigate through to the steam temp screen. •...
- Page 41 7. Setting the Date Screen 2 - Clock Date adjust screen • Go to the second screen menu. • Press the symbol. • To scroll between year/month/date press • Press the arrows to change year/month/date. • Press to save. 8. Setting the Day and Time Screen 2 - Clock Time adjust screen •...
-
Page 42: How To Program Auto On/Off
HOW TO PROGRAM AUTO ON/OFF Each day the machine can be programmed to turn on and off twice. For example: • T1 – the machine turns on at 6.30am and turns off at 10.30am • T2 – the machine turns on at 5pm and turns off at 11pm To programme your machine follow the instructions listed below in sequential order. - Page 43 • Press once to set ‘T1’ stop time MONDAY T1 • Press to set hour. Press to advance or decrease hour STOP • Press to set minutes. Press to advance or decrease minutes • Once finished programming the various days press to save and Monday T1 –...
-
Page 44: Setting The Coffee Volume Portions
SETTING THE COFFEE VOLUME PORTIONS (volumetric portion control) A flow meter allows the machine to calculate the precise coffee volume you would like from the single or double porta filter. (Generally 25 to 30ML from the single porta filter and 50 to 60 ML from the double porta filter). When you are sure the grind setting is correct you can set the flow meter. -
Page 45: Hot Water Tempering Valve
HOT WATER TEMPERING VALVE Located on the cup warming tray. You can regulate the temperature of the water coming from the hot water tap without unduly influencing the steam pressure. Using a very fine screwdriver turn the adjustment screw to increase / decrease the hot water / cold water mix as per the indications on the cup tray panel. -
Page 46: Pressure Profiles
PRESSURE PROFILES The R9V pressure profile system allows up to 5 time interval and pressure adjustments to be made over the course of the extraction. It is therefore possible to increase / decrease the length of time and change the pressure for each interval. - Page 47 USING THE MACHINE IN MANUAL MODE To use the machine manually and create you own profile: Screen 1 – Graph symbol Screen 1 – Manual mode symbol 1. Press symbol and cycle through graph profiles – to the symbol. 2. The machine is now in manual mode. 3.
-
Page 48: Machine Operation
MACHINE OPERATION 1. Install the portafilter by inserting it into the group head and rotate the portafilter handle from left to right. The portafilter is inserted properly once it is firmly inside the group head and the portafilter handle is sitting at 90 degrees from the face of the machine (Fig G). - Page 49 CAUTION THE WATER IS VERY HOT. 10. More details of brewing coffee and steaming milk are outlined in the Mano section of this Rocket Espresso handbook. R9V Instruction Manual_v12.indd 31 8/07/19 20:21...
-
Page 50: Miscela
MISCELA The coffee blend 1. Ideally coffee beans should be consumed between three and fourteen days from roasting. In the first three days the beans are still releasing carbons from the roasting process. 2. From fourteen days the coffee will start to lose its flavor characteristics to become old and stale tasting. -
Page 51: Macinatura
MACINATURA The grinding of the coffee blend 1. An espresso grind is a very fine grind yet still granular. 2. Coffee loses its flavor rapidly once ground therefore only grind as much as is needed for the next espresso beverage. 3. -
Page 52: Mano
MANO The skilled hand of the barista What is espresso? • Espresso is a 25-30ml (50-60ml for a double) beverage prepared from 7-9 grams (14-18 grams for a double) of coffee through which clean water of 90.5 °-96.1°C has been forced at 9-10 atmospheres of pressure, and where the grind of the coffee is such that the brew time is 20-30 seconds. -
Page 53: How To Make Beautiful Espresso
Tamp pressure should be around 30kg so the applied pressure should be very firm. 5. Rocket Espresso filter baskets have a reference line inside them, that the grounds, once tamped, should be level with. Continued over page... - Page 54 HOW TO MAKE BEAUTIFUL ESPRESSO CONTINUED... 6. Insert the portafilter into the group head and activate the pump immediately by lifting the brew lever. 7. Observe the flow. 8. Liquid volume should be 50-60ml in 20-30 seconds (from the double handle or 25-30ml in 25-30 seconds if using the single basket.
- Page 55 Extraction at 8-10 seconds 25-30 seconds R9 V Instruction Manual_v12.indd 37 8/07/19 20:21...
-
Page 56: How To Texture & Pour Milk
HOW TO TEXTURE MILK 1. Half fill your stainless milk jug with fresh cold milk. Use a 250ml jug if you are preparing milk for one milk coffee. Use the 500ml jug if preparing two milk coffees. 2. Purge the steam wand of condensation by quickly releasing steam into the atmosphere for a few seconds 3. - Page 57 R9V Instruction Manual_v12.indd 38 8/07/19 20:21 R9 V Instruction Manual_v12.indd 37 8/07/19 20:21...
- Page 58 MILK TEXTURING There are three parts to texturing milk. They should be done simultaneously: stretch, swirl and heat. STRETCH The air must be folded into the milk to stretch it. Place the nozzle just below the surface of the cold milk and turn the steam wand on, releasing its full pressure.
- Page 59 HOW TO POUR HEATED MILK 1. Start by pouring the heated milk gently into the centre of the crema ensuring that the crema stays intact. 2. Once the espresso and milk is nicely combined and the volume in the cup is about half full, speed up the pouring process by taking the spout closer to the cup and increasing the angle on the pour.
- Page 60 ESPRESSO MENU RISTRETTO FLAT WHITE • • 90ml demitasse 150ml cup • • 20ml restricted 40ml double shot double shot • 110ml lightly textured hot milk ESPRESSO CAFFE LATTE • • 90ml demitasse 220ml glass or cup • • 40ml double shot 40ml double shot •...
-
Page 61: Preventative Maintenance & Cleaning
PREVENTATIVE MAINTENANCE & CLEANING Keeping your machine clean will prolong its life and produce much better espresso beverages. STEAM NOZZLES 1. Clean the steam nozzle after every use by wiping with a damp cloth. Turn the steam wand on to release condensation and milk residue. - Page 62 REMOVING THE SHOWER FOIL AND HEAD SEAL 1. Using a number 3 allen key remove the shower foil and dispersion screen. 2. Scrub the inside of the group head with the supplied group cleaning brush. 3. Using a damp cloth wipe clean the area where the portafilter engages into the group head.
- Page 63 BODYWORK 1. Wipe the stainless steel surfaces with a soft, non-abrasive and damp cloth. Polish using a dry, soft cloth. The Rocket Espresso supplied stainless steel cloth is best for the cleaning of your machine body work. We do not recommend using any of the commercial stainless steel cleaners.
-
Page 64: Troubleshooting
TROUBLESHOOTING EXTRACTION IS TOO FAST • Check the filter basket is not under-dosed. • Check the grind is not too coarse. EXTRACTION IS TOO SLOW • Check the filter basket is not overfull. • Check the grind is not too fine. •... - Page 65 TROUBLESHOOTING ESPRESSO TASTES SOUR • Extraction may be too fast. Check the grind is not too coarse. Correct the dose and make it finer. ESPRESSO IS WATERY AND THIN • Extraction may be too fast. If it is, the crema will be pale. Check the grind is not too coarse.
-
Page 66: Preparing Your Rocket For Transportation And/Or Servicing
Rocket will give you further technical instructions on how to ship. 6. Your Rocket Espresso machine weighs in excess of 47kg and can be easily damaged when shipped in a cardboard box. - Page 67 MODEL • R9 V (see R NINE ONE) The retail outlet or local distributor that you purchased this Rocket Espresso Milano machine should be your first point of contact for all service and warranty enquiries about your machine. AUTHORISED ROCKET ESPRESSO MILANO DISTRIBUTOR CONTACT DETAILS •...
- Page 68 Pg 49 R9 V Instruction Manual_v12.indd 49 8/07/19 20:21...
- Page 69 The Low Voltage Directive hereby declare that the following model of espresso machines produced by the formentioned company • Rocket Espresso R9 V are in conformity with the applicable requirements of the following documents: EN 55014-1:2006+A1:2009 + A2:2011 EN 60335-2-15:2002+A1:2005+A2:2008+A11:2012 EN 55014-...
Need help?
Do you have a question about the R9V Series and is the answer not in the manual?
Questions and answers