
Subscribe to Our Youtube Channel
Related Manuals for Rocket Espresso R9V


Summary of Contents for Rocket Espresso R9V
- Page 1 EN - PROFESSIONAL COFFEE MACHINE Use and maintenance manual Original instructions...
- Page 3 Congratulations on purchasing a Rocket Espresso machine – one of the finest espresso machines in the world. Your machine is a Certified Authentic Rocket Espresso machine. This User Manual covers the Rocket Espresso R9V model.
-
Page 4: Table Of Contents
UNPACKED MACHINE ............13 MACHINE HANDLING ...............13 2.2.1 MACHINE MOVEMENT INSTALLED .......14 DESCRIPTION OF THE MACHINE ..........14 DESIGNATED USE ..............14 R9V TECHNICAL SPECIFICATIONS ........14 MACHINE DESCRIPTION ............15 ACCESSORY ................16 TECHNICAL DATA ..............16 INSTALLATION ................17 CONNECTIONS TO BE PROVIDED BY THE USER ....18 4.1.1... - Page 5 START UP ................20 DIGITAL DISPLAY GLOSSARY ..........21 FACTORY SETTINGS OF YOUR MACHINE ......23 PRESSURE PROFILE SETTINGS .........23 PERSONALISE YOUR R9V.............23 5.4.1 LANGUAGE SETTINGS ............23 5.4.2 TEMPERATURE SETTINGS (UNITS) ......24 5.4.3 CHANGE THE TEMPERATURE OF THE COFFEE BOILER ..........24 5.4.4 CHANGE THE TEMPERATURE OF THE SERVICE BOILER ..........24...
-
Page 6: Introduction
- INTRODUCTION BEFORE PERFORMING ANY OPERATION ON THE MACHINES, THE OPERATORS MUST CAREFULLY READ THE INSTRUCTIONS CONTAINED IN THIS PUBLICATION (AND IN ATTACHED ONES) AND FOLLOW THEM THROUGHOUT THE INTERVENTIONS. IF IN DOUBT ON THE CORRECT INTERPRETATION OF THE INSTRUCTIONS, CONTACT OUR ASSISTANCE SERVICE FOR THE NECESSARY CLARIFICATIONS. -
Page 7: General Information
1.2 GENERAL INFORMATION This user manual is an essential part of the safe operation of your Rocket Espresso machine, therefore it is important that you read the enclosed warnings and cautions carefully. Particularly information concerning safety during installation, operation and cleaning. Please keep this User Manual in a safe place where it can be made available to all users. -
Page 8: Safety Instruction
The installation and repair must conform to local electrical and plumbing safety codes and regulations. 10. Installation of any Rocket Espresso machine must only be undertaken by duly authorized and properly trained and qualified personnel. 11. This machine is only safe when it has been correctly connected to an efficient earthing/ grounding system. - Page 9 ‘off’ position at the machine power switch and discon- nect it from the electrical supply. Do not attempt to repair it. Contact a Rocket Espresso qualified and authorized technician. Any repair must be performed by the manufacturer or by an authorized dealer using only original parts.
-
Page 10: Declaration Of Conformity
■ R NINE ONE ■ BOXER e BOXER timer ■ RE timer ■ R9 ■ RE DOPPIA ■ R9V are in conformity with the applicable requirements of the following documents: EN 55014-1:2006+A1:2009 + A2:2011 EN 60335-2-15:2002+A1:2005+A2:2008+A11:2012 EN 55014-2:1997+A1:2001+A2: 2008 EN 60335-1:2012... -
Page 11: Transport And Installation
traces of tampering, damaged parts, etc. - TRANSPORT AND It will also be necessary to check that the machine is complete with all its parts, any INSTALLATION accessories and technical documentation as per the transport documentation. The machine installation per- CAUTION! Before proceeding sonnel must, before proceeding, with the installation, in case... -
Page 12: Packed Machine
MACHINE UNDER MAINTENANCE damage the structure. 2.1.1 Packed machine For opening cut the straps and remove the cover (fig. 2.3 - fig. 2.4). State of the machine: packaging on the floor or on the vehicle. Operators in charge: 2 qualified operator 2 qualified technician Personal protective equipment to be used: CAUTION: Wear protective gloves... -
Page 13: Unpacked Machine
Avoid to let the machine un- packed outdoor, always keep in a place where atmospheric agents cannot damage the product. Do not clean with acids the ma- chine, they will get damaged in MACHINE an irreversible way. For cleaning UNDER use only commercial products, MAINTENANCE for chromed steel surfaces or... -
Page 14: Machine Movement Installed
In the case of a failure or if the machine is not working properly, switch it off and do not attempt any direct repair. Contact the service center. 3.2 R9V technical specifica- tions Features ■ Programmable pressure profile system ■... -
Page 15: Machine Description
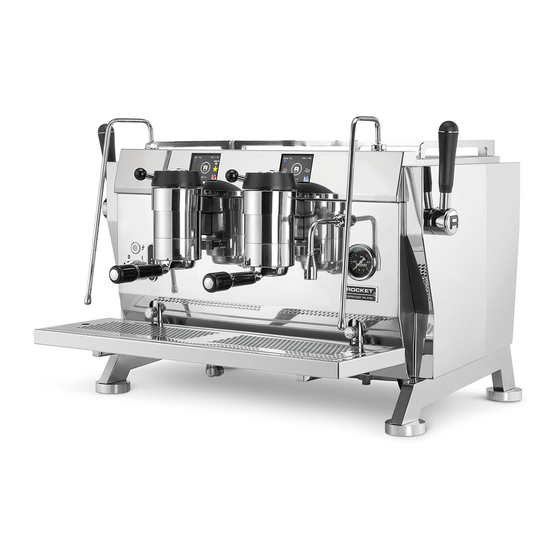
ON/OFF: ‘O‘ = OFF and ‘1’ = ON. Steam wand for steaming milk: caution can be become and cause burns. Steam tap lever. Upper grid cup warmer R9V 2GR Digital touch display. Hot water wand Boiler Pressure gauge Drip tray with grid Group control paddle 10. -
Page 16: Accessory
3.4 Accessory 3.5 Technical data The machine is supplied complete with a rich Voltage series of accessories (fig._3.3) ■ Please refer to the technical data plate on Check the box and packaging to ensure the machine that the following parts and accessories are included: Wattage 1. -
Page 17: Installation
- INSTALLATION The Coffè machine is only to be installed in locations where use and maintenance is restricted to trained personnel. The support surface shall be leveled, dry, smooth, steady and stable and at such a height that the cup-warming surface is at over 150 cm from ground. -
Page 18: Connections To Be Provided By The User
4.1 Connections to be provided 4.1.1 Water supply by the user (Fig.4.3) Connections must be carried out Make sure that the maximum supply by qualified personnel in full pressure of water does not exceed accordance with federal, state 6.5 bar; otherwise, install a pressure and local regulations. -
Page 19: Water Drain
technician in charge of installation is required 4.1.3 Electric supply to perform all the hydraulic connections so that they are totally compliant to all the related rules, regulations and provisions in force in the Before connecting the machine installation site on hygiene, hydraulic system ensure that the type label details safety and environmental protection. -
Page 20: Installing Steam Tap Levers
It is necessary to provide a circuit breaker at - START UP the start of the power cable, complete with magnetic release elements in accordance with We assume the machine has been properly the type label details. The contact opening installed. - Page 21 between symbols. Machine temperature is always indicated above this symbol. symbols indicates the selected pressure profile being used. symbol indicates manual mode symbol recalls last saved manual profile fig_5.2 Turn the paddle of both groups (5-6) to release a cup of hot water from the group - first time use only.
- Page 22 fig_5.6 fig_5.7 Screen 2 (fig._5.6) symbol indicates the service boiler 17.Press symbol to set your single/dou- is turned off/on ble coffee volumes Press symbol to select language, 18.Press symbol to put machine on water source (tank or water supply) and standby temperature C°...
- Page 23 5.2 Factory settings of your 5.4 Personalise your R9V machine Prior to delivery your Rocket R9V espresso machine has been tested. The factory settings 5.4.1 Language Settings mean that your machine is set and ready for use. Default settings are as follows Screen 2 - Spanner Symbol ■...
- Page 24 5.4.2 Temperature Settings 5.4.3 Change the Tempera- (units) ture of the Coffee Boiler Screen 2 - Spanner Symbol Screen 2 - Temperature Symbol ■ Go to the second screen menu and press ■ Go to the second screen menu and press symbol symbol fig_5.10...
- Page 25 5.4.4 Change the Temperature 5.4.5 Switch Service Boiler of the Service Boiler On/Off Screen 2 - Temperature Symbol Screen 2 - Steam On ■ Go to the second screen menu and press ■ Go to the second screen menu symbol ■...
- Page 26 5.4.6 Setting the Date 5.4.7 Setting the Day and Time Screen 2 - Clock Screen 2 - Clock ■ Go to the second screen menu ■ Go to the second screen menu ■ Press the symbol ■ Press the symbol fig_5.19 fig_5.21 Time adjust screen...
- Page 27 Automatic Start – Off 5.5 How to program auto ON/OFF ■ Press to navigate through to the automatic start menu. Each day the machine can be programmed ■ To enable feature press so that to turn on and off twice. appears and the graphic displays ON.
- Page 28 Monday T1 – Stop time fig_5.27 ■ Press once to set ‘T1’ stop time. ■ Press to set hour. Press MONDAY T2 to advance or decrease hour. ■ Press to set minutes. Press START to advance or decrease minutes 17 : 00 ■...
- Page 29 fig_5.30 5.6 SETTING THE COFFEE VOL- UME PORTIONS (volumetric portion control) A flow meter allows the machine to calculate the precise coffee volume you would like from the single or double porta filter. (Generally 25 to 30ML from the single porta filter and 50 to 60 ML from the double porta filter).
- Page 30 5.7 SETTING DRIP TRAY HEIGHT 5.8 PRESSURE PROFILES Loosen the two screws (1 - fig._5.31) and The R9V pressure profile system allows up lower or raise the drip tray (2) to the desired to 5 time interval and pressure adjustments height.
- Page 31 indicated by the profile on the screen. The 5.8.1 USING THE MACHINE IN display will allow you to monitor pressure, MANUAL MODE time and water volume. To use the machine manually and create you fig_5.36 own profile. Screen 1 – Graph symbol 1.
- Page 32 head. Turn the paddle (or operate automat- - MACHINE OPERATION ically through the display) to release heated water and start the brewing process. Make sure that the machine is 6. To stop the brewing process return the ready for full safety operation as described in the previous group control paddle to the starting position chapters...
- Page 33 10. More details of brewing coffee and steam- ing milk are outlined in the Mano section of STEAM NOZZLES this Rocket Espresso handbook. 1. Clean the steam nozzle after every use by wiping with a damp cloth. Turn the steam wand on to release condensation and milk residue.
- Page 34 HOT WATER NOZZLE 3. Empty the basket of the detergent and backflush using water only as above until 1. Clean the hot water spout, check that the the group is thoroughly cleansed of deter- nozzle is not encrusted. Unscrew the noz- gent residue.
- Page 35 BODYWORK 1. Wipe the stainless steel surfaces with a soft, non-abrasive and damp cloth. Polish using a dry, soft cloth. The Rocket Espresso supplied stainless steel cloth is best for the cleaning of your machine body work. We do not recommend using any of the com- mercial stainless steel cleaners.(fig._7.7)
- Page 36 DESCALING Water escaping from around the handle 1. Rocket Espresso do not recom- ■ Check the head seals. If they have dried mend descaling your espresso out, they will need to be replaced. machine. ■ Ensure the group handles are kept in place 2.
- Page 37 Low or no pressure from steam wand - DISMANTLEMENT ■ May be due to overuse of the group head Proceed with the emptying of the products or hot water tap. Give the machine time to and of the water as described in the previous recover pressure.
- Page 38 Note...
- Page 40 All rights reserved. This manual may not be reproduced, in whole or in part, without the prior written authorization of ROCKET MILANO s.r.l. ROCKET MILANO s.r.l. reserves the right to make any changes it deems necessary at any time. ROCKET MILANO S.R.L. Via Curiel 13, 20060 LISCATE (MI) Italy...
Need help?
Do you have a question about the R9V and is the answer not in the manual?
Questions and answers