Table of Contents
Advertisement
Available languages
Available languages
Advertisement
Table of Contents

Subscribe to Our Youtube Channel
Related Manuals for Gaggia Multix style PROFESSIONAL

Summary of Contents for Gaggia Multix style PROFESSIONAL
- Page 1 All manuals and user guides at all-guides.com...
- Page 2 All manuals and user guides at all-guides.com...
- Page 3 All manuals and user guides at all-guides.com I s t r u z i o n i p e r l ' u s o p a g . 2 I n s t r u c t i o n s f o r u s e p a g .
- Page 4 All manuals and user guides at all-guides.com...
-
Page 5: Dati Tecnici
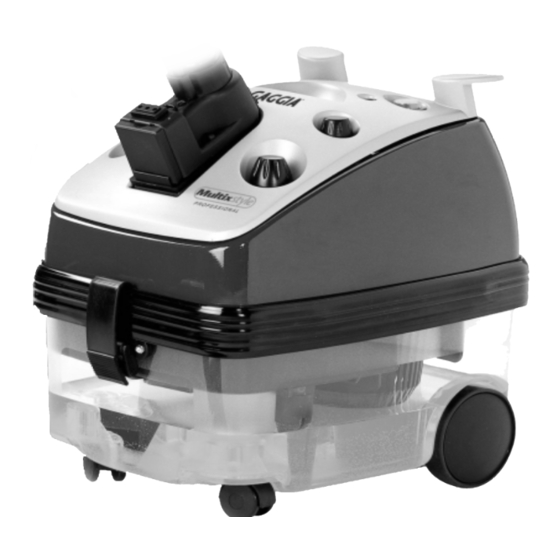
All manuals and user guides at all-guides.com A Manopola regolazione aspirazione B Interruttore caldaia Q Flessibile C Spia luminosa rossa (mancanza acqua) R Bocchettina per tessuti D Presa accessori S Lancia E Tappo di riempimento T Spazzola multiuso F Gancio di apertura U Tubi prolunga G Serbatoio di recupero V Spazzola tergivetro... - Page 6 All manuals and user guides at all-guides.com Gentile Cliente, il gradimento da Lei dimostratoci con l'acquisto del nostro apparecchio merita molto di più di un semplice ringraziamento. Per noi è un'importante manifestazione di fiducia di cui Le siamo molto grati. Il giusto riconoscimento per la Sua scelta non può...
-
Page 7: Precauzioni Per L'utilizzo
All manuals and user guides at all-guides.com PRECAUZIONI PER L'UTILIZZO Prima di utilizzare il Generatore - Aspiratore - Stiro, leggere attentamente le presenti istruzioni d'uso. La ditta Costruttrice declina ogni responsabilità per eventuali danni a persone o cose causati dall'inosservanza di quanto qui di seguito riportato o dall'utilizzo improprio dell'apparecchio. -
Page 8: Prescrizioni Di Sicurezza
- Se dal tappo di riempimento (E) dovesse fuoriuscire un forte e continuo getto di vapore, spegnere l'apparecchio e rivolgersi ad un Centro Assistenza Autorizzato Gaggia. - Per eventuale sostituzione del tappo di riempimento (E) e degli altri dispositivi di controllo e sicurezza, usare esclusivamente ricambi originali. - Page 9 All manuals and user guides at all-guides.com SEQUENZE OPERATIVE DI PREPARAZIONE Prima di utilizzare l'apparecc hio eseguire le seguenti operazioni: - Svitare il tappo di riempimento (E) (Fig. 4) - Introdurre acqua del rubinetto o demineralizzata nella caldaia utilizzando l'apposita bottiglia (1) (Fig. 5) Svita Avvita Una volta raggiunto il livello di riempimento, la bottiglia...
-
Page 10: Funzionamento
All manuals and user guides at all-guides.com ATTACCO DEL TUBO FLESSIBILE PER LA FUNZIONE VAPORE ASPIRAZIONE (Fig. 8-9) - Aprire completamente lo sportello (2) della presa accessori (D) ed inserire l'attacco rapido (3) del tubo flessibile (o del ferro da stiro) nella presa posta sulla parte anteriore dell'apparecchio, premendo a fondo (Fig. - Page 11 All manuals and user guides at all-guides.com NOTA Entrambe le funzioni di aspirazione o di erogazione vapore possono essere eseguite contemporaneamente. NOTA Per un migliore funzionamento e durata degli accessori, pulire e lubrificare periodicamente con grassi siliconici gli o ring di tenuta (7 - 8) (Fig. 12) e tutte le parti d'innesto.
- Page 12 All manuals and user guides at all-guides.com MONTAGGIO INSERTI RIGIDI (Z BIS) SU TELAIO SETOLATO (Z ) (Fig. 18) Per il montaggio degli inserti rigidi (Z BIS) per moquettes e tappeti sul telaio setolato (Z ) inserirli nelle apposite guide con le linguette rivolte all'interno. MONTAGGIO INSERTI SETOLATI (Z BIS) SU TELAIO SETOLATO (Z...
- Page 13 All manuals and user guides at all-guides.com LANCIA (S) (Fig. 20) La lancia (S) viene utilizzata per particolari tipi di pulizie: fessure tra mobili, giunzione di sedili o divani, angoli acuti, ecc. dove lo sporco è maggiormente resistente ed è necessaria una particolare igiene.
- Page 14 All manuals and user guides at all-guides.com - L'accensione della spia rossa (C) indica che la caldaia è rimasta senz'acqua: in questo caso, interviene il termostato che blocca automaticamente l'apparecchio. Procedere quindi come segue: a) Smettere immediatamente di lavorare e spegnere la caldaia agendo sull'interruttore (B - Caldaia).
-
Page 15: Accessori Opzionali
All manuals and user guides at all-guides.com ACCESSORI OPZIONALI FERRO DA STIRO (Fig. 25 - 26) UTILIZZO DEL GENERATORE PER STIRARE Per il suo utilizzo inserire l'attacco (3) del ferro da stiro nella sede della presa accessori (Fig. 25A) al posto del tubo flessibile, come descritto a pag. - Page 16 All manuals and user guides at all-guides.com PRODOTTO ANTISCHIUMA-ANTIMUFFA OPZIONALE Previene la formazione di schiuma, nel caso venissero aspirate sostanze schiumose ed evita che nel tempo (max 30 giorni) si formino muffe nel serbatoio di recupero. USO: versare l'antischiuma-antimuffa nel serbatoio di recupero (G), nelle quantità indicate sul flacone fornito.
- Page 17 All manuals and user guides at all-guides.com ACCESSORI OPZIONALI PER LE FUNZIONI VAPORE - ASPIRAZIONE SPAZZOLA TONDA CON INSERTI MORBIDO, RIGIDO O TRIANGOLARE RIGIDO Viene applicata sull'impugnatura o sui tubi prolunga ed è utilissima per aspirare la polvere dagli interstizi. Sono disponibili tre diversi inserti con setole morbide, rigide o di forma triangolare con setole rigide, che vengono inseriti sul corpo spazzola tondo.
- Page 18 All manuals and user guides at all-guides.com ACCESSORI OPZIONALI PER LE FUNZIONI VAPORE - ASPIRAZIONE SPAZZOLA ROTANTE A DEPRESSIONE Unisce all'azione igienizzante del vapore l'effetto della depressione generata dall'aspirazione del motore, permettendo di rimuovere peli, polvere ed impurità da tutte le superfici tessili (tappeti, moquettes, divani, sedili di automobili, ecc.) INSERIMENTO: Inserire la spazzola nella parte terminale femmina del tubo prolunga (U) o...
- Page 19 All manuals and user guides at all-guides.com ACCESSORI OPZIONALI PER LA SOLA FUNZIONE ASPIRAZIONE UTILIZZO DEGLI ACCESSORI Per l'utilizzo degli accessori inserire il raccordo monoblocco (33) del tubo flessibile (32) (Fig. 29) nella sede della presa accessori al posto del tubo flessibile, come descritto a pag. 8 (Fig.
- Page 20 All manuals and user guides at all-guides.com ACCESSORI OPZIONALI PER LA SOLA FUNZIONE ASPIRAZIONE (a) TUBO TELESCOPICO Particolarmente utile per raggiungere punti alti o nascosti (sotto i mobili, divani, letti). Si applica direttamente sull'impugnatura (34). (b) LANCIA ASPIRAZIONE Indicata per particolari tipi di pulizie (fessure tra mobili, sedili o divani) dove risulta difficoltosa l'aspirazione.
- Page 21 All manuals and user guides at all-guides.com ACCESSORI OPZIONALI PER LA SOLA FUNZIONE ASPIRAZIONE (e) PIASTRA FELTRO Si applica alla spazzola (d) e in questo modo é possibile pulire efficacemente il parquet. (f) SPAZZOLA TERMOSIFONE Utile per la pulizia degli spazi come le fessure dei termosifoni e tutte le superfici di piccole dimensioni difficili da raggiungere.
-
Page 22: Manutenzione
All manuals and user guides at all-guides.com MANUTENZIONE ATTENZIONE La manutenzione deve essere eseguita a macchina spenta e con spina di corrente staccata. Svita Effettuare periodicamente (circa ogni 100 ore di funzionamento, oppure ogni 6 mesi) il lavaggio della caldaia utilizzando un apposito prodotto disincrostante in commercio (per l'utilizzo seguire le indicazioni riportate sul prodotto) operando come segue:... -
Page 23: Pulizia Degli Accessori
All manuals and user guides at all-guides.com PULIZIA Prima di pulire la macchina, è indispensabile disinserirel'interruttore generale e staccare la spina dalla presa di corrente. Inoltre, aspettare che la macchinasi raffreddi. Mai immergere l'apparecchio nell'acqua! E' Severamente vietato cercare di intervenire all'interno della macchina. - Page 24 All manuals and user guides at all-guides.com...
-
Page 25: Technical Data
All manuals and user guides at all-guides.com e n g l i s h A Suction regulation knob B Boiler switch Q Work hose C Red warning light (no water) R Textiles tool D Accessories socket S Nozzle E Fill-up cap T Multipurpose brush F Opening catch U Extension tubes... - Page 26 All manuals and user guides at all-guides.com e n g l i s h Dear Customer, The appreciation you have shown in purchasing this appliance deserves much more than a simple thank you note. Your purchase is an important expression of confidence and we are very grateful about that.
- Page 27 All manuals and user guides at all-guides.com e n g l i s h PRECAUTIONS TO BE TAKEN WHEN USING THE MACHINE Before using the Steam Generator / Suction cleaner / Iron, read these instructions care- fully. Under no circumstances shall the manufacturing Company be held responsible for any damage to people or property that may be caused by a failure to follow the instruc- tions given below or by improper use of the equipment.
-
Page 28: Safety Precautions
All manuals and user guides at all-guides.com e n g l i s h WARNING Any servicing of the supply cable must exclusively be carried out by personnel from the GAGGIA after-sales service. IMPORTANT - If a violent and continuous jet of steam is ejected from the fill-up cap (E), switch off the appliance and contact one of the Gaggia Authorised Service Centres. - Page 29 All manuals and user guides at all-guides.com e n g l i s h PREPARING THE APPLIANCE READY FOR USE Before using the appliance, carry out the following operations: - Unscrew the fill-up cap (E) (Fig. 4). - Pour tap or demineralised water into the boiler, using the fill bottle provided (1) (Fig.
-
Page 30: Operating The Appliance
All manuals and user guides at all-guides.com e n g l i s h CONNECTING THE HOSE FOR THE STEAM/VACUUM FUNCTION (Fig. 8-9) - Open the flap (2) of the accessories socket (D) and plug the quick connection (3) of the hose (or of the iron) into the socket located on the front portion of the appliance. - Page 31 All manuals and user guides at all-guides.com e n g l i s h NOTE Both functions, suction and steam delivery, can be carried out at the same time. NOTE For improved accessories performance and durability, regularly clean the O-rings (7-8) (Fig. 12) and all connecting parts and lubricate with silicone-based grease.
- Page 32 All manuals and user guides at all-guides.com e n g l i s h FITTING THE STIFF INSERTS (Z AND Z BIS) ONTO THE BRISTLED FRAME (Z ) (Fig. 18) To fit the stiff inserts (Z and Z BIS) for fitted and non-fitted carpets onto the bristled frame (Z ), introduce the inserts into the appropriate guides with the tabs facing inwards.
- Page 33 All manuals and user guides at all-guides.com e n g l i s h NOZZLE (S) (Fig. 20) The nozzle (S) is suitable for specific cleaning jobs: crevices between furniture units, seams in seats or sofas, sharp cor- ners, etc. – where dirt is generally more stubborn and where special hygiene is required.
- Page 34 All manuals and user guides at all-guides.com e n g l i s h When the red warning light (C) is on, it indicates that there is no water in the boiler: if this happens, the thermostat will automatically stop the appliance. Carry out the following proce- dure: a) stop your cleaning job immediately and switch off the boiler by pressing the switch (B- Boiler)
-
Page 35: Optional Accessories
All manuals and user guides at all-guides.com e n g l i s h OPTIONAL ACCESSORIES IRON (Fig. 25-26) USING THE STEAM GENERATOR FOR IRONING To use the steam generator for ironing, introduce the iron connector into the accessories socket (Fig. - Page 36 All manuals and user guides at all-guides.com e n g l i s h FOAM-AND-MOULD GUARD (OPTIONAL) This product prevents foam formation when picking up foamy agents. It also prevents the build-up of moulds in the recovery tank (for max 30 days). HOW TO USE: mix the product in the recovery tank (G) in the quantities specified on the bottle provided.
- Page 37 All manuals and user guides at all-guides.com e n g l i s h OPTIONAL ACCESSORIES FOR THE STEAM / VACUUM FUNCTIONS ROUND BRUSH WITH SOFT, STIFF OR STIFF TRIANGULAR INSERTS This round brush is designed to be connected to the handle or to the extension tubes and is handy for vacuuming dust from crevices.
- Page 38 All manuals and user guides at all-guides.com e n g l i s h OPTIONAL ACCESSORIES FOR THE STEAM / VACUUM FUNCTIONS ROTATING DEPRESSION BRUSH This tool combines the hygienic cleaning power of steam and the depression effect generated by the motor’s suction, thus enabling the removal of hairs, dust and impurities from all textile surfaces (car- pets, fitted carpets, sofas, car seats, etc.).
- Page 39 All manuals and user guides at all-guides.com e n g l i s h OPTIONAL ACCESSORIES FOR THE VACUUM FUNCTION ALONE USING THE ACCESSORIES To use the accessories, introduce the connec- tion piece (33) of the work hose (32) (Fig. 29) into the accessories socket –...
- Page 40 All manuals and user guides at all-guides.com e n g l i s h OPTIONAL ACCESSORIES FOR THE VACUUM FUNCTION ALONE (a) TELESCOPIC TUBE This tool is particularly handy for reaching high or concealed areas (under furniture, sofas, beds). This tool must be fitted directly onto the handle (34).
- Page 41 All manuals and user guides at all-guides.com e n g l i s h OPTIONAL ACCESSORIES FOR THE VACUUM FUNCTION ALONE (e) FELT PLATE The felt plate should be applied to the brush (d) to clean parquet floors effectively. (f) RADIATOR BRUSH This tool is useful for cleaning gaps in the radiators, and any small surface that is particularly hard to reach.
-
Page 42: Maintenance
All manuals and user guides at all-guides.com e n g l i s h MAINTENANCE ATTENTION Maintenance of the appliance must be carried out Unscrew when the machine is switched off and unplugged. Approximately every 100 hours of operation, or every 6 months, wash the boiler using an appro- priate scale removing product available on the market (follow the instructions given by product... -
Page 43: Cleaning The Appliance
All manuals and user guides at all-guides.com e n g l i s h CLEANING THE APPLIANCE Before cleaning the appliance you should make sure that the main switch is OFF and the plug is disconnected from the wall socket. Also, you should allow the machine to cool down.
Need help?
Do you have a question about the Multix style PROFESSIONAL and is the answer not in the manual?
Questions and answers