Table of Contents
Advertisement
Quick Links
Advertisement
Table of Contents

Related Manuals for Tascam RC-900


Summary of Contents for Tascam RC-900
- Page 1 D01176620C RC-900 Remote Control Unit OWNER'S MANUAL...
- Page 2 CE Marking Information and retain them for your records. a) Applicable electromagnetic environment: E4 Model number b) The average half-cycle r.m.s. inrush current Serial number 1. On initial switch-on : 0.11Arms 2. After a supply interruption of 5s : 0.55Arms TASCAM RC-900...
- Page 3 TASCAM RC-900...
-
Page 4: Table Of Contents
When using an HS-2, HS-2000 or HS-4000 ..13 When using a SS-CDR200/SS-R200 .....13 6 – Specifications ..............19 Adjusting the display and indicators ......14 General .................19 Adjusting display contrast ........14 Dimensional drawings ............19 Adjusting display brightness .........14 Adjusting indicator brightness ......14 TASCAM RC-900... -
Page 5: Introduction
Take care when opening the package not to damage the items. Keep the packing materials for transportation in the future. Please contact TASCAM if any of these items are missing or have been damaged during transportation. • Main unit ....................1 •... -
Page 6: Precautions For Placement
Once every five years, please contact the retailer where you • Places with significant vibrations or that are otherwise purchased the unit or a TASCAM service center for internal unstable cleaning. If the unit is not cleaned for a long time and dust is •... -
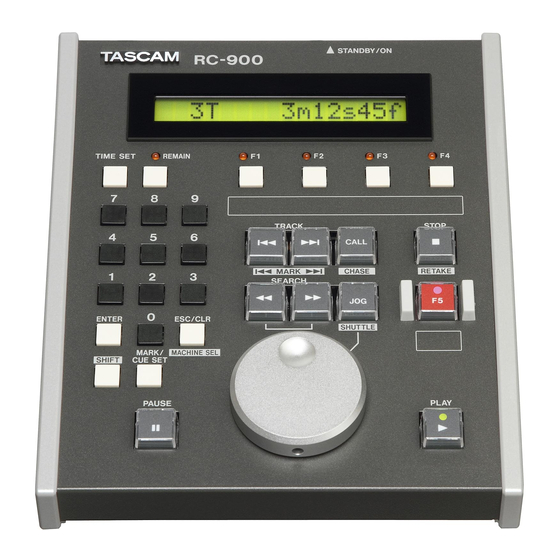
Page 7: Names And Functions Of Parts
You cannot adjust the brightness of another TIME SET button connected unit. When the playback mode is continuous or single, press this button to enable time input in the track (take) time display area. Use the number (0–9) buttons to input the time. TASCAM RC-900... - Page 8 • At the current position when you press the PAUSE button PAUSE button/indicator when in JOG mode. When using a CD-9010CF or CD-9010: This has the same function as the STANDBY button. When stopped or during jog playback, press this button to enter playback standby at that point. TASCAM RC-900...
- Page 9 ON might be possible. However, turning jog or shuttle mode ON using the connected main unit might NOTE not turn jog or shuttle mode ON for this unit. • When using an SS-CDR200 or SS-R200, the search speed cannot be increased with this operation. TASCAM RC-900...
-
Page 10: Rear Panel
Rear panel Cord holder RS-232C SEL switch Use this to hold the cord of the included TASCAM PS-P520 Use to select the active unit connector. Set the switch to g AC adaptor to prevent it from becoming accidentally discon- to activate the TO DEVICE connector. Set the switch to t to nected. -
Page 11: Preparations
Set the RS-232C SEL switch to g. Example of connection with an SS-CDR200/SS-R200 CAUTION Before disconnecting the connection cable, always turn OFF the power of both this unit and the connected unit. Connecting this cable with the power on could damage the unit. TASCAM RC-900... -
Page 12: Powering The Unit
(See “Function button shock. assignments according to machine selection” below.) • This unit receives its power through the TASCAM PS-P520 AC • This setting is retained even when this unit’s power is turned adaptor. No power is supplied through the connection cable. -
Page 13: Making Communication Settings On The Main Unit
6. After making the settings, press the SS-CDR200/SS-R200 Turn the CD-6010 TRACK SKIP/DATA knob, and press the HOME/DISPLAY button to return to the Home Screen. TRACK SKIP/DATA knob to confirm the selection. 4. Press the CD-6010 MENU button to exit menu mode. TASCAM RC-900... -
Page 14: Adjusting The Display And Indicators
NOTE • The display brightness setting is retained even when the unit’s power is turned OFF. • This operation only adjusts the brightness of this unit’s display. This unit cannot adjust the brightness of the connected main unit. TASCAM RC-900... -
Page 15: Operation
(0–9) buttons to input the connected machine. For details, please refer to the Owner’s elapsed time from the beginning of the track (take). Input Manual for the connected machine. two digits each for minutes, seconds and frames for audio TASCAM RC-900... -
Page 16: Cue Point Playback
For details, please refer to the Owner’s Manual for the connected machine. Playback from a cue point Press a function (F1–F4) button that has a lit indicator to enter playback standby at the cue point assigned to that button. TASCAM RC-900... -
Page 17: Editing Tracks (Takes)
Press the ESC/CLR [MACHINE SEL] or STOP button to cancel division. 4. After setting the division point, press the ENTER button to divide the track. 5. A pop-up message will appear after division Successful completes. TASCAM RC-900... -
Page 18: Other Functions
SEARCH m/, SEARCH m/, buttons buttons SHIFT + / SHIFT + / button(END CHK) button(END CHK) PAUSE button PAUSE button JOG button PLAY button (monitoring playback)* None None *Only when the connected device setting is “6: CD-9010 [B]” TASCAM RC-900... -
Page 19: Specifications
6 – Specifications General Power supply voltage AC adaptor (TASCAM PS-P520. included) AC adaptor input : AC 100-240V, 1.0A AC adaptor output : DC +5V, 2.0A Power consumption 1 W or less Dimensions (width × height × depth) 176 x 59 x 215 mm Weight 1.4 kg... - Page 20 RC-900 TEAC CORPORATION Phone: +81-42-356-9143 1-47 Ochiai, Tama-shi, Tokyo 206-8530 Japan TEAC AMERICA, INC. Phone: +1-323-726-0303 7733 Telegraph Road, Montebello, California 90640 USA TEAC MEXICO, S.A. de C.V. Phone: +52-55-5010-6000 Río Churubusco 364, Colonia Del Carmen, Delegación Coyoacán, CP 04100, México DF, México...
Need help?
Do you have a question about the RC-900 and is the answer not in the manual?
Questions and answers