Table of Contents
Advertisement
May 2021
Falcon®+ Operator Manual
9306900OM-EN
Revision 21-01
Original Instructions
Falcon®+
WARNING
Read this manual thoroughly before attempting to operate or service this
equipment. Keep a current copy for your reference.
®
© 2019, 2021 OPEX
Corporation
All rights reserved. This document is provided by OPEX for use by their customers, partners and dealers. No portion
of these materials may be reproduced, published, or stored in a database or retrieval system, other than for its
intended use without the express, written consent of OPEX Corporation.
Advertisement
Table of Contents

Subscribe to Our Youtube Channel
Related Manuals for Opex Falcon+


Summary of Contents for Opex Falcon+
- Page 1 © 2019, 2021 OPEX Corporation All rights reserved. This document is provided by OPEX for use by their customers, partners and dealers. No portion of these materials may be reproduced, published, or stored in a database or retrieval system, other than for its...
-
Page 2: Contacting Opex
Fax: +1 856.727.1955 https://www.opex.com/ If you find errors, inaccuracies, or any other issues or concerns with this document, please contact the OPEX Technical Writers via email at: GroupTechwriters@opex.com For help with opexservice.com website-related issues, please contact the OPEX Web Developers via email at: GroupWebDev@opex.com... -
Page 3: Ec Declaration Of Conformity
I, the undersigned, hereby declare that the equipment specified above conforms to the above Directive(s) and Standard(s). Place: Moorestown, New Jersey USA (Signature) Date: August 26, 2016 H. Scott Maurer (Full Name) President, OPEX International (Position) Falcon®+ Operator Manual OPEX Corporation... - Page 4 Ref. Certif. No. US/6554/ITS-M1 IEC SYSTEM FOR MUTUAL RECOGNITION OF TEST CERTIFICATES FOR ELECTRICAL EQUIPMENT (IECEE) CB SCHEME Falcon®+ Operator Manual OPEX Corporation...
-
Page 5: Document History
0.4. Translation History Table 1: Revision history for translated manuals Source Translation Details (click blue text to Date (English version) Revision go to that page) Operator Manual Language codes: German Spanish Italian Korean English French Japanese Polish Falcon®+ Operator Manual OPEX Corporation... -
Page 6: Table Of Contents
Table of Contents 0.1. Contacting OPEX ..................2 0.2. EC Declaration of Conformity ..............3 0.3. Document History ................... 5 0.4. Translation History .................. 5 Chapter 1 Introduction 1.1. About the Manual .................. 12 1.1.1. Manual navigation aids ..............12 1.2. - Page 7 4.11. Editing a Batch While Scanning ............80 4.12. Suspending and Resuming Multiple Batches ........81 4.12.1. CertainScan Internal Batch Editor ..........82 4.12.2. Closing a Batch ................83 4.13. Rescan Feeder ................... 84 Table of Contents Falcon®+ Operator Manual OPEX Corporation...
- Page 8 5.6.2. Contact Image Sensor ..............111 5.6.3. Feed Assembly ................112 Chapter 6 Statistics and Batch Output File Extensions 6.1. Falcon+ Statistics ................114 6.1.1. Creating Statistic Reports ............114 6.1.2. General Information ..............116 Table of Contents Falcon®+ Operator Manual OPEX Corporation...
- Page 9 6.1.3. Overall System Performance Measures ........117 6.1.4. Performance Details ..............118 6.1.5. Reject Terms ................119 6.1.6. Jams .................... 122 6.1.7. Stops ................... 128 6.2. Batch Output File Extensions .............. 130 6.2.1. Extensions: .................. 130 Table of Contents Falcon®+ Operator Manual OPEX Corporation...
- Page 10 (This page is intentionally blank) Table of Contents Falcon®+ Operator Manual OPEX Corporation...
-
Page 11: Introduction
1. Introduction 1.1. About the Manual ........12 1.1.1. -
Page 12: About The Manual
1.1. About the Manual WARNING Read this chapter thoroughly before using this equipment. This manual contains information about the OPEX Falcon+ series of scanners, operational procedures and safety-related components, including: • safety information, safety hazards and precautions • main component identification and function •... -
Page 13: Safety Message Conventions
Indicates a hazardous situation that, if not avoided, could result in death or serious injury. CAUTION Indicates a hazardous situation that, if not avoided, could result in minor or moderate injury. NOTICE Indicates information considered important, but not hazard related (e.g. messages relating to property damage). Introduction Falcon®+ Operator Manual OPEX Corporation... -
Page 14: Safety Guidelines
1.3. Safety Guidelines The information provided in this section is intended to educate you on various safety issues regarding the operation and maintenance of the OPEX equipment, and provides an explanation of the safety guidelines to be observed when working with this equipment. -
Page 15: Ergonomics
Falcon+ if you put these suggestions into practice. The scanner has been designed with you in mind. If it is operated correctly, you should find your work experience comfortable and enjoyable. Introduction Falcon®+ Operator Manual OPEX Corporation... - Page 16 (This page is intentionally blank) Introduction Falcon®+ Operator Manual OPEX Corporation...
-
Page 17: Overview
2. Overview 2.1. Main Controls and System Components ....18 2.2. Equipment Model/Serial Number Location....22 2.3. -
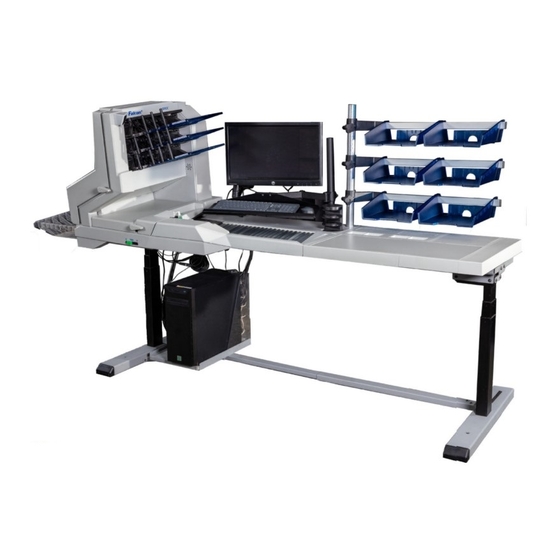
Page 18: Main Controls And System Components
Conveyor/Feeder Thickness Measuring Integrated Device (TMD) Work Station Override Rescan Feeder drop slot, MFD Override, CIS (inside scanner) Windows 10-based Host Computer with CertainScan Software Main Power Switch Figure 2-1: Main Controls and Components Overview Falcon®+ Operator Manual OPEX Corporation... - Page 19 UPS. Host Computer The 64-bit computer with Windows 10 operating system houses OPEX’s feature-rich CertainScan 5.0 host software. Touchscreen Monitor Use the monitor to log in and out of the Falcon+ system. The monitor’s touchscreen controls should be used to operate the system and run jobs.
- Page 20 Thickness Measuring Device. If the job requires the TMD, the operator will be prompted, stating that the TMD is not engaged, which requires the operator to select continue to override that piece. Overview Falcon®+ Operator Manual OPEX Corporation...
- Page 21 Rear Graphics Printer (optional) In place of the standard rear audit trail printer, this optional printer is capable of printing graphics such as signatures, logos and Code 39 barcodes. Up to five different graphics can be sprayed. Overview Falcon®+ Operator Manual OPEX Corporation...
-
Page 22: Equipment Model/Serial Number Location
2.2. Equipment Model/Serial Number Location Before contacting OPEX Technical Support, locate the Model/Serial label on your machine so that you can provide the assisting technician with your Reference Serial Number (Figure 2-2). See contact information on page Figure 2-2: Model/Serial label Overview Falcon®+ Operator Manual... -
Page 23: Falcon+ System Components
2.3. Falcon+ System Components The Falcon+ uses a Windows 10-based Host computer installed with OPEX software for controlling the machine functions, and to provide a graphical user interface for the operator. Items are scanned based on Job and Page Type configuration. -
Page 24: Specifications
• North America: 100 - 120 VAC 1 A 50 / 60Hz Electrical Specifications • Europe: 220 - 240 VAC 0.6A 50 / 60Hz UL/ANSI-62368-1, CAN/CSA STD. C22.2 No. Electrical Standards 62368-1, IEC 62368-1 Overview Falcon®+ Operator Manual OPEX Corporation... - Page 25 • Audit trail printing (front & rear) • Rear graphics printer (for signature and code Optional Features 39 Bar code printing • OPEX-provided generic mount for external capture device • Multi-slot ID Assist Tower (up to two per scanner) Falcon+, FalconV+, Falcon RED+, FalconV...
- Page 26 (This page is intentionally blank) Overview Falcon®+ Operator Manual OPEX Corporation...
-
Page 27: Operation
3. Operation 3.1. Power on the System and Launch CertainScan ... . . 28 3.2. CertainScan Operator Accounts ......29 3.3. -
Page 28: Power On The System And Launch Certainscan
4. Double-click the CS icon (Figure 3-1) on the desktop to launch CertainScan. Figure 3-1: CertainScan icon 5. The CertainScan Main screen will display for Operator Login (Figure 3-2). Figure 3-2: CertainScan Main Login Operation Falcon®+ Operator Manual OPEX Corporation... -
Page 29: Certainscan Operator Accounts
Level being the lowest level and Manager Level being the highest. These default accounts do not require passwords, and may be used in their current form to operate the scanner. However, for security purposes, OPEX recommends creating unique, password-protected operator accounts for each user, setting the appropriate operator level for each user, and then deleting the four default accounts. -
Page 30: Logon To Certainscan
2. Enter your password (Figure 3-3). 3. Press OK. Note: If the default operator accounts are not shown, and you do not have a user account, ask your Falcon+ Administrator for assistance. Figure 3-3: Enter password Operation Falcon®+ Operator Manual OPEX Corporation... -
Page 31: Certainscan Main Interface
• Job for single feed, front and back color capture. OPEX 300DPI Color: • Remittance Job for Stub, Check, etc. OPEX 300DPI Exception Mail: • Job for stack feed, front and back color capture. OPEX 300DPI Stack Feed: Operation Falcon®+ Operator Manual... -
Page 32: Select A Job To Launch Certainscan Run Screen
3.5. Select a Job to Launch CertainScan Run Screen Click on a Job in the Main Screen to open the run screen. Note that default OPEX jobs are shown in Figure 3-5. Custom Jobs will normally be shown here, when configured. - Page 33 Batch ID is configured in the Job (Figure 3-8). Figure 3-8: Prompt for Operator Entry Note: File names cannot contain the following characters: " / \ [ ] : ; | = , + * ? < >. Operation Falcon®+ Operator Manual OPEX Corporation...
-
Page 34: Job Run Screen
6. Image Viewer, separate display to view larger image of selected thumbnail (see also “Run Screen Preview Image Icons” on page 36). 7. Information Windows for scanned Job. Right-click in header for selections. 8. Job Actions buttons. Figure 3-9: Run Screen Operation Falcon®+ Operator Manual OPEX Corporation... -
Page 35: Run Screen Buttons
Start a New Batch. Press the Action button to access the Rescan, New Batch, and Void buttons. The Action button only appears if two or more of these buttons (Rescan, New Batch, Void) are enabled. Operation Falcon®+ Operator Manual OPEX Corporation... -
Page 36: Run Screen Preview Image Icons
CertainScan Edit? Image Blank - Image is known to be blank according to batch’s image data. No Snippet Metadata - Image information was not saved in the batch. This is configured in the page type. Operation Falcon®+ Operator Manual OPEX Corporation... - Page 37 An attempt will be made when the system is not busy. The host Should not appear software is probably in the middle of scanning or finishing up writing the last scanned items to disk. Operation Falcon®+ Operator Manual OPEX Corporation...
-
Page 38: Run Screen Display Views
Remittance (Figure 3-10). Service Bureau Remittance Figure 3-10: Customer Type descriptive names Note: Operators with Manager level access can set Customer Type for document separation descriptive names (System Setup > System > User Interface Settings). Operation Falcon®+ Operator Manual OPEX Corporation... - Page 39 Bin View (see page page Images with Markers View (see Group View (see page page Set/Transaction Dual View (see Images with Labels View (see page page Sequence Dual View (see Images Only View (see page page Operation Falcon®+ Operator Manual OPEX Corporation...
- Page 40 All scanned pages displayed in a single row from left to right in scan order, row header shows respective sequence number. A new row begins after the fifth image (Figure 3-12). Figure 3-12: Sequence View Operation Falcon®+ Operator Manual OPEX Corporation...
- Page 41 All scanned pages displayed in a single row from left to right in scan order with additional Groups in the Set when they exist. Scroll buttons appear on the left to scroll between Groups (Figure 3-14). Figure 3-14: Group View Operation Falcon®+ Operator Manual OPEX Corporation...
- Page 42 All scanned pages are displayed in scan order left to right and row header shows Set number. Scroll buttons provided on right to scroll between Sets (Figure 3-15). Figure 3-15: Set Dual / Transaction Dual view Operation Falcon®+ Operator Manual OPEX Corporation...
- Page 43 A new row begins after the fifth image across. Scroll buttons provided on right to scroll between sequence numbers (Figure 3-16). Figure 3-16: Sequence Dual view Operation Falcon®+ Operator Manual OPEX Corporation...
- Page 44 Sets (Figure 3-17). Figure 3-17: Group Dual view Dual Image Displays selected front and back or secondary image per Job setup. Scroll function provided to scroll through pages (Figure 3-18). Figure 3-18: Dual Image view Operation Falcon®+ Operator Manual OPEX Corporation...
- Page 45 • Example 2: Set collapsed, plus icon shows above Set marker. Groups and pages are not displayed. • Example 3: Group collapsed, plus icon shows above Group marker. No pages are displayed. Figure 3-19: Pages with Markers / Packed view Operation Falcon®+ Operator Manual OPEX Corporation...
- Page 46 • Example 3: Group is collapsed, plus icon shows left of Group marker. No pages are displayed. Page is collapsed, plus icon shows left of Page marker. No pages are displayed. Figure 3-20: Images with Markers / Full view Operation Falcon®+ Operator Manual OPEX Corporation...
- Page 47 • Images with Labels [4x2] - pages are arranged in 4 columns and 2 rows • Images with Labels [5x2] - pages are arranged in 5 columns and 2 rows Figure 3-21: Images with Labels views Operation Falcon®+ Operator Manual OPEX Corporation...
- Page 48 All pages displayed in a single row from left to right in scan order. No Set, Group or Page color markers. Includes magnify icons to enhance display view (Figure 3-22). Figure 3-22: Images Only / Snippets Only view Operation Falcon®+ Operator Manual OPEX Corporation...
-
Page 49: Image Viewer Functions
Zoom screen. Re-center the zoom by touching the new center on the monitor or use the mouse. You can also use the + and - keys on the keyboard to zoom in and out. Operation Falcon®+ Operator Manual OPEX Corporation... - Page 50 Clicking this button will make this image the Default for this page type. Close the Preview window. Use the Previous/Next arrow buttons to scroll through the batch. Use the Full Front/Full Back (or Partial Front/Partial Back) buttons to view images associated with the page type. Operation Falcon®+ Operator Manual OPEX Corporation...
-
Page 51: Information Window Selections
Imager viewer. • Batch Images: View of all pages and images in the batch. Clicking on a page will move to that page in run screen and display in Image Viewer. Operation Falcon®+ Operator Manual OPEX Corporation... - Page 52 The list of edit actions is cleared when the edited batch is saved. A new list of edit actions begins with the next batch. Operation Falcon®+ Operator Manual OPEX Corporation...
-
Page 53: Additional Information Windows
• WholesaleWorks 1: This panel is controlled by the ScanLink plug-in for the job. This panel is visible if the plug-in requests it. This panel is also labeled by the plug-in. Operation Falcon®+ Operator Manual OPEX Corporation... -
Page 54: Item Preparation
The arrow indicates the paper path. - items placed too close to the feeder to be aligned. WRONG - Place items close to the conveyor side rail and back from the feeder to RIGHT align. Operation Falcon®+ Operator Manual OPEX Corporation... -
Page 55: Skew
If the angle is greater than 2 degrees, then the system will jam for “too skewed”. If it jams for 5 degrees or more, contact your OPEX administrator. Figure 3-25: Skew examples 3.10.2. Scanning Items •... -
Page 56: Run A Job And Scan Items
Note: The conveyor operates differently depending on the Feed Mode setting: Normal, Stack, Passive. Stack feeding can be accomplished in either Stack or Normal modes. Height sensors come into effect in Stack mode. Operation Falcon®+ Operator Manual OPEX Corporation... -
Page 57: Managing Operator Account
• Add: Click for new display to enter Operator Name, access Level, Shift, Password, Language and assign to Groups, if Groups have been added and configured. • Delete: Select an Operator or select multiples to delete. Operation Falcon®+ Operator Manual OPEX Corporation... - Page 58 • Add Group: This is for Job access by Group, reference. Enter a Group Name. The Description field is free text field to enter additional information regarding the Group. • Remove Group: Select a Group to delete. This will remove Group with no confirmation. Operation Falcon®+ Operator Manual OPEX Corporation...
-
Page 59: Add New Operator
When Groups are available, select the Groups to provide Operator Group Membership. Click Save for new operator or Cancel to exit without saving. Existing OPEX defaults can be selected to Modify. Figure 3-28: Add Operator Note: Once you set up the operators required, we highly recommend that you delete all of the OPEX default operators. -
Page 60: Job Access By Group
3. Click Open to save the “Permissions.txt” file. 4. Click the Apply button which appears next to configured parameter to save. 5. Ensure the Operator Management parameter is set to Legacy. 6. Restart CertainScan. Figure 3-29: Create Permissions File Operation Falcon®+ Operator Manual OPEX Corporation... - Page 61 Description field. Click in the description field box to enter supporting information (Figure 3-30). For example: • Group Name = First Shift • Description = Banking Customer Jobs Figure 3-30: Add Group Operation Falcon®+ Operator Manual OPEX Corporation...
- Page 62 After adding Operator Groups, select an operator and click on Modify button. In the Operator display, select Available Groups and click Add button. When finished, click Save (Figure 3-31). Figure 3-31: Add Operators to Groups Operation Falcon®+ Operator Manual OPEX Corporation...
- Page 63 Next select Available Group(s) and click on Add button to place group(s) access to Jobs contained in the selected Folder. When complete, restart CertainScan to apply Job access by group feature. Figure 3-32: Add Jobs to Folder Operation Falcon®+ Operator Manual OPEX Corporation...
- Page 64 (This page is intentionally blank) Operation Falcon®+ Operator Manual OPEX Corporation...
-
Page 65: Working With Jobs
4. Working with Jobs 4.1. Overview ..........67 4.2. - Page 66 4.19. Clearing the Bins ........96 Working with Jobs Falcon®+ Operator Manual OPEX Corporation...
-
Page 67: Overview
A Job configured as Unstructured can have Page Types scanned in any sequence. The only restriction is that the boundary, in most cases an envelope, must be scanned. The boundary indicates the current set is complete, and the next set will begin. Working with Jobs Falcon®+ Operator Manual OPEX Corporation... -
Page 68: Assigning A
For example, if the job expects to see either a batch ticket or a stub to start a set, their corresponding Page Type buttons will appear in color. Figure 4-2: Sample Page Type buttons - Structured Job Working with Jobs Falcon®+ Operator Manual OPEX Corporation... -
Page 69: Page Type Locking
A Virtual Page Type is identified by a dashed line around the button and inserted by clicking on the button (Figure 4-4). Figure 4-4: Virtual Page Type example Working with Jobs Falcon®+ Operator Manual OPEX Corporation... -
Page 70: Page Sub-Types
1. When running a Job, press the Page Type button configured with Page Sub-Types. 2. Select the associated Page Sub-Type from pop-up display (Figure 4-5). 3. Scan the Page Sub-Type item and continue scanning. Figure 4-5: Page-Sub Types Working with Jobs Falcon®+ Operator Manual OPEX Corporation... -
Page 71: Adjusting The Image Quality
4.6.1. Adjusting Capture Parameter screen buttons Table 4-1: Adjust Capture Parameter screen buttons Gamma When enabled, the Gamma buttons allow you to adjust the balance between bright and dark areas of the image. Working with Jobs Falcon®+ Operator Manual OPEX Corporation... - Page 72 Mode works like a toggle: selecting it enables the alternate track speed mode. Once finished with the alternate mode, you must deselect it to revert back to the normal track speed mode. Working with Jobs Falcon®+ Operator Manual OPEX Corporation...
- Page 73 DPI mode. Once finished with the alternate mode, you must deselect it to revert back to the normal DPI mode. Return to the default capture parameters. Defaults Working with Jobs Falcon®+ Operator Manual OPEX Corporation...
-
Page 74: Rescanning An Item
Note: If an audit trail was printed on the item the first time it was scanned, press Rescan NP (no print) to replace the item in the batch. This way, no additional audit trails will be printed on the item. Figure 4-7: Rescan Action buttons Working with Jobs Falcon®+ Operator Manual OPEX Corporation... -
Page 75: Deleting Items From A Batch
Figure 4-8: Confirm Delete window Note: It is possible to delete individual images/snippets. To delete an image from the middle of the batch, stop the run, right-click on the image to delete, and then select Delete. Working with Jobs Falcon®+ Operator Manual OPEX Corporation... -
Page 76: Starting A New Batch
Figure 4-9: Action - New Batch • Press the Close Batch button, then scan the new batch ticket or the first item of the new batch. • Scan a batch ticket to start a new batch. Working with Jobs Falcon®+ Operator Manual OPEX Corporation... -
Page 77: Voiding Item Or Set/Transaction
When the batch parameter Allow Void Batch is set to Yes with Marked Image, the VOID stamp will appear over the image on the run screen and the item will be designated as void in the batch file (Figure 4-11). Figure 4-11: Voided Item Working with Jobs Falcon®+ Operator Manual OPEX Corporation... - Page 78 Image, the VOID stamp will not appear over the image on the run screen. However, the item will be designated with a Void status in the output file (Figure 4-12). Figure 4-12: XML Batch Output File Example Working with Jobs Falcon®+ Operator Manual OPEX Corporation...
- Page 79 UnVoid Set to remove the void from the selected item and all other items included in the set. The Cancel button is used to close the Action window without performing any functions. Figure 4-13: Action Window - Unvoid Item Working with Jobs Falcon®+ Operator Manual OPEX Corporation...
-
Page 80: Editing A Batch While Scanning
Note: With an image being copied, this will cause multiple images in a batch to contain the same DLN (Document Locator Number). The audit trail is not regenerated, although OPEX Transform can be used to regenerate audit trails with new sequence numbers or other available batch Transform options. -
Page 81: Suspending And Resuming Multiple Batches
Figure 4-14: Suspend Batch View a list of suspended batches by clicking the Batch Resume button from the Main Menu. Select the desired batch and resume scanning (Figure 4-15). Figure 4-15: Resume Batch Working with Jobs Falcon®+ Operator Manual OPEX Corporation... -
Page 82: Certainscan Internal Batch Editor
Once you have deleted an item, click the Exit button to close the Batch Editor. If the batch was repaired properly, a dialog box will appear notifying the operator that the batch is now valid. Working with Jobs Falcon®+ Operator Manual OPEX Corporation... -
Page 83: Closing A Batch
Figure 4-18: Repairing invalid batches 4.12.2. Closing a Batch When scanning is finished, press the Stop button, and then press the Exit button for pop-up display to Close Batch (Figure 4-19). Figure 4-19: Close Batch Working with Jobs Falcon®+ Operator Manual OPEX Corporation... -
Page 84: Rescan Feeder
2. Insert the item(s) one at a time into the slot. 3. When finished, press the Rescan Feeder button again. The slot will no longer be illuminated, and feeding will resume at the auto feeder. Working with Jobs Falcon®+ Operator Manual OPEX Corporation... -
Page 85: Using The Rescan Feeder In Reject Condition
To use the Rescan Feeder without multi-feed detection with a reject condition: 1. When the Rescan Feeder slot is flashing, press the Rescan Feeder button, the run screen dialog will close, and the slot will become lit a solid blue. Working with Jobs Falcon®+ Operator Manual OPEX Corporation... - Page 86 2. Insert the item(s) one at a time into the slot. 3. When finished, press the Rescan Feeder button again. The slot will no longer be illuminated, and feeding will resume at the auto feeder. Working with Jobs Falcon®+ Operator Manual OPEX Corporation...
-
Page 87: Multi-Feed Detection (Mfd)
Note: To scan multiple items (one after the other), press and hold the MFD Override button and the LED will flash RED. When finished scanning multiple items, press the MFD override button again to turn off MFD and resume scanning. Working with Jobs Falcon®+ Operator Manual OPEX Corporation... -
Page 88: Pausing The Scanner And Disabling Mfd
4. Press the MFD Override button, LED will flash Red and Yellow. 5. Press Continue button on the run screen to rescan the item. 6. The item will scan, and the LED will go off to resume scanning. Figure 4-23: Reject condition Working with Jobs Falcon®+ Operator Manual OPEX Corporation... -
Page 89: Id Assist
When a Job is run that uses ID Assist, the ID Assist indicator LED will be lit. When ID Assist is triggered, the indicator light will blink, indicating that ID Assist was triggered. Once the item is scanned, the ID Assist LED will turn off. Working with Jobs Falcon®+ Operator Manual OPEX Corporation... - Page 90 ID Assist feature will not apply. ID Assist #2 ID Assist #1 ID Assist indicator LED ID Assist verify Figure 4-24: ID Assist Working with Jobs Falcon®+ Operator Manual OPEX Corporation...
-
Page 91: Multi-Slot Id Assist
• Slide the item from left to right in the slot • Slide the item from right to left in the slot • Insert the item straight in and pull straight out Working with Jobs Falcon®+ Operator Manual OPEX Corporation... - Page 92 Multi-slot Assist instructions display in the information window for the operator while scanning. A graphical image shows the colors and direction to swipe the item (Figure 4-26). Figure 4-26: Example of the Info Window for a Multi-Slot ID Assist Job Working with Jobs Falcon®+ Operator Manual OPEX Corporation...
-
Page 93: Key Assist
The Key Assist feature will not work with structured jobs and with Reference ID’s. Reference ID require keyboard input. Make sure Num Lock is enabled (LED lit) Bk Sp Lock Home Pg Up Enter Pg Dn Figure 4-27: External keypad Working with Jobs Falcon®+ Operator Manual OPEX Corporation... -
Page 94: Clearing Paper Jams
3. To close the scanner cover, hold onto the latch and gently pull the cover closed. 4. When the cover reaches the closed position, rotate the latch clockwise until the lock latches into place. NOTICE Slamming the scanner cover down can damage the image sensors. Working with Jobs Falcon®+ Operator Manual OPEX Corporation... - Page 95 3. To close the transport cover, hold onto the latch and gently pull the cover closed. 4. When the cover reaches the closed position, rotate the latch clockwise until you hear the lock snap into place. Working with Jobs Falcon®+ Operator Manual OPEX Corporation...
-
Page 96: Clearing The Bins
Pressing the green release buttons (one for each bin) will lift the knock-down tabs (the top fingers), which are aimed to easily re-insert an item that may have jammed in the transport. Release buttons for knock-down tabs. Figure 4-30: Clearing the bins Working with Jobs Falcon®+ Operator Manual OPEX Corporation... -
Page 97: Maintenance
5. Maintenance 5.1. Calibrating the Touchscreen Monitor ..... . 98 5.2. Removing/Replacing the Printer Cartridge ....99 5.3. -
Page 98: Calibrating The Touchscreen Monitor
Touchscreen Monitor (OPEX # 2887800). This 21.5 inch LED backlit touchscreen monitor features a 3-sensor optical touchscreen, and is calibrated for its touch sensitivity before it leaves OPEX. To Calibrate the Monitor 1. Access the Tablet PC Settings window. In the search field, type Tablet PC and hit Enter. -
Page 99: Removing/Replacing The Printer Cartridge
- Swing open the paper guide to expose the printer assembly. Press the hinged paper guide here Front Printer Access Back Printer Access Figure 5-2: Printer Access Maintenance Falcon®+ Operator Manual OPEX Corporation... - Page 100 2. Insert the new cartridge by tipping the front end of the cartridge in first, and then pushing in the rear of the cartridge until it “clicks” into place. 3. Go to Diagnostics > Printer and click Replace Ink Cartridge to reset ink drop count. Maintenance Falcon®+ Operator Manual OPEX Corporation...
-
Page 101: Removing/Replacing The Graphic Printer
2. Loosen the thumbscrew shown in Figure 5-4. Loosen thumbscrew Figure 5-4: Loosen graphic printer thumbscrew 3. Swing open the paper guide to expose the graphics printer, as shown in Figure 5-5. Graphics Printer Assembly Figure 5-5: Graphics Printer Assembly Maintenance Falcon®+ Operator Manual OPEX Corporation... - Page 102 4. Loosen the thumbscrew on the IMTECH Graphics printer assembly shown in Figure 5-6. Loosen Figure 5-6: Loosen thumbscrew 5. Pivot the printer assembly towards you. 6. Push the cartridge release lever out of the way (see Figure 5-7). Figure 5-7: Cartridge release lever Maintenance Falcon®+ Operator Manual OPEX Corporation...
- Page 103 (see Figure 5-10). Figure 5-9: Graphics Printer Interlock 11. Swing the paper guide back over the graphics printer and tighten its thumbscrew. 12. Close the stacker cover. Maintenance Falcon®+ Operator Manual OPEX Corporation...
- Page 104 To adjust the carriage position, loosen the thumb screw, slide the carriage to a new position on the shaft, and then retighten the thumb screw (Figure 5-10). Loosen thumb screw to move carriage along detent shaft Figure 5-10: Adjusting printer carriage position Maintenance Falcon®+ Operator Manual OPEX Corporation...
-
Page 105: Attaching The Bin And Stacker Fingers
If the finger is held down flat, it is not possible to install it. Figure 5-11: Lower Stacker Fingers Note: On production machines, the stacker fingers are black. The white stacker finger shown above was used to provide better contrast in the photo. Maintenance Falcon®+ Operator Manual OPEX Corporation... -
Page 106: Upper Stacker Fingers
Rotate the finger assembly so the axle sits flat. Center the finger assembly in the snap-in pivot. Rotate the finger assembly underneath the snap-in pivot. Figure 5-12: Upper Stacker Fingers Maintenance Falcon®+ Operator Manual OPEX Corporation... -
Page 107: Attaching The Stacker Finger
When correctly installed, the stacker finger’s lever is behind the tab on the release button shaft (Figure 5-13). Rear view Stacker finger’s lever is behind tab on release button’s shaft Wedge an object under this button Figure 5-13: Attaching Stacker Fingers Maintenance Falcon®+ Operator Manual OPEX Corporation... - Page 108 Figure 5-14: Attaching Stacker Fingers Rotate the assembly up into place, while lightly squeezing the front tabs. These will snap into place. Rotate into Squeeze position tabs Figure 5-15: Attaching Stacker Fingers Maintenance Falcon®+ Operator Manual OPEX Corporation...
-
Page 109: Bins
• Top: Side justifiers on top and bottom. • Middle three: Side justifiers on bottom, only. • Bottom: No side justifiers. Top: Justifiers on top & bottom Middle 3: Justifiers on bottom only Bottom: No justifiers Figure 5-16: Stacker Bins Maintenance Falcon®+ Operator Manual OPEX Corporation... -
Page 110: Cleaning The Scanner
2. Check the transport area once a shift. Open the scanner cover and clear the area of paper debris, dust, envelope flaps, etc. 3. Vacuum dust and debris from the stacker bins as necessary. 4. Vacuum dust and debris from the conveyor rollers as necessary. Maintenance Falcon®+ Operator Manual OPEX Corporation... -
Page 111: Contact Image Sensor
CIS glass. Wipe the CIS glass clean with a lint free cloth and glass cleaner, for example Windex. Be sure to clean the top and bottom CIS. The CIS’s are located underneath the transport door (Figure 5-17). Figure 5-17: CIS Maintenance Falcon®+ Operator Manual OPEX Corporation... -
Page 112: Feed Assembly
18). Also clean the feed rollers that lead up to the feeder. Use a cleaner such as Formula 409 to clean the feed mechanism on a weekly basis or as necessary. Feed assembly tab Retard pad Figure 5-18: Feed Assembly Maintenance Falcon®+ Operator Manual OPEX Corporation... - Page 113 6. Statistics and Batch Output File Extensions 6.1. Falcon+ Statistics ........114 6.1.1.
-
Page 114: Statistics And Batch Output File Extensions
- Read thru previous runs: To find Jobs deleted from the current list of Jobs and Operators. If a Job was deleted it is still stored in the stats Statistics and Batch Output File Extensions Falcon®+ Operator Manual OPEX Corporation... - Page 115 - Jobs: Generate a statistics report sorted by job name(s) - Operators: Generate a statistics report sorted by Operator name(s) Check the box to exclude jobs run by the OPEX Technician in your report. 4. Click the Matching Runs button to see how many jobs have been run that match the criteria selected above.
-
Page 116: General Information
(Summary Report only) Lists the number of jobs included in Jobs Included the report. (Summary Report only) Lists the number of jobs that ended Jobs Ended in the specified time window. Statistics and Batch Output File Extensions Falcon®+ Operator Manual OPEX Corporation... -
Page 117: Overall System Performance Measures
Number of pieces fed into the Falcon®+ per hour. The formula for the Reference Feed Rate is: Reference Feed Reference Feed Rate = Rate Input * 6600 Run Time (seconds) + (Jams * Ref. Jam Clear Time (seconds)) Statistics and Batch Output File Extensions Falcon®+ Operator Manual OPEX Corporation... -
Page 118: Performance Details
Total time the Falcon®+ was halted for a jam. Jam Time Time the Operator was in the Run Job window, but the Idle Time Falcon®+ was not processing pieces. Statistics and Batch Output File Extensions Falcon®+ Operator Manual OPEX Corporation... -
Page 119: Reject Terms
Results when a piece is identified as something other than a Check Expected check when the system is expecting a check. Statistics and Batch Output File Extensions Falcon®+ Operator Manual OPEX Corporation... - Page 120 Results when a piece is identified as one with page sub- No Page Sub- types and no default page sub-type has been specified and Type Selected the operator did not make a page sub-type selection. Statistics and Batch Output File Extensions Falcon®+ Operator Manual OPEX Corporation...
- Page 121 “Stop Machines for Rejects” is set to something Jamsorts other than “No” until the reject is cleared. All input pieces immediately following a jam until the jam is cleared. Statistics and Batch Output File Extensions Falcon®+ Operator Manual OPEX Corporation...
-
Page 122: Jams
Stacker Entry Sensor did not make the correct decision in time. A gate that did not fire properly can also cause it. Statistics and Batch Output File Extensions Falcon®+ Operator Manual OPEX Corporation... - Page 123 This is Host to Controller Report frequently caused by pushing the system to its Missing limits or by something causing the system to get out of sync. Statistics and Batch Output File Extensions Falcon®+ Operator Manual OPEX Corporation...
- Page 124 The Post Feed MFD Trail Sensor is blocked. Blocked A Stepper Motor has stalled. Stepper Stall Detected Pre Crush Roller Sensor The Pre Crush Roller Sensor is blocked. Blocked Statistics and Batch Output File Extensions Falcon®+ Operator Manual OPEX Corporation...
- Page 125 This event can occur during a run when the fuse for the servo motor, which controls the Servo Fuse 2 Fault Detected downstream or left-hand pre-feed arm, is detected to be open or blown. Statistics and Batch Output File Extensions Falcon®+ Operator Manual OPEX Corporation...
- Page 126 Feeder Fan Fault Detected operating. This event occurs when the RJ45 cable between the IO stepper board and the OPEX IO link port is unplugged, and when the IO stepper board is powered off. If either of those conditions are true and the scanner is running,...
- Page 127 The history of the automatic setting of the TMD DAC is contained within the TMD_DAC_Set- tings_Log.dat file. It is recommended that you delete the log file from the C:\OPEX directory to avoid seeing this error message (at least) once more after the TMD has been serviced.
-
Page 128: Stops
Blocked attempting to start up. Results when the bin 2 gate sensor is blocked by something when the system is attempting to Bin 2 Gate Sensor Blocked start up. Statistics and Batch Output File Extensions Falcon®+ Operator Manual OPEX Corporation... - Page 129 Results when the ScanLink Plug-in has ScanLink Plug-in requested a stoppage. Requested a Stoppage Results when a piece is detected to be too Too Skewed skewed to pass through the system safely. Statistics and Batch Output File Extensions Falcon®+ Operator Manual OPEX Corporation...
-
Page 130: Batch Output File Extensions
6.2. Batch Output File Extensions An internal batch file format called OII (OPEX Interchange Interface) is used to pass batches between OPEX applications (CertainScan, CertainScan Edit, and OPEX Transform). This allows changes to be applied along the way, and then produce the final output (OXI, ODI, Custom) made available to the back- end user. - Page 131 About OPEX Corporation OPEX Corporation is more than a manufacturer of machines. We continuously reimagine technology to power the future for our customers. With an innovative approach, we engineer unique automated solutions that support our customers so they can solve the most pressing business challenges for both today and tomorrow.
- Page 132 OPEX Corporation | 305 Commerce Drive | Moorestown, NJ 08057-4234 | USA http://www.opex.com...
Need help?
Do you have a question about the Falcon+ and is the answer not in the manual?
Questions and answers