
Related Manuals for Miele WTD160 WCS 8/5 KG WT1


Summary of Contents for Miele WTD160 WCS 8/5 KG WT1
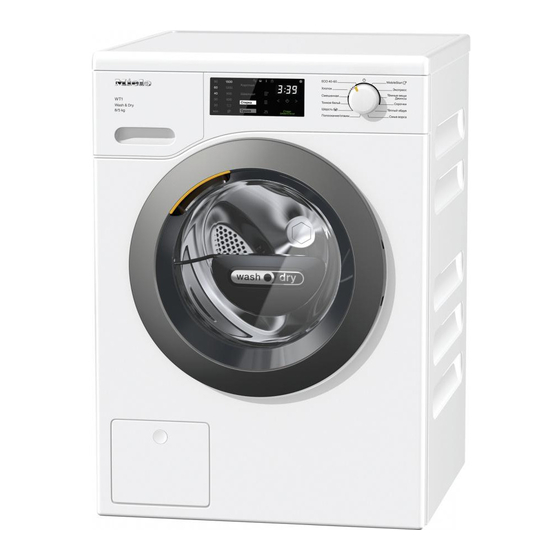
- Page 1 *INSTALLATION* 11887140-00 Installation Front view a Water inlet hose e Detergent drawer b Electrical connection f Door c Flexible drain hose (with detachable g Access to drain filter, drain pump and elbow) emergency release d Control panel h 4 height-adjustable feet...
-
Page 2: Rear View
*INSTALLATION* 11887140-00 Installation Rear view a Protruding lid for holding when d Safety caps for transit bars moving the appliance e Transport clips for water inlet hoses b Drain hose and drain hoses c Water inlet hose f Electrical connection... -
Page 3: Installation Surface
*INSTALLATION* 11887140-00 Installation Installation surface Carrying the washer-dryer to its installation site A concrete floor is the most suitable installation surface. It is far less prone Danger of injury due to to vibration during the spin cycle than unsecured lid. wooden floorboards or a carpeted The fixings at the back of the lid surface. - Page 4 *INSTALLATION* 11887140-00 Installation Pull out the transit bar. Pull out the transit bar. Covering holes Removing the right-hand transit bar Danger of injury from sharp edges. There is a danger of injury from reaching into holes that are not covered.
- Page 5 *INSTALLATION* 11887140-00 Installation Refitting the transit bars Installing under a worktop Building under kits* must only be Risk of damage from incorrect installed/dismantled by a specialist. transport. The washer-dryer may become - A special building under kit* is damaged if moved without the transit required.
-
Page 6: Aligning The Washer-Dryer
*INSTALLATION* 11887140-00 Installation Aligning the washer-dryer The washer-dryer must stand perfectly level on all four feet to ensure safe and proper operation. Incorrect installation may increase electricity and water consumption and may cause the washer-dryer to move about. Screwing out and adjusting the feet The 4 adjustable feet are used to level the washer-dryer. -
Page 7: The Water Protection System
Installation Electronic unit and casing The water protection system - The floor tray The Miele water protection system protects all parts of the washer-dryer Any leaking water is collected in a from water damage. floor tray in the base of the washer- dryer. -
Page 8: Water Intake
*INSTALLATION* 11887140-00 Installation Maintenance Water intake Only use a genuine Miele hose that has Health risk and risk of damage been pressure tested to withstand at due to contaminated incoming water. least 7000 kPa should you ever need a The quality of the incoming water replacement. -
Page 9: Water Drainage
If required, the hose can be extended to a length of up to 5 m. Accessories are available from Miele or from your Miele dealer. For a delivery head of more than 1 m (up to a max. of 1.8 m) a replacement drain pump will need to be fitted. -
Page 10: Electrical Connection
If the mains connection cable is damaged, it must only be replaced with a specific mains connection cable of the same type (available from the Miele Customer Service Department). For safety reasons, such replacement may only be carried out by a qualified technician or the Miele Customer Service Department.
Need help?
Do you have a question about the WTD160 WCS 8/5 KG WT1 and is the answer not in the manual?
Questions and answers
The depth dimension is given as 637 mm, does it include the protruding lip. And does this protruding lip cover the pipework.