Table of Contents
Advertisement
Quick Links
Advertisement
Table of Contents

Related Manuals for Hoover HSV1800


Summary of Contents for Hoover HSV1800
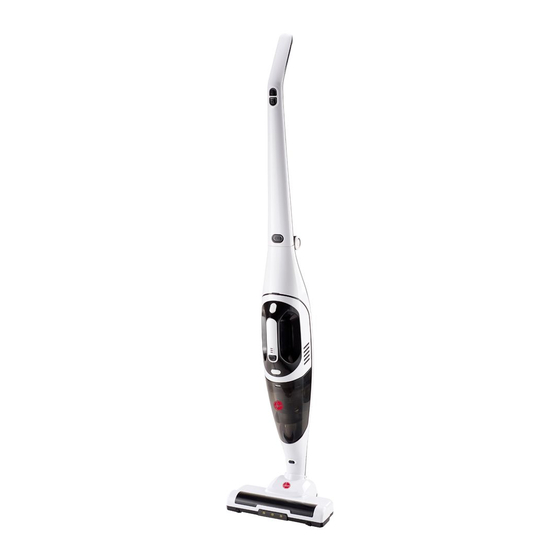
- Page 1 INSTRUCTIONS AND WARRANTY MODEL: HSV1800 HOOVER BLIZZARD 2 in 1 STICK VACUUM...
-
Page 2: Package Contents
Congratulations on purchasing our Hoover Blizzard 2 in 1 Stick Vacuum. Each unit is manufactured to ensure safety and reliability. Before using this appliance for the first time, please read the instruction manual carefully and keep it for future reference. - Page 3 5. Avoid any contact with moving parts. 6. This appliance is not intended for use by persons (including children) with reduced physical, sensory or mental capabilities, or lack of experience and knowledge, unless they have been given supervision or instruction concerning use of the appliance by a person responsible for their safety.
-
Page 4: Parts Diagram
21. Do not leave this appliance unattended during use. Always unplug the unit when not in use or before cleaning. 22. Always operate the appliance on a smooth, even, stable surface. Do not place the unit on a hot surface. 23. -
Page 5: Assembling The Product
ASSEMBLING THE PRODUCT... - Page 6 Remove all the parts from the packaging ● Expand the body support by folding handle open as shown below: ● Assemble motorized brush shown below:...
- Page 7 ● Assemble the 2 in 1 vacuum as shown below: ● Assemble the charging base as shown below:...
-
Page 8: Charging The Vacuum
CHARGING THE VACUUM ● The vacuum is not fully charged at the factory and should be fully charged before first use. This should take approximately 8 hours. ● If the vacuum has not been used for extended periods of time, the vacuum should be fully charged before it is used again. - Page 9 ● After returning the vacuum to the charge base, the power level LED indicator lights will display the current battery charge level: If the first LED light is on - the battery power is low, If the first LED light is on while the second LED light is flickering - the battery power level is more than half, If the first and second LED light is on while the third LED light is flickering –...
- Page 10 to select the desired power setting. ● The brush bar speed is controlled by the HIGH or LOW power settings and will vary according to the power level selected. ● Push the handle back and forth to move the brush back and forth, twist the handle to turn the brush left or right.
-
Page 11: General Maintenance And Cleaning
● The crevise nozzle found on the back of the body support can be used for vacuuming in corners and small spaces. To use the nozzle, insert the rounded side of the nozzle, in to the main air inlet as shown below. Note: The battery power level is indicated by the 3 LED lights on the handheld vacuum. - Page 12 ● Note: Do not wash any of the parts with water. Only wipe with a damp cloth. ● The Hoover Blizzard can be folded up as show below: Step 1: Press the handle release button. Step 2: Fold the handle down.
-
Page 13: Servicing The Appliance
SERVICING THE APPLIANCE There are no user serviceable parts in this appliance. If the unit is not operating correctly, please check the following: ● You have followed the instructions correctly ● That the wall socket is switched on. ● That the mains power supply is ON. ●... - Page 14 PLEASE AFFIX YOUR PROOF OF PURCHASE/RECEIPT HERE IN THE EVENT OF A CLAIM UNDER WARRANTY THIS RECEIPT MUST BE PRODUCED. W A R R A N T Y 1. Home of Living Brands (Pty) Limited (“Home of Living Brands”) warrants to the original purchaser of this product (“the customer”) that this product will be free of defects in quality and workmanship which under normal personal, family or household use and purpose may manifest within a period of 1 (one) year from the date of purchase (“warranty period”).
- Page 15 or modification by or on behalf of the customer, then the supplier may replace the product or pay a refund to the customer. 7. The customer may be responsible for certain costs where products returned are not in the original packaging, or if the packaging is damaged. This will be deducted from any refund paid to the customer.
Need help?
Do you have a question about the HSV1800 and is the answer not in the manual?
Questions and answers