Table of Contents
Advertisement
Quick Links
www.weslo.com
Model No. WLTL22306.1
Serial No.
Write the serial number in the space
above for future reference.
Serial Number Decal
QUESTIONS?
If you have questions, or if parts are
damaged or missing, DO NOT CON-
TACT THE STORE; please contact
Customer Care.
IMPORTANT: Please register this
product (see the limited warranty
on the back cover of this manual)
before contacting Customer Care.
1-866-699-3756
CALL TOLL-FREE:
Mon.–Fri. 6 a.m.–6 p.m. MT
Sat. 8 a.m.–4 p.m. MT
ON THE WEB:
www.wesloservice.com
CAUTION
Read all precautions and instruc-
tions in this manual before using
this equipment. Save this manual
for future reference.
All manuals and user guides at all-guides.com
USER'S MANUAL
Advertisement
Table of Contents

Related Manuals for Weslo CADENCE 60 CT


Summary of Contents for Weslo CADENCE 60 CT
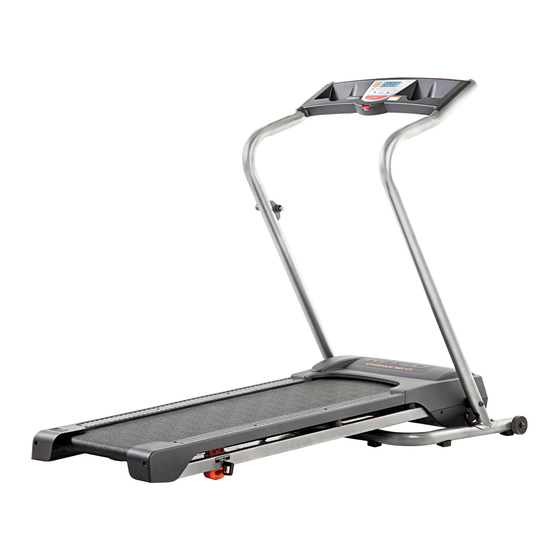
- Page 1 All manuals and user guides at all-guides.com www.weslo.com USER'S MANUAL Model No. WLTL22306.1 Serial No. Write the serial number in the space above for future reference. Serial Number Decal QUESTIONS? If you have questions, or if parts are damaged or missing, DO NOT CON- TACT THE STORE;...
-
Page 2: Table Of Contents
Apply the decal in the location shown. Note: The decals may not be shown at actual size. •Hazardous Voltage •Risk of Electric Shock •Unplug Treadmill before Assembly /Disassembly. WESLO is a registered trademark of ICON IP, Inc. -
Page 3: Important Precautions
3. Use the treadmill only as described. page 10. To purchase a surge suppressor, see your local WESLO dealer or call the telephone 4. Keep the treadmill indoors, away from mois- number on the front cover of this manual and ture and dust. - Page 4 All manuals and user guides at all-guides.com 18. Use the included dumbbells only as de- 23. When folding or moving the treadmill, make scribed in this manual. Properly store the sure that the storage latch is holding the dumbbells in the dumbbell holders on the frame securely in the storage position.
-
Page 5: Before You Begin
® 60 CT treadmill. The CADENCE 60 CT treadmill offers ual. To help us assist you, note the product model a selection of features designed to make your workouts number and serial number before contacting us. -
Page 6: Assembly
All manuals and user guides at all-guides.com ASSEMBLY To hire an authorized service technician to assemble the treadmill, call 1-800-445-2480. Assembly re- quires two persons. Set the treadmill in a cleared area and remove all packing materials. Do not dispose of the packing materials until assembly is completed. - Page 7 All manuals and user guides at all-guides.com 2. Have a second person hold the Base (71) in the position shown. Identify the Right Handrail (6) which has a large hole near the lower end. Hold the Right Handrail (6) so that the bend is in the Large position shown.
- Page 8 All manuals and user guides at all-guides.com 5. Hold the Console (1) near the Right Handrail (6). Touch Connector the Right Handrail to discharge any static. Untie the wire tie from the end of the Wire Harness (22). Insert the end of the Wire Harness through the three looped plastic ties.
- Page 9 All manuals and user guides at all-guides.com 8. Carefully lower the Handrails (6, 7) to the floor. Center the Frame (55) between the Handrails, and tighten the four Handrail Bolts (12). Then, raise the Handrails to the vertical position. See drawing 8a. Attach the Latch Assembly (41) to the Left Handrail (7) with two 16mm Screws (58).
-
Page 10: Operation And Adjustment
All manuals and user guides at all-guides.com OPERATION AND ADJUSTMENT THE PRE-LUBRICATED WALKING BELT that is properly installed and grounded in accor- dance with all local codes and ordinances. IMPORTANT: The treadmill is not compatible with Your treadmill features a walking belt coated with high- performance lubricant. - Page 11 All manuals and user guides at all-guides.com CONSOLE DIAGRAM Clip FEATURES OF THE CONSOLE HOW TO TURN ON THE POWER IMPORTANT: If the treadmill has been exposed to The treadmill console offers a selection of features cold temperatures, allow it to warm to room tem- designed to make your workouts more effective.
- Page 12 All manuals and user guides at all-guides.com HOW TO USE THE MANUAL MODE The lower right dis- play—The lower right Insert the key into the console. display can show the speed of the walking See HOW TO TURN ON THE POWER on page belt and the approxi- mate number of calo- ries that you have burned.
- Page 13 All manuals and user guides at all-guides.com HOW TO USE A CROSSTRAINER PROGRAM To stop the program, press the Stop button. The time will begin to flash in one of the displays. To Insert the key into the console. restart the program, press the Start button. The walking belt will begin to move at 1 mph.
-
Page 14: How To Fold And Move The Treadmill
HOW TO FOLD AND MOVE THE TREADMILL All manuals and user guides at all-guides.com HOW TO FOLD THE TREADMILL FOR STORAGE Unplug the power cord. CAUTION: You must be able to safely lift 45 lbs. (20 kg) to raise, lower, or move the treadmill. - Page 15 All manuals and user guides at all-guides.com HOW TO LOWER THE TREADMILL FOR USE 1. Hold the treadmill with your right hand as shown. Pull the latch knob to the left and hold it. Pivot the frame down until it is past the latch pin. Latch Knob Catch...
-
Page 16: Troubleshooting
All manuals and user guides at all-guides.com TROUBLESHOOTING Most treadmill problems can be solved by following the steps below. Find the symptom that applies, and follow the steps listed. If further assistance is needed, please see the front cover of this manual. PROBLEM: The power does not turn on SOLUTION: a. - Page 17 All manuals and user guides at all-guides.com PROBLEM: The walking belt slows when walked on SOLUTION: a. Use only a single-outlet surge suppressor that meets all of the specifications described on page 10. b. If the walking belt is overtightened, treadmill perfor- mance may decrease and the walking belt may be- 2–3 in.
-
Page 18: Exercise Guidelines
All manuals and user guides at all-guides.com EXERCISE GUIDELINES WARNING: Aerobic Exercise—If your goal is to strengthen your cardiovascular system, you must perform aerobic exer- Before beginning cise, which is activity that requires large amounts of this or any exercise program, consult your oxygen for prolonged periods of time. - Page 19 All manuals and user guides at all-guides.com SUGGESTED STRETCHES The correct form for several basic stretches is shown at the right. Move slowly as you stretch—never bounce. 1. Toe Touch Stretch Stand with your knees bent slightly and slowly bend forward from your hips.
- Page 20 NOTES All manuals and user guides at all-guides.com...
-
Page 21: Part List
PART LIST All manuals and user guides at all-guides.com Model No. WLTL22306.1 R1110A To locate the parts listed below, see the EXPLODED DRAWING near the end of this manual. Key No. Qty. Description Key No. Qty. Description Console Reed Switch Round Cap Rear Platform Bolt Key/Clip... -
Page 22: Exploded Drawing
EXPLODED DRAWING A All manuals and user guides at all-guides.com Model No. WLTL22306.1 R1110A... - Page 23 EXPLODED DRAWING B All manuals and user guides at all-guides.com Model No. WLTL22306.1 R1110A...
-
Page 24: Ordering Replacement Parts
All manuals and user guides at all-guides.com ORDERING REPLACEMENT PARTS To order replacement parts, please see the front cover of this manual. To help us assist you, be prepared to pro- vide the following information when contacting us: • the model number and serial number of the product (see the front cover of this manual) •...
Need help?
Do you have a question about the CADENCE 60 CT and is the answer not in the manual?
Questions and answers