Advertisement
Quick Links
Wha t is in the Box ?
Clock radio, quick start guide and safety/warranty leaflet.
Features
•
Bluetooth audio streaming from smartphone, tablet or laptop
•
Wireless charging for use with a wireless charging enabled device
•
DAB / DAB+ / FM RDS wavebands
•
20 radio station presets (10 DAB and 10 FM)
•
Multi-level display dimmer
•
2 alarms with humane wake
•
Sleep and snooze timers
•
USB socket for device charging
•
Headphone socket for private listening
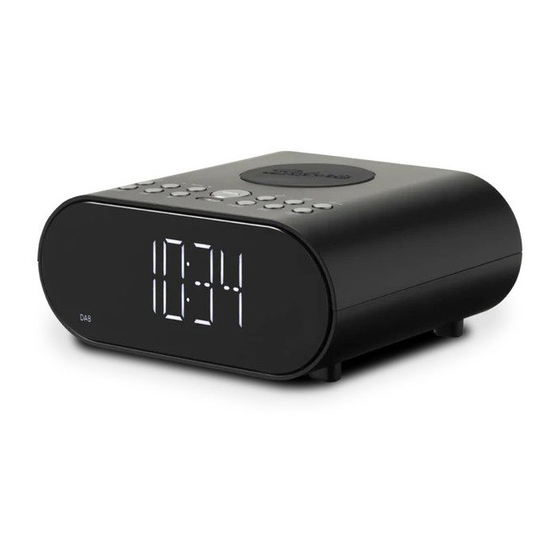
Controls
15
1
2
3
5
4
Tune
Snooze
OK
DAB
FM
Preset
11
13
12
10
14
16
18
20
21
19
17
1 On/Standby / Sleep button
12 Bluetooth Pair button
2 Tune Down button
13 FM button
3 Tune Up button
14 DAB button
4 Snooze / Ok / Info button
15 Wireless charging pad
5 Alarm button
16 LED display
6 Menu / Back button
17 Loudspeaker
7 Volume Up button
18 USB socket (for service use only)
8 Volume Down button
19 DAB / FM wire aerial
9 Dimmer button
20 Headphone socket
10 Preset button
21 USB charging socket
11 Light sensor
22 AC adaptor cable
•
It is recommended that the DAB band be used wherever possible as better
results in terms of quality and freedom from interference will usually be obtained
than on the FM band.
S T EP 1 - P l u g i n & p l a y D A B r a d i o
A - Connect to the mains
Please read the safety leaflet provided before
connecting your clock radio to the mains.
1 Place your clock radio on a flat surface.
2 Fully extend the wire aerial located on the rear of
the clock radio.
3 Plug the mains adaptor into a wall socket and switch
on the socket.
4 A start up screen will show. The clock will set.
Note: If no signals are found it may be necessary to relocate your clock radio to a position
giving better reception and carry out a scan for new stations.
B - Switch on your clock radio
1 Press and release the On/Standby button to switch
on the clock radio. After each use the clock radio
will remember the mode used and then switch on
in that mode the next time it is used. To switch off
your clock radio press the On/Standby button.
2 If this is the first time the radio is used a scan of
the Band III DAB channels will be carried out.
C - Select a DAB radio station
1 If needed, press the DAB button to select the
6
7
DAB mode.
Vol
2 Press the Tune Up or Down buttons to step
through the list of available DAB stations.
3 Press the OK button to select the station.
4 Adjust the Volume.
Dim
Vol
9
8
•
Press and release the OK button to cycle through
the various DAB display options.
The display options are station name, scrolling
text, program type, signal strength (the minimum
signal marker ( ) shows the minimum signal
strength needed for good DAB reception),
multiplex name, frequency, bit rate, time and
date.
22
D - Scan for DAB stations
As time passes new stations may become
available or you may have moved to a different
part of the country.
1 Press the Menu button. Press the Tune
Up or Down buttons to highlight 'SCAN'.
2 Press the OK button. Your radio will perform
a scan of the Band III DAB channels. As
new stations are found, they will be added to the list stored in the radio.
Menu options
1 To access or exit your clock radio's menu
system press the Menu button.
2 Press the Tune Up or Down and OK
buttons to select menu options.
3 To exit menu options, press the Menu
button as needed.
S TE P 2 - P l a y F M r a d i o
Search tuning - FM
1 Carefully, fully extend the wire aerial.
2 Press the FM button to select the FM mode.
3 Apply a long press on the Tune Up or Down
buttons. Your radio will scan upwards (low to
high frequency) or downwards (high to low
frequency) and will stop automatically when it
DAB
finds a station of sufficient strength.
4 If the signal is strong enough and there is RDS
data present the display will show the station
name for a few seconds. Adjust the Volume.
•
Press and release the OK button to cycle
through the various FM display options.
To manual tune, press and release the Tune
Up or Down buttons to tune to a station. The
frequency will change in steps of 50 kHz.
Preset radio stations
There are 20 memory presets, 10 for DAB and 10 for FM. Presets are remembered by the
clock radio in the event of a power failure.
To store a preset
1 Tune to the required radio station.
2 Apply a long press on the Preset button.
3 Press the Tune Up or Down buttons to select the
desired station number under which you wish to
store the station. Press the OK button. The display
DAB
will show for example, 'P1 SAVED'. Repeat this
Tune
procedure for the remaining presets.
To recall a preset
1 Choose DAB or FM mode.
2 Press and release the Preset button.
3 Use the Tune Up or Down buttons to select the
desired preset. Press OK. Your clock radio will
tune to the station stored in the preset memory.
DAB
Note: The display will show 'EMPTY' if no station
has been stored to that preset.
Snooze
OK
1 Ensure Bluetooth is enabled on your smart device. Ensure your clock radio is
switched on.
2 Press and release the Bluetooth Pair button to
select the Bluetooth mode. The Bluetooth icon
will flash on the display and your clock radio will
show that it is 'discoverable'.
Tune
3 On your smart device select 'Ortus DAB Charge'.
Snooze
Once the connection is established the icon will
OK
remain steady. You may now play your music.
4 Adjust the volume on your Bluetooth device or
on your clock radio. Press OK for information.
5 The audio player in your smart device may be
able to respond to the Play/Pause, Next or
Previous track on the clock radio. Press the
Bluetooth Pair button to pause playback. Press
the button again to resume playback. Press the
Tune
Tune Up or Down buttons to skip to the next or
Snooze
previous track. Note: Not all player applications
or devices may respond to all of these buttons.
OK
6 To connect a different device apply a long press
on the Bluetooth Pair button. Your clock radio
will become discoverable by other devices.
Tune
FM
FM
Snooze
OK
Tune
Preset
DAB
Snooze
OK
ST E P 3 - B l u e t oo t h
Snooze
OK
Tune
continued overleaf...
Advertisement

Subscribe to Our Youtube Channel
Related Manuals for Roberts Ortus DAB Charge


Summary of Contents for Roberts Ortus DAB Charge
- Page 1 As time passes new stations may become show that it is ‘discoverable’. Tune available or you may have moved to a different 3 On your smart device select ‘Ortus DAB Charge’. Snooze 1 On/Standby / Sleep button part of the country.
- Page 2 (your clock radio will scan for stations with good reception). button to cancel the sleep timer or set the sleep timer to ‘Off’. www.robertsradio.com Issue 1a Please read this guide and the safety/warranty leaflet before use © 2021 Roberts Radio Limited 2021-07-08...
Need help?
Do you have a question about the Ortus DAB Charge and is the answer not in the manual?
Questions and answers
Why do I have a broadcast signal flashing on display
The broadcast signal is flashing on the display of the Roberts DAB Charge because it is in Bluetooth mode and is discoverable, waiting for a connection.
This answer is automatically generated