
Related Manuals for Roberts DAB/FM/CD Stereo Clock Radio


Summary of Contents for Roberts DAB/FM/CD Stereo Clock Radio
- Page 1 DAB / FM / CD Stereo Clock Radio with CD Bookmark Please read this manual before use...
-
Page 2: Table Of Contents
Contents Sound 38 clock radio features ..........2 CD repeat function.............22 Controls ................3-4 CD intro function ..............22 Using your clock radio for the fi rst time .......5 CD random play..............23 Operating your clock radio - DAB ........6 Creating a play list (Program play) ........23 Selecting a station - DAB.............7 Checking and editing a program........24 Secondary services - DAB...........7... -
Page 3: Sound 38 Clock Radio Features
Sound 38 clock radio features The Roberts Sound 38 clock radio provides the following features in an attractive compact unit. • • Adjustable sleep timer which can be set to turn off after between Radio for DAB and FM with RDS broadcasts. -
Page 4: Controls
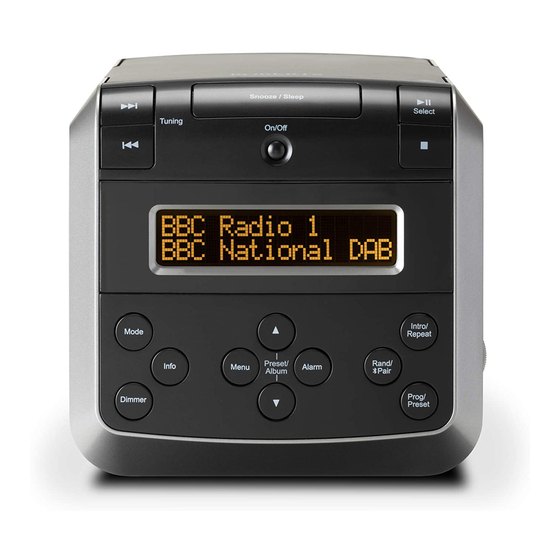
Controls (Front) 1. Menu button 6. Display button 16. Volume control 11. Tuning Up / Fast-forward button 2. Preset / Album Down button 7. Preset / Album Up button 17. Random / Program button 12. Snooze button 3. Function button (DAB/FM/CD/AUX) 8. -
Page 5: Controls
Controls (Rear view) 19. Open / Close CD button 23. DC input socket 20. CD lid 24. Wire DAB / FM aerial 21. Auxiliary input socket 25. USB socket (for software upgrades) 22. Headphone socket If you need any further advice, please call our Technical Helpline on :- 020 8758 0338 (Mon-Fri) -
Page 6: Using Your Clock Radio For The Fi Rst Time
Using your clock radio for the fi rst time 1. Place your clock radio on a fl at surface. 2. Fully extend the wire aerial located on the rear of your clock radio. Place the wire antenna so that it is as straight as possible extending either above or below the clock radio. -
Page 7: Operating Your Clock Radio - Dab
Operating your clock radio - DAB 1. Fully extend the wire aerial located on the rear of your clock radio. Place the wire antenna so that it is as straight as possible extending either above or below the clock radio. 2. -
Page 8: Selecting A Station - Dab
Selecting a station - DAB 1. The top line of the display shows the name of the station currently selected. 2. Press the Tuning Up or Down buttons to scroll through the list of available stations on the lower line of the display. Stop pressing the Tuning buttons when you fi... -
Page 9: Display Options - Dab
Display options - DAB Your radio has a range of display options when in DAB mode:- 1. Press the Display button to cycle through the various options. a. Scrolling text Displays scrolling text messages such as artist/track name, phone in number, etc. -
Page 10: Finding New Stations - Dab
Finding new stations - DAB As time passes new stations may become available. To fi nd new stations proceed as follows:- 1. Press and release the Function button until the DAB band is selected. 2. Press and release the Auto Scan button. The display will show 'Scanning'. -
Page 11: Manual Tuning - Dab
Manual tuning - DAB Manual tuning allows you to tune your radio to a particular DAB frequency in Band III. Any new stations found will be added to the station list. This function can also be used to assist the positioning of the aerial or the clock radio to optimise reception for a specifi... -
Page 12: Dynamic Range Control (Drc) Settings - Dab
Dynamic Range Control (DRC) settings - DAB Dynamic range control (also known as DRC) can make quieter sounds easier to hear when your clock radio is used in a noisy environment. There are three levels of compression: DRC 0 No compression applied. (default) DRC 1 Maximum compression applied. -
Page 13: Operating Your Radio - Search Tuning Fm
Operating your radio - Search tuning FM 1. Fully extend the wire aerial located on the rear of your clock radio. Place the wire antenna so that it is as straight as possible extending either above or below the clock radio. Press the On / Off button to switch on your clock radio. -
Page 14: Manual Tuning - Fm
Manual tuning - FM 1. Fully extend the wire aerial located on the rear of your clock radio. Place the wire antenna so that it is as straight as possible extending either above or below the radio. 2. Press the On / Off button to switch on your clock radio. 3. -
Page 15: Display Options - Fm
Display options - FM Your clock radio has a range of display options for FM mode:- The Radio Data System (RDS) is a system in which inaudible digital information is transmitted in addition to the normal FM radio programme. RDS offers several useful features. The following are available on your clock radio. -
Page 16: Stereo / Mono Setting - Fm
Stereo / Mono setting - FM Your radio will play stereo FM broadcasts in stereo provided that the received signal is of adequate strength. However, as a stereo signal becomes weaker the audio signal will become poorer. It may be preferable to force the radio to play the station in mono in order to reduce the level of background hiss. -
Page 17: Recalling A Preset Station
2. Press and release the Function button to select the DAB or FM waveband. 3. Tune to the required station as previously described. 4. Press and release the Rand/Prog button, the display will show 'Preset' with '01' fl ashing. 5. Press the Preset Up or Down buttons to select the desired preset number under which you wish to store the station. -
Page 18: Compact Discs / Mp3/Wma-Cds
Compact discs Use only Digital Audio CDs which have the symbol. Never write on a CD or attach any sticker to the CD. Always hold the CD at the edge and store it in its box after use with the label facing up. To remove dust and dirt, breathe on the CD and wipe it with a soft, lint free cloth in a straight line from the centre towards the edge. - Page 19 WARNING CLASS 1 LASER PRODUCT means that the laser's construction makes it inherently safe so that the legally prescribed maximum permissible radiation values can never be exceeded. Caution: Using any equipment or devices other than those described and specifi ed in these operating instructions, or tampering with the unit in any way, can result in dangerous exposure to radiation.
-
Page 20: Playing A Cd
Inserting a CD 1. To open the CD compartment, press and release CD Open/Close button in the top right hand corner. 2. Put the CD on the spindle until it clicks into place and then gently close the CD compartment by pushing the cd lid (top right hand corner) back into position. -
Page 21: Cd Bookmark
5. To pause playback press the Play / Pause button. The pause symbol will show on the display. Audio CD: The current track number and the elapsed playing time will be shown on the display. MP3 / WMA CD: The fi le name with ID3 tag scrolls, the elapsed playing time will be shown on the display. -
Page 22: Selecting A Track
Selecting a track 1. Audio CD: While the CD is playing, press either the Tuning Up or Down buttons to change the desired track. You can also skip to a wanted track when the player is in stop mode. Press the Play / Pause button to play the selected track. -
Page 23: Cd Repeat Function
CD repeat function 1. Whilst the CD is playing press the Intro / Repeat button. The clock radio will step through the following options: Audio CD: Repeat 1 Repeat ALL Normal Play MP3 / WMA CD: Repeat 1 Repeat Folder Repeat Normal Play 2. -
Page 24: Cd Random Play
CD random play 1. While the CD is playing, press and release the Prog / Random button to play all tracks on the CD in random order. 'RAND' will appear on the display. The tracks are played in random order until all tracks have been played. -
Page 25: Checking And Editing A Program
Checking and editing a program Whilst the CD is in stop mode, you can check and edit the program. 1. Press the Prog / Random button repeatedly. The display will show the play list that you have have already programmed. 2. -
Page 26: Setting Alarms
Setting alarms Your clock radio has four alarms which can be set to wake you by DAB, FM radio, CD or beep type alarm. Each alarm can be set to sound: Once only Daily Monday to Friday Monday to Saturday Saturday to Sunday Note: The alarms can only be set with the radio in standby mode. - Page 27 6. Press and release the Up or Down buttons to select the desired alarm hour. Press and hold the Up or Down buttons to advance the time quickly. 7. Press and release the Alarm button to confi rm the setting. The minute digits will fl...
- Page 28 13. When the clock radio is in standby the alarm symbol will appear if an alarm is set. Note: When the alarm is set to wake by radio, the last used station will be switched on at the alarm time. Note: The alarm volume will be the volume previously listened to when setting up the alarm.
-
Page 29: Snooze Function
Snooze function 1. When the alarm sounds, pressing the Snooze button will silence the alarm for the number of minutes specifi ed for that particular alarm. 2. The snooze setting can be adjusted between 5, 10, 15 and 20 minutes in 5 minute increments. -
Page 30: Sleep Function
Sleep function Your clock radio can be set to turn off after a preset time has elapsed. The sleep setting can be adjusted between 0 and 90 minutes in 10 minute increments. 1. Ensure your clock radio is switched on. Press and release the Sleep button. -
Page 31: Clock Display
Clock display When your clock radio is in Standby mode you can set the display to show either the time or the time and date. 1. Press and release the Display button to toggle between showing the time or showing both the date and time. Dimmer The brightness of the display can be adjusted while the unit is in Standby mode or while playing. -
Page 32: Software Version
Software version The software display cannot be altered and is just for your reference. Ensure your clock radio is switched on. 1. Press and release the Function button to select either the DAB or FM mode. 2. Press and release the Menu button. 3. -
Page 33: System Reset
System reset If your clock radio fails to operate correctly, or some digits on the display are missing or incomplete carry out the following procedure. 1. Ensure your clock radio is switched on. Press and release the Function button to select either the DAB or FM mode. Press and release the Menu button. -
Page 34: Headphone Socket
Headphone socket A 3.5mm stereo Headphone Socket is provided on the rear of your clock radio for use with headphones or an earpiece. Inserting a plug automatically mutes the internal loudspeakers. Please be aware that the sensitivity of headphones can vary widely. We therefore recommend setting volume to a low level before connecting headphones to the clock radio. -
Page 35: Cautions
Cautions • The clock radio shall not be exposed to dripping or splashing and that no objects fi lled with liquids, such as vases, shall be placed on the radio. Do not allow this clock radio to be exposed to water, steam or sand. Do •... -
Page 36: Guarantee
Company’s service department for attention. In the event that it is not possible to return the instrument to the Roberts' dealer from whom it was purchased, please contact Roberts Radio Technical Services at the address shown below.
Need help?
Do you have a question about the DAB/FM/CD Stereo Clock Radio and is the answer not in the manual?
Questions and answers