
Related Manuals for Sentiotec SCALA Medium


Summary of Contents for Sentiotec SCALA Medium
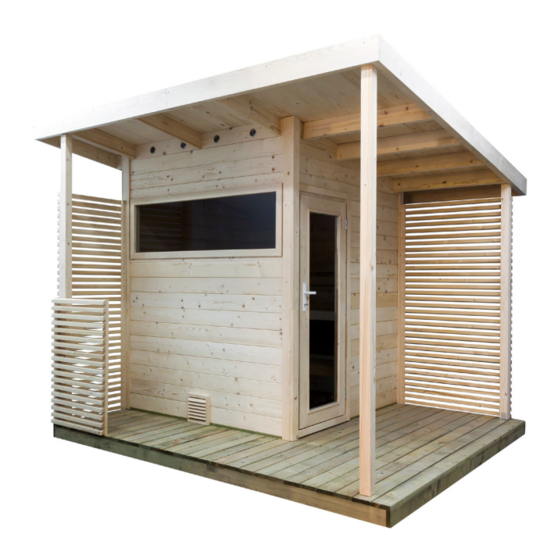
- Page 1 Garden sauna SCALA Medium 344 x 313 x 272 cm ASSEMBLY INSTRUCTIONS English SCALA-M Version 08/21 item no. 1-053-022...
-
Page 2: Table Of Contents
Table of Contents 1. Preparing for installation 1.1. Important note 1.2. Maintenance and cleaning 1.3. Foundation 1.4. Anchoring the outdoor sauna 1.5. Disposal 1.6. Tools required 1.7. Parts list 2. Floor plan/foundation 2.1. Right-hand assembly 2.2. Left-hand assembly 3. View/dimensions 4. -
Page 3: Preparing For Installation
Read these assembly instructions carefully and keep them within reach. so that you can look up product information at any time. These assembly instructions can also be found in the downloads section of our website: www.sentiotec.com/downloads. 1.1. Important note ● Check with your local planning authority (municipal office, magistrate) with respect to the building regulations and load standards. -
Page 4: Maintenance And Cleaning
Instructions for installation p. 4/16 ● The wood of the outdoor sauna is untreated. To increase the life expectancy, we recommend painting the outside with a suitable paint to protect the wood. ● The inside of the wooden parts used must not be treated with any paint. 1.2. Maintenance and cleaning ● The sauna should be cleaned inside with a damp cloth. Only use warm water –... -
Page 5: Anchoring The Outdoor Sauna
Instructions for installation p. 5/16 1.4. Anchoring the outdoor sauna The outdoor sauna must be firmly anchored on the base plate or the strip foundation. Strong winds can exert a powerful force on the garden sauna. To prevent damage to your, or third party, property proper anchoring is essential. We point out that anchoring the garden sauna is the responsibility of the customer and we do not accept any liability for accidental damage. 1.5. -
Page 6: Tools Required
Instructions for installation p. 6/16 1.6. Tools required ● Hammer with a wooden head or a mallet ● Cordless screwdriver with bits for cross-head screws and Torx ● Roller tape measure ● Drill bits with a diameter of 3 mm, 10 mm, 20 - 30 mm (for sauna heater power cable) ● Spirit level ●... -
Page 7: Parts List
Instructions for installation p. 7/16 1.7. Parts list Dimensions No. of Name items Base frame Base frame (impregnated) 1910x146x40 Base frame (impregnated) 1990x146x40 W1: Front side with door Block plank with hole for cable 1085x146x40 13 Block plank 1085x146x40 Block plank above the door 1910x146x40 Block plank upper triangle 1910x397x40... - Page 8 Instructions for installation p. 8/16 Dimensions No. of Name items Corner covers Corner cover 1000x80x20 Corner cover 1630x80x20 Corner cover 82° 1630x80x20 Corner cover 1360x80x20 Corner cover 82° 1360x80x20 Inner roof Roof panel 1890x955x55 Roof panel 1890x955x55 Roof support strip 82° 1910x40x40 Roof support slat 1910x40x40...
- Page 9 Instructions for installation p. 9/16 Dimensions No. of items Name Window Insulating safety glass 1587x506x16 Window frame 1805x560x32 Interior fittings Bench 1900x600x88 Bench 1900x500x88 Bench 1305x600x88 Backrests 1800x220x48 Bench support slats 1045x88x28 Bench support slats 595x88x28 Heater protection grille 1000x88x28 Heater protection grille 490x70x28 Heater protection grille...
- Page 10 Instructions for installation p. 10/16 Dimensions No. of Name items Accessories Ventilation slide 620P 215x170x20 Ventilation grille 250x250x30 Headrest 520S 430x250x70 Lamp protective grille 920S Lamp without bulb Assembly material set Assembly instructions Polymer adhesive (290ml) Stainless steel ventilation grille Metal angle 60x60x3 146 Iron pins...
-
Page 11: Floor Plan/Foundation
Instructions for installation p. 11/16 2. Floor plan/foundation 2.1. Right-hand assembly 3210 2030 Version right/ oikea 3290 2040 1250... -
Page 12: Left-Hand Assembly
Instructions for installation p. 12/16 2.2. Left-hand assembly 3210 2030 Version left/ vasen 3290 1250 2040... -
Page 13: View/Dimensions
Instructions for installation p. 13/16 3. View/dimensions 3435 3130... -
Page 14: Assembling The Cabin
Instructions for installation p. 14/16 4. Assembling the cabin ATTENTION! Note the floor plans on page 11 or 12 and illustrations from page 17 onwards. 4.1. Assembling the base frame Place the impregnated base frame on the foundation as shown on the floor plan and the foundation illustrations (see pages 11 and 13). Glue the floor frame at the corners and screw the parts together with 5 x 90 mm screws. 4.2. -
Page 15: Installing The Benches And Backrests
Instructions for installation p. 15/16 4.6. Installing the benches and backrests 4.7. Installing the windows and doors First insert the window frame on the inside and screw it to the cabin wall. Insert the glass from the outside and fit the second window frame. Place the inner door from the lobby into the door opening and fix it by fitting the door panel inside from the sauna interior. Place the outer door in the door opening and fix it by fitting the door panel from the inside. - Page 16 Instructions for installation p. 16/16...
- Page 17 Gartensauna SCALA Medium 344 x 313 x 272 cm MONTAGEANLEITUNG Deutsch SCALA-M Version 08/21 Artikel-Nr. 1-053-022...
- Page 18 Table of Contents 1. Montage Vorbereitung 1.1. Wichtige Hinweise 1.2. Wartung und Reinigung 1.3. Fundament 1.4. Verankerung der Außensauna 1.5. Entsorgung 1.6. Benötigtes Werkzeug 1.7. Stückliste 2. Grundriss / Fundament 2.1. Aufbau rechts 2.2. Aufbau links 3. Ansicht / Abmessungen 5.
-
Page 19: Montage Vorbereitung
1. Montage Vorbereitung Lesen Sie diese Montageanleitung gut durch und bewahren Sie sie auf. So können Sie jederzeit Produktinformationen nachlesen. Sie finden diese Montageanleitung auch im Downloadbereich unserer Webseite auf www.sentiotec.com/downloads. 1.1. Wichtige Hinweise ● Erkundigen Sie sich bei Ihrer zuständige Baubehörde (Gemeindeamt, Ma- gistrat) bezüglich den Bauvorschriften und Belastungsnormen. -
Page 20: Wartung Und Reinigung
Montageanleitung S. 4/16 ● Das Holz der Außensauna ist unbehandelt. Um die Lebensdauer zu erhöhen, empfehlen wir, außen mit einer geeigneten Holzschutzfarbe zu streichen. ● Die Innen zu verwendenden Holzteile dürfen nicht mit Farbe behandelt werden. 1.2. Wartung und Reinigung ● Die Sauna sollte innen mit einem feuchten Tuch gereinigt werden. Verwenden Sie nur warmes Wasser - keine Reinigungsmittel. ●... -
Page 21: Verankerung Der Außensauna
Montageanleitung S. 5/16 1.4. Verankerung der Außensauna Es ist sehr wichtig, dass die Außensauna fest mit der Bodenplatte oder dem Streifenfundament verankert wird. Bei starkem Wind können große Kräfte auf das Gartenhaus einwirken. Um Schäden am eigenen oder fremden Eigentum zu vermeiden ist eine fachgerechte Verankerung unbedingt notwendig. Wir weisen Sie darauf hin, dass die Verankerung des Gartenhauses im Verantwortungsbereich des Kunden liegt, und wir für auftretende Schäden keine Gewährleistung übernehmen. 1.5. -
Page 22: Benötigtes Werkzeug
Montageanleitung S. 6/16 1.6. Benötigtes Werkzeug ● Hammer und Beilageholz oder einen Gummihammer ● Akkuschrauber mit Bits für Kreuzschrauben und Torx ● Rollmaßband ● Bohrer mit Durchmesser 3 mm, 10 mm, 20 - 30 mm (für Stromkabel Saunaofen) ● Wasserwaage ● Innensechskant-Schlüssel 1,5 mm ● Universalmesser ● Leiter Dieses Symbol kennzeichnet Tipps und nützliche Hinweise Vorbohren Ablängen auf Naturmaß... -
Page 23: Stückliste
Montageanleitung S. 7/16 1.7. Stückliste Name Dimensions No. of items Grundrahmen Grundrahmen (imprägniert) 1910x146x40 Grundrahmen (imprägniert) 1990x146x40 W1: Vorderseite mit Tür Blockbohle mit bohrung für kabel 1085x146x40 13 Blockbohle 1085x146x40 Blockbohle über der Tür 1910x146x40 Blockbohle oberes Dreieck 1910x397x40 W2: Seitenwand 14 Blockbohle 1990x146x40 Blockbohle mit Bohrungen für Abluft... - Page 24 Montageanleitung S. 8/16 Name Dimensions No. of items Eckabdeckungen Eckabdeckung 1000x80x20 Eckabdeckung 1630x80x20 Eckabdeckung 82° 1630x80x20 Eckabdeckung 1360x80x20 Eckabdeckung 82° 1360x80x20 Dach innen Dachpanel 1890x955x55 Dachpanel 1890x955x55 Dachauflageleiste 82° 1910x40x40 Dachauflageleiste 1910x40x40 Dachauflageleiste 2x82° links 1847x40x40 Dachauflageleiste 2x82° rechts 1847x40x40 Dach außen Dachsparren 2060x130x40 Dachsparren 1495x130x40 Dachsparren 767x128x40...
- Page 25 Montageanleitung S. 9/16 Name Dimensions No. of items Fenster isolierendes Sicherheitsglas 1587x506x16 Fensterrahmen 1805x560x32 Inneneinrichtung Bank 1900x600x88 Bank 1900x500x88 Bank 1305x600x88 Rückenlehne 1800x220x48 Bankauflageleisten 1045x88x28 Bankauflageleisten 595x88x28 Ofenschutzgitter 1000x88x28 Ofenschutzgitter 490x70x28 Ofenschutzgitter 675x70x28 Ofenschutzgitter (Strebe) 575x88x28 Terrasse Grundrahmen (imprägniert) 1210x95x40 Grundrahmen (imprägniert) 2000x95x40 Grundrahmen (imprägniert)
- Page 26 Montageanleitung S. 10/16 Name Dimensions No. of items Zubehör Lüftungsschieber 620P 215x170x20 Lüftungsgitter 250x250x30 Kopfstütze 520S 430x250x70 Lampenschutzgitter 920S Leuchte ohne leuchtmittel Montage Material Set Montageanleitung Polymerkleber (290ml) Edelstahl Lüftungsgitter Metall Winkel 60x60x3 146 Eisenstifte Dachpappe...
-
Page 27: Grundriss / Fundament
Montageanleitung S. 11/16 2. Grundriss / Fundament 2.1. Aufbau rechts 3210 2030 Version right/ oikea 3290 2040 1250... -
Page 28: Aufbau Links
Montageanleitung S. 12/16 2.2. Aufbau links 3210 2030 1910 Version left/ vasen 3290 1250 2040... -
Page 29: Ansicht / Abmessungen
Montageanleitung S. 13/16 3. Ansicht / Abmessungen 3435 3130... -
Page 30: Montage Kabine
Montageanleitung S. 14/16 4. Montage Kabine ACHTUNG! Beachten Sie den Grundrisse auf Seite 11 bzw. 12 und die Abbildungen ab Seite 17. 4.1. Montage Grundrahmen Legen Sie den imprägnierten Grundrahmen auf das Fundament wie dies im Grundriss und in den Fundament-Darstellungen angezeigt ist (siehe Seite 11 und 13). -
Page 31: Montage Bänke Und Rückenlehne
Montageanleitung S. 15/16 4.6. Montage Bänke und Rückenlehne 4.7. Montage Fenster und Türen Setzen Sie zuerst den Fensterrahmen innen ein und verschrauben ihn mit der Kabinenwand. Setzen Sie das Glas von außen ein und montieren Sie den zweiten Fensterrahmen. Stellen Sie die Innentür vom Vorraum aus in die Türöffnung und fixieren Sie ihn durch die Montage der Türverblendung innen von der Sauna-Innenseite. - Page 32 Montageanleitung S. 16/16...
- Page 33 Sauna de jardin SCALA Medium 344 x 313 x 272 cm INSTRUCTIONS DE MONTAGE Français SCALA-M Version 08/21 Référence 1-053-022...
- Page 34 Table des matières 1. Préparation du montage 1.1. Remarques importantes 1.2. Entretien et nettoyage 1.3. Fondation 1.4. Ancrage du sauna extérieur 1.5. Élimination 1.6. Outils requis 1.7. Nomenclature 2. Plan de construction / fondation 2.1. Construction à droite 2.2. Construction à gauche 3.
-
Page 35: Préparation Du Montage
à tout moment aux informations sur le produit. Vous pouvez également trouver ces instructions de montage dans la zone de téléchargement de notre site Web : www.sentiotec.com/downloads. 1.1. Remarques importantes ● Renseignez-vous auprès de l’autorité locale chargée de la construction (bureau municipal, magistrat) sur les règles de construction et les normes... -
Page 36: Entretien Et Nettoyage
Instructions de montage p. 4/16 ● Le bois du sauna extérieur n’est pas traité. Pour augmenter sa durée de vie, nous recommandons de peindre l’extérieur avec une peinture de protection du bois adaptée. ● Les pièces en bois utilisées à l’intérieur du sauna ne doivent pas être traitées avec de la peinture. 1.2. Entretien et nettoyage ●... -
Page 37: Ancrage Du Sauna Extérieur
Instructions de montage p. 5/16 1.4. Ancrage du sauna extérieur Il est très important que le sauna extérieur soit solidement ancré à la dalle ou aux semelles filantes. Par vent fort, de grandes forces peuvent agir sur la mai- sonnette de jardin. Afin d’éviter d’endommager votre propriété ou les biens de tiers, un ancrage professionnel est absolument nécessaire. Nous attirons votre attention sur le fait que l’ancrage de la maisonnette de jardin est à... -
Page 38: Outils Requis
Instructions de montage p. 6/16 1.6. Outils requis ● Marteau et cales ou maillet en caoutchouc ● Visseuse électrique avec bits pour vis en croix et Torx ● Ruban de mesure ● Foret de 3 mm de diamètre, 10 mm, 20 - 30 mm (pour câble électrique poêle de sauna) ● Niveau à bulle ●... -
Page 39: Nomenclature
Instructions de montage p. 7/16 1.7. Nomenclature Dimensions Qté Cadre de base Cadre de base (imprégné) 1910x146x40 Cadre de base (imprégné) 1990x146x40 W1 : Face avant avec porte Madrier avec trou percé pour les câbles 1085x146x40 13 Madrier 1085x146x40 Madrier (au-dessus de la porte) 1910x146x40 Madrier (au-dessus du triangle) 1910x397x40... - Page 40 Instructions de montage p. 8/16 Dimensions Qté Cache angle Cache angle 1000x80x20 Cache angle 1630x80x20 Cache angle (82°) 1630x80x20 Cache angle 1360x80x20 Cache angle (82°) 1360x80x20 Partie intérieure du toit Panneau de toit 1890x955x55 Panneau de toit 1890x955x55 Baguette d’appui de toiture (82°) 1910x40x40 Baguette d’appui de toiture 1910x40x40...
- Page 41 Instructions de montage p. 9/16 Dimensions Qté Cadre de fenêtre Verre de sécurité isolant 1587x506x16 Cadre de fenêtre 1805x560x32 Équipement intérieur Banc 1900x600x88 Banc 1900x500x88 Banc 1305x600x88 Dossier 1800x220x48 Baguettes d’appui de banc 1045x88x28 Baguettes d’appui de banc 595x88x28 Grilles de protection de poêle 1000x88x28 Grilles de protection de poêle 490x70x28...
- Page 42 Instructions de montage p. 10/16 Dimensions Qté Accessoires Registres d’aération 620P 215x170x20 Grilles d’aération 250x250x30 Appui-tête 520S 430x250x70 Grille de protection pour lampe 920S Lampe sans ampoule Kit de matériel d’assemblage Instructions de montage Adhésif polymère (290 ml) Grille d’aération en acier inoxydable Équerre d’angle en métal 60x60x3 146 Goupilles en fer...
-
Page 43: Plan De Construction / Fondation
Instructions de montage p. 11/16 2. Plan de construction / fondation 2.1. Construction à droite 3210 2030 Version right/ oikea 3290 2040 1250... -
Page 44: Construction À Gauche
Instructions de montage p. 12/16 2.2. Construction à gauche 3210 2030 Version left/ vasen 3290 1250 2040... -
Page 45: Vue / Dimensions
Instructions de montage p. 13/16 3. Vue / dimensions 3435 3130... -
Page 46: Montage De La Cabine
Instructions de montage p. 14/16 4. Montage de la cabine ATTENTION ! Référez-vous aux plans des pages 11 et 12 et aux illustrations à partir de la page 17. 4.1. Montage du cadre de base Placez le cadre de base imprégné sur la fondation comme indiqué sur le plan de construction et les illustrations de la fondation (voir pages 11 et 13). -
Page 47: Montage Des Bancs Et Des Dossiers
Instructions de montage p. 15/16 4.6. Montage des bancs et des dossiers 4.7. Montage des fenêtres et des portes Insérez d’abord le cadre de la fenêtre à l’intérieur et vissez-le à la paroi de la cabine. Insérez le verre par l’extérieur et montez le deuxième cadre de fenêtre. Placez la porte intérieure du vestibule dans l’ouverture de la porte et fixez-la en montant la garniture de la porte à... - Page 48 Instructions de montage p. 16/16...
- Page 49 Sauna da giardino SCALA Medium 344 x 313 x 272 cm ISTRUZIONI DI MONTAGGIO Italiano SCALA-M Versione 08/21 Codice articolo 1-053-022...
- Page 50 Indice 1. Preparazione per il montaggio 1.1. Indicazioni importanti 1.2. Manutenzione e pulizia 1.3. Fondamenta 1.4. Ancoraggio della sauna all’aperto 1.5. Smaltimento 1.6. Attrezzi necessari 1.7. Elenco dei pezzi 2. Pianta/fondamenta 2.1. Installazione a destra 2.2. Installazione a sinistra 3. Vista/dimensioni 4.
-
Page 51: Preparazione Per Il Montaggio
è possibile controllare in qualsiasi momento le informazioni relative al prodotto. Le presenti istruzioni di montaggio sono disponibili anche nella sezione download del nostro sito web all’indirizzo: www.sentiotec.com/downloads. 1.1. Indicazioni importanti ● Informatevi presso l’autorità edilizia competente locale (ufficio comunale o autorità comunali) per i regolamenti edilizi e gli standard di carico. -
Page 52: Manutenzione E Pulizia
Istruzioni di montaggio P. 4/16 ● Il legno della sauna esterna non è trattato. Per aumentare la durata di vita, si consiglia di dipingere l’esterno con una vernice protettiva per legno adatta. ● I componenti in legno da utilizzare all’interno non devono essere trattati con vernice. 1.2. Manutenzione e pulizia ● La sauna all’interno deve essere pulita con un panno umido. Utilizzare solo acqua calda senza detergenti. -
Page 53: Ancoraggio Della Sauna All'aperto
Istruzioni di montaggio P. 5/16 1.4. Ancoraggio della sauna all’aperto È molto importante che la sauna all’aperto sia saldamente ancorata alla pia- stra di fondo o alla striscia di fondazione. In caso di vento forte, grandi forze possono agire sulla casetta da giardino. Per evitare danni alla vostra proprietà o a quella di altri, un ancoraggio professionale è assolutamente necessario. Vorremmo sottolineare che l’ancoraggio della casetta da giardino è di responsabilità... -
Page 54: Attrezzi Necessari
Istruzioni di montaggio P. 6/16 1.6. Attrezzi necessari ● Martello e pezzo di legno oppure martello in gomma ● Avvitatore elettrico con punte per viti con testa a croce e viti Torx ● Metro a nastro avvolgibile ● Punte per trapano da 3 mm, 10 mm, 20-30 mm (per cavo elettrico della stufa per sauna) ●... -
Page 55: Elenco Dei Pezzi
Istruzioni di montaggio P. 7/16 1.7. Elenco dei pezzi Dimensioni N. di Nome articoli Telaio base Telaio di base (impregnato) 1910x146x40 Telaio di base (impregnato) 1990x146x40 W1: parte anteriore con porta Trave per Blockhaus con foro per il cavo 1085x146x40 13 Trave per Blockhaus 1085x146x40 Trave per Blockhaus sopra la porta... - Page 56 Istruzioni di montaggio P. 8/16 Dimensioni N. di Nome articoli Coperture angolari Copertura angolare 1000x80x20 Copertura angolare 1630x80x20 Copertura angolare a 82° 1630x80x20 Copertura angolare 1360x80x20 Copertura angolare a 82° 1360x80x20 Tetto interno Pannello del tetto 1890x955x55 Pannello del tetto 1890x955x55 Listello di supporto del tetto a 82°...
- Page 57 Istruzioni di montaggio P. 9/16 Dimensioni N. di articoli Nome Finestra Vetro di sicurezza isolante 1587x506x16 Telaio della finestra 1805x560x32 Allestimento interno Panca 1900x600x88 Panca 1900x500x88 Panca 1305x600x88 Schienale 1800x220x48 Listelli di supporto panca 1045x88x28 Listelli di supporto panca 595x88x28 Griglia di protezione stufa 1000x88x28 Griglia di protezione stufa 490x70x28...
- Page 58 Istruzioni di montaggio P. 10/16 Dimensioni N. di Nome articoli Accessori Cursore di ventilazione 620P 215x170x20 Griglia di ventilazione 250x250x30 Poggiatesta 520S 430x250x70 Griglia di protezione della lampada 920S Lampada senza lampadina Set di materiale di montaggio Istruzioni di montaggio Adesivo polimerico (290ml) Griglia di ventilazione in acciaio inox Angolo di metallo...
-
Page 59: Pianta/Fondamenta
Istruzioni di montaggio P. 11/16 2. Pianta/fondamenta 2.1. Installazione a destra 3210 2030 Version right/ oikea 3290 2040 1250... -
Page 60: Installazione A Sinistra
Istruzioni di montaggio P. 12/16 2.2. Installazione a sinistra 3210 2030 Version left/ vasen 3290 1250 2040... -
Page 61: Vista/Dimensioni
Istruzioni di montaggio P. 13/16 3. Vista/dimensioni 3435 3130... -
Page 62: Montaggio Cabina
Istruzioni di montaggio P. 14/16 4. Montaggio cabina ATTENZIONE! Osservate la pianta a Pagina 11 o 12 e le illustrazioni da Pagina 17. 4.1. Montaggio telaio di base Posizionare il telaio di base impregnato sulle fondamenta come mostrato nella pianta e nelle illustrazioni delle fondamenta (vedi pagine 11 e 13). Incollare il telaio di base agli angoli e avvitare i pezzi con 5 viti da 90 mm. -
Page 63: Montaggio Di Panche E Schienali
Istruzioni di montaggio P. 15/16 4.6. Montaggio di panche e schienali 4.7. Montaggio di finestre e porte Per prima cosa inserite il telaio della finestra all’interno e avvitatelo alla parete della cabina. Inserire il vetro dall’esterno e montare il secondo telaio della finestra. Posizionare la porta interna dell’anticamera nell’apertura della porta e fissarla montando il rivestimento interno della porta dall’interno della sauna. Posizionare la porta esterna nell’apertura della porta e fissarla montando il rivestimento della porta dall’interno. 4.8. Montaggio degli zoccoli 4.9. Montaggio del pannello scorrevole di aerazione 4.10. - Page 64 Istruzioni di montaggio P. 16/16...
- Page 65 Tuinsauna SCALA Medium 344 x 313 x 272 cm MONTAGEHANDLEIDING Nederlands SCALA-M Versie 08/21 Artikelnr. 1-053-022...
- Page 66 Inhoudsopgave 1. Montagevoorbereiding 1.1. Belangrijke aanwijzingen 1.2. Onderhoud en reiniging 1.3. Fundering 1.4. Verankering van de buitensauna 1.5. Afvoer 1.6. Vereist gereedschap 1.7. Stuklijst 2. Plattegrond / fundering 2.1. Opbouw rechts 2.2. Opbouw links 3. Aanzicht / afmetingen 4. Montage cabine 4.1.
-
Page 67: Montagevoorbereiding
Pag. 3/16 1. Montagevoorbereiding Lees deze montagehandleiding goed door en bewaar hem goed. Zo kunt u te allen tijde productinformatie nalezen. U vindt deze montagehandleiding ook op onze website, www.sentiotec.com/downloads. 1.1. Belangrijke aanwijzingen ● Informeer u bij uw verantwoordelijke bouwinstantie (gemeentekantoor, ma- gistraat) naar de bouwvoorschriften en belastingsnormen. ● Een solide betonfundering is belangrijk voor de houdbaarheid en de veiligheid van uw buitensauna. Wij adviseren u om de fundering door een vakbedrijf te laten aanleggen. -
Page 68: Onderhoud En Reiniging
Montagehandleiding Pag. 4/16 ● Het hout van de buitensauna is onbehandeld. Om de levensduur te verlengen, adviseren we om deze vanbuiten te behandelen met een geschikte houtverf. ● De houten onderdelen die binnen worden gebruikt, mogen niet met verf worden behandeld. 1.2. Onderhoud en reiniging ● De sauna moet vanbinnen met een vochtige doek worden gereinigd. Gebruik alleen warm water, geen reinigingsmiddel. ● Als de sauna voor langere tijd niet wordt gebruikt, adviseren wij de cabine een keer per maand te verwarmen. Harsbuilen gelden niet als reclamatiereden. -
Page 69: Verankering Van De Buitensauna
Montagehandleiding Pag. 5/16 1.4. Verankering van de buitensauna Het is heel belangrijk dat de buitensauna in de gietplaat of de strokenfun- dering wordt verankerd. Bij sterke wind kunnen er grote krachten op de bui- tensauna inwerken. Om beschadiging van eigen of andermans eigendom te voorkomen is een deskundige verankering noodzakelijk. -
Page 70: Vereist Gereedschap
Montagehandleiding Pag. 6/16 1.6. Vereist gereedschap ● Hamer en slaghout of een rubberhamer ● Accuschroefmachine met bits voor kruiskopschroeven en torx ● Rolmaat ● Boren met diameters 3 mm, 10 mm, 20 - 30 mm (voor stroomkabel van saunakachel) ● Waterpas ● Inbussleutel 1,5 mm ● Universeel mes ● Ladder Dit symbool kenmerkt tips en nuttige aanwijzingen Voorboren Inkorten met kapzaag Controle van de rechte hoek:... -
Page 71: Stuklijst
Montagehandleiding Pag. 7/16 1.7. Stuklijst Afmetingen Aantal Naam items Basisframe Basisframe (geïmpregneerd) 1910x146x40 Basisframe (geïmpregneerd) 1990x146x40 W1: Voorzijde met deur Blokplank met boring voor kabels 1085x146x40 13 Blokplank 1085x146x40 Blokplank boven de deur 1910x146x40 Blokplank bovenste driehoek 1910x397x40 W2: Zijwand 14 Blokplank 1990x146x40 Blokplank met boringen voor afvoerlucht... - Page 72 Montagehandleiding Pag. 8/16 Afmetingen Aantal Naam items Hoekafdekkingen Hoekafdekking 1000x80x20 Hoekafdekking 1630x80x20 Hoekafdekking 82° 1630x80x20 Hoekafdekking 1360x80x20 Hoekafdekking 82° 1360x80x20 Dak binnen Dakpaneel 1890x955x55 Dakpaneel 1890x955x55 Daksteunlat 82° 1910x40x40 Daksteunlat 1910x40x40 Daksteunlat 2x82° links 1847x40x40 Daksteunlat 2x82° rechts 1847x40x40 Dak buiten Dakspanten 2060x130x40 Dakspanten...
- Page 73 Montagehandleiding Pag. 9/16 Afmetingen Aantal items Naam Raam Isolerend veiligheidsglas 1587x506x16 Raamkozijn 1805x560x32 Binneninrichting Bank 1900x600x88 Bank 1900x500x88 Bank 1305x600x88 Rugleuning 1800x220x48 Steunlijsten bank 1045x88x28 Steunlijsten bank 595x88x28 Kachelbeschermingsrooster 1000x88x28 Kachelbeschermingsrooster 490x70x28 Kachelbeschermingsrooster 675x70x28 Kachelbeschermingsrooster (schoor) 575x88x28 Terras Basisframe (geïmpregneerd) 1210x95x40 Basisframe (geïmpregneerd) 2000x95x40...
- Page 74 Montagehandleiding Pag. 10/16 Afmetingen Aantal Naam items Toebehoren Ventilatieschuif 620P 215x170x20 Ventilatierooster 250x250x30 Hoofdsteun 520S 430x250x70 Lampbeschermingsrooster 920S Lamp zonder lichtbron Set montagemateriaal Montagehandleiding Polymeerlijm (290ml) Edelstaal ventilatierooster Metalen hoek 60x60x3 146 IJzeren pennen Dakvilt...
-
Page 75: Plattegrond / Fundering
Montagehandleiding Pag. 11/16 2. Plattegrond / fundering 2.1. Opbouw rechts 3210 2030 Version right/ oikea 3290 2040 1250... -
Page 76: Opbouw Links
Montagehandleiding Pag. 12/16 2.2. Opbouw links 3210 2030 Version left/ vasen 3290 1250 2040... -
Page 77: Aanzicht / Afmetingen
Montagehandleiding Pag. 13/16 3. Aanzicht / afmetingen 3435 3130... -
Page 78: Montage Cabine
Montagehandleiding Pag. 14/16 4. Montage cabine LET OP! Neem de plattegronden op pagina 11 en 12 en de afbeelding vanaf pagina 13 in acht. 4.1. Montage basisframe Leg het geïmpregneerde basisframe op de fundering zoals afgebeeld op de plattegrond en in de funderingsafbeeldingen (zie pagina 11 en 13). Lijm het bodemframe aan de hoeken en schroef de onderdelen vast met schroeven 5 x 90 mm. -
Page 79: Montage Banken En Rugleuning
Montagehandleiding Pag. 15/16 4.6. Montage banken en rugleuning 4.7. Montage ramen en deuren Plaats eerst het raamkozijn aan de binnenzijde en schroef het vast aan de cabi- newand. Plaats het glas er vanaf buiten in en monteer het tweede raamkozijn. Plaats de binnendeur vanuit de voorruimte in de deuropening en zet deze vast door de montage van de deurbekleding binnen aan de binnenzijde van de sauna. - Page 80 Montagehandleiding Pag. 16/16...
- Page 81 Pictures p. 17/34 4.1. 1990x146x40 1990x146x40 9 Stk. 5 x 90...
- Page 82 Pictures p. 18/34 4.2. 5 x 60 5 x 60 4.3. 5 x 90 5 x 90...
- Page 83 Pictures p. 19/34 5 x 90...
- Page 84 Pictures p. 20/34...
- Page 85 Pictures p. 21/34 4.4. 3,2 x 40...
- Page 86 Pictures p. 22/34 4.5. 4 x 70 1830x40x40 mm 82° 1830x40x40 mm 82°...
- Page 87 Pictures p. 23/34 3,5 x 40...
- Page 88 Pictures p. 24/34 4.6. 5 x 60 5 x 60 4,5 x 50...
- Page 89 Pictures p. 25/34 3,5 x 50 4.7. 12 Pcs. 3,2 x 40 12 Pcs. 3,2 x 40...
- Page 90 Pictures p. 26/34 5 x 90 3,2 x 40 3,2 x 40...
- Page 91 Pictures p. 27/34 4.8. 3,2 x 40 1910 1900 4.9. 3,2 x 40...
- Page 92 Pictures p. 28/34 4.10. 6 x 120 6 x 150 5 x 100...
- Page 93 Pictures p. 29/34 5 x 100 3,5 x 50 1718 1718 1965 1390 1528 1828 1718 1718...
- Page 94 Pictures p. 30/34 3,5 x 50 3,5 x 50 3,5 x 50 3,5 x 50...
- Page 95 Pictures p. 31/34 4.11. 5 x 80 5 x 80 4 x 70 4 x 70 3,5 x 50...
- Page 96 Pictures p. 32/34 3,5 x 50 4.12. 3,5 x 50 3,5 x 50...
- Page 97 Pictures p. 33/34 4.13. 4 x 70 4 x 70...
- Page 98 Pictures p. 34/34 4 x 70 3,5 x 50 4 x 70 3,5 x 50...
- Page 99 NOTIZEN / APPUNTI / NOTES / NOTE / NOTITIES ………………………………………………….....………………………………………………………………... ……………………………………………………………..……………………………………………………………... …………………………………………………………….....………………………………………………………... …………………………………………………….....………………………………………………………………... ……………………………………………………………..……………………………………………………………... ……………………………………………………………..……………………………………………………………... ……………………………………………………………..…………………………………………………………... …………………………………………………………….....………………………………………………………... …………………………………………………………….....………………………………………………………... …………………………………………………………….....………………………………………………………... …………………………………………………………….....………………………………………………………... …………………………………………………………….....………………………………………………………..…………………………………………………………….....………………………………………………………... …………………………………………………………….....………………………………………………………... …………………………………………………………….....………………………………………………………... …………………………………………………………….....………………………………………………………... …………………………………………………………….....………………………………………………………... …………………………………………………………….....………………………………………………………... …………………………………………………………….....………………………………………………………...
- Page 100 GmbH | Division of Harvia Group | Wartenburger Straße 31, A-4840 Vöcklabruck T +43 (0) 7672/22 900-50 | F -80 | info@sentiotec.com | www.sentiotec.com...
Need help?
Do you have a question about the SCALA Medium and is the answer not in the manual?
Questions and answers