Advertisement
Available languages
Available languages
Quick Links
Model WH2725AT Installation and
Setup Instructions
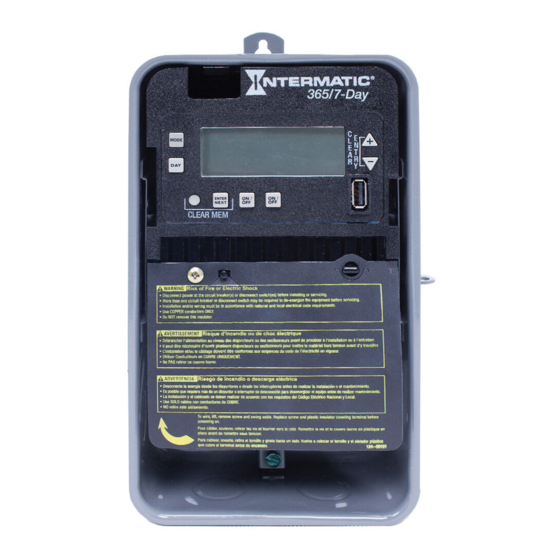
WARNING
Risk of Fire or Electric Shock
• Disconnect power at the circuit breaker(s) or disconnect switch(es) before installing or servicing.
• More than one circuit breaker or disconnect switch may be required to de-energize the equipment before servicing.
• Installation and/or wiring must be in accordance with National and Local Electrical Code requirements.
• Use #14-#8 AWG wires, rated at least 105°C - COPPER conductors ONLY.
• If the power disconnect point is out of sight, lock it in the OFF position and tag it to prevent unexpected application power.
• Make sure there is no wire insulation under the terminal plate on the time switch connector. Firmly tighten terminal screws.
• For outdoor locations or wet locations (rain-tight), conduit hubs that comply with requirements of the UL514B (standard for fitting conduit and
outlet boxes) are to be used.
• Do not remove insulator that is covering terminals.
• Do NOT exceed maximum current carrying capacity.
• KEEP DOOR CLOSED AT ALL TIMES when not servicing.
NOTICE
• Do NOT touch circuit board components, contact can create a static discharge, which can damage these electronic components.
Description
This document explains the setup and configuration of the Intermatic WH2725AT 1-Circuit
Pre-programmed Water Heater Time Switch. The time switch can support up to 16 fixed OFF
events . Each fixed event can be applied to any time outside of the City Code requirements.
The time switch features an LCD and panel-mounted control buttons to set, review, and
monitor the time switch functions, including setting date and time and schedule creation.
Follow these instructions to complete the installation and programming of the WH2725AT
Pre-programmed Water Heater Time Switch. The time switch has the city codes for enabling
usage of the water heater already programmed onto its on board memory.
Federal Communications Commission (FCC) Notice
This device complies with part 15 of the FCC rules. Operation of this device is subject to the following two conditions: (1) This device
may not cause harmful interference, and (2) This device must accept any interference, including interference that may cause undesired
operation. This equipment has been tested and found to comply with the limits for a Class B digital device, pursuant to Part 15 of the
FCC Rules. These limits are designed to provide reasonable protection against harmful interference when the equipment is operated
in a residential environment. This equipment generates, uses and radiates radio frequency energy and, if not installed and used in
accordance with instructions, may cause harmful interference to radio communications. However, there is no guarantee that
interference will not occur in a particular installation. If this equipment does cause harmful interference to radio or television reception,
which can be determined by turning the equipment off and on, the user is encouraged to try to correct the interference by one or more
of the following measures:
• Reorient or relocate the receiving antenna.
• Increase the separation between the equipment and receiver.
• Connect the equipment into an outlet on a circuit different from that to which the receiver is connected.
• Consult the dealer or an experienced radio/TV technician for help.
Pre-programmed
Water Heater Timer
With 100-Hour Backup
Shown in indoor/outdoor
lockable metal enclosure
Advertisement

Subscribe to Our Youtube Channel
Related Manuals for Intermatic WH2725AT


Summary of Contents for Intermatic WH2725AT
- Page 1 • Do NOT touch circuit board components, contact can create a static discharge, which can damage these electronic components. Description This document explains the setup and configuration of the Intermatic WH2725AT 1-Circuit Pre-programmed Water Heater Time Switch. The time switch can support up to 16 fixed OFF events .
- Page 2 Installation Snap out catch Tilt top forward Follow these instructions to install the time switch. Open the time switch enclosure door. Remove and retain the screw that secures the plastic insulator. Lift the left side of the plastic insulator and pivot away to expose the terminal strip. Press the latch at the top of the enclosure and pull out the mechanism from the enclosure.
- Page 3 Initial Setup The following sections provide instructions for the initial setup of the time switch. NOTE: The lockout pin code is on the LCD display of the unit. Activate power to the time switch. The display will show 000 with the first 0 flashing, the ARROW icon above the ENTER/NEXT button and the ON icon above the on/off button will turn on.
- Page 4 The SET ON/OFF EVENTS and OFF@ icons are displayed. Press ENTER/NEXT if this fixed off event is not needed, go to step 17 10. Press – to eliminate this event, or press + to keep this event for the selected day. 11.
-
Page 5: Limited Two-Year Warranty
LIMITED TWO-YEAR WARRANTY If within the warranty period specified, this product fails due to a defect in material or workmanship, Intermatic Incorporated will repair or replace it, at its sole option, free of charge. This warranty is extended to the original household purchaser only and is not transferable. - Page 6 Siga estas instrucciones para completar la instalación y la programación del temporizador para calentador de agua con programa preestablecido WH2725AT. El temporizador viene con los códigos de la ciudad para permitir el uso del calentador de agua ya programados en la memoria de la tarjeta.
- Page 7 Inclinar la parte Instalación Levantar la lengüeta superior hacia de cierre adelante Siga estas instrucciones para instalar el temporizador. Abra la puerta de la caja del temporizador. Retire y conserve el tornillo que sujeta el aislante de plástico. Levante el lado izquierdo del aislante de plástico y gírelo hacia afuera para exponer la regleta de terminales.
- Page 8 Configuración inicial En las siguientes secciones, se proporcionan instrucciones para la configuración inicial del temporizador. NOTA: El código pin de bloqueo se encuentra en la pantalla LCD de la unidad. Active la energía para el temporizador. En la pantalla, se mostrará 000 y el primer 0 aparecerá titilando; se encenderán el icono de FLECHA que está...
- Page 9 Si los días deseados para este evento son Entonces SÁB-DOM Presione DAY (DÍA) dos veces y, luego, presione ENTER/NEXT (ENTRAR/ SIGUIENTE) para guardar. Vaya al paso 1. PROGRAMAR CADA DÍA DE MANERA Presione DAY (DÍA) tres veces y el icono de LUN empezará a titilar. INDIVIDUAL Vaya al paso 8.
- Page 10 Si, dentro del período de garantía especificado, este producto presenta fallas a causa de defectos en los materiales o en la mano de obra, Intermatic Incorporated lo reparará o reemplazará sin cargo, a su exclusivo criterio. Esta garantía se extiende solo al comprador original y no es transferible.
Need help?
Do you have a question about the WH2725AT and is the answer not in the manual?
Questions and answers