Advertisement
Quick Links
©2010 ClearSpan™
All Rights Reserved. Reproduction
is prohibited without permission.
Revision date: 10.05.10
ClearSpan
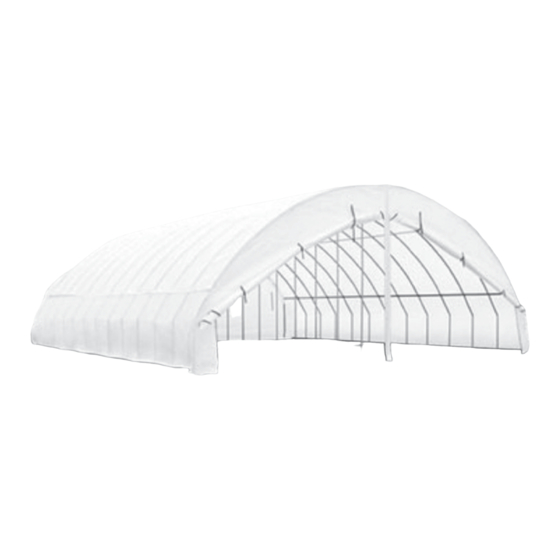
42' Wide Round Style Storage Master
Photo may show a different but similar model.
CLEARSPAN
™
STK#
DIMENSIONS
106183
42' W x 15' H x 42' L
106184
42' W x 15' H x 60' L
VALUE LINE
™
1
Advertisement

Subscribe to Our Youtube Channel
Related Manuals for ClearSpan 106183


Summary of Contents for ClearSpan 106183
- Page 1 VALUE LINE ™ ClearSpan ™ 42' Wide Round Style Storage Master Photo may show a different but similar model. ©2010 ClearSpan™ STK# DIMENSIONS All Rights Reserved. Reproduction is prohibited without permission. 106183 42' W x 15' H x 42' L...
-
Page 2: Safety Precautions
BEGIN TO ASSEMBLE THE SHELTER. • Identify whether underground cables and pipes are present before preparing the site or anchoring the Thank you for purchasing this ClearSpan™ shelter. When structure. properly assembled and maintained, this product will • Location should be away from structures that could provide years of reliable service. -
Page 3: Assembly Procedure
These words and phrases are common to most ends of a pipe can be inserted into couplers and the ClearSpan™ shelters and identify the different parts of straight ends of other pipes of the same diameter. the shelter. (Some are used in this document. Others may •... -
Page 4: Required Tools
CLEARSPAN VALUE LINE ™ SPECIAL NOTE: Baseboards for Frame REQUIRED TOOLS These instructions describe installing a baseboard The following list identifies the main tools needed to (recommended) at ground level along each side of the assemble the shelter. Additional tools and supports may be frame. - Page 5 CLEARSPAN VALUE LINE ™ The following graphics and photos will help you identify the different parts and show you how they are used. (Not all parts are shown.) CC6214 FA4482B QH1404 Fabric Clips Tek Screw Band Clamp QH1061 102857 10016108...
- Page 6 CLEARSPAN VALUE LINE ™ 42' Wide Round Style Storage Master OVERVIEW This section is an overview of the process for assembling your Round Style Storage Master. For details, please see Assembling the Round Style Storage Master Components. The illustration below identifies main parts of the shelter.
- Page 7 CLEARSPAN VALUE LINE ™ LAY OUT THE BUILDING SITE 4. String a line at least as long as the building from the first stake at 90°. After the site is prepared, lay out the building site. NOTE: A transit can be used to ensure an accurate 90°...
- Page 8 CLEARSPAN VALUE LINE ™ LAY OUT THE BUILDING SITE (CONTINUED) 11. Using the remaining ground posts, drive the center Space below is reserved for customer notes. ground posts in the same manner as the side ground posts. Verify on-center dimensions.
- Page 9 CLEARSPAN VALUE LINE ™ ASSEMBLING THE ROUND STYLE STORAGE MASTER FRAME COMPONENTS 42R1902 42R1903 NOTE: Assistance is required to assemble the frame. 42R1902 42R1902 INTERIOR RAFTER ASSEMBLY 42R1902 42R1902 This section is an overview of the process for assembling your interior rafters. The illustration below identifies main...
- Page 10 CLEARSPAN VALUE LINE ™ END RAFTER ASSEMBLY Complete the following steps for the two (2) end rafters 42R1902 42R1903 only. 42R1902 42R1902 1. Select the required couplers, clamps and pipes needed 42R1902 to assemble an end rafter. Arrange these on a flat 42R1902 surface and assemble rafter as shown below.
-
Page 11: Frame Assembly
CLEARSPAN VALUE LINE ™ ASSEMBLE AND PRE-MARK THE PURLINS 7. After assembling all rafters and pre-marking the purlins, continue with assembling the frame. Pre-marking the purlins speeds the assembly process and eliminates the need to measure each purlin as it is FRAME ASSEMBLY installed. - Page 12 CLEARSPAN VALUE LINE ™ FRAME ASSEMBLY (CONTINUED) ATTENTION: Do not allow the center support pipe to extend into the opening that remains for the upper 3. Secure the leg pipes to the ground posts top hole using purlin. 5/16" x 2-1/2" machine bolts and nuts as shown below.
- Page 13 CLEARSPAN VALUE LINE ™ FRAME ASSEMBLY (CONTINUED) 14. Tighten the cross connectors and end clamps on the 17. Once all rafters are set and all purlins are in place and rafters to secure the first purlin pipes. secured, return to each pipe splice of each purlin run and install a Tek screw through the pipes to secure the 15.
- Page 14 CLEARSPAN VALUE LINE ™ FRAME ASSEMBLY (CONTINUED) Strut Assembly Procedure 1. After the rafter assembly is complete, verify that the 20. With all rafters and center supports in place, take one band clamps are in the proper location. See diagram end panel and spread it out on a clean, flat surface with below.
- Page 15 CLEARSPAN VALUE LINE ™ ANCHOR THE ASSEMBLED FRAME BASEBOARD INSTALLATION (RECOMMENDED) At this point, anchor the frame. Consult the MUST READ Gather the parts document for anchoring information and suggestions. • Treated or recycled plastic lumber (supplied by Please call customer service at 1-800-245-9881 for customer).
-
Page 16: Cable Assembly
CLEARSPAN VALUE LINE ™ CABLE ASSEMBLY Cable assemblies provide diagonal bracing for the building. Each cable assembly includes the following items: • Cable • Turnbuckle (1) • Cable thimbles (2) • Cable clamps (4) Cable Clamps Turnbuckle Thimble Cable Typical Turnbuckle Assembly Cable Assembly Procedure 1. -
Page 17: Cable Placement
CLEARSPAN VALUE LINE ™ TIGHTEN THE CABLING 1. After attaching both cable assemblies to the building frame, return to the first turnbuckle and tighten the cables. NOTE: Tighten the cables in each section evenly so that the frame remains plumb. - Page 18 CLEARSPAN VALUE LINE ™ FINISH ROUGH EDGES INSTALL THE RATCHETS FOR THE MAIN COVER Gather the parts All ratchets are attached on the outside of the assembled frame. Complete the following steps to position and secure • Duct tape the ratchets to the frame.
- Page 19 CLEARSPAN VALUE LINE ™ PREPARE MAIN COVER Gather the parts: • Pipe 1.315" x 75" swaged • Pipe 1.315" x 73.5" plain • Main cover • Tek screws Assembly Procedure NOTE: When handling the main cover and setting it in position, do not pull on the end straps. They will pull out of the cover.
- Page 20 CLEARSPAN VALUE LINE ™ ATTACH MAIN COVER 4. Once the main cover is pulled into position, center the cover on the frame and remove the ropes. Loosely Gather the parts: secure the ends of the cover to the side ratchets attached to the front and back end rafters.
- Page 21 CLEARSPAN VALUE LINE ™ INSTALL THE MAIN COVER SIDE STRAPS NOTE: Depending on the where the ratchet was attached to the rafter, the strap may need to be cut to The side straps wrap around slits created in the side the proper length.
- Page 22 CLEARSPAN VALUE LINE ™ INSTALL THE PVC CONDUIT FOR MAIN COVER ENDS For long shelters, PVC conduits are used near the ends of the main cover to provide an additional tie-down position. The PVC conduit is inserted into notched pockets at each Complete these steps to install the conduit and strapping end of the main cover.
- Page 23 CLEARSPAN VALUE LINE ™ 10. Continue to weave the strap around the end rafter and INSTALL PVC CONDUIT (CONTINUED) PVC conduit working up and over the rafter and down 3. Wrap the Tek screw and joint using duct tape. to the other end of the PVC conduit.
- Page 24 CLEARSPAN VALUE LINE ™ INSTALL PVC CONDUIT (CONTINUED) Assembly Procedure: 14. With the strap tied to the end rafter, tighten the strap. 1. Pull the bonnet portion of the main cover back to This strapping will pull against the strapping installed at expose the end rafter.
- Page 25 CLEARSPAN VALUE LINE ™ ATTACH END PANELS (CONTINUED) ATTACH END RATCHETS 7. Moving outward in both directions, continue attaching The end ratchets are used to secure the bonnet portion of fabric clips to secure the end panel to the rafter. Evenly the main cover.
- Page 26 • For replacement or missing parts, call 1-800-245-9881 for assistance. NOTE: With the exception of Truss Arch buildings, ClearSpan™ shelters and greenhouses do not have any tested loading criteria. Bonnet of Main Cover End panel not shown.
- Page 27 CLEARSPAN VALUE LINE ™ QUICK START GUIDE 42' Wide Round Style Storage Master Frame shown may be a different length from actual frame. 42'-0" WIDTH FRONT FRONT Grid Represents 12" Squares Revision date: 10.05.10...
- Page 28 CLEARSPAN VALUE LINE ™ Revision date: 10.05.10...
- Page 29 CLEARSPAN VALUE LINE ™ Revision date: 10.05.10...
- Page 30 CLEARSPAN VALUE LINE ™ Revision date: 10.05.10...
- Page 31 CLEARSPAN VALUE LINE ™ Revision date: 10.05.10...
- Page 32 CLEARSPAN VALUE LINE ™ Revision date: 10.05.10...
- Page 33 CLEARSPAN VALUE LINE ™ Space below is reserved for customer notes. Revision date: 10.05.10...
Need help?
Do you have a question about the 106183 and is the answer not in the manual?
Questions and answers