Advertisement
Quick Links
Thank you for purchasing a Sealey product. Manufactured to a high standard, this product will, if used according to these
instructions, and properly maintained, give you years of trouble free performance.
IMPORTANT: PLEASE READ THESE INSTRUCTIONS CAREFULLY. NOTE THE SAFE OPERATIONAL REQUIREMENTS, WARNINGS & CAUTIONS. USE
THE PRODUCT CORRECTLY AND WITH CARE FOR THE PURPOSE FOR WHICH IT IS INTENDED. FAILURE TO DO SO MAY CAUSE DAMAGE AND/OR
PERSONAL INJURY AND WILL INVALIDATE THE WARRANTY. KEEP THESE INSTRUCTIONS SAFE FOR FUTURE USE.
Refer to
Wear protective
instructions
gloves
1. SAFETY
WARNING! Take care when using and moving scaffolding, extended ladders and other such equipment in the vicinity of power
‰
cables - risk of potentially fatal electric shock.
WARNING! Ensure Health and Safety, local authority, and general workshop practice regulations are adhered to when using this
‰
equipment.
Familiarise yourself with the application and limitations of the scaffold, as well as the potential hazards.
9
Maintain the equipment in good condition.
9
DO NOT use the equipment if any parts are damaged or missing as this may cause failure and/or personal injury.
8
Replace or repair damaged parts. Use genuine parts only.
9
Non-authorised parts may be dangerous and will invalidate the warranty.
9
Keep the work area clean, uncluttered and ensure there is adequate lighting.
9
WARNING! Use scaffold on level and solid ground and ensure the brakes are applied and/or that the scaffold is anchored and held
‰
firmly in place by some means.
WARNING! DO NOT erect or use the scaffolding on sloping or unstable ground.
‰
WARNING! Never over-reach when on the scaffolding.
‰
Keep children and unauthorised persons away from the working area.
9
DO NOT use the scaffolding for any purpose other than that for which it is designed.
8
DO NOT allow children to climb the scaffolding.
8
DO NOT use the equipment when you are tired, under the influence of alcohol, drugs or intoxicating medication.
8
When not in use store in a safe, dry, childproof area.
9
DO NOT use the equipment without side guardrails, knee rails and toe boards fitted. Use all the components supplied.
8
When used outside, mobile scaffold towers should, wherever possible, be secured to a building or other reliable structure.
9
It is good practice to tie in all scaffold towers of any height, especially when left unattended or in exposed windy conditions. Use only
9
the recommended wall anchors.
Beware of strong wind conditions. DO NOT erect or use a free standing tower if the wind is likely to exceed 7.7m/sec (17mph or
9
Beaufort force 4).
Take care when using mobile scaffold towers in hangers or uncovered buildings as wind force may be increased due to funnelling
9
effects.
DO NOT climb a tower from the outside. Never climb on the horizontal or diagonal braces. You should only climb the tower on the
8
inside using the ladder end frames.
DO NOT lean ladders against the tower. Never use ladders or boxes to gain additional height.
8
DO NOT bridge between the mobile scaffold tower and buildings.
8
Stabilisers and ballast weights shall always be fitted where specified. Ballast is used at the base to stabilise towers from overturning.
9
Ballast must be of solid material (i.e. NOT water or loose sand) and should be positioned so as not to overload individual legs.
Ballast should be secured from accidental removal.
Keep equipment clean and inspect before and after use for damage. Use serviceable equipment only. All working parts e.g. castors,
9
adjustable legs; stabiliser clamps should be lubricated lightly with oil. Repairs should only be carried out by the supplier or other
competent person approved by the supplier.
Ensure that all personnel, tools and materials are removed from the tower prior to moving it. Only move the scaffold tower manually
9
on a firm level surface, which is free of any obstacles .
Only move it longitudinally or diagonally. DO NOT exceed normal walking speed. Raise the stabilisers 12mm (½") from the ground.
9
After moving re-lock the castors, check that the tower is level and ensure that the stabilisers are secure and have a firm footing.
9
DO NOT exceed the safe working load of the platform. The maximum capacity of the working platform for an evenly distributed load
8
is 1.5 kN/m² (according to HD1004 – scaffold tower Class 2).
DO NOT jump on to or off the platforms.
8
DO NOT use any lifting equipment on the mobile scaffold tower.
8
© Jack Sealey Limited
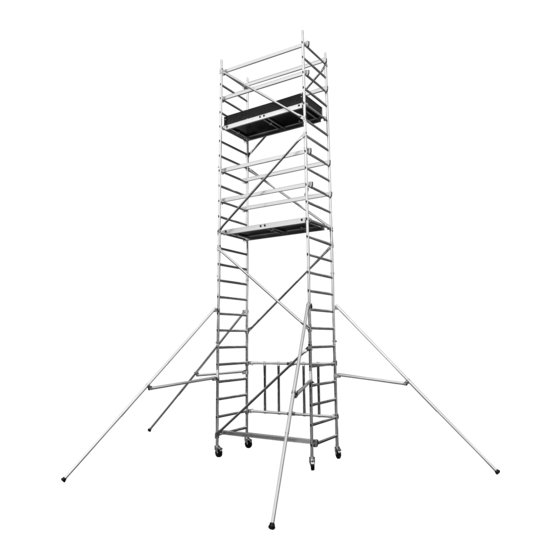
PLATFORM SCAFFOLD TOWER EN 1004
MODEL NO:
TOWER EXTENSION PACK 3
TOWER EXTENSION PACK 4
A MINIMUM OF TWO PEOPLE ARE
REQUIRED TO BUILD THIS TOWER
Wear Head
Protection
Original Language Version
SSCL1.V2
SSCL1.V2, SSCL3, SSCL4 Issue:4 28/06/21
SSCL3
MODEL NO:
SSCL4
MODEL NO:
Advertisement

Related Manuals for Sealey SSCL1.V2


Summary of Contents for Sealey SSCL1.V2
- Page 1 SSCL4 MODEL NO: Thank you for purchasing a Sealey product. Manufactured to a high standard, this product will, if used according to these instructions, and properly maintained, give you years of trouble free performance. IMPORTANT: PLEASE READ THESE INSTRUCTIONS CAREFULLY. NOTE THE SAFE OPERATIONAL REQUIREMENTS, WARNINGS & CAUTIONS. USE THE PRODUCT CORRECTLY AND WITH CARE FOR THE PURPOSE FOR WHICH IT IS INTENDED.
-
Page 2: Specification
2. INTRODUCTION SSCL1.V2: EN 1004 Approved Scaffold Tower System designed to meet the UK PASMA 3T standards. Robust aluminium frame unit with durable corrosion resistance. Heavy-duty platform with trap door for safe access to platform. Can be used as a 3m or 3.8m working height platform by fitting extension kit supplied with the unit. - Page 3 SSCL1.V2 fig.4 SSCL3 Original Language Version © Jack Sealey Limited SSCL1.V2, SSCL3, SSCL4 Issue:4 28/06/21...
- Page 4 Tools or other elements needed for working on the unit must be hoisted via the trapdoors on the platforms. 5.9. Never stand on a platform without protection (brace) when assembling high elements (fig.6). Original Language Version © Jack Sealey Limited SSCL1.V2, SSCL3, SSCL4 Issue:4 28/06/21...
- Page 5 It is important to block the base ladder wheels using their brakes before carrying out any operation (fig.8): fig.7 fig.8 5.13. Unfold the folding base and lock it in position with the pin. Attach the platform to the 3rd rung (fig.9). fig.9 Original Language Version © Jack Sealey Limited SSCL1.V2, SSCL3, SSCL4 Issue:4 28/06/21...
- Page 6 Remove the pins and stoppers from the bases of the ‘2 rung’ ladders. NOTE: fix the pins around the bottom rung of the ladder to prevent it from being lost during handling (fig.11). fig.11 Original Language Version © Jack Sealey Limited SSCL1.V2, SSCL3, SSCL4 Issue:4 28/06/21...
- Page 7 Next attach the platform to the 6th rung. Sit on the platform and attach the 4 braces to the rungs on the inside of the uprights as shown in the diagram in (fig.13). fig.13 Original Language Version SSCL1.V2, SSCL3, SSCL4 Issue:4 28/06/21 © Jack Sealey Limited...
- Page 8 Start from the base assembled and attach the brace to the 1st rung. Prepare the ‘2 rung’ and ‘7 rung’ ladders removing the pins and stoppers from their bases (fig.15). NOTE: fix the pins around the bottom rung of the ladder (fig.15). fig.15 Original Language Version SSCL1.V2, SSCL3, SSCL4 Issue:4 28/06/21 © Jack Sealey Limited...
-
Page 9: Stabilizer Assembly
8. STABILIZER ASSEMBLY 8.1. Installation of stabilisers fastened to the uprights by means of two wing nut clamps (fig.17): fig.17 Original Language Version © Jack Sealey Limited SSCL1.V2, SSCL3, SSCL4 Issue:4 28/06/21... - Page 10 To tighten the stabilisers, unscrew the wing nut at the intersection between the two stabiliser sections and gently press the calliper to slide it downwards before tightening the nut again (fig.20). fig.20 Original Language Version © Jack Sealey Limited SSCL1.V2, SSCL3, SSCL4 Issue:4 28/06/21...
- Page 11 Start from the base assembled and attach the brace to the 1st rung. Prepare the ‘2 rung’ and ‘7 rung’ ladders removing the pins and stoppers from their bases. NOTE: fix the pins around the bottom rung of the ladder fig.23 Original Language Version SSCL1.V2, SSCL3, SSCL4 Issue:4 28/06/21 © Jack Sealey Limited...
- Page 12 SSCL1.V2, SSCL3, SSCL4 Issue:4 28/06/21 Original Language Version © Jack Sealey Limited...
- Page 13 • Increasing the height beyond the authorised level. • Using components other than those provided and described in the parts list. fig.29 • Using the scaffolding without its stabilisers. Original Language Version © Jack Sealey Limited SSCL1.V2, SSCL3, SSCL4 Issue:4 28/06/21...
-
Page 14: Maintenance
All parts which show signs of: - Permanent deformation. - Drill holes. - Notches (caused by grinding for example). - Significant oxidation..must be discarded! In case of doubt, replace the component. Original Language Version © Jack Sealey Limited SSCL1.V2, SSCL3, SSCL4 Issue:4 28/06/21... - Page 15 Isolate the damaged components to be replaced. 15.3. DURING DISMANTLING: 15.3.1. Follow the assembly procedure in the reverse order. 15.3.2. Follow the instructions below for the folding base: fig.32 Original Language Version © Jack Sealey Limited SSCL1.V2, SSCL3, SSCL4 Issue:4 28/06/21...
- Page 16 Important: No Liability is accepted for incorrect use of this product. Warranty: Guarantee is 12 months from purchase date, proof of which is required for any claim. Sealey Group, Kempson Way, Suffolk Business Park, Bury St Edmunds, Suffolk. IP32 7AR 01284 757500 01284 703534 sales@sealey.co.uk...
Need help?
Do you have a question about the SSCL1.V2 and is the answer not in the manual?
Questions and answers