BorMann Lite Series Manual
Hide thumbs
Also See for Lite Series:
- Manual (76 pages) ,
- User manual (21 pages) ,
- Quick start manual (6 pages)
Table of Contents
Advertisement
Available languages
Available languages
Quick Links
Advertisement
Table of Contents

Related Manuals for BorMann Lite Series


Summary of Contents for BorMann Lite Series
- Page 1 B P L 7100 042662 WWW.BORMANNTOOLS.COM...
-
Page 2: Intended Use
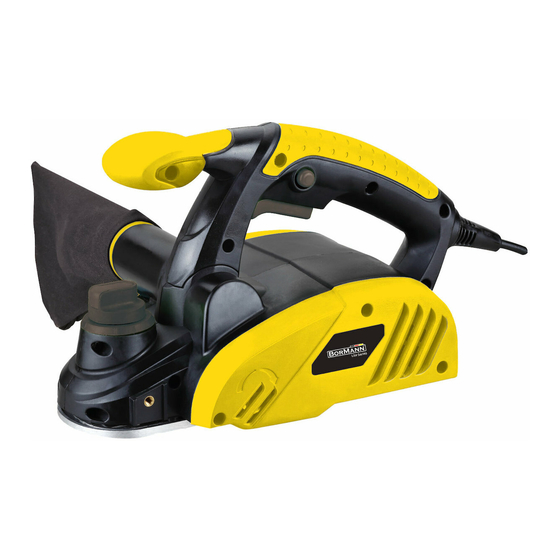
DESCRIPTION OF MAIN PARTS / ΠΕΡΙΓΡΑΦΉ ΚΥΡΙΩΝ ΤΜΉΜΑΤΩΝ 11. Blade changing wrench 1. Planer 12. Chip ejection outlet 2. Dust bag 13. Depth stop 3. Parallel guide 14. V-groove for chamfering 4. Depth stop 15. Front planer base 5. Additional handle 16. - Page 3 GENERAL SAFETY INSTRUCTIONS for power tools WARNING ! READ THROUGH THE INSTRUCTIONS FOR USE BEFORE STARTING UP THE EQUIPMENT. Failure to follow all instructions listed below, may result in electric shock, fire and /or serious personal injury. Persons, who are not familiar with the instructions, may not operate the equipment.
- Page 4 Specific planer safety warnings 1. Additional safety instructions for the planer - Planing 1. Ensure that the blade has come to a complete stop before putting the power tool down. An exposed and rotating blade can get snagged on the surface and lead to a loss of control of the tool and result in severe injury.
- Page 5 Using external extraction For optimal extraction of dust and chips, you can connect the planer to a dust extrac- tion unit or a vacuum cleaner. - Attach a suitable dust extraction hose (not included in the supply) to the chip ejec- tor 12.
-
Page 6: Mains Connection
Usage Mains connection Check if the existing mains voltage matches with the specification on the rating plate of the planer. The planer is designed for use with single-phase AC 230V ~ / 50 Hz and has protective insulation. Use an extension cable if the work area is not close to the mains outlet. Ensure an extension cable with sufficient conductor di- ameter (min. - Page 7 Adjusting the rebate depth Use the depth stop in addition to the parallel guide if you want rebates. - Loosen the knurled screw A on the chip ejector side. - Adjust the desired depth using the depth stop 13. The adjusted value can be read on the scale.
-
Page 8: Maintenance, Cleaning, Storage And Transport
Rebating WARNING! Move the planer to the workpiece only after switching it on. Otherwise there is risk of kickback due to the rotat- ing planer blades. Fabricating rebates can be helpful, for example, when repairing door and window frames. Adjust the rebate width using the parallel guide 10. - Adjust the rebate depth using the depth stop 13 . -
Page 9: Changing The Drive Belt
• Pull the wrench 11 from the planer • Turn the blade drum till you can easily access the planer blades. • Loosen the three hexagonal screws. • Slide the planer blade sideways in the direction of the chip ejector 12 out of its holder. -
Page 10: Troubleshooting
• Place the new toothed belt on the small belt pulley and mount it while turning the large belt pulley. • Mount the housing cover. Regularly check the condition of the planer. Especially check if: a. the switches are not damaged, b. the accessories are in proper condition, c. the power cord and the plug are not damaged, d. the ventilation slots are not blocked and clean. -
Page 11: Environmental Protection & Disposal
Noise and vibrations levels Noise emissions Tested according to EN 62841. The noise level at the workplace may exceed 85 dB (A); safety precautions are required for the operator in this case (wearsuit- able hearing protection device). Sound pressure level: L 85 dB(A) Sound power level: L 96 dB(A) - Page 12 Γενικές οδηγίες ασφαλείας ΠΡΟΕΙΔΟΠΟΙΉΣΉ! ΔΙΑΒΑΣΤΕ ΚΑΙ ΚΑΤΑΝΟΉΣΤΕ ΟΛΕΣ ΤΙΣ ΟΔΉΓΙΕΣ. Εάν δεν ακολουθήσετε όλες τις παρακάτω οδη- γίες, μπορεί να προκληθεί ηλεκτροπληξία, πυρκαγιά ή/και σοβαρός τραυματισμός. Πρόσωπα τα οποία δεν είναι εξοικειωμένα με τις οδηγίες, δεν επιτρέπεται να χειρίζονται τον εξοπλισμό. Διατηρήστε τις οδηγίες χρήσης σε ασφαλές...
- Page 13 7. Ελέγξτε για λανθασμένη ευθυγράμμιση ή σύνδεση κινητών μερών, θραύση μερών και οποιαδήποτε άλλη κατάσταση που μπορεί να επηρεάσει τη λει- τουργία των εργαλείων. Εάν έχετε υποστεί βλάβη, φροντίστε να επισκευαστεί το εργαλείο πριν το χρησιμοποιήσετε. Πολλά ατυχήματα προκαλούνται από ανεπαρκώς...
- Page 14 Τοποθέτηση / αφαίρεση συλλέκτη σκόνης - Συνδέετε πάντοτε τον συλλέκτη σκόνης 2 στον εκτοξευτήρα ροκανιδιών 12 πριν ξεκινήσετε την εργασία. - Για να αφαιρέσετε, αποσυνδέστε τον συλλέκτη σκόνης από τον εκτοξευτή ροκανιδιών. Σημείωση: Ο συλλέκτης σκόνης μπορεί να συνδεθεί μόνο σε μία θέση. Χρήση...
- Page 15 Xρήση Σύνδεση με το ηλ. δίκτυο Ελέγξτε αν η υπάρχουσα τάση δικτύου ταιριάζει με τις προδιαγραφές που αναγράφονται στην πινακίδα ονομαστικών τιμών της πλάνης. Η πλάνη έχει σχεδιαστεί για χρήση με μονοφασικό εναλλασσόμενο ρεύμα 230V ~ / 50 Hz και διαθέτει προστατευτική μόνωση. Χρησιμοποιήστε...
- Page 16 Ρυθμίζοντας το βάθος εντομής Χρησιμοποιήστε το στοπ βάθους εκτός από τον παράλληλο οδηγό, αν επιθυμείτε εντομές. - Χαλαρώστε τη βίδα με την ροζέττα Α στην πλευρά του εκτοξευτήρα πριονιδίων. - Ρυθμίστε το επιθυμητό βάθος χρησιμοποιώντας το στοπ βάθους 13. Η ρυθμισμένη...
- Page 17 Διεξαγωγή εντομών ΠΡΟΕΙΔΟΠΟΙΉΣΉ! Μετακινήστε την πλάνη προς το τεμάχιο κατεργασίας μόνο μετά την ενεργοποίησή της. Διαφορετικά, υπάρχει κίνδυνος ανάκρουσης λόγω των περιστρεφόμενων λεπίδων της πλάνης. Η κατασκευή εντομών μπορεί να είναι χρήσιμη, για παράδειγμα, κατά την επισκευή κουφωμάτων θυρών και παραθύρων. Ρυθμίστε...
- Page 18 - Τραβήξτε το κλειδί 11 από την πλάνη - Στρέψτε το τύμπανο έως ότου αποκτήσετε εύκολη πρόσβαση στις λεπίδες. - Χαλαρώστε τις τρεις εξαγωνικές βίδες. - Σύρετε τη λεπίδα πλάνης πλάγια προς την κατεύθυνση του εκτοξευτήρα ροκανιδιών 12 έξω από την υποδοχή της. - Αντιστρέψτε...
-
Page 19: Επίλυση Προβλημάτων
- Τοποθετήστε τον νέο οδοντωτό ιμάντα στη μικρή τροχαλία ιμάντα και προσαρμόστε τον ενώ περιστρέφετε τη μεγάλη τροχαλία ιμάντα. - Τοποθετήστε το κάλυμμα του περιβλήματος. Ελέγχετε τακτικά την κατάσταση της πλάνης. Ελέγχετε ιδιαιτέρως εάν: α. οι διακόπτες έχουν υποστεί ζημιά, β. τα εξαρτήματα είναι σε καλή κατάσταση, γ. το καλώδιο ρεύματος και το φις έχουν υποστεί ζημιά, δ. οι σχισμές εξαερισμού... - Page 20 Eπίπεδα ήχου και δονήσεων Εκπομπές θορύβου Δοκιμές σύμφωνα με το πρότυπο EN 62841. Το επίπεδο θορύβου στο χώρο εργασίας μπορεί να υπερβαίνει τα 85 dB (A)- σε αυτή την περίπτωση απαιτούνται μέτρα ασφαλείας για τον χειριστή (κατάλληλη συσκευή προστασίας της ακοής). Επίπεδο...
Need help?
Do you have a question about the Lite Series and is the answer not in the manual?
Questions and answers