Table of Contents
Advertisement
Quick Links
Advertisement
Table of Contents

Related Manuals for Scarlet Tech Apollo M1


Summary of Contents for Scarlet Tech Apollo M1
- Page 1 Apollo M1 Wireless Solar Crane Camera User Guide...
-
Page 2: Table Of Contents
Table of Contents Instrument at a Glance Product Overview Parts & Specifications 1.Hook-View Camera 2.Winch-View Camera 3.Solar Power Station 3.Touchscreen Monitor Operation Screen Display 1.Live View 2. Menu 1. Camera Setup 1.Pairing 2.Camera View Selection 3.Resolution 4.Brightness 5.Anti-flicker 2. Record Setup 1.Recording Time 2.Storage Management 3. -
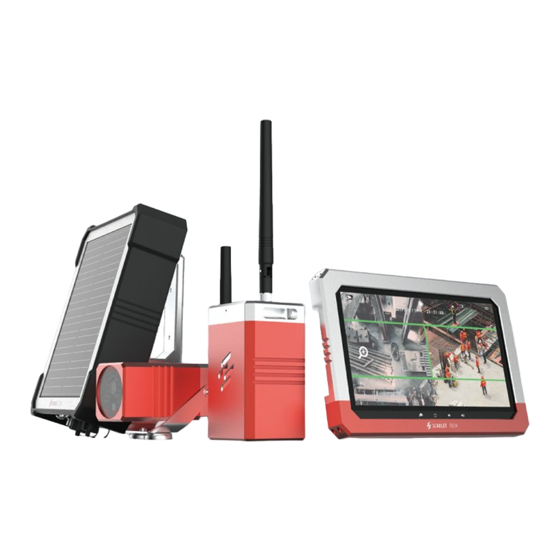
Page 3: Instrument At A Glance
Apollo M1 is also featured with Apollo Cam App (free download for iOS and Android users) and Scarlet 4G router; it can be paired with any smartphones or tablets for remote monitoring access anytime,... -
Page 4: Parts & Specifications
Parts & Specifications 1. Hook-View Camera 1. 5 Pin Port 4. Lanyard Hole 2. SMA Port 5. Magnet Mount 3. Mic 6. Pairing Button Specifications 90mm 80mm Dimension 148 x 90 x80mm Weight 990g Video Full HD (1920x1080) Field of View 114°... -
Page 5: Winch-View Camera
2. Winch-View Camera 1. SMA Port 4. Holder 2. Pairing Button 5. Magnet Mount 3. Mic 6. Power cable Specifications Dimension 115 x 73 x 85mm Weight 450g Video Full HD (1920x1080) 73mm 120mm Field of View 104° Night Vision IR LED x 20 Zoom Audio... -
Page 6: Solar Power Station
3. Solar Power Station 1. Solar Pannel 5. 5 Pin Port Green: Power ON 2. Magnet Mount 6. Power Button with LED Indicator Red: Charging No Light: Need Charging or Power OFF 3. Charging Port 7. Reset Button 4. USB-A Port 8. -
Page 7: Touchscreen Monitor
4. Touchscreen Monitor 1. SMA Port 9. MircoSD card slot 2. Alert LED 10. USB connector(USB2.0) for HDD 3. Power LED 11. Mini HDMI connector 4. Channel swtiching 12. Power adapter plug 5. Menu button 13. Speaker 6. Volume down 14. -
Page 8: Operation
Operation 1. After finish setting up, make sure that monitor is turned on. Adjust to local date and time. On monitor screen go to Menu-> System-> Date and Time. 2. The hook-view and winch-view camera are already paired with the monitor by default. Default setting: Camera 1: Hook-view camera Camera 2: Winch-view camera... -
Page 9: Screen Display
Screen Display Scarlet Apollo M1 screen display consists of 2 main pages: (1) Live View & (2) Menu 1.Live View: Live view is the first screen display you will see when camera is connected and monitor is turned ON, displaying a real-time audio/video streaming. - Page 10 1. Camera Number: Displays the camera number. White Icon: Displays the live view Gray Icon: Only displays live view without audio 2. Signal Strength: Shows the strength of the signal being received. 3. Resolution: Displays the current resolution of the live view image you are viewing. FHD (1080P) resolution HD (720p) resolution (Default setting) 4.
-
Page 11: Menu
8. HDMI Output: The icon shows that the HDMI cable has been connected to a display device, tap the icon to output the video/audio signal to display device. Steps: 1. Connect a mini HDMI to HDMI cable between the monitor and the display device. 2. -
Page 12: Camera Setup 1.Pairing
1. Camera Setup 1.Pairing Steps: Menu > Camera > Pair Note: Apollo M1 hook-view and winch-view camera are already paired by default. Make sure the monitor, hook-view, and winch-view camera are all turned on before using. 2.Camera View Selection: The camera selection function is useful when you have multiple cameras operating. Choose which... -
Page 13: Resolution
3.Resolution: Steps: Menu > Camera > Resolution Tap to setup each camera’s resolution individually. You have the option of viewing and recording your camera(s) in HD (720p) or FHD (1080P). 4.Brightness: Steps: Menu > Camera > Brightness Change the brightness for each camera that is configured. Repeatedly tap the camera to select the desired brightness level from 1 to 8. -
Page 14: Record Setup
2. Record Setup 1.Recording Time: Steps: Menu > Record > Recording Time Choose the recording duration for each recording file. There are 3 recording durations available: 5 minutes, 10 minutes, and 15 minutes. 2.Storage Management: Steps: Menu > Record > Storage Management 1. -
Page 15: System Setup
3.System Setup 1.Date and Time: Steps: Menu > System > Date and Time Tap the ”+” and “-” icons to adjust the date and time. NTP Clock: Tap the icon automatically synchronize system clock with a network Time Proto- col(NTP) time server 2.Power Saving: Steps: Menu >... -
Page 16: Language
4.Language: Steps: Menu > System > Language Choose your preferred language for the system. 5.FirmWare Info : Steps: Menu > System > FirmWare Info Tap to display FirmWare information. 6.Network: 1. IP Setting: Steps: Menu > System > Network > IP Setting •... -
Page 17: Alert Setup
2. Information: Steps: Menu > System > Network > IP Setting The information setting displays the UID (Unique Identity) number and the default password. Password is unique to each device and cannot be reset/change. DH C P 1 9 2 . 1 6 8 . 1 0 . 1 2 5 5 . -
Page 18: Alert Volume
3.Alert Volume: Steps: Menu > Alert > Alert Volume Increase / decrease the volume or turn off the alert sound 4.Cycle: Steps: Menu > Alert > Cycle Adjust the time duration between each alert tone. Note: When the alert tone is ringing, tap the screen or press the Menu button to stop the alert tone. -
Page 19: Playback
5. Playback Steps: Menu > Playback 1. Recording files are arranged based on date and time. Tap folder (YYYY/MM/DD) to open file. 2. Tap to play the recording file. -
Page 20: Volume
6. Volume Steps: Menu > Volume Tap the volume button to adjust volume level. -
Page 21: Remote Monitoring Access
Remote Monitoring Access You can watch the live view from multiple channels on your smartphone or tablet. Enjoy flexible remote monitoring anytime and anywhere in the world. This function requires: 1. Apollo Cam App (Free Download on App Store & Google Play) 2. - Page 22 3. Wait for about 1 minute. The “RSSI” light indicator will show a green color when it is properly turned Note: If “RSSI” light indicator show a red color, the internet is not properly connected. Please contact your local telecom provider. RSSI 4.
-
Page 23: Ios
Note: Checking IP Address If remote monitoring connection is successful, 4G router IP address will be shown on monitor. Steps: Menu > System > Network > Information 1.Add Device: 1. Open the Apollo Cam App 2. Adding by QR Code: Tap the icon then tap “QR Code” to scan the QR code located on the rear of the monitor. - Page 24 3. Change the device name or leave it as originally displayed. Enter the password, and then tap “Save”. Note: Password: On monitor screen go to Menu > System > Network > Information *Password is unique to each device and cannot be reset/change. Please keep it confidential. 2.Device List Screen Tap the icon to see the device list screen.
- Page 25 3. Live View To watch real-time audio/video streaming, tap the device photo on the “Device List” screen. Camera 1 will be displayed by default. If you have multiple cameras configured, tap “Channel” and select the camera you want to view. 1.
- Page 26 a. Video Quality: Tap this to change the video quality. Adjusting the video quality may help if problems occurred when viewing the live view. Note: • FHD: high video quality but low frame rate. • HD: medium video quality and medium frame rate. •...
-
Page 27: Android
Android 1.Add Device: 1. Open the Apollo Cam App 2. Tap the icon to enter “Add Device” screen. The UID number and QR code are located at the rear of the monitor. You can manually input the UID number or tap “Scan” to scan the QR code. 3. - Page 28 2. Device List Screen 1. Device photo: Tap the device photo to watch a live video. 2. Device name 3. Device status: (1) Online: If the device status shows “Online”, tap the device photo to watch live viewing. (2) Connection: If the device status shows “Connection”, wait until the status changes to online, and then tap the device photo to watch live viewing.
- Page 29 4. Device Setting (Edit Device) Tap the icon on the “Device List” screen, and then select “Edit Device” to switch the screen to “Edit Device”. 1. Name: Tap to change the device name. 2. Advance Setting: Tap this to enter advance setting. a.
-
Page 30: Safety, Handling, & Maintenance
Safety, Handling, & Maintenance Important Safety Information WARNING: Failure to follow these safety instructions could result in electric shock, or other injuries, or damage to the solar crane camera system or to other property. Read all the safety information below before using the solar crane camera system. -
Page 31: Warranty & Services
Warranty & Services Warranty Conditions This instrument is guaranteed for one-year warranty against material or production defects, in accor- dance with our general sales conditions. During the warranty period the manufacturer reserves the right to decide either to repair or replace the product. Should you need any reason to return the instrument for repair or replacement, take prior agreements with the local distributor from whom you bought it. - Page 32 Scarlet Tech Co., Ltd. © 2020 Scarlet Tech Co., Ltd. All rights reserved. 4F-3, No. 347 , HePing E Rd, 2nd Sec, DaAn District, Taipei City 106, Taiwan info@scarlet.com.tw www.scarlet-tech.com version 200623...
Need help?
Do you have a question about the Apollo M1 and is the answer not in the manual?
Questions and answers