Advertisement
Quick Links
Advertisement

Related Manuals for Scarlet Tech Apollo M1


Summary of Contents for Scarlet Tech Apollo M1
- Page 1 Apollo M1 Wireless Solar Crane Camera Quick Set-Up Guide...
-
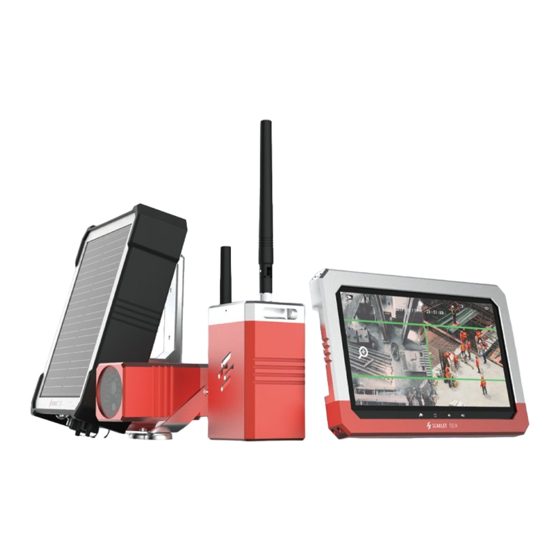
Page 2: Product Content
Product Content Main Products (1) Hook-View Camera x 1 (2) Winch-View Camera x 1 (3) Solar Power Station x 1 (4) Touchscreen Monitor x 1 Cables & Accessories (5) Monitor Display Mount x 1 (6) Monitor Power Adapter x 1 (7) Stainless-steel Safety Lanyard (1 M) x 1 (8) Battery Power Charger x 1 (9) Battery Power Cable x 1... -
Page 3: Set Up Instructions
Set Up Instructions <1> Touchscreen Monitor (20) 1. Insert a MicroSD card into the card slot at the side of the monitor. 2. Turn ON the LCD monitor. Tap the screen to display dual-screen view. Note: • MicroSD is for video recording. •... - Page 4 <2> Hook-View Camera & Solar Power Station (16) 1. Install omnidirectional antenna on the SMA port. 2. Wipe clean the crane hoist surface. 3. Mount the hook-view camera on the crane’s hook surface. 4. Mount the power station on the crane’s hook surface, above the hook-view camera.
- Page 5 (11) (10) Tips : Neatly organize the cables using magnetic cord holder. 5. Connect hook-view camera and the solar power station using the hook-view Camera 5-Pin power cable.
- Page 6 6. Turn ON the solar power station.The LED indicator will show a green light. 7. Important step: Use paperclip or pen to press the pair button. Hook-view camera will show a red light. 8. Check the hook-view camera display on the monitor screen.
-
Page 7: Safety Precaution
Safety Precaution Use the stainless-steel safety lanyard. Slide the lanyard over the anchor on the top of the hook-view camera and on the back of the solar power station. Then lock the lanyard hook to the crane to secure position. - Page 8 <3> Winch-View Camera (16) 1. Install antenna on the back of the winch-view camera. (10) Tips : Neatly organize the cables using magnetic cord holder. 2. Mount the winch-view camera on the crane’s winch surface.
- Page 9 Note: Adjust the angle using anchor screw (12) 3. Connect winch-view camera power cable with the power adapter, then plug the power. 4. Check the winch-view camera display on the monitor screen.
- Page 10 <4> Placing Touchscreen Monitor 1. Install holder to monitor in clockwise direction. 2. Firmly press holder to mounting surface. Note: Wipe clean surface before mounting.
- Page 11 3. Adjust position using the knob. (13) (14) 0.5M 4. Use panel directional antenna signal cable to connect the monitor and the antenna panel.
- Page 12 <5> Placing Panel Directional Antenna (15) 1.Remove the screw and bolt, then pull the joint down. 2.Clip the holder to mounting surface. Diameter: 23~27.5mm Note: Make sure the distance between monitor and directional panel antenna is less than 50cm...
- Page 13 3. Close the joints first, then insert the bolts into the hole, screw tightly to lock position. 4. Adjust position using the knob.
- Page 14 (13) 5. Plug the panel directional antenna to the holder.
- Page 15 Placement Recommendation 1. Tower Crane Adjust antenna position pointing towards the panel directional antenna surface for smooth signal reception. 2. Mobile Crane Note: Panel directional antenna must be facing the hook-view camera for smooth signal transmission. *Situation may vary depending on the crane types and actual operating environment.
- Page 16 Pairing Important Note: Apollo M1 hook-view and winch-view camera are already paired by default. Make sure the monitor, hook-view, and winch-view camera are all turned ON before using. The wireless cameras must be paired with the monitor before use. Pairing Additional Camera: 1.
- Page 17 Scarlet Tech Co., Ltd. © 2020 Scarlet Tech Co., Ltd. All rights reserved. 4F-3, No. 347 , HePing E Rd, 2nd Sec, DaAn District, Taipei City 106, Taiwan info@scarlet.com.tw www.scarlet-tech.com version 200623...
Need help?
Do you have a question about the Apollo M1 and is the answer not in the manual?
Questions and answers