Advertisement
Quick Links
lightmybricks
User Guides for Light My Bricks LED Lighting Kits for LEGO®
Nov 6 · 11 min read
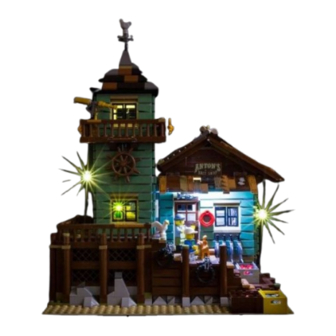
Light My Bricks: Old Fishing Store
Lighting Kit
Here is the instructions document for the LEGO Old Fishing Store LED
lighting kit. Please read and follow the steps carefully to ensure this lighting
kit is installed properly.
. . .
Advertisement

Related Manuals for LIGHT MY BRICKS Old Fishing Store Lighting Kit 103041


Summary of Contents for LIGHT MY BRICKS Old Fishing Store Lighting Kit 103041
- Page 1 User Guides for Light My Bricks LED Lighting Kits for LEGO® Nov 6 · 11 min read Light My Bricks: Old Fishing Store Lighting Kit Here is the instructions document for the LEGO Old Fishing Store LED lighting kit. Please read and follow the steps carefully to ensure this lighting kit is installed properly.
-
Page 2: Package Contents
Package contents: 4x White 15cm Bit Lights • 3x White Strip Lights • 1x 6-Port Expansion Board • 1x 30cm Connecting Cable • 1x 15cm Connecting Cable • 1x 5cm Connecting Cable • AA Battery Pack (Requires 3x AA Batteries) •... - Page 3 CAUTION: Forcing LEGO® to connect over a cable can result in damaging the cable and light. Connecting cable connectors to Expansion Boards Take extra care when inserting connectors to ports of Expansion Boards. Connectors can be inserted only one way. With the expansion board facing up, look for the soldered “=”...
- Page 4 Incorrectly inserting the connector can can result in bent pins inside the port or possible overheating of the expansion board when connected. Connecting cable connectors to Strip Lights Take extra care when inserting connectors to ports on the Strip Lights. Connectors can be inserted only one way.
- Page 5 Installing Bit Lights under LEGO® bricks and plates. When installing Bit Lights under LEGO® pieces, ensure they are placed the correct way up (Yellow LED component exposed). You can either place them directly on top of LEGO® studs or in between. .
- Page 6 Remove the lamp section and then disassemble as per below. 2.) Take a White 15cm Bit Light and then thread the connector side through the hole on top of the bottom piece. Thread it all the way through until the LED is at against the top of the piece.
- Page 7 You may need bend the LED slightly so that it sits at against the top of the LEGO piece Reconnect the top section to secure the LED in place.
- Page 8 Reconnect the lamp back to the desk inside the building ensuring the cable is facing the front left corner so that it is not visible if you look in the window.
- Page 9 3.) Take the top section of the Old Fishing Store and remove the roof. Disconnect the at clear 2x2 boat stud piece from underneath the roof and then take a White 15cm Bit Light and place it directly in the centre. Reconnect the at clear boat stud piece directly over the Bit Light to secure it in place.
- Page 10 Ensure the LED is the correct way facing up Secure the cable by laying it underneath the bottom brown 1x6 plate.
- Page 11 Ensure the cable is laid in between studs 4.) Before reconnecting the roof, thread the Bit Light cable from theroof down and then pull it out from the bottom of the top section.
- Page 12 5.) Remove the lamp from the bottom of this section and thendisconnect the black round stud from underneath.
- Page 13 Take another White 15cm Bit Light and thread the connector side through the top of the black round plate. Thread it all the way through until the LED is at against the top of the plate then reconnect the top section of the lamp.
- Page 14 You may need bend the LED slightly so that it sits at against the top of the LEGO piece 6.) Reconnect the lamp to the outside of the upper level and then laythe cable and secure it underneath the brown LEGO 1x6 plate.
- Page 15 7.) Take the 6-Port Expansion Board and then connect the two bit light cables to spare ports. 8.) Take the 30cm Connecting Cable and connect one end to the expansion board.
- Page 16 9.) Take the AA Battery Pack and insert 3x AA Batteries to it before placing it at the back of the old shing store in the following location. It should seat neatly in between the back of the building and rail. 10.) Take the entire upper level above the set and take the bit lightcable from the lamp inside and connect it to the expansion board.
- Page 17 Take the battery pack cable and connect it to the expansion board. Tuck the expansion board and excess cables (except for the 30cm cable) up inside the upper level as per below.
- Page 18 Before reconnecting the upper level back to it’s original position, ensure the 30cm connecting cable is pulled across to the right section of the building.
- Page 19 Test VIEW FROM THE BACK: Ensure 30cm cable is accessible after reconnecting upper level the lights we have installed so far by turning ‘ON’ the battery pack.
- Page 20 11.) Remove the lamp from the right side of the building and thendisconnect the black round stud from underneath.
- Page 21 Take another White 15cm Bit Light and thread the connector side through the top of the black round plate. Thread it all the way through until the LED is at against the top of the plate then reconnect the top section of the lamp.
- Page 22 You may need bend the LED slightly so that it sits at against the top of the LEGO piece 12.) Remove the following tiles on the wall surrounding where thelamp was connected to. Reconnect the lamp with bit light installed and then pull the cable behind and up.
- Page 23 13.) Continue laying the cable up the side of the wall in between thefollowing studs before reconnecting the tiles over the top.
- Page 24 14.) Turn the building around to the front and remove the “Anton’s BaitShop” sign from the hinges and then turn the sign section over as per below.
- Page 25 15.) Take 1x White Strip Light and then connect a 15cm Connecting Cable to the left port.
- Page 26 Using it’s adhesive backing, stick the strip light to the bottom of the ‘Anton’s Bait Shop’ sign in the following position. 16.) Take the sign section above the shing store and then connect theother end of the lamp cable from underneath into the right port of the strip light before reconnecting the sign section back into place.
- Page 27 Tuck in the excess cable from the lamp underneath the sign section as per below: Pull the 15cm connecting cable from the strip light out so we can connect this later.
- Page 28 17.) Take the main roof section and then turn it over onto its back asper below: Take the remaining 2x White Strip Lights and stick them to the provided LEGO 1x6 Plates using their adhesive backing.
- Page 29 Take the 5cm Connecting Cable and connect them between the two strip lights. 18.) Mount the two Strip Lights underneath the main roof section inthe below position.
- Page 30 19.) Take roof over the shing store and then connect the other end ofthe 30cm cable from the left section of the building to the top of the right strip light. Before reconnecting the roof, take the other end of the 15cm cable below and connect it to the top of the left strip light.
- Page 31 This nally completes installation of the Old Fishing Store Light Kit. Now turn ‘ON’ your light kit and ENJOY! . . .
Need help?
Do you have a question about the Old Fishing Store Lighting Kit 103041 and is the answer not in the manual?
Questions and answers