Agilent Technologies 8163A User Manual
Lightwave multimeter, lightwave measurement system & lightwave multichannel system
Hide thumbs
Also See for 8163A:
- Manual (466 pages) ,
- User manual (446 pages) ,
- Programming manual (274 pages)

Related Manuals for Agilent Technologies 8163A


Summary of Contents for Agilent Technologies 8163A
- Page 1 Agilent 8163A Lightwave Multimeter, Agilent 8164A Lightwave Measurement System, & Agilent 8166A Lightwave Multichannel System User’s Guide...
- Page 2 The material in this document is subject to change without notice. Fourth Edition: 08164-91011 E0300 Agilent Technologies makes no warranty of any kind with regard to this printed material, including, but not limited to, the implied First Edition: warranties of merchantability and fitness for a particular E0599: May 1999 purpose.
-
Page 3: Safety Considerations
AC power source that supplies between 100 V and 240 V at a frequency in the range from 50 to 60 Hz. The maximum power consumption is 450 VA with all options installed. Agilent 8163A Lightwave Multimeter, Agilent 8164A Lightwave Measurement System, & Agilent 8166A Lightwave Multichannel System, Fourth Edition... -
Page 4: Line Power Cable
• Adequate load-carrying capacity (see table of specifications). • Ground connection. • Cable clamp. Agilent 8163A Lightwave Multimeter, Agilent 8164A Lightwave Measurement System, & Agilent 8166A Lightwave Multichannel System, Fourth Edition... -
Page 5: Operating Environment
• Do not operate the instrument in the presence of flammable gases or fumes. Operation of any electrical instrument in such an environment constitutes a definite safety hazard. Agilent 8163A Lightwave Multimeter, Agilent 8164A Lightwave Measurement System, & Agilent 8166A Lightwave Multichannel System, Fourth Edition... -
Page 6: Safety Symbols
Do not proceed beyond a CAUTION sign until the indicated conditions are fully understood and met. Agilent 8163A Lightwave Multimeter, Agilent 8164A Lightwave Measurement System, & Agilent 8166A Lightwave Multichannel System, Fourth Edition... -
Page 7: Laser Safety Information
** Max. permissible CW output power is the highest optical power that is permitted within the ap- propriate laser class. Agilent 8163A Lightwave Multimeter, Agilent 8164A Lightwave Measurement System, & Agilent 8166A Lightwave Multichannel System, Fourth Edition... -
Page 8: Initial Safety Information For Tunable Laser Modules
** Max. permissible CW output power is the highest optical power that is permitted within the appropriate laser class. Laser Safety Labels - 28 mW Max. CW Output Power Figure 1 USA Safety Labels (81655A, 81656A, 81657A) Agilent 8163A Lightwave Multimeter, Agilent 8164A Lightwave Measurement System, & Agilent 8166A Lightwave Multichannel System, Fourth Edition... -
Page 9: Laser Safety Labels - 15 Mw Max. Cw Output Power
These laser safety warning labels are fixed on the outside of the Agilent 8164A Lightwave Measurement System before shipment. Figure 3 USA Safety Labels (81640A, 81680A, 81682A, 81689A) Agilent 8163A Lightwave Multimeter, Agilent 8164A Lightwave Measurement System, & Agilent 8166A Lightwave Multichannel System, Fourth Edition... -
Page 10: Further Safety Information
• The laser module has a built-in safety circuitry which will disable the optical output in the case of a fault condition. WAR N I NG Refer Servicing only to qualified and authorized personnel. Agilent 8163A Lightwave Multimeter, Agilent 8164A Lightwave Measurement System, & Agilent 8166A Lightwave Multichannel System, Fourth Edition... -
Page 11: The Structure Of This Manual
• Parameters are indicated by italics enclosed by square brackets, for example, [Range Mode], or [MinMax Mode]. • Menu items are indicated by italics enclosed in brackets, for example, <MinMax>, or <Continuous>. Agilent 8163A Lightwave Multimeter, Agilent 8164A Lightwave Measurement System, & Agilent 8166A Lightwave Multichannel System, Fourth Edition... - Page 12 Agilent 8163A Lightwave Multimeter, Agilent 8164A Lightwave Measurement System, & Agilent 8166A Lightwave Multichannel System, Fourth Edition...
-
Page 13: Table Of Contents
Introducing Softkeys Introducing Hardkeys Special Module States Slot and Channel Numbers How to Navigate/Modify the Display Overview Screen How to Use the Cursor Key Agilent 8163A Lightwave Multimeter, Agilent 8164A Lightwave Measurement System, & Agilent 8166A Lightwave Multichannel System, Fourth Edition... - Page 14 How to Connect an External Monitor How to Connect a Printer Power Measurement How to Measure Power The Power Value How to Set the Number of Digits Agilent 8163A Lightwave Multimeter, Agilent 8164A Lightwave Measurement System, & Agilent 8166A Lightwave Multichannel System, Fourth Edition...
- Page 15 What is a Tunable Laser ? How to Set the Power How to Set the Output Power of a CW Signal How to Set Output Power Agilent 8163A Lightwave Multimeter, Agilent 8164A Lightwave Measurement System, & Agilent 8166A Lightwave Multichannel System, Fourth Edition...
- Page 16 How to Set the Modulation Output Mode How to Use Triggers How to Use Input Triggering How to Use Output Triggering How to Use Auxiliary Functions Agilent 8163A Lightwave Multimeter, Agilent 8164A Lightwave Measurement System, & Agilent 8166A Lightwave Multichannel System, Fourth Edition...
- Page 17 How to Set Markers How to Zoom In How to Zoom Out To Switch the Grid On/Off How to Use Legends How to Identify Curves Agilent 8163A Lightwave Multimeter, Agilent 8164A Lightwave Measurement System, & Agilent 8166A Lightwave Multichannel System, Fourth Edition...
- Page 18 What is the Pmax Curve ? How to View the Pmax Curve Recording Measurement Results Printing Application Measurement Results Saving Application Measurement Results to Diskette Agilent 8163A Lightwave Multimeter, Agilent 8164A Lightwave Measurement System, & Agilent 8166A Lightwave Multichannel System, Fourth Edition...
- Page 19 Return Shipments to Agilent Technologies Agilent Technologies Sales and Service Offices Accessories Instrument and Options - Agilent 8163A Modules Instrument and Options - Agilent 8164A Agilent 8163A Lightwave Multimeter, Agilent 8164A Lightwave Measurement System, & Agilent 8166A Lightwave Multichannel System, Fourth Edition...
- Page 20 Testing the the Modify Knob Testing the Number Keys Module Interaction Test Test of the Tunable Laser Module Channel (Slot 0) GPIB Interface Test (Optional) Agilent 8163A Lightwave Multimeter, Agilent 8164A Lightwave Measurement System, & Agilent 8166A Lightwave Multichannel System, Fourth Edition...
- Page 21 How to clean metal filters or attenuator gratings Additional Cleaning Information How to clean bare fiber ends How to clean large area lenses and mirrors Agilent 8163A Lightwave Multimeter, Agilent 8164A Lightwave Measurement System, & Agilent 8166A Lightwave Multichannel System, Fourth Edition...
- Page 22 How to Upgrade Firmware from CD-ROM Agilent 8163A Firmware Upgrade Procedure Agilent 8164A Firmware Upgrade Procedure Agilent 81640A/80A/82A Firmware Upgrade Procedure Agilent 8166A Firmware Upgrade Procedure Index Agilent 8163A Lightwave Multimeter, Agilent 8164A Lightwave Measurement System, & Agilent 8166A Lightwave Multichannel System, Fourth Edition...
-
Page 23: Figures
Zeroing Screen . 78 Figure 47 Zeroing Fails, if the Power Meter Receives Input Light. . 79 Figure 48 Auto-Range Mode . . 80 Agilent 8163A Lightwave Multimeter, Agilent 8164A Lightwave Measurement System, & Agilent 8166A Lightwave Multichannel System, Fourth Edition... - Page 24 Figure 102 Measuring the Power with the Connector Terminated . . 146 Figure 103 Measuring the Power Transmitted Through the Measurement Cable . 147 Agilent 8163A Lightwave Multimeter, Agilent 8164A Lightwave Measurement System, & Agilent 8166A Lightwave Multichannel System, Fourth Edition...
- Page 25 Storing the Agilent 8164A on its Back Legs. . . 209 Figure 158 Carry the Agilent 8164A Lightwave Measurement System using this Strap . 209 Agilent 8163A Lightwave Multimeter, Agilent 8164A Lightwave Measurement System, & Agilent 8166A Lightwave Multichannel System, Fourth Edition...
- Page 26 . 215 Figure 166 Fitting a Blind Panel . . 216 Figure 167 Rear Panel of the Agilent 8163A Lightwave Multimeter System . 217 Figure 168 Rear Panel of the Agilent 8164A Lightwave Measurement System . . 217 Figure 169 Rear Panel of the Agilent 8166A Lightwave Multichannel System .
-
Page 27: Tables
Equipment Required for Performance Tests . . 247 Table 9 Reference Wavelength and Power Settings . 252 Table 10 Cleaning Instructions for Modules . 266 Agilent 8163A Lightwave Multimeter, Agilent 8164A Lightwave Measurement System, & Agilent 8166A Lightwave Multichannel System, Fourth Edition... - Page 28 Tables Agilent 8163A Lightwave Multimeter, Agilent 8164A Lightwave Measurement System, & Agilent 8166A Lightwave Multichannel System, Fourth Edition...
-
Page 29: Getting Started
Getting Started Agilent 8163A Lightwave Multimeter, Agilent 8164A Lightwave Measurement System, & Agilent 8166A Lightwave Multichannel System, Fourth Edition... - Page 30 Getting Started This chapter introduces the features of the Agilent 8163A Lightwave Multimeter, the Agilent 8164A Lightwave Measurement System, and the Agilent 8166A Lightwave Multichannel System. Here you will find a quick description of the instrument, how to use the user interface and how to perform a simple sample session.
-
Page 31: Agilent 8163A Lightwave Multimeter
• fixed wavelength Laser Sources, and • Interface Modules for Optical Heads. The front-loadable module slots support all modules designed for the HP 8153A Lightwave Multimeter. Agilent 8163A Lightwave Multimeter, Agilent 8164A Lightwave Measurement System, & Agilent 8166A Lightwave Multichannel System, Fourth Edition... -
Page 32: Agilent 8164A Lightwave Measurement System
• fixed wavelength Laser Sources, and • Interface Modules for Optical Heads. The front-loadable module slots support all modules designed for the HP 8153A Lightwave Multimeter. Agilent 8163A Lightwave Multimeter, Agilent 8164A Lightwave Measurement System, & Agilent 8166A Lightwave Multichannel System, Fourth Edition... -
Page 33: Agilent 8166A Lightwave Multichannel System
The front-loadable module slots do not support any modules designed for the HP 8153A Lightwave Multimeter, that is, modules with part numbers less than 81600. Agilent 8163A Lightwave Multimeter, Agilent 8164A Lightwave Measurement System, & Agilent 8166A Lightwave Multichannel System, Fourth Edition... -
Page 34: A Description Of The User Interface
Keypad Figure 8 The Agilent 8164A Lightwave Measurement System User Interface The Agilent 8163A and the Agilent 8166A do not provide the following two features of the Agilent 8164A’s user interface: • the Modify Knob, and • the Numerical Keypad. -
Page 35: Password
A softkey is a key whose function changes depending on the keys that you have pressed before. The function of the softkey is shown on the display to the left of the softkey. Agilent 8163A Lightwave Multimeter, Agilent 8164A Lightwave Measurement System, & Agilent 8166A Lightwave Multichannel System, Fourth Edition... -
Page 36: Introducing Hardkeys
• to identify the channel when using an application, see “Applications” on page 153, and • to identify a channel when using a GPIB command, see the Agilent 8163A Lightwave Multimeter, Agilent 8164A Lightwave Measurement System, & Agilent 8166A Lightwave Multichannel System Programming Guide for more information on GPIB commands. -
Page 37: How To Navigate/Modify The Display
Multimeter, this screen is shown immediately after start-up. It shows the most important parameters of all installed modules. Figure 10 The Agilent 8163A’s Overview Screen Agilent 8163A Lightwave Multimeter, Agilent 8164A Lightwave Measurement System, & Agilent 8166A Lightwave Multichannel System, Fourth Edition... - Page 38 Multichannel System, this screen is shown immediately after start-up. It shows the module slots that are occupied. Figure 12 The Agilent 8166A’s Overview Screen Agilent 8163A Lightwave Multimeter, Agilent 8164A Lightwave Measurement System, & Agilent 8166A Lightwave Multichannel System, Fourth Edition...
-
Page 39: How To Use The Cursor Key
You can use the Modify Knob to change the value of a parameter. See “How to Change the Value of a Parameter” on page 46. Agilent 8163A Lightwave Multimeter, Agilent 8164A Lightwave Measurement System, & Agilent 8166A Lightwave Multichannel System, Fourth Edition... -
Page 40: How To Change Channel
You should see the Details screen as shown in Figure 15, Figure 16, or Figure 17. Figure 15 The Agilent 8163A’s Details Screen for a Power Sensor Channel Agilent 8163A Lightwave Multimeter, Agilent 8164A Lightwave Measurement System, & Agilent 8166A Lightwave Multichannel System, Fourth Edition... - Page 41 The arrow indicates that undisplayed channels can be accessed by pressing the Channel hardkey. To return to the overview screen press the [Overview] softkey. Agilent 8163A Lightwave Multimeter, Agilent 8164A Lightwave Measurement System, & Agilent 8166A Lightwave Multichannel System, Fourth Edition...
-
Page 42: How To Access The Menu
Figure 18 and Figure 19 show the type of menu you should see for a Power Sensor channel. Figure 18 The Agilent 8163A/6A Menu for a Power Sensor Channel Figure 19 The Agilent 8164A Menu for a Power Sensor Channel Agilent 8163A Lightwave Multimeter, Agilent 8164A Lightwave Measurement System, &... -
Page 43: How To Change The System Configuration
“Additional Information” on page 53 for more details. Figure 20 The Agilent 8163A System Configuration Menu Figure 21 The Agilent 8164A System Configuration Menu Agilent 8163A Lightwave Multimeter, Agilent 8164A Lightwave Measurement System, & Agilent 8166A Lightwave Multichannel System, Fourth Edition... -
Page 44: How To Get Help
You can scroll through the text using the up and down cursor keys. The scroll bar displays the current position in the text. Agilent 8163A Lightwave Multimeter, Agilent 8164A Lightwave Measurement System, & Agilent 8166A Lightwave Multichannel System, Fourth Edition... -
Page 45: How To Access Applications
After you exit from the application, any modules selected by these applications will automatically be preset, all parameters will be set to their default values for the selected modules. Agilent 8163A Lightwave Multimeter, Agilent 8164A Lightwave Measurement System, & Agilent 8166A Lightwave Multichannel System, Fourth Edition... -
Page 46: How To Change The Value Of A Parameter
• from the Details screen, after pressing the [Details] softkey, • from the Menu screen, after pressing the [Menu] softkey, or, • for the Agilent 8163A and Agilent 8164A, from the Overview screen. To start editing a parameter, you move to it and: •... -
Page 47: How To Make A Big Change To A Continuous Parameter
3 Enter the new value for the digit by using the numerical keypad, the up and down cursors or turning the modify knob. 4 Repeat steps 2 and 3 to continue editing the value. Agilent 8163A Lightwave Multimeter, Agilent 8164A Lightwave Measurement System, & Agilent 8166A Lightwave Multichannel System, Fourth Edition... -
Page 48: How To Change A Discrete Parameter
2 Move to the <Averaging Time> parameter and press Enter. You see the screen in Figure 26. 3 Move to <1 s>, by using the cursor key, and press Enter. Agilent 8163A Lightwave Multimeter, Agilent 8164A Lightwave Measurement System, & Agilent 8166A Lightwave Multichannel System, Fourth Edition... -
Page 49: How To Set All Parameters To Their Default Values
The new value is the nearest valid value to the value you entered. Agilent 8163A Lightwave Multimeter, Agilent 8164A Lightwave Measurement System, & Agilent 8166A Lightwave Multichannel System, Fourth Edition... -
Page 50: A Sample Session
This sample session shows you how to measure the power of a modulated signal at a single wavelength. The sample session is written for the Agilent 8163A Lightwave Multimeter or Agilent 8164A Lightwave Measurement System, the Agilent 81689A Tunable Laser module, and the Agilent 81632A Power Sensor. To perform the sample... - Page 51 8 How to set the wavelength for the Tunable Laser module: Move to the wavelength parameter, [λ], for the Tunable Laser module and press Enter. Enter 1540.000 and press Enter. Agilent 8163A Lightwave Multimeter, Agilent 8164A Lightwave Measurement System, & Agilent 8166A Lightwave Multichannel System, Fourth Edition...
- Page 52 You should notice that the power reading is approximately half the value set on the Tunable Laser module. This is because the output is modulated by a square wave with a 50% duty cycle. Agilent 8163A Lightwave Multimeter, Agilent 8164A Lightwave Measurement System, & Agilent 8166A Lightwave Multichannel System, Fourth Edition...
-
Page 53: Additional Information
Additional Information Agilent 8163A Lightwave Multimeter, Agilent 8164A Lightwave Measurement System, & Agilent 8166A Lightwave Multichannel System, Fourth Edition... - Page 54 Additional Information This chapter describes the system functions of the Agilent 8163A Lightwave Multimeter, the Agilent 8164A Lightwave Measurement System, and the Agilent 8166A Lightwave Multichannel System. Here you will find out how to set the configuration settings and how to connect an external monitor.
-
Page 55: Using The System Utilities
You can move to any of the menu items by using the cursor key or the Modify knob. Select an item by pressing Enter or the [OK] softkey. Agilent 8163A Lightwave Multimeter, Agilent 8164A Lightwave Measurement System, & Agilent 8166A Lightwave Multichannel System, Fourth Edition... -
Page 56: How To Set The Backlight & Contrast
The Backlight and Contrast menu options allow you to change the appearance of the screen. NO T E The Backlight and Contrast menu options are supported by the Agilent 8163A and Agilent 8166A but not by the Agilent 8164A. To Set the Contrast To change the contrast level of the Agilent 8163A/6A’s screen:... -
Page 57: How To Set The Date & Time
• you send the :SYSTem:DATE? or :SYSTem:TIME? GPIB commands, see your instrument’s Programming Guide for more details. To set the date and time: 1 Press the Config hardkey. Agilent 8163A Lightwave Multimeter, Agilent 8164A Lightwave Measurement System, & Agilent 8166A Lightwave Multichannel System, Fourth Edition... -
Page 58: How To Set The Gpib Address
How to Set the GPIB Address NO T E The default GPIB address is 20. To set the GPIB address: 1 Press the Config hardkey. Agilent 8163A Lightwave Multimeter, Agilent 8164A Lightwave Measurement System, & Agilent 8166A Lightwave Multichannel System, Fourth Edition... -
Page 59: How To Select The Printer Type
Figure 34, displaying the following printer types: – <HP PCL>, you can use any printer that uses the Hewlett-Packard Printer Control Language Level 3 or higher, and Agilent 8163A Lightwave Multimeter, Agilent 8164A Lightwave Measurement System, & Agilent 8166A Lightwave Multichannel System, Fourth Edition... -
Page 60: How To Lock/Unlock The High-Power Laser Sources
3 Move to your printer type and press Enter. You return to the configuration menu. How to Lock/Unlock the High-Power Laser Sources To unlock high-power laser sources (including Tunable Laser modules): 1 Press the Config hardkey. Agilent 8163A Lightwave Multimeter, Agilent 8164A Lightwave Measurement System, & Agilent 8166A Lightwave Multichannel System, Fourth Edition... -
Page 61: How To Change The Password
4 Enter your new password. It should be 4 digits long. Press Enter. You are asked to enter the new password again. 5 Enter your new password again and press Enter. Agilent 8163A Lightwave Multimeter, Agilent 8164A Lightwave Measurement System, & Agilent 8166A Lightwave Multichannel System, Fourth Edition... -
Page 62: If You Forget Your Password
Additional Information Using the System Utilities If You Forget Your Password If you forget your password, contact your nearest Agilent Technologies Sales/Service Office. Find contact details by accessing http://www.agilent.com/ on the internet. How to Set the Trigger Configuration The trigger level at the external trigger connectors is by default active high, this means when a trigger rises above the high TTL level, a trigger is accepted. -
Page 63: How To Configure Your Foot Pedal
Agilent 81610FP Foot Pedal. 4 Press Enter. How to Get Information About Modules To get information about modules: 1 Press the Config hardkey. Agilent 8163A Lightwave Multimeter, Agilent 8164A Lightwave Measurement System, & Agilent 8166A Lightwave Multichannel System, Fourth Edition... - Page 64 4 The part number, serial number, and firmware revision of the chosen module are displayed, as shown in Figure 39. Figure 39 Viewing Information About a Module Agilent 8163A Lightwave Multimeter, Agilent 8164A Lightwave Measurement System, & Agilent 8166A Lightwave Multichannel System, Fourth Edition...
-
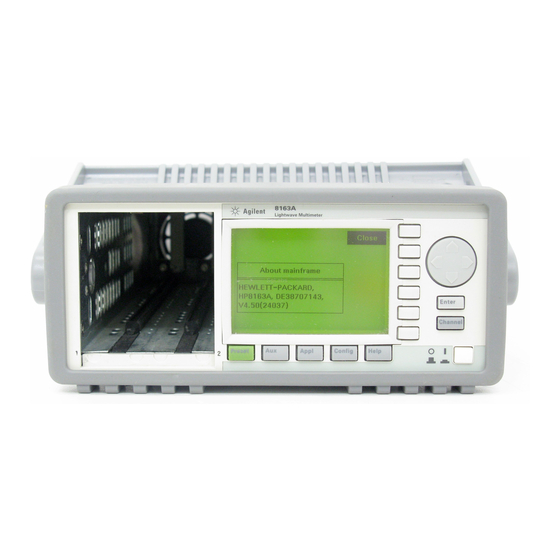
Page 65: How To Get Information About The Mainframe
Figure 40 Viewing Information About the Mainframe 3 Press [Close] to return to the configuration menu. Agilent 8163A Lightwave Multimeter, Agilent 8164A Lightwave Measurement System, & Agilent 8166A Lightwave Multichannel System, Fourth Edition... -
Page 66: How To Connect An External Monitor
You can connect a standard VGA monitor to the Agilent 8164A Lightwave Measurement System. This is a useful feature for making presentations or for training courses. NO T E You cannot connect a monitor to the Agilent 8163A Lightwave Multimeter or Agilent 8166A Lightwave Multichannel System. Video Outlet Figure 41 Rear Panel of the Agilent 8164A Lightwave Measurement System •... -
Page 67: How To Connect A Printer
• a help screen, see “How to Get Help” on page 44, • data from an application, see “Printing Application Measurement Results” on page 194. Agilent 8163A Lightwave Multimeter, Agilent 8164A Lightwave Measurement System, & Agilent 8166A Lightwave Multichannel System, Fourth Edition... - Page 68 Additional Information How to Connect a Printer Agilent 8163A Lightwave Multimeter, Agilent 8164A Lightwave Measurement System, & Agilent 8166A Lightwave Multichannel System, Fourth Edition...
-
Page 69: Power Measurement
Power Measurement Agilent 8163A Lightwave Multimeter, Agilent 8164A Lightwave Measurement System, & Agilent 8166A Lightwave Multichannel System, Fourth Edition... - Page 70 Power Measurement This chapter describes how to use the Agilent 8163A Lightwave Multimeter, the Agilent 8164A Lightwave Measurement System, and the Agilent 8166A Lightwave Multichannel System to measure optical power using a Power Meter, that is: • a Power Sensor module or •...
-
Page 71: How To Measure Power
Pressing the Power Unit softkey allows you to select either W, dB, or dBm as the units in which power is displayed. The Power Unit softkey is visible when you Agilent 8163A Lightwave Multimeter, Agilent 8164A Lightwave Measurement System, & Agilent 8166A Lightwave Multichannel System, Fourth Edition... -
Page 72: What Are The Power Units
To set the power unit to dBm: 1 Move to the [P] parameter and press the [Power Unit] softkey. You will see the menu in Figure 43. Agilent 8163A Lightwave Multimeter, Agilent 8164A Lightwave Measurement System, & Agilent 8166A Lightwave Multichannel System, Fourth Edition... -
Page 73: How To Set The Calibration Offset
1 Move to the Power Meter channel and press the [Details] softkey. 2 Move to the [Cal] parameter and press Enter. 3 Enter 40.000 and press Enter. Agilent 8163A Lightwave Multimeter, Agilent 8164A Lightwave Measurement System, & Agilent 8166A Lightwave Multichannel System, Fourth Edition... -
Page 74: How To Set The Reference Level
When you press the [Dsp->Ref] softkey, the absolute power level, the power value in dBm or Watts, is stored as the reference, that is: REF = P measured Agilent 8163A Lightwave Multimeter, Agilent 8164A Lightwave Measurement System, & Agilent 8166A Lightwave Multichannel System, Fourth Edition... -
Page 75: How To Reference Another Power Measurement Channel
3 Move to the channel number you want to reference, using the cursor key, and press Enter. For example, in Figure 44, you could choose 3.1 (for channel 3.1). Agilent 8163A Lightwave Multimeter, Agilent 8164A Lightwave Measurement System, & Agilent 8166A Lightwave Multichannel System, Fourth Edition... -
Page 76: How To Set The Wavelength
If electrical offsets are not removed, they affect the accuracy of power measurement. Agilent 8163A Lightwave Multimeter, Agilent 8164A Lightwave Measurement System, & Agilent 8166A Lightwave Multichannel System, Fourth Edition... - Page 77 <Zero All> option to zero all power measurement channels. You will see the screen shown in Figure 46, this appears for around 30 seconds while zeroing is performed. Agilent 8163A Lightwave Multimeter, Agilent 8164A Lightwave Measurement System, & Agilent 8166A Lightwave Multichannel System, Fourth Edition...
- Page 78 Press Enter and start again at step 1. 4 When the zeroing operation finishes, press the [Close] softkey to close the menu. Agilent 8163A Lightwave Multimeter, Agilent 8164A Lightwave Measurement System, & Agilent 8166A Lightwave Multichannel System, Fourth Edition...
-
Page 79: How To Choose The Range Mode
9% and 100% of full scale. The default state is for automatic ranging to be enabled. • <Manual>, which allows you to set a user-defined range. Agilent 8163A Lightwave Multimeter, Agilent 8164A Lightwave Measurement System, & Agilent 8166A Lightwave Multichannel System, Fourth Edition... -
Page 80: How To Set The Range
10 Move to the [Range Mode] parameter and press Enter. 11 Move to <Manual>, by using the cursor key, and press Enter. 12 Move to the [Range] parameter and press Enter. Agilent 8163A Lightwave Multimeter, Agilent 8164A Lightwave Measurement System, & Agilent 8166A Lightwave Multichannel System, Fourth Edition... - Page 81 Upper Power Limit. You must decrease the [Range] value. See Table 1 on page 83 for more details. Figure 50 Out of Range - Power Greater Than Upper Power Limit Agilent 8163A Lightwave Multimeter, Agilent 8164A Lightwave Measurement System, & Agilent 8166A Lightwave Multichannel System, Fourth Edition...
- Page 82 [Range] value. You must increase the [Range] value. See Table 1 on page 83 for more details. Figure 51 Out of Range - Power Less Than Resolution Agilent 8163A Lightwave Multimeter, Agilent 8164A Lightwave Measurement System, & Agilent 8166A Lightwave Multichannel System, Fourth Edition...
-
Page 83: Upper Power Limit And Resolution
19.999 nW 0.001 nw −60 dBm −57.000 dBm −100.000 dBm 1.9999 nW 0.1 pW −70 dBm −67.000 dBm −110.000 dBm 199.99 pW 0.01 pW Agilent 8163A Lightwave Multimeter, Agilent 8164A Lightwave Measurement System, & Agilent 8166A Lightwave Multichannel System, Fourth Edition... -
Page 84: How To Set The Averaging Time
For a Dual Power Sensor, you cannot set the MinMax Mode of the slave channel, channel 2, directly. By default, the MinMax Mode of the slave channel, Agilent 8163A Lightwave Multimeter, Agilent 8164A Lightwave Measurement System, & Agilent 8166A Lightwave Multichannel System, Fourth Edition... - Page 85 The Window and Refresh Modes To choose the <Refresh> MinMax mode: 1 Move to the Power Meter channel and press the [Details] softkey. Agilent 8163A Lightwave Multimeter, Agilent 8164A Lightwave Measurement System, & Agilent 8166A Lightwave Multichannel System, Fourth Edition...
-
Page 86: How To Turn Off Minmax Mode
1 Move to the Power Meter channel and press the [Details] softkey. 2 Move to the [MinMax Mode] parameter and press Enter. 3 Move to <Off>, by using the cursor key, and press Enter. Agilent 8163A Lightwave Multimeter, Agilent 8164A Lightwave Measurement System, & Agilent 8166A Lightwave Multichannel System, Fourth Edition... -
Page 87: How To Hold The Screen
Power Module Channel is Held - Details Screen By pressing the [Hold/Cnt] softkey a second time the screen will display new measurements continuously. Agilent 8163A Lightwave Multimeter, Agilent 8164A Lightwave Measurement System, & Agilent 8166A Lightwave Multichannel System, Fourth Edition... -
Page 88: How To Use Triggers
Power Measurement How to Measure Power How to Use Triggers Agilent 8163A Series Power Meter modules allow you trigger the instrument to perform tasks and to output trigger signals to external measurement instruments. NO T E For a Dual Power Sensor, you cannot set the any trigger parameters of the slave channel, channel 2, directly. -
Page 89: How To Use Output Triggering
• use the :TRIGger GPIB command, see your mainframe’s Programming Guide. How to Use Output Triggering You can configure Agilent 8163A Series Power Meter modules to output a trigger when the instrument performs certain tasks. To set your module’s Output Trigger Configuration: 1 See “How to Set the Trigger Configuration”... -
Page 90: Dual Power Meters - Master And Slave Channels
Parameters that can only be set using the master channel Parameter <Zero> <MinMax mode> <Reset MinMax> <Data points> <Averaging time> <Range mode> <Input trigger mode> <Output trigger mode> Agilent 8163A Lightwave Multimeter, Agilent 8164A Lightwave Measurement System, & Agilent 8166A Lightwave Multichannel System, Fourth Edition... -
Page 91: Laser Sources
Laser Sources Agilent 8163A Lightwave Multimeter, Agilent 8164A Lightwave Measurement System, & Agilent 8166A Lightwave Multichannel System, Fourth Edition... - Page 92 Laser Sources This chapter describes how to use the Agilent 8163A Lightwave Multimeter, the Agilent 8164A Lightwave Measurement System, and the Agilent 8166A Lightwave Multichannel System to control fixed-wavelength laser source modules. Agilent 8163A Lightwave Multimeter, Agilent 8164A Lightwave Measurement...
-
Page 93: How To Use Laser Source Modules
1 Move to [λ] parameter and press Enter. 2 Select <1309.6+1551.6>, using the cursor key, and press Enter. You will see the screen in Figure 61. Agilent 8163A Lightwave Multimeter, Agilent 8164A Lightwave Measurement System, & Agilent 8166A Lightwave Multichannel System, Fourth Edition... -
Page 94: How To Enable/Disable Laser Output
1 Move to [State] parameter and press Enter. 2 Move to [Off], by using the cursor key, and press Enter. The green LED on the module front panel switches off. Agilent 8163A Lightwave Multimeter, Agilent 8164A Lightwave Measurement System, & Agilent 8166A Lightwave Multichannel System, Fourth Edition... -
Page 95: How To Set Attenuation
How to Modulate the Optical Output How to Change Modulation Source The Modulation Source parameter, [Mod Src], allows you to modulate the output signal. Agilent 8163A Lightwave Multimeter, Agilent 8164A Lightwave Measurement System, & Agilent 8166A Lightwave Multichannel System, Fourth Edition... -
Page 96: How To Disable Modulation
How to Increase Linewidth You can use coherence control to increase the linewidth of the optical signal output from your Agilent 8163A Series Laser Source module. Enabling the coherence control increases the linewidth of the optical output signal to between 50 and 500 MHz (typically). Coherence control greatly reduces interference effects and therefore improves the power stability in sensitive test setups. -
Page 97: How To Modulate Dual-Wavelength Laser Source Modules
4 Move to the [Mod Frq] parameter for the lower wavelength source and press Enter. 5 Enter 100.000 and press Enter. 6 Move to the [Mod Src] parameter for the lower wavelength source and press Enter. Agilent 8163A Lightwave Multimeter, Agilent 8164A Lightwave Measurement System, & Agilent 8166A Lightwave Multichannel System, Fourth Edition... -
Page 98: How To Use Triggers
How to Use Output Triggering You can configure the output trigger connector to output a TTL signal at the frequency of the internal modulation of a Agilent 8163A Series Laser Source module. To set your module’s Output Trigger Configuration: 1 See “How to Set the Trigger Configuration”... - Page 99 – <Modulation>, the output trigger connector outputs a TTL signal at the frequency of the internal modulation. This signal is output whether the laser is switched on or off. 5 Press Enter. Agilent 8163A Lightwave Multimeter, Agilent 8164A Lightwave Measurement System, & Agilent 8166A Lightwave Multichannel System, Fourth Edition...
- Page 100 Laser Sources How to Use Laser Source Modules Agilent 8163A Lightwave Multimeter, Agilent 8164A Lightwave Measurement System, & Agilent 8166A Lightwave Multichannel System, Fourth Edition...
-
Page 101: Tunable Lasers
Tunable Lasers Agilent 8163A Lightwave Multimeter, Agilent 8164A Lightwave Measurement System, & Agilent 8166A Lightwave Multichannel System, Fourth Edition... - Page 102 Tunable Lasers This chapter explains how to control Tunable Laser modules from the user interface of the Agilent 8163A Lightwave Multimeter, the Agilent 8164A Lightwave Measurement System, and the Agilent 8166A Lightwave Multichannel System. Agilent 8163A Lightwave Multimeter, Agilent 8164A Lightwave Measurement...
-
Page 103: What Is A Tunable Laser
• <Manual Att.> Mode, you specify the output power and the attenuation. The two modes are separate, the values set in one mode do not affect values set in the other. Agilent 8163A Lightwave Multimeter, Agilent 8164A Lightwave Measurement System, & Agilent 8166A Lightwave Multichannel System, Fourth Edition... -
Page 104: How To Set The Output Power Of A Cw Signal
– <Both (master:1)>, where both optical outputs can be enabled but only the output of the low SSE optical output can be regulated. Agilent 8163A Lightwave Multimeter, Agilent 8164A Lightwave Measurement System, & Agilent 8166A Lightwave Multichannel System, Fourth Edition... - Page 105 You can only view or set the parameters for the primary optical output, for example, the high power output for <Both (master:2)>. Agilent 8163A Lightwave Multimeter, Agilent 8164A Lightwave Measurement System, & Agilent 8166A Lightwave Multichannel System, Fourth Edition...
-
Page 106: How To Set The Optical Output
3 Move to the power parameter, [P], and press [Pwr unit]. 4 Move to <dBm> and press Enter. 5 Type 5.000, using the numerical keypad and press Enter. Agilent 8163A Lightwave Multimeter, Agilent 8164A Lightwave Measurement System, & Agilent 8166A Lightwave Multichannel System, Fourth Edition... - Page 107 Move to <Manual Att.> and press Enter. The attenuation parameter, [Atten.], appears, see Figure 67. 7 Move to [Atten.], type 3.000, using the numerical keypad, and press Enter. Figure 67 Setting Attenuation Agilent 8163A Lightwave Multimeter, Agilent 8164A Lightwave Measurement System, & Agilent 8166A Lightwave Multichannel System, Fourth Edition...
-
Page 108: What Is Excessive Power
2 Move to the <Dark position> and press Enter. The Dark Position box appears. 3 Move to one of the following menu items: – <On>, to enable the dark position, or Agilent 8163A Lightwave Multimeter, Agilent 8164A Lightwave Measurement System, & Agilent 8166A Lightwave Multichannel System, Fourth Edition... -
Page 109: The Analog Output
2 Move to <dBm> and press Enter. 3 Press Enter to edit the power value. 4 Enter −10.000 and press Enter. Agilent 8163A Lightwave Multimeter, Agilent 8164A Lightwave Measurement System, & Agilent 8166A Lightwave Multichannel System, Fourth Edition... -
Page 110: How To Set The Bnc Output Line Mode As An Analog Output
Figure 70 shows an example of specified and permitted wavelength range. Permitted Range Not to Scale Specified Range λ [nm] 1450 1460 1580 1600 Figure 70 Specified and Permitted Wavelength Range Agilent 8163A Lightwave Multimeter, Agilent 8164A Lightwave Measurement System, & Agilent 8166A Lightwave Multichannel System, Fourth Edition... -
Page 111: How To Set The Wavelength Directly
4 Move to <Offset>, by using the cursor key, press Enter, and press Close. You see the screen in Figure 71. Figure 71 Setting a Relative Wavelength Agilent 8163A Lightwave Multimeter, Agilent 8164A Lightwave Measurement System, & Agilent 8166A Lightwave Multichannel System, Fourth Edition... -
Page 112: How To Change The Output Wavelength
You can use a wavelength sweep to measure the wavelength-dependent loss of an optical component. Agilent 8163A Lightwave Multimeter, Agilent 8164A Lightwave Measurement System, & Agilent 8166A Lightwave Multichannel System, Fourth Edition... -
Page 113: How To Set The Wavelength Sweep
• Select <Oneway>, if you want to start every sweep cycle at [λ Start] and to end every sweep cycle at [λ Stop]. Agilent 8163A Lightwave Multimeter, Agilent 8164A Lightwave Measurement System, & Agilent 8166A Lightwave Multichannel System, Fourth Edition... -
Page 114: How To Set The Maximum Power For The Sweep Range
3 Move to the <Stepped> sweep mode and press Enter. 4 Move to [λ Start] and press Enter. 5 Enter 1510.000 and press Enter. Agilent 8163A Lightwave Multimeter, Agilent 8164A Lightwave Measurement System, & Agilent 8166A Lightwave Multichannel System, Fourth Edition... - Page 115 – Press [Continue] to continue sweeping automatically. – Press [Prev] or [Next] to sweep manually. – Press [Stop] to end the sweep. Agilent 8163A Lightwave Multimeter, Agilent 8164A Lightwave Measurement System, & Agilent 8166A Lightwave Multichannel System, Fourth Edition...
-
Page 116: How To Execute A Continuous Sweep
Pausing a Stepped Sweep How to Execute a Continuous Sweep NO T E Continuous sweep mode is not available for the Agilent 81689A Tunable Laser module. Agilent 8163A Lightwave Multimeter, Agilent 8164A Lightwave Measurement System, & Agilent 8166A Lightwave Multichannel System, Fourth Edition... - Page 117 • <Coherence ctrl.> is the chosen [Mod src]. Choose another modulation source as the [Mod src]. 16 A continuous sweep can end in two ways: Agilent 8163A Lightwave Multimeter, Agilent 8164A Lightwave Measurement System, & Agilent 8166A Lightwave Multichannel System, Fourth Edition...
-
Page 118: How To Perform A Manual Sweep
– press [Next] to move on to the next wavelength step, – press [Prev] to move on to the previous wavelength step, or – press [Stop] to end the sweep. Agilent 8163A Lightwave Multimeter, Agilent 8164A Lightwave Measurement System, & Agilent 8166A Lightwave Multichannel System, Fourth Edition... -
Page 119: How To Modulate A Signal
This is the maximum output power of the output signal; at the minimum output power, no power is output. Output Power Figure 77 The Modulated Signal Agilent 8163A Lightwave Multimeter, Agilent 8164A Lightwave Measurement System, & Agilent 8166A Lightwave Multichannel System, Fourth Edition... -
Page 120: How To Set The Output Power Of A Modulated Signal
Agilent 81682A, and Agilent 81640A - a BNC input connector and a BNC output connector. There is one BNC connector on the front panel of the Agilent 81689A - a BNC input connector. Agilent 8163A Lightwave Multimeter, Agilent 8164A Lightwave Measurement System, & Agilent 8166A Lightwave Multichannel System, Fourth Edition... -
Page 121: External Analog Modulation
There is one BNC connector on the front panel of the Agilent 81689A - a BNC input connector. An absolute maximum of ±6 V can be applied as an external voltage to any BNC connector. Agilent 8163A Lightwave Multimeter, Agilent 8164A Lightwave Measurement System, & Agilent 8166A Lightwave Multichannel System, Fourth Edition... -
Page 122: Wavelength Locking
Agilent 81682A, and Agilent 81640A - a BNC input connector and a BNC output connector. An absolute maximum of ± 6 V can be applied as an external voltage to any BNC connector. Agilent 8163A Lightwave Multimeter, Agilent 8164A Lightwave Measurement System, & Agilent 8166A Lightwave Multichannel System, Fourth Edition... -
Page 123: External Digital Modulation Using Input Trigger Connector
• the power of the output signal of all other modules adjusts so that the average power of the output signal is always 50% of the set power. To enable external digital modulation using the Input Trigger Connector: Agilent 8163A Lightwave Multimeter, Agilent 8164A Lightwave Measurement System, & Agilent 8166A Lightwave Multichannel System, Fourth Edition... -
Page 124: How To Increase Linewidth
<External Digital>, or <Backplane> as the chosen modulation source. The output signal has the same frequency as the optical output. 4 Press [OK]. Agilent 8163A Lightwave Multimeter, Agilent 8164A Lightwave Measurement System, & Agilent 8166A Lightwave Multichannel System, Fourth Edition... -
Page 125: How To Set The Modulation Output Mode
1 See “How to Set the Trigger Configuration” on page 62 for how to configure the trigger connectors. 2 Move to the Tunable Laser channel and press [Menu]. Agilent 8163A Lightwave Multimeter, Agilent 8164A Lightwave Measurement System, & Agilent 8166A Lightwave Multichannel System, Fourth Edition... -
Page 126: How To Use Output Triggering
To set your module’s Output Trigger Configuration: 1 See “How to Set the Trigger Configuration” on page 62 for how to configure the trigger connectors. Agilent 8163A Lightwave Multimeter, Agilent 8164A Lightwave Measurement System, & Agilent 8166A Lightwave Multichannel System, Fourth Edition... - Page 127 If you choose <Step Finished> and a <Continuous> sweep, the wavelength interval between hardware triggers is set by the [Step] parameter, although, the sweep is not stepped. Agilent 8163A Lightwave Multimeter, Agilent 8164A Lightwave Measurement System, & Agilent 8166A Lightwave Multichannel System, Fourth Edition...
-
Page 128: How To Use Auxiliary Functions
The instrument automatically performs a wavelength zero from time to time. To avoid interruption of your measurements, you should perform a wavelength zero at a time of your choice. Agilent 8163A Lightwave Multimeter, Agilent 8164A Lightwave Measurement System, & Agilent 8166A Lightwave Multichannel System, Fourth Edition... - Page 129 The instrument automatically performs a Wavelength Zero if there is a ± 5 K N O TE temperature change since the last Wavelength Zero was performed. Agilent 8163A Lightwave Multimeter, Agilent 8164A Lightwave Measurement System, & Agilent 8166A Lightwave Multichannel System, Fourth Edition...
- Page 130 Tunable Lasers How to Use Auxiliary Functions Agilent 8163A Lightwave Multimeter, Agilent 8164A Lightwave Measurement System, & Agilent 8166A Lightwave Multichannel System, Fourth Edition...
-
Page 131: Return Loss Measurement
Return Loss Measurement Agilent 8163A Lightwave Multimeter, Agilent 8164A Lightwave Measurement System, & Agilent 8166A Lightwave Multichannel System, Fourth Edition... - Page 132 Return Loss Measurement This chapter explains how to use the Agilent 8163A Lightwave Multimeter or Agilent 8164A Lightwave Measurement System to measure Return Loss. Here you will find: • a quick explanation of the terms Return Loss and Insertion Loss, •...
-
Page 133: Getting Started With Return Loss
The description starts with measuring the reflection factor. When we have got this figure, we can convert it easily to the return loss. Agilent 8163A Lightwave Multimeter, Agilent 8164A Lightwave Measurement System, & Agilent 8166A Lightwave Multichannel System, Fourth Edition... -
Page 134: What Is Insertion Loss
If you use high-coherence light sources, you can improve performance by: • modulating the output signal at 2 kHz or higher or • using coherence control to reduce the coherence of the signal. Agilent 8163A Lightwave Multimeter, Agilent 8164A Lightwave Measurement System, & Agilent 8166A Lightwave Multichannel System, Fourth Edition... -
Page 135: Taking Calibration Measurements
CA U TI O N Agilent Technologies supplies patchcords with a Diamond HMS-10/Agilent/HRL high return loss connector on one end. These patchcords are necessary so that the Agilent 8163A Lightwave Multimeter, Agilent 8164A Lightwave Measurement System, & Agilent 8166A Lightwave Multichannel System, Fourth Edition... - Page 136 For best results and higher repeatability, fix the cables. 8163A Lightwave Multimeter Laser 81534A Source Agilent 81109AC Agilent 81101AC Figure 87 Return Loss Measurement Setup Agilent 8163A Lightwave Multimeter, Agilent 8164A Lightwave Measurement System, & Agilent 8166A Lightwave Multichannel System, Fourth Edition...
-
Page 137: Calibrating The Return Loss Module
“Measuring the Reflection Reference using a Reference Cable” on page 140. Agilent 8163A Lightwave Multimeter, Agilent 8164A Lightwave Measurement System, & Agilent 8166A Lightwave Multichannel System, Fourth Edition... -
Page 138: Measuring The Reflection Reference
10 Move to <Reflectance Calibration> and press Enter. The instrument measures the power reflected by the component. The overview screen for the return loss Agilent 8163A Lightwave Multimeter, Agilent 8164A Lightwave Measurement System, & Agilent 8166A Lightwave Multichannel System, Fourth Edition... -
Page 139: Measuring The Termination Parameter
To measure insertion loss and the front panel delta, you must measure the return loss of a reference cable. The reference cable must be a fiber with a Diamond HMS-10/Agilent/HRL and Diamond HMS-10/Agilent connector. Agilent 8163A Lightwave Multimeter, Agilent 8164A Lightwave Measurement System, & Agilent 8166A Lightwave Multichannel System, Fourth Edition... -
Page 140: Calibrating The Hp 81534A Return Loss Module Using A Reference Cable
5 Press [Menu]. Move to <Reflectance Calibration> and press Enter. The instrument measures the power reflected by the component. The <RL> value changes to the same value as entered for <RLref>. Agilent 8163A Lightwave Multimeter, Agilent 8164A Lightwave Measurement System, & Agilent 8166A Lightwave Multichannel System, Fourth Edition... -
Page 141: Measuring The Power Transmitted Through The Reference Cable
12 Press [Menu]. Move to <Terminated Calibration> and press Enter. The instrument measures the power reflected by the component. The instrument measures and sets the termination parameter. Agilent 8163A Lightwave Multimeter, Agilent 8164A Lightwave Measurement System, & Agilent 8166A Lightwave Multichannel System, Fourth Edition... -
Page 142: Measuring The Front Panel Delta
It is not necessary to make new calibration measurements for each DUT. You can make the calibration measurements for your system, and then measure the return loss of many devices. Agilent 8163A Lightwave Multimeter, Agilent 8164A Lightwave Measurement System, & Agilent 8166A Lightwave Multichannel System, Fourth Edition... -
Page 143: Measuring The Insertion Loss
– <Para>, the power measured during the termination calibration in dB relative to 1 µW, – <Ref>, the power measured during the reference calibration in dB relative to 1 µW, Agilent 8163A Lightwave Multimeter, Agilent 8164A Lightwave Measurement System, & Agilent 8166A Lightwave Multichannel System, Fourth Edition... - Page 144 – <AvgTime>, the averaging time. Figure 99 The Calibration Parameters Screen NO T E We recommend that you choose an averaging time of 1 second or longer. Agilent 8163A Lightwave Multimeter, Agilent 8164A Lightwave Measurement System, & Agilent 8166A Lightwave Multichannel System, Fourth Edition...
-
Page 145: A Background To Return Loss Measurement With The Hp 81534A
The reflection factor for the component is called R . Normally the return loss for the component (RL ) is specified, but these values are related: – – ------- Agilent 8163A Lightwave Multimeter, Agilent 8164A Lightwave Measurement System, & Agilent 8166A Lightwave Multichannel System, Fourth Edition... -
Page 146: Measuring The Power Transmitted Through The Reflection Reference
Under Test, DUT) directly to a Power Meter and measure the transmitted power, . You can use E to calculate the front panel delta, see “Calculating the Meas Meas Agilent 8163A Lightwave Multimeter, Agilent 8164A Lightwave Measurement System, & Agilent 8166A Lightwave Multichannel System, Fourth Edition... -
Page 147: Measuring The Reflections From The Dut
Measuring the Reflections from the Device Under Test You can use E to calculate the insertion loss, see “Calculating the Insertion Loss of the DUT” on page 151. Agilent 8163A Lightwave Multimeter, Agilent 8164A Lightwave Measurement System, & Agilent 8166A Lightwave Multichannel System, Fourth Edition... -
Page 148: Calculating The Return Loss Of The Dut
For “Measuring the Power when there are No Reflections” on page 146, the value of the reflection factor is zero. This gives the following equation: Agilent 8163A Lightwave Multimeter, Agilent 8164A Lightwave Measurement System, & Agilent 8166A Lightwave Multichannel System, Fourth Edition... -
Page 149: Calculating The Front Panel Delta
“Measuring the Power Transmitted Through the Measurement Cable” on page 146. The system may be represented by the general diagram shown in Figure 107. Agilent 8163A Lightwave Multimeter, Agilent 8164A Lightwave Measurement System, & Agilent 8166A Lightwave Multichannel System, Fourth Edition... - Page 150 Me as Meas When you enter a value for the Front Panel Delta, <FPDelta>, the instrument automatically performs the following calculation: (17) 2∆L Agilent 8163A Lightwave Multimeter, Agilent 8164A Lightwave Measurement System, & Agilent 8166A Lightwave Multichannel System, Fourth Edition...
-
Page 151: Calculating The Insertion Loss Of The Dut
“Measuring the Power Transmitted Through the DUT” on page 147. The equation below gives the insertion loss of the DUT, IL (18) – -------------- - Me as Agilent 8163A Lightwave Multimeter, Agilent 8164A Lightwave Measurement System, & Agilent 8166A Lightwave Multichannel System, Fourth Edition... - Page 152 Return Loss Measurement A Background to Return Loss Measurement with the HP 81534A Agilent 8163A Lightwave Multimeter, Agilent 8164A Lightwave Measurement System, & Agilent 8166A Lightwave Multichannel System, Fourth Edition...
- Page 153 Applications Agilent 8163A Lightwave Multimeter, Agilent 8164A Lightwave Measurement System, & Agilent 8166A Lightwave Multichannel System, Fourth Edition...
- Page 154 Applications This chapter explains how to set up and perform the following applications using the Agilent 8163A Lightwave Multimeter or Agilent 8164A Lightwave Measurement System: • The Logging application logs and displays power measurements. The Logging application performs measurements consecutively without the possibility of any pause between measurements.
-
Page 155: Working With Application Graphs
As a default, the C and D markers are out of range when you first open a graph. See “How to Set Markers” on page 156, for more information on setting moving markers. Agilent 8163A Lightwave Multimeter, Agilent 8164A Lightwave Measurement System, & Agilent 8166A Lightwave Multichannel System, Fourth Edition... -
Page 156: How To Set Markers
To zoom out to the fullest extent: 1 Press the [Menu] softkey. The menu appears. Agilent 8163A Lightwave Multimeter, Agilent 8164A Lightwave Measurement System, & Agilent 8166A Lightwave Multichannel System, Fourth Edition... -
Page 157: To Switch The Grid On/Off
Figure 109, where all the Power Meters are listed numerically with regard to legend number. All legend texts, if you have Agilent 8163A Lightwave Multimeter, Agilent 8164A Lightwave Measurement System, & Agilent 8166A Lightwave Multichannel System, Fourth Edition... -
Page 158: How To Select The Samples Display
The samples display determines how the curves of the graph are represented. To choose the samples display: 1 Press the [Menu] softkey and move to <Samples Display>. A box displaying the following options appears: Agilent 8163A Lightwave Multimeter, Agilent 8164A Lightwave Measurement System, & Agilent 8166A Lightwave Multichannel System, Fourth Edition... - Page 159 Depending on the zoom level you choose, if these dots are very close to each other, the curve will resemble a line. Figure 111 Samples Display - <Samples> Agilent 8163A Lightwave Multimeter, Agilent 8164A Lightwave Measurement System, & Agilent 8166A Lightwave Multichannel System, Fourth Edition...
-
Page 160: How To Read Curve Values
In this way, you can read the time/wavelength and power values that relate to each sample and the difference between these values for markers A and Agilent 8163A Lightwave Multimeter, Agilent 8164A Lightwave Measurement System, & Agilent 8166A Lightwave Multichannel System, Fourth Edition... -
Page 161: How To Lock Markers To The Curve
You can unlock markers A and B from the curve by performing the following instructions: 1 Press the [Menu] softkey. 2 Move to <Unlock From Curve> and press Enter to return to the graph. Agilent 8163A Lightwave Multimeter, Agilent 8164A Lightwave Measurement System, & Agilent 8166A Lightwave Multichannel System, Fourth Edition... -
Page 162: How To Lock/Unlock Markers To Samples
Figure 114 shows a graph where markers A and B are locked to samples. If you press the cursor key, the marker will move to another sample. Figure 114 Lock to Samples On Agilent 8163A Lightwave Multimeter, Agilent 8164A Lightwave Measurement System, & Agilent 8166A Lightwave Multichannel System, Fourth Edition... - Page 163 – <Lock to Samples Off>, to lock markers to the curve. N O TE Only one of these menu items will be available for selection. 3 Press Enter to return to the graph. Agilent 8163A Lightwave Multimeter, Agilent 8164A Lightwave Measurement System, & Agilent 8166A Lightwave Multichannel System, Fourth Edition...
-
Page 164: The Logging Application
• displayed on the screen, • printed out to hardcopy, or • saved to disk drive of your Agilent 8164A Lightwave Measurement System. Agilent 8163A Lightwave Multimeter, Agilent 8164A Lightwave Measurement System, & Agilent 8166A Lightwave Multichannel System, Fourth Edition... -
Page 165: How To Set Up A Logging Function
The Application Menu 2 Move to <Logging> and press Enter. The Agilent 8164A Logging Setup Screen, as shown in Figure 118, or the Agilent 8163A Logging Modules Setup Screen, as shown in Figure 119, appears depending on the mainframe instrument you are using. -
Page 166: Selecting/Deselecting Power Meters
If you are using the Agilent 8164A Lightwave Multimeter, you may set all Power meter parameters from the Logging Setup Screen, see Figure 118. Agilent 8163A Lightwave Multimeter, Agilent 8164A Lightwave Measurement System, & Agilent 8166A Lightwave Multichannel System, Fourth Edition... - Page 167 Auto-ranging mode is not available from the <Range Mode> menu. If you wish to use the auto-ranging mode, see “The Stability Application” on page 173. 11 Move to <Range> and press Enter. Agilent 8163A Lightwave Multimeter, Agilent 8164A Lightwave Measurement System, & Agilent 8166A Lightwave Multichannel System, Fourth Edition...
-
Page 168: Setting Logging Parameter
Measurement screen, as shown in Figure 121, appears. A progress bar at the bottom of the screen shows the proportion of the logging application that has been completed. Agilent 8163A Lightwave Multimeter, Agilent 8164A Lightwave Measurement System, & Agilent 8166A Lightwave Multichannel System, Fourth Edition... - Page 169 The Logging Application Applications N O TE If the averaging time [AvgTime] is less than 100 ms for a Agilent 8163A Series Power Meter, the progress bar and the graph are not updated until the measurement completes. Figure 121 The Logging Measurement Screen - Measurement Running 18 There are two softkeys available from the Logging Measurement screen.
-
Page 170: Analysing A Logging Application
20 You cannot access the Logging Analysis screen from the graph. If you are viewing the graph, press [Close]. Agilent 8163A Lightwave Multimeter, Agilent 8164A Lightwave Measurement System, & Agilent 8166A Lightwave Multichannel System, Fourth Edition... -
Page 171: Setting Analysis Parameters
23 To edit the reference mode used for the analysis, move to <Ref Mode>, press Enter, move to one of the following referencing modes: Agilent 8163A Lightwave Multimeter, Agilent 8164A Lightwave Measurement System, & Agilent 8166A Lightwave Multichannel System, Fourth Edition... -
Page 172: Viewing The Statistics For A Power Meter Channel
25 If you are using the Agilent 8164A, move to [Stat Ch.], press Enter, move to a Power Meter channel, and press Enter. If you are using the Agilent 8163A, press [More], the screen in Figure 125 appears, move to [Stat Ch.], press Enter, move to a Power Meter channel, and press Enter. -
Page 173: On-Screen Messages
Power Meter channels, plots the results as a graph, and generates a statistical analysis of the results. Total Time Averaging Time Dwell Time Period Time Figure 126 Example Stability Application Agilent 8163A Lightwave Multimeter, Agilent 8164A Lightwave Measurement System, & Agilent 8166A Lightwave Multichannel System, Fourth Edition... -
Page 174: How To Set Up A Stability Function
How to Set Up a Stability Function To set up a stability function: 1 Press the Appl hardkey. The Applications menu, as shown in Figure 117, appears. Agilent 8163A Lightwave Multimeter, Agilent 8164A Lightwave Measurement System, & Agilent 8166A Lightwave Multichannel System, Fourth Edition... -
Page 175: Selecting/Deselecting Power Meters
2 Move to the Module Selection box. As a default, all Power Meters are selected, this means that all Power Meters will log power measurements. Press [Edit]. Agilent 8163A Lightwave Multimeter, Agilent 8164A Lightwave Measurement System, & Agilent 8166A Lightwave Multichannel System, Fourth Edition... -
Page 176: Setting Power Meter Parameters
If no Power Meter channel is selected, you cannot exit by pressing Enter. Setting Power Meter Parameters NO T E If you are using the Agilent 8163A Lightwave Multimeter, press [Modules] to access the Stability Setup Screen, as shown in Figure 129. Not all parameters are available from the Stability Setup Screen. -
Page 177: Setting Stability Parameter
14 Move to [Total Time], press Enter. [Total Time] is a value of the form xx:yy:zz, where xx is a value in hours (maximum 23 hours), yy is a value in Agilent 8163A Lightwave Multimeter, Agilent 8164A Lightwave Measurement System, & Agilent 8166A Lightwave Multichannel System, Fourth Edition... -
Page 178: Running A Stability Application
“Working with Application Graphs” on page 155 for information on zooming in and out. – Press [Cancel] to return to the Stability Setup screen without completing the stability application. Agilent 8163A Lightwave Multimeter, Agilent 8164A Lightwave Measurement System, & Agilent 8166A Lightwave Multichannel System, Fourth Edition... -
Page 179: Analysing A Stability Application
20 You cannot access the Stability Analysis screen from the graph. If you are viewing the graph, press [Close]. Agilent 8163A Lightwave Multimeter, Agilent 8164A Lightwave Measurement System, & Agilent 8166A Lightwave Multichannel System, Fourth Edition... -
Page 180: Setting Analysis Parameters
Applications The Stability Application 21 Press [Analysis]. The Stability Analysis screen appears as shown in Figure 132 for the Agilent 8164A and Figure 133 for the Agilent 8163A. Figure 132 The Agilent 8164A Stability Analysis Screen Figure 133 The Agilent 8163A Stability Analysis Screen - First Screen... -
Page 181: Viewing The Statistics For A Power Meter Channel
25 If you are using the Agilent 8164A, move to [Stat Ch.], press Enter, move to a Power Meter channel, and press Enter. If you are using the Agilent 8163A, press [More], the screen in Figure 134 appears, move to [Stat Ch.], press Enter, move to a Power Meter channel, and press Enter. -
Page 182: On-Screen Messages
Measurement System to control a system for testing pigtailed or connectorized passive devices (filters, couplers, and isolators) over wavelength. You must first install a Tunable Laser module and Power Meters in your Agilent 8163A Lightwave Multimeter or Agilent 8164A Lightwave Measurement System. -
Page 183: How To Set Up Pact
7 Perform steps until you have selected the required Tunable Laser modules for your application and press Enter. N O TE If no Tunable Laser module is selected, you cannot exit by pressing Enter. Agilent 8163A Lightwave Multimeter, Agilent 8164A Lightwave Measurement System, & Agilent 8166A Lightwave Multichannel System, Fourth Edition... -
Page 184: Selecting/Deselecting Power Meters
– <Stepped>, which dwells at wavelengths that are separated by a certain step size, or – <Continuous>, which sweeps continually at the speed you set. Press Enter. Agilent 8163A Lightwave Multimeter, Agilent 8164A Lightwave Measurement System, & Agilent 8166A Lightwave Multichannel System, Fourth Edition... -
Page 185: How To Measure The Reference
– <Both (master:1)>, where both optical outputs can be enabled but only the output of the low SSE optical output can be regulated. Press Enter. How to Measure the Reference 19 Press [Reference]. Agilent 8163A Lightwave Multimeter, Agilent 8164A Lightwave Measurement System, & Agilent 8166A Lightwave Multichannel System, Fourth Edition... - Page 186 [V Sweep], is displayed. Figure 136 PACT Reference Screen NO T E The application chooses the power, [P], see step 15 for more information. Agilent 8163A Lightwave Multimeter, Agilent 8164A Lightwave Measurement System, & Agilent 8166A Lightwave Multichannel System, Fourth Edition...
- Page 187 – Press [Cancel] to return to the PACT Reference screen without completing the reference measurement, all reference values that were measured will be deleted. Agilent 8163A Lightwave Multimeter, Agilent 8164A Lightwave Measurement System, & Agilent 8166A Lightwave Multichannel System, Fourth Edition...
-
Page 188: How To Perform A Loss Measurement
If [Step] does not divide exactly into the difference between [λ Stop] and [λ Start], the parameters are automatically corrected to meet the constraints of PACT. Agilent 8163A Lightwave Multimeter, Agilent 8164A Lightwave Measurement System, & Agilent 8166A Lightwave Multichannel System, Fourth Edition... - Page 189 <Continuous> sweep mode, the graph will update at the end of each sweep. Figure 140 shows a graph with low dynamic range that is the result of a single Agilent 8163A Lightwave Multimeter, Agilent 8164A Lightwave Measurement System, & Agilent 8166A Lightwave Multichannel System, Fourth Edition...
- Page 190 Figure 141 shows a graph with high dynamic range that is the result of a three sweeps that were combined using a "stitching" process. Figure 140 Low Dynamic Range Figure 141 High Dynamic Range Agilent 8163A Lightwave Multimeter, Agilent 8164A Lightwave Measurement System, & Agilent 8166A Lightwave Multichannel System, Fourth Edition...
-
Page 191: Analysing A Pact Measurement
28 You cannot access the PACT Analysis screen from the graph. If you are viewing the graph, press [Close]. Agilent 8163A Lightwave Multimeter, Agilent 8164A Lightwave Measurement System, & Agilent 8166A Lightwave Multichannel System, Fourth Edition... -
Page 192: On-Screen Messages
No measurement is possible until the connection at the Remote Interlock Connector closes, see “The Remote Interlock (RIL) connector” on page 218 for details. Agilent 8163A Lightwave Multimeter, Agilent 8164A Lightwave Measurement System, & Agilent 8166A Lightwave Multichannel System, Fourth Edition... -
Page 193: The Pmax Curve
How to View the Pmax Curve To view the Pmax Curve: 1 Press the Appl hardkey. The Applications menu, as shown in Figure 117, appears. Agilent 8163A Lightwave Multimeter, Agilent 8164A Lightwave Measurement System, & Agilent 8166A Lightwave Multichannel System, Fourth Edition... -
Page 194: Recording Measurement Results
– “The Logging Application” on page 164, – “The Stability Application” on page 173, or – “The PACT Application” on page 182. 2 Move to the Analysis Screen. Agilent 8163A Lightwave Multimeter, Agilent 8164A Lightwave Measurement System, & Agilent 8166A Lightwave Multichannel System, Fourth Edition... - Page 195 145, appears. Figure 145 The Printing in Progress Screen N O TE If you want to cancel the print job, press the [Cancel] softkey. Agilent 8163A Lightwave Multimeter, Agilent 8164A Lightwave Measurement System, & Agilent 8166A Lightwave Multichannel System, Fourth Edition...
-
Page 196: Saving Application Measurement Results To Diskette
If you are using the Agilent 8164A Lightwave Measurement System, you can save application measurement results to diskette by completing the following instructions: 1 Perform any of the following applications as described above: Agilent 8163A Lightwave Multimeter, Agilent 8164A Lightwave Measurement System, & Agilent 8166A Lightwave Multichannel System, Fourth Edition... - Page 197 7 If you wish to change the suggested file name, use the on-screen keyboard to modify the name. 8 Press [OK] to save the data to diskette using the displayed file name. Agilent 8163A Lightwave Multimeter, Agilent 8164A Lightwave Measurement System, & Agilent 8166A Lightwave Multichannel System, Fourth Edition...
- Page 198 Applications Recording Measurement Results Agilent 8163A Lightwave Multimeter, Agilent 8164A Lightwave Measurement System, & Agilent 8166A Lightwave Multichannel System, Fourth Edition...
-
Page 199: Installation And Maintenance
Installation and Maintenance Agilent 8163A Lightwave Multimeter, Agilent 8164A Lightwave Measurement System, & Agilent 8166A Lightwave Multichannel System, Fourth Edition... - Page 200 Installation and Maintenance This chapter provides installation instructions for the Agilent 8163A Lightwave Multimeter System, Agilent 8164A Lightwave Measurement System, and the Agilent 8166A Lightwave Multichannel System. It also includes information about initial inspection and damage claims, preparation for use, packaging, storage, and shipment.
-
Page 201: Safety Considerations
To avoid hazardous electrical shock, do not perform electrical tests when there are signs of shipping damage to any portion of the outer enclosure (covers, panels, and so on). Agilent 8163A Lightwave Multimeter, Agilent 8164A Lightwave Measurement System, & Agilent 8166A Lightwave Multichannel System, Fourth Edition... -
Page 202: Ac Line Power Supply Requirements
AC Line Power Supply Requirements The Agilent 8163A Lightwave Multimeter System can operate from the single- phase AC power source that supplies between 100 V and 240 V at a frequency in the range 50 to 60 Hz. The maximum power consumption is 120 VA with all options installed. - Page 203 WA R NI NG To avoid the possibility of injury or death, you must observe the following precautions before switching on the instrument. Agilent 8163A Lightwave Multimeter, Agilent 8164A Lightwave Measurement System, & Agilent 8166A Lightwave Multichannel System, Fourth Edition...
- Page 204 The AC power requirements are summarized on the rear panel of the instrument. Figure 151 AC Power Requirement Markings - Agilent 8163A Figure 152 AC Power Requirement Markings - Agilent 8164A Agilent 8163A Lightwave Multimeter, Agilent 8164A Lightwave Measurement System, & Agilent 8166A Lightwave Multichannel System, Fourth Edition...
-
Page 205: Changing The Battery
Operating and Storage Environment The following summarizes the operating environment ranges. In order for the Agilent 8163A Lightwave Multimeter System, Agilent 8164A Lightwave Agilent 8163A Lightwave Multimeter, Agilent 8164A Lightwave Measurement System, & Agilent 8166A Lightwave Multichannel System, Fourth Edition... -
Page 206: Temperature
The operating humidity for the Agilent 8164A Lightwave Measurement System is < 80% from 10° C to +35° C. The operating humidity for the Agilent 8163A Lightwave Multimeter System and the Agilent 8166A Lightwave Multichannel System is up to 95% from 0°C to 45°C. -
Page 207: Operating Position
(1 inch) 25 mm (1 inch) Figure 154 Correct Operating Position of the 8163A Figure 155 Correct Operating Position of the Agilent 8164A Agilent 8163A Lightwave Multimeter, Agilent 8164A Lightwave Measurement System, & Agilent 8166A Lightwave Multichannel System, Fourth Edition... -
Page 208: Storage Position
• make sure that the instrument is in stand-by mode, see page 76 and • disconnect all connections to the back panel. Agilent 8163A Lightwave Multimeter, Agilent 8164A Lightwave Measurement System, & Agilent 8166A Lightwave Multichannel System, Fourth Edition... -
Page 209: Carrying The Instrument
• that you do not attempt to lift the instrument alone, at least two people are needed to carry the instrument, • that your back is straight and you bend your legs rather than your spine, Agilent 8163A Lightwave Multimeter, Agilent 8164A Lightwave Measurement System, & Agilent 8166A Lightwave Multichannel System, Fourth Edition... -
Page 210: Using Modules
• Front-loadable modules - these modules fit in the four module slots at the front of the Agilent 8164A Lightwave Measurement System or the two module slots at the front of the Agilent 8163A Lightwave Multimeter System or the 17 module slots at the front of the Agilent 8166A Lightwave Multichannel System. -
Page 211: How To Fit A Front-Loadable Module
Make sure that the instrument is in stand-by mode, see page 202, before you remove a module. Agilent 8163A Lightwave Multimeter, Agilent 8164A Lightwave Measurement System, & Agilent 8166A Lightwave Multichannel System, Fourth Edition... - Page 212 Side View of a Back-Loadable Module 2 Pull the module out of the mainframe, using the handle, being careful to keep the module completely flat. Agilent 8163A Lightwave Multimeter, Agilent 8164A Lightwave Measurement System, & Agilent 8166A Lightwave Multichannel System, Fourth Edition...
-
Page 213: How To Fit A Back-Loadable Module
CA U TI O N Disconnect all electrical and optical connectors before you fit this module into the instrument, as this can cause damage to the connectors. Agilent 8163A Lightwave Multimeter, Agilent 8164A Lightwave Measurement System, & Agilent 8166A Lightwave Multichannel System, Fourth Edition... - Page 214 This is the catch making contact. 4 Tighten retaining screws, to hold module in place. Agilent 8163A Lightwave Multimeter, Agilent 8164A Lightwave Measurement System, & Agilent 8166A Lightwave Multichannel System, Fourth Edition...
-
Page 215: Adding A Connector Interface
• optimize cooling by guiding the air flow. Fitting Blind Panels for Front-Loadable Module Slots To fit the a blind panel (part number - 08163-40199), perform the following procedure. Agilent 8163A Lightwave Multimeter, Agilent 8164A Lightwave Measurement System, & Agilent 8166A Lightwave Multichannel System, Fourth Edition... -
Page 216: Fitting A Filler Module For Back-Loadable Module Slots
Trigger Input, see Figure 167 or Figure 168. These are TTL inputs. A maximum of 5 V can be applied as an external voltage to either of these input connectors. Agilent 8163A Lightwave Multimeter, Agilent 8164A Lightwave Measurement System, & Agilent 8166A Lightwave Multichannel System, Fourth Edition... - Page 217 Figure 167 Rear Panel of the Agilent 8163A Lightwave Multimeter System Figure 168 Rear Panel of the Agilent 8164A Lightwave Measurement System Agilent 8163A Lightwave Multimeter, Agilent 8164A Lightwave Measurement System, & Agilent 8166A Lightwave Multichannel System, Fourth Edition...
-
Page 218: The Remote Interlock (Ril) Connector
Rear Panel of the Agilent 8166A Lightwave Multichannel System The Remote Interlock (RIL) connector There is a Remote Interlock (RIL) connector at the back of the Agilent 8163A Lightwave Multimeter System, Agilent 8164A Lightwave Measurement System, and Agilent 8166A Lightwave Multichannel System. This is to protect the user from injury when using class IIIb laser sources. -
Page 219: Gpib Interface
GPIB cable directly to a GPIB interface. Connector The following figure shows the connector and pin assignments. Connector Part Number: 1251-0293 Figure 170 GPIB Connector Agilent 8163A Lightwave Multimeter, Agilent 8164A Lightwave Measurement System, & Agilent 8166A Lightwave Multichannel System, Fourth Edition... -
Page 220: Gpib Logic Levels
Claims and Repackaging If physical damage is evident or if the instrument does not meet specification when received, notify the carrier and the nearest Agilent Technologies Sales/Service Office. The Agilent Technologies Sales/Service Office will arrange for repair or replacement of the unit without waiting for settlement of the claim against the carrier. -
Page 221: Return Shipments To Agilent Technologies
(305) 267 4288 (FAX) Australia/ 1 800 629 485 (Australia) New Zealand: 0800 738 378 (New Zealand) Asia-Pacific: (852) 2599 7777 (852) 2506 9285 (FAX) Agilent 8163A Lightwave Multimeter, Agilent 8164A Lightwave Measurement System, & Agilent 8166A Lightwave Multichannel System, Fourth Edition... - Page 222 Installation and Maintenance Claims and Repackaging Agilent 8163A Lightwave Multimeter, Agilent 8164A Lightwave Measurement System, & Agilent 8166A Lightwave Multichannel System, Fourth Edition...
- Page 223 Accessories Agilent 8163A Lightwave Multimeter, Agilent 8164A Lightwave Measurement System, & Agilent 8166A Lightwave Multichannel System, Fourth Edition...
- Page 224 Accessories The Agilent 8163A Lightwave Multimeter, the Agilent 8164A Lightwave Measurement System, and the Agilent 8166A Lightwave Multichannel System are available in various configurations for the best possible match to the most common applications. This appendix provides information on the available options and accessories.
-
Page 225: Instrument And Options - Agilent 8163A
Each Optical Head listed above, must be used with one of the following Optical Head Interface modules: Optical Head Interfaces Model No. Description Agilent 81618A Single Channel Interface Agilent 81619A Dual Channel Interface Agilent 8163A Lightwave Multimeter, Agilent 8164A Lightwave Measurement System, & Agilent 8166A Lightwave Multichannel System, Fourth Edition... -
Page 226: Instrument And Options - Agilent 8164A
Japanese User’s Guide 08164-91511 French User’s Guide 08164-91211 Simplified Chinese (China) User’s Guide 08164-91611 Traditional Chinese (Taiwan) User’s Guide 08164-91711 Korean User’s Guide 08164-91811 Agilent 8163A Lightwave Multimeter, Agilent 8164A Lightwave Measurement System, & Agilent 8166A Lightwave Multichannel System, Fourth Edition... -
Page 227: Modules
Dual Channel Interface Accessories for Optical Heads Model No. Description Agilent 81624CE Head extension cable (4 m) Agilent 81624DD D-shape head adapter (magnetic) Agilent 8163A Lightwave Multimeter, Agilent 8164A Lightwave Measurement System, & Agilent 8166A Lightwave Multichannel System, Fourth Edition... -
Page 228: Agilent 81645A Filler Module
Option 021 - Agilent 81689A Standard single mode fiber, for straight contact connectors. Option 022 - Agilent 81689A Standard single mode fiber, for angled contact connectors. Agilent 8163A Lightwave Multimeter, Agilent 8164A Lightwave Measurement System, & Agilent 8166A Lightwave Multichannel System, Fourth Edition... -
Page 229: Option 071 - All Tunable Laser Source Modules
Sensor InGaAs 1 mm, -110 dBm Agilent 81635A Dual Sensor InGaAs 1 mm, -80 dBm Optical Heads Model No. Description Agilent 81623A Ge Head, -80 dBm Agilent 8163A Lightwave Multimeter, Agilent 8164A Lightwave Measurement System, & Agilent 8166A Lightwave Multichannel System, Fourth Edition... - Page 230 LD Module 1310/1550 nm, 13 dBm Tunable Laser Source Module Model No. Description Agilent 81689A Compact Tunable Laser for Multichannel Test Applica- tions Agilent 8163A Lightwave Multimeter, Agilent 8164A Lightwave Measurement System, & Agilent 8166A Lightwave Multichannel System, Fourth Edition...
-
Page 231: Hp 8153A Lightwave Multimeter Modules
850 nm, Multimode Laser Diode HP 81552SM 1310 nm, Single-Mode Laser Diode HP 81553SM 1550 nm, Single-Mode Laser Diode HP 81554SM 1310/1550 nm, Single-Mode Laser Diode Agilent 8163A Lightwave Multimeter, Agilent 8164A Lightwave Measurement System, & Agilent 8166A Lightwave Multichannel System, Fourth Edition... -
Page 232: Gpib Cables And Adapters
• GPIB Adapter, 10834A, 2.3 cm extender. Use this adapter if there is no space to connect your GPIB cable directly to a GPIB interface. Agilent 8163A Lightwave Multimeter, Agilent 8164A Lightwave Measurement System, & Agilent 8166A Lightwave Multichannel System, Fourth Edition... -
Page 233: Specifications
Specifications Agilent 8163A Lightwave Multimeter, Agilent 8164A Lightwave Measurement System, & Agilent 8166A Lightwave Multichannel System, Fourth Edition... - Page 234 Specifications The Agilent 8163A Lightwave Multimeter, the Agilent 8164A Lightwave Measurement System, and the Agilent 8166A Lightwave Multichannel System are produced to the ISO 9001 international quality system standard as part of Agilent Technologies’ commitment to continually increasing customer satisfaction through improved quality control.
-
Page 235: Agilent 8163A Specifications
For code compatibility to the HP 8153A Lightwave Multimeter please refer to the mainframe’s Programming Guide, part number 08164-91016. Ordering Information Option 908 Rack mount kit Agilent 8163A Lightwave Multimeter, Agilent 8164A Lightwave Measurement System, & Agilent 8166A Lightwave Multichannel System, Fourth Edition... -
Page 236: Agilent 8164A Specifications
Memory cards according to PCMCIA type I, II, and III. External Keyboard PS/2 connector Agilent 8163A Series modules are NOT compatible with the HP 8153A Lightwave Multimeter. For code compatibility to the HP 8153A Lightwave Multimeter please refer to the mainframe’s Programming Guide, part number 08164-91016. -
Page 237: Agilent 8166A Specifications
For code compatibility to the HP 8153A Lightwave Multimeter please refer to the mainframe’s Programming Guide, part number 08164-91016. Ordering Information Option 908 Rack mount kit Agilent 8163A Lightwave Multimeter, Agilent 8164A Lightwave Measurement System, & Agilent 8166A Lightwave Multichannel System, Fourth Edition... -
Page 238: Declaration Of Conformity
Conducted Immunity 3 V, 80% EN 61000-4-8:1993 Power freq. Magn. Field 3A/m; 50 Hz IEC 1000-4-11:1994 Voltage Dips and Interruptions 30%-10 ms; 60%-100 ms Agilent 8163A Lightwave Multimeter, Agilent 8164A Lightwave Measurement System, & Agilent 8166A Lightwave Multichannel System, Fourth Edition... -
Page 239: Supplementary Information
The FDA Accession Number 9920431-00 The FDA Accession Number 9122175-06 Böblingen, 29 April, 1999 Wolfgang Fenske Update, 15 July, 1999 TMO-B Regulations Consultant Agilent 8163A Lightwave Multimeter, Agilent 8164A Lightwave Measurement System, & Agilent 8166A Lightwave Multichannel System, Fourth Edition... -
Page 240: Agilent 8164A Lightwave Measurement System
Safety: IEC 1010-1:1990 incl. A1:1992 + A2:1995 EN 61010-1:(1993) + A2:1995 IEC 825-1 (1993); FDA 21 CFR 1040.10 EN 60825-1 (1994) Agilent 8163A Lightwave Multimeter, Agilent 8164A Lightwave Measurement System, & Agilent 8166A Lightwave Multichannel System, Fourth Edition... -
Page 241: Supplementary Information
The FDA Accession Number 9920431-00 The FDA Accession Number 9122175-06 Böblingen, 29 April, 1999 Wolfgang Fenske Update, 15 July, 1999 TMO-B Regulations Consultant Agilent 8163A Lightwave Multimeter, Agilent 8164A Lightwave Measurement System, & Agilent 8166A Lightwave Multichannel System, Fourth Edition... -
Page 242: Agilent 8166A Lightwave Multichannel System
Conducted Immunity 3 V, 80% EN 61000-4-8:1993 Power freq. Magn. Field 3A/m; 50 Hz Voltage Dips and 30%-10 ms; 60%-100 ms IEC 1000-4-11:1994 Interruptions Agilent 8163A Lightwave Multimeter, Agilent 8164A Lightwave Measurement System, & Agilent 8166A Lightwave Multichannel System, Fourth Edition... -
Page 243: Supplementary Information
The FDA Accession Number 9920431-00 The FDA Accession Number 9122175-06 Böblingen, 29 April, 1999 Wolfgang Fenske Update, 15 July, 1999 TMO-B Regulations Consultant Agilent 8163A Lightwave Multimeter, Agilent 8164A Lightwave Measurement System, & Agilent 8166A Lightwave Multichannel System, Fourth Edition... - Page 244 Specifications Declaration of Conformity Agilent 8163A Lightwave Multimeter, Agilent 8164A Lightwave Measurement System, & Agilent 8166A Lightwave Multichannel System, Fourth Edition...
-
Page 245: Performance Tests
Performance Tests Agilent 8163A Lightwave Multimeter, Agilent 8164A Lightwave Measurement System, & Agilent 8166A Lightwave Multichannel System, Fourth Edition... - Page 246 CPU, a hard-disk drive, and a display. The Agilent 8164A Lightwave Measurement System also has a floppy-disk drive. The complete characteristics to which the Agilent 8163A Lightwave Multimeter, the Agilent 8164A Lightwave Measurement System, or the Agilent 8166A Lightwave Multichannel System is tested are given in “Specifications”...
-
Page 247: Equipment Required
Since the test limits and set-up information are printed on the Test Record for easy reference, the record can also be used as an Agilent 8163A Lightwave Multimeter, Agilent 8164A Lightwave Measurement System, & Agilent 8166A Lightwave Multichannel System, Fourth Edition... -
Page 248: Test Failure
Record can also be used as a permanent record and may be reproduced without written permission from Agilent Technologies. Test Failure If the Agilent 8163A Lightwave Multimeter, the Agilent 8164A Lightwave Measurement System, or the Agilent 8166A Lightwave Multichannel System fail any Performance Test, return the instrument to the nearest Agilent Technologies Sales/Service Office for repair. -
Page 249: Display/Key Functional Test
7 Press Preset, the green hardkey. An egg-timer icon should be displayed while all parameters are set to their default values. The Overview Screen showing all channels should appear. Agilent 8163A Lightwave Multimeter, Agilent 8164A Lightwave Measurement System, & Agilent 8166A Lightwave Multichannel System, Fourth Edition... -
Page 250: Testing The Softkeys And The Cursor Key
The Modify Knob is only available if you use the Agilent 8164A. 23 Turn the Modify Knob clockwise. Check the fields on the display being highlighted one after another. Agilent 8163A Lightwave Multimeter, Agilent 8164A Lightwave Measurement System, & Agilent 8166A Lightwave Multichannel System, Fourth Edition... -
Page 251: Testing The Number Keys
4 Ensure that [λ], the wavelength of the power sensor module equals [λ], the wavelength of the laser source in slot 1. 5 Ensure, the attenuation of the laser source is set to 0.00 dB. Agilent 8163A Lightwave Multimeter, Agilent 8164A Lightwave Measurement System, & Agilent 8166A Lightwave Multichannel System, Fourth Edition... -
Page 252: Test Of The Tunable Laser Module Channel (Slot 0)
8 Note the power reading of the power sensor in the test record. The Module Interaction Test ends here if you use the Agilent 8163A. NO T E If you use the Agilent 8164A, perform steps 9 to 12. -
Page 253: Gpib Interface Test (Optional)
5 The reply from the instrument should be a string of the form, HEWLETT-PACKARD, <Model Number>, <Serial Number>, <Firmware Revision Number> 6 Press [Local] to return the instrument to local control. Agilent 8163A Lightwave Multimeter, Agilent 8164A Lightwave Measurement System, & Agilent 8166A Lightwave Multichannel System, Fourth Edition... - Page 254 Performance Tests Performance Test Instructions Agilent 8163A Lightwave Multimeter, Agilent 8164A Lightwave Measurement System, & Agilent 8166A Lightwave Multichannel System, Fourth Edition...
-
Page 255: Test Record
Line Frequency ________________________ Customer _______________________ Test Facility ________________________ Report No _______________________ Performed by ___________________________________________________________ Special Notes ___________________________________________________________ ___________________________________________________________ ___________________________________________________________ ___________________________________________________________ ___________________________________________________________ ___________________________________________________________ ___________________________________________________________ Agilent 8163A Lightwave Multimeter, Agilent 8164A Lightwave Measurement System, & Agilent 8166A Lightwave Multichannel System, Fourth Edition... - Page 256 - 6 dBm ____________ + 6 dBm ____________ ____________ GPIB Interface Test Check the appropriate function Passed Failed GPIB Interface Test ____________ ____________ Agilent 8163A Lightwave Multimeter, Agilent 8164A Lightwave Measurement System, & Agilent 8166A Lightwave Multichannel System, Fourth Edition...
-
Page 257: Agilent 8164A Lightwave Measurement System Performance Test257
Line Frequency ________________________ Customer _______________________ Test Facility ________________________ Report No _______________________ Performed by ___________________________________________________________ Special Notes ___________________________________________________________ ___________________________________________________________ ___________________________________________________________ ___________________________________________________________ ___________________________________________________________ ___________________________________________________________ ___________________________________________________________ Agilent 8163A Lightwave Multimeter, Agilent 8164A Lightwave Measurement System, & Agilent 8166A Lightwave Multichannel System, Fourth Edition... - Page 258 ___________ ___________ ___________ 13 ___________________________ ___________ ___________ ___________ 14 ___________________________ ___________ ___________ ___________ 15 ___________________________ ___________ ___________ ___________ 16 ___________________________ ___________ ___________ ___________ Agilent 8163A Lightwave Multimeter, Agilent 8164A Lightwave Measurement System, & Agilent 8166A Lightwave Multichannel System, Fourth Edition...
- Page 259 - 16 dBm ________ − 4 dBm ____________ Using Agilent 81640A ____________ GPIB Interface Test Check the appropriate function Passed Failed GPIB Interface Test ____________ ____________ Agilent 8163A Lightwave Multimeter, Agilent 8164A Lightwave Measurement System, & Agilent 8166A Lightwave Multichannel System, Fourth Edition...
- Page 260 Performance Tests Test Record Agilent 8163A Lightwave Multimeter, Agilent 8164A Lightwave Measurement System, & Agilent 8166A Lightwave Multichannel System, Fourth Edition...
-
Page 261: Agilent 8166A Lightwave Multichannel System Performance Test261
Line Frequency ________________________ Customer _______________________ Test Facility ________________________ Report No _______________________ Performed by ___________________________________________________________ Special Notes ___________________________________________________________ ___________________________________________________________ ___________________________________________________________ ___________________________________________________________ ___________________________________________________________ ___________________________________________________________ ___________________________________________________________ Agilent 8163A Lightwave Multimeter, Agilent 8164A Lightwave Measurement System, & Agilent 8166A Lightwave Multichannel System, Fourth Edition... - Page 262 ___________ ___________ ___________ 13 ___________________________ ___________ ___________ ___________ 14 ___________________________ ___________ ___________ ___________ 15 ___________________________ ___________ ___________ ___________ 16 ___________________________ ___________ ___________ ___________ Agilent 8163A Lightwave Multimeter, Agilent 8164A Lightwave Measurement System, & Agilent 8166A Lightwave Multichannel System, Fourth Edition...
- Page 263 Slot 15 and Slot 17 - 6 dBm ____________ + 20 dBm ____________ ____________ GPIB Interface Test Check the appropriate function Passed Failed GPIB Interface Test ____________ ____________ Agilent 8163A Lightwave Multimeter, Agilent 8164A Lightwave Measurement System, & Agilent 8166A Lightwave Multichannel System, Fourth Edition...
- Page 264 Performance Tests Test Record Agilent 8163A Lightwave Multimeter, Agilent 8164A Lightwave Measurement System, & Agilent 8166A Lightwave Multichannel System, Fourth Edition...
-
Page 265: Cleaning Instructions
Cleaning Instructions Agilent 8163A Lightwave Multimeter, Agilent 8164A Lightwave Measurement System, & Agilent 8166A Lightwave Multichannel System, Fourth Edition... - Page 266 If you are unsure of the correct cleaning procedure for your optical device, we recommend that you first try cleaning a dummy or test device. Agilent Technologies assume no liability for the customer’s failure to comply with these requirements. Cleaning Instructions for this Instrument The Cleaning Instructions apply to a number of different types of Optical Equipment.
-
Page 267: Safety Precautions
In this section, we want to suggest ways to help you clean your various optical devices, and thus significantly improve the accuracy and repeatability of your lightwave measurements. Agilent 8163A Lightwave Multimeter, Agilent 8164A Lightwave Measurement System, & Agilent 8166A Lightwave Multichannel System, Fourth Edition... -
Page 268: What Do I Need For Proper Cleaning
Do not press the bottom of the cap onto the fiber too hard, as any dust in the cap can scratch or pollute your fiber surface. If you need further dust caps, please contact your nearest Agilent Technologies sales office. -
Page 269: Cotton Swabs
There are many different kinds of pipe cleaner available from tobacco shops. Agilent 8163A Lightwave Multimeter, Agilent 8164A Lightwave Measurement System, & Agilent 8166A Lightwave Multichannel System, Fourth Edition... -
Page 270: Compressed Air
A microscope can be found in most photography stores, or can be obtained through or specialist mail order companies. Special fiber-scopes are available from suppliers of splicing equipment. Agilent 8163A Lightwave Multimeter, Agilent 8164A Lightwave Measurement System, & Agilent 8166A Lightwave Multichannel System, Fourth Edition... -
Page 271: Ultrasonic Bath
Polymer film is available from laboratory suppliers or specialist mail order companies. Using polymer film is a gentle method of cleaning extremely sensitive devices, such as reference reflectors and mirrors. Agilent 8163A Lightwave Multimeter, Agilent 8164A Lightwave Measurement System, & Agilent 8166A Lightwave Multichannel System, Fourth Edition... -
Page 272: Infrared Sensor Card
Keep the caps on the equipment always when it is not in use. All of Agilent Technologies’ lightwave instruments and accessories are shipped with either laser shutter caps or dust caps. If you need additional or replacement dust caps, contact your nearest Agilent Technologies Sales/Service Office. -
Page 273: Cleaning Instrument Housings
This depends on the degree of dirtiness, or the depth of the scratches. This is a difficult procedure Agilent 8163A Lightwave Multimeter, Agilent 8164A Lightwave Measurement System, & Agilent 8166A Lightwave Multichannel System, Fourth Edition... -
Page 274: How To Clean Connector Adapters
Some adapters have an anti-reflection coating on the back to reduce back reflection. This coating is extremely sensitive to solvents and mechanical abrasion. Extra care is needed when cleaning these adapters. Agilent 8163A Lightwave Multimeter, Agilent 8164A Lightwave Measurement System, & Agilent 8166A Lightwave Multichannel System, Fourth Edition... -
Page 275: How To Clean Connector Interfaces
3 Moisten a new cotton-swab with isopropyl alcohol. 4 Clean the interface by rubbing the cotton-swab over the surface using a small circular movement. Agilent 8163A Lightwave Multimeter, Agilent 8164A Lightwave Measurement System, & Agilent 8166A Lightwave Multichannel System, Fourth Edition... -
Page 276: How To Clean Bare Fiber Adapters
Some lenses have special coatings that are sensitive to solvents, grease, liquid and mechanical abrasion. Take extra care when cleaning lenses with these coatings. Agilent 8163A Lightwave Multimeter, Agilent 8164A Lightwave Measurement System, & Agilent 8166A Lightwave Multichannel System, Fourth Edition... -
Page 277: How To Clean Instruments With A Fixed Connector Interface
Never try to open the instrument and clean the optical block by yourself, because it is easy to scratch optical components, and cause them to be misaligned. Agilent 8163A Lightwave Multimeter, Agilent 8164A Lightwave Measurement System, & Agilent 8166A Lightwave Multichannel System, Fourth Edition... -
Page 278: How To Clean Instruments With An Optical Glass Plate
How to clean instruments with an optical glass plate Some instruments, for example, the optical heads from Agilent Technologies have an optical glass plate to protect the sensor. Clean this glass plate in the same way as optical lenses (see “How to clean lenses” on page 276). -
Page 279: How To Clean Instruments With A Recessed Lens Interface
Some optical devices, such as the Agilent 81000BR Reference Reflector, which has a gold plated surface, are very sensitive to mechanical stress or pressure. Do Agilent 8163A Lightwave Multimeter, Agilent 8164A Lightwave Measurement System, & Agilent 8166A Lightwave Multichannel System, Fourth Edition... -
Page 280: How To Clean Metal Filters Or Attenuator Gratings
Use this procedure particularly when there is greasy dirt on the device: 1 Put the optical device into a bath of isopropyl alcohol, and wait at least 10 minutes. Agilent 8163A Lightwave Multimeter, Agilent 8164A Lightwave Measurement System, & Agilent 8166A Lightwave Multichannel System, Fourth Edition... -
Page 281: Additional Cleaning Information
Preferred Procedure Use the following procedure on most occasions. 1 Blow away any dust or dirt with compressed air. Agilent 8163A Lightwave Multimeter, Agilent 8164A Lightwave Measurement System, & Agilent 8166A Lightwave Multichannel System, Fourth Edition... -
Page 282: Other Cleaning Hints
This section contain some additional hints which we hope will help you further. For further information, please contact your local Agilent Technologies representative. Agilent 8163A Lightwave Multimeter, Agilent 8164A Lightwave Measurement... - Page 283 Never open the instruments as they can be damaged. Opening the instruments puts you in danger of receiving an electrical shock from your device, and renders your warranty void. Agilent 8163A Lightwave Multimeter, Agilent 8164A Lightwave Measurement System, & Agilent 8166A Lightwave Multichannel System, Fourth Edition...
- Page 284 Cleaning Instructions Other Cleaning Hints Agilent 8163A Lightwave Multimeter, Agilent 8164A Lightwave Measurement System, & Agilent 8166A Lightwave Multichannel System, Fourth Edition...
-
Page 285: Firmware Upgrades
Firmware Upgrades Agilent 8163A Lightwave Multimeter, Agilent 8164A Lightwave Measurement System, & Agilent 8166A Lightwave Multichannel System, Fourth Edition... - Page 286 Firmware Upgrades This chapter provides information about the firmware upgrade process for the Agilent 8163A Lightwave Multimeter, the Agilent 8164A Lightwave Measurement System, and the Agilent 8166A Lightwave Multichannel System. Agilent 8163A Lightwave Multimeter, Agilent 8164A Lightwave Measurement System, & Agilent 8166A Lightwave Multichannel System, Fourth Edition...
-
Page 287: Firmware Upgrade Process
<Technical Support> underneath the "Test and Measurement" heading, clicking on <Software Updates and Firmware Upgrades>, and then clicking on <Fiber Optic Test Equipment Software and Firmware Upgrades>. Agilent 8163A Lightwave Multimeter, Agilent 8164A Lightwave Measurement System, & Agilent 8166A Lightwave Multichannel System, Fourth Edition... -
Page 288: How To Upgrade Firmware
Agilent Sales/Service Office for a free copy of the Support Disk * If you need help installing firmware, please contact your nearest Agilent Technologies Sales/Service Office. Figure 172 Firmware Upgrade Flow Chart How to Upgrade Firmware You can receive a firmware upgrade on the following media: •... -
Page 289: Agilent 8163A Firmware Upgrade Procedure
Firmware Upgrades Agilent 8163A Firmware Upgrade Procedure To upgrade firmware for the Agilent 8163A, you require a PC, running MS Windows 95 or NT 4.0, or higher, plus a serial null-modem cable, that was supplied with your Agilent 8163A mainframe. -
Page 290: Agilent 81640A/80A/82A Firmware Upgrade Procedure
3 Insert the DISK_1 into your PC and open a DOS command window if you are running Windows. 4 Copy the first firmware image file to DISK_1 using the command "copydisk.exe 64m202_1.img a:". Agilent 8163A Lightwave Multimeter, Agilent 8164A Lightwave Measurement System, & Agilent 8166A Lightwave Multichannel System, Fourth Edition... -
Page 291: Agilent 8166A Firmware Upgrade Procedure
3 Press the "File Selection" button, the file selection box appears. 4 Move to the file "66_fl202.bin" and click on OK. 5 Click on ’Port Settings’. Agilent 8163A Lightwave Multimeter, Agilent 8164A Lightwave Measurement System, & Agilent 8166A Lightwave Multichannel System, Fourth Edition... - Page 292 Otherwise, turn off the power and try again. 8 Click on ’Program’ and wait until the download completes. The instrument will reboot with the new firmware. Agilent 8163A Lightwave Multimeter, Agilent 8164A Lightwave Measurement System, & Agilent 8166A Lightwave Multichannel System, Fourth Edition...
- Page 293 Modulation dB 72 laser sources 95 dBm 72 tunable lasers 119 Default Password 35, 61 Modules empty slots 215 Dual-Wavelength Laser Sources 93 Agilent 8163A Lightwave Multimeter, Agilent 8164A Lightwave Measurement System, & Agilent 8166A Lightwave Multichannel System, Fourth Edition...
- Page 294 Safety 201 softkeys 35 information for laser source 7 symbols 6 Sample Session 50 Watts 72 Slot Numbers 36 Wavelength Specifications laser sources 93 Agilent 8163A Lightwave Multimeter, Agilent 8164A Lightwave Measurement System, & Agilent 8166A Lightwave Multichannel System, Fourth Edition...
- Page 295 118 performing a sweep 114 repeat mode 113 stepped 114 sweep parameters 113 Wavelength Zero 128 Zeroing Electrical Offsets 76 Zoom 156 Agilent 8163A Lightwave Multimeter, Agilent 8164A Lightwave Measurement System, & Agilent 8166A Lightwave Multichannel System, Fourth Edition...