Eryone ER-20 User Manual
Hide thumbs
Also See for ER-20:
- Quick starter manual (8 pages) ,
- Quick starter manual (2 pages) ,
- Manual (2 pages)
Advertisement
Advertisement
Table of Contents

Related Manuals for Eryone ER-20


Summary of Contents for Eryone ER-20
-
Page 2: Quick Assembly
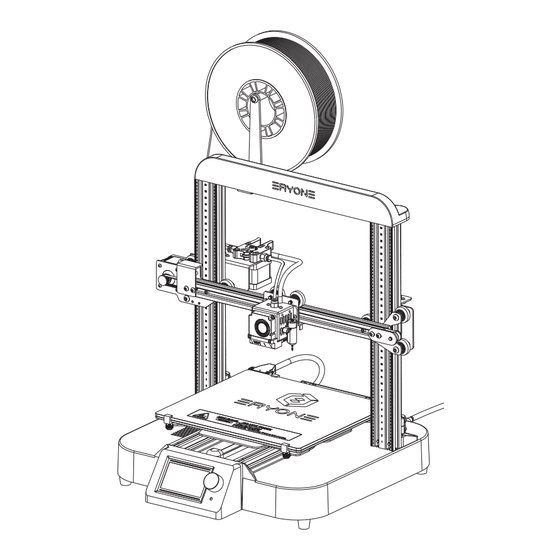
Quick Assembly-Overview ③ ④ ⑤ ① ② ⑦ ⑥ ⑨ ⑧ ① Base frame ⑦ SD card slot ② Printing surface ⑧ Power switch ③ Extruder ⑨ Power cable port ④ Gantry frame ⑩ LCD screen ⑤ Ery Sensor ⑪ USB cable port ⑥... - Page 3 Prepare ① ② ③ ④ ① Base frame half assembly ② Gantry frame half assembly ③ Lead screw ④ All-in-one toolkit pack Assembly Steps We have prepared “ER20 Assembly Guide” of the video for you, it is saved in the SD card in the printer. Please open “ER20 Assembly Guide Video” folder for reference.
-
Page 4: Calibration And Print
Auto leveling The ER-20 3D printer firmware turns on the automatic leveling function by default. The sensor Eryone developed enables the machine to automatically level. We can Level the printer easily by calibrating. -
Page 5: Table Of Contents
Table of Content Quick Assembly Calibration And Print Safety Information Printer Specifications Packaging Screen Menu Introduction Driver Installation And Software Slicing Firmware Update Trouble shooting And Printer Maintenance... -
Page 6: Safety Information
Make sure the printer power is turned off before installing or removing ● printer component. Keep this manual is for future reference ● Eryone company reserves the right of final interpretation. ●... -
Page 7: Printer Specifications
Printer Specifications Printer and its parameters Molding Technology 250x220x200mm Printing Size 0.05mm Printing Precision X/Y/Z axis positioning precision 12.5μm/12.5μm/2.5μm 1.75mm Filament diameter Nozzle diameter 0.4mm Recommended printing speed 40-70mm/s PLA, PETG,TPU,etc Filament 49dB Average noise Software Parameters File Format .STL, .OBJ, .ADE, .AMF Files GCODE Operation system... -
Page 8: Packaging
Packaging Please check the packaging list of your printer. It should contain the following: □ Printer □ All-in-one toolkit pack: □ Install screw □ SD card+knob+USB Cable □ Filament holder □ Tool kit □ Extra gift □ Spare screws □ Printer user manual □... -
Page 9: Screen Menu Introduction
Since the firmware of the printer may be updated in the future, the menu may not be consistent with the actual screen display, please refer to the actual menu and refer to the latest version of the manual. Please go to Eryone's website to download the latest version of the manual: www.eryone.com... - Page 10 LCD layout □Motion □Move Axis □Move X □Move 10mm □Move 1mm □Move 0.1mm □Move Y □Move 10mm □Move 1mm □Move 0.1mm □Move Z □Move 10mm □Move 1mm □Move 0.1mm □Move 0.025mm □Extruder □Move 10mm □Move 1mm □Move 0.1mm □Auto Home □Level Bed □Bed leveling: On □Fade Height:...
- Page 11 □Preheat ABS □Preheat ABS □Preheat ABS End □Preheat ABS Bed □Cooldown □Configuration □Advanced Settings □Set Home offsets □Velocity □Vmax X □Vmax Y □Vmax Z □Vmax E □Vmax Min □VTrav Min □Acceleration □Accel □A-Retract □A-Travel □Amax X □Amax Y □Amax Z □Amax E □Jerk □Probe offsets...
- Page 12 □TMC Drivers □Driver Current □Sensorless Homing □Stepping Mode □Temperature □Autotemp □Min □Max □Fact □Filament □E in mm3 □Unload mm □Load mm □Initialize EEPROM □Probe Z offset □Calibrate Z □BLTouch □Outage Recovery □Preheat PLA Conf □Preheat ABS Conf □Store Settings □Load Settings □Restore Defaults □Change Filament □Preheat PLA...
- Page 13 ■ Motion: Motion Menu Printer motion parts control menu to move every axis. □ Move axis: Move each axis □ Move X: 3 type of mode,10mm/1mm/0.1mm □ Move X: 3 type of mode,10mm/1mm/0.1mm □ Move Z: 4 type of mode,10mm/1mm/0.1mm/0.025mm □...
- Page 14 □ Preheat ABS: Preheat menu. Preheat the nozzle, heated bed, or both. When using this feature, the heating component will enter the heating state according to the ABS preheating parameters preset in the firmware. ■ Configuration: This menu is the most complicated part of the LCD menu. It is recommended that you do not change any parameters in this menu if you are unclear.
- Page 15 □ Probe offsets: Auto Leveling sensor offset setting □ Probe X offs: Auto Leveling sensor X axis offset setting □ Probe Y offs: Auto Leveling sensor Y axis offset setting □ Probe Z offs: Auto Leveling sensor Z axis offset setting □...
- Page 16 □ Temperature: This option is related to the automatic temperature adjustment function setting □ Autotemp: Whether to turn on automatic temperature adjustment (off by default) □ Min: Minimum value of automatic temperature adjustment □ Max: Maximum value of automatic temperature adjustment □...
- Page 17 □ Board info: Printer motherboard information □ Thermistors: Printer thermistors information ■ Change the Media: Replace the printed SD card (This option is not available on The ER-20) ■ Change the Media: Select the slice file from the SD card...
-
Page 18: Driver Installation And Software Slicing
Install the driver and slicing First we need to install our driver on our computer. If your system is WIN10, you can enter the device driver management → update the driver, so that the driver will be installed automatically 1. You can import the driver for this printer from the SD card surface, located in: /USB Driver/ . - Page 19 1) You can find the slicing software default parameters from the SD card, Located in the root directory /ER-20 Cura Profiles/, (if you don't know how to import slice parameters, there is a video on the SD card that comes with the machine for reference) 2) Visit this link to get the latest slicing software profiles...
- Page 20 Set basic printer parameters Set print header basic parameters...
- Page 21 Import default parameters of PLA Import default parameters of PLA...
- Page 22 3D models: You can refer to these websites to get free or paid models (Eryone does not charge any fee, but the paid model is set by the model-maker). www.thingiverse.com or www.myminifactory.com Position adjustment After importing the STL file, you need to adjust the model.
- Page 23 Now you can click the slice icon and save it to the SD card. Insert the SD card into the printer and choose print code To learn more about model slicings , please visit our website: www.eryone.com Follow our professional engineers to play with 3D model slicings!
-
Page 24: Firmware Update
Add new features, etc. (Update the firmware can effectively improve the user experience, this is our commitment), you can visit https://www.eryone.com/forum to get the latest firmware Preparation: 1. Laptop /PC (The printer driver has been installed,If you have not installed it, please refer to the Driver Installation section.) - Page 25 Select firmware and flash Flash completed...
- Page 26 3. Refresh the EEPROM of the printer, restart, and complete the update! Open Cura, find the Monitor menu and enter Gcode "M502" to refresh the data M502 Enter Gcode "M500" to save the data and remove the cable M500...
-
Page 27: Trouble Shooting And Printer Maintenance
Trouble shooting and printer maintenance This section lists just a few common solutions to the problem.If your printer has a problem not in the list, please visit the Eryone company official forum: https://www.eryone.com/forum ■ Print layer shift usually caused by the step loss of the stepping motor, which may be caused by the following circumstances: 1. - Page 28 ■ Homing failed Because the ER-20 uses the stattguard function(senserless homing) of TMC2209.When we find that it can't home correctly, we just need to lower its key parameter: the sensitivity value. The default value for X/Y is 70/90, which you can adjust by LCD button ■...
- Page 29 How to contact us If you have any questions during the installation process, please contact us for technical support: Mail: technical@eryone.com Facebook: https://www.facebook.com/groups/247271792709370 Whatsapp: +86 18138406906 +1 (803) 336-5110 Check out our youtube channel for more information about the printer video:...
Need help?
Do you have a question about the ER-20 and is the answer not in the manual?
Questions and answers