Table of Contents
Advertisement
Available languages
Available languages
Quick Links
1. Introduction & Features
To all residents of the European Union
Important environmental information about this product
This symbol on the device or the package indicates that disposal of the device after its lifecycle could harm
the environment.
Do not dispose of the unit (or batteries) as unsorted municipal waste; it should be taken to a specialised
company for recycling.
This device should be returned to your distributor or to a local recycling service.
Respect the local environmental rules.
If in doubt, contact your local waste disposal authorities.
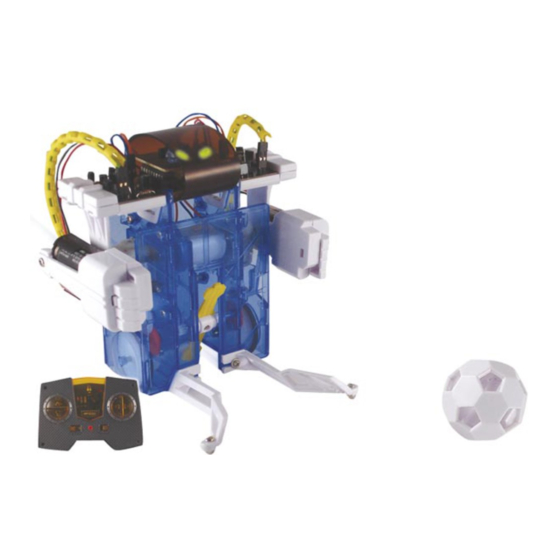
Thank you for buying the KSR9! Please read the manual thoroughly before bringing this device into service. If the
device was damaged in transit, don't install or use it and contact your dealer.
The KSR9 requires 2 x 1.5V AA batteries (not incl.) and 1 x 9V battery (not incl.); the remote control requires 4 x
1.5V AA batteries (not incl.). Apart from the batteries, you will also need a pair of long-nose pliers, a diagonal cutter
and a screwdriver.
2. Remote Control
a. Introduction
This is a 4-channel IR remote control used to control one KSR9. Line up to 4 KSR9's by choosing a different channel
for each Botball.
b. Parts List
P1 Battery terminal #1 x 2
P4 Tapping screw (2.3 x 7mm) x 4
P5 Tapping screw (2.6 x 7mm) x 4
KSR9
KSR9 – "BOTBALL" KIT
P2 Battery terminal #2 x 2
P6 Finished PCB
- 1 -
P3 Battery terminal #3 x 2
VELLEMAN
Advertisement
Table of Contents

Related Manuals for Velleman Botball Kit KSR9


Summary of Contents for Velleman Botball Kit KSR9
- Page 1 P1 Battery terminal #1 x 2 P2 Battery terminal #2 x 2 P3 Battery terminal #3 x 2 P4 Tapping screw (2.3 x 7mm) x 4 P6 Finished PCB P5 Tapping screw (2.6 x 7mm) x 4 KSR9 - 1 - VELLEMAN...
- Page 2 Assembly 3. The Botball a. Introduction Control the Botball by means of the remote control. Select a different channel for each Botball (max. 4 Botballs) when playing against each other. KSR9 - 2 - VELLEMAN...
- Page 3 12mm) x 3 7mm) x 17 Machine screw (2 Sponge x 1 Buzzer x 1 Battery holder x 1 x 5mm) x 2 Battery snap x 1 Eyelet x 2 Finished PCB Housing x 2 KSR9 - 3 - VELLEMAN...
- Page 4 Assembly KSR9 - 4 - VELLEMAN...
- Page 5 KSR9 - 5 - VELLEMAN...
- Page 6 Next, cut out the cardboard shapes and decorate the front and back of the shirt. Dress your Botball according to the drawing below. Save the cut-out shapes in case you want to make other shirts. Fig. 1 KSR9 - 6 - VELLEMAN...
-
Page 7: Wiring Diagram
5. Wiring Diagram Fig. 2 – Remote control Fig. 3 - Botball KSR9 - 7 - VELLEMAN... - Page 8 Gooi dit toestel (en eventuele batterijen) niet bij het gewone huishoudelijke afval; het moet bij een gespecialiseerd bedrijf terechtkomen voor recyclage. U moet dit toestel naar uw verdeler of naar een lokaal recyclagepunt brengen. Respecteer de plaatselijke milieuwetgeving. Hebt u vragen, contacteer dan de plaatselijke autoriteiten inzake verwijdering. KSR9 - 8 - VELLEMAN...
- Page 9 Knip vervolgens de vormen uit het karton en versier beide kanten van het shirt. Kleed uw Botball volgens figuur 1 op blz. 6. Bewaar de vormen om later meer shirts te kunnen maken. KSR9 - 9 - VELLEMAN...
-
Page 10: Problemen En Oplossingen
• Ga na of de bedrading van M1, M2 en M3 niet omgekeerd is aangesloten wanneer uw Botball niet op de instructies antwoordt. • Controleer de bedrading van BZ wanneer de Botball geen geluid maakt. De informatie in deze handleiding kan te allen tijde worden gewijzigd zonder voorafgaande kennisgeving. KSR9 - 10 - VELLEMAN... - Page 11 Assemblage (voir ill. à la page 2) 3. Le char d’assaut a. Introduction Manœuvrez votre Botball à l’aide de la télécommande. Choisissez un canal pour chaque Botball (max. 4 robots) si vous désirez vous opposer à d’autres joueurs. KSR9 - 11 - VELLEMAN...
-
Page 12: Opération
Il est conseillé de choisir le canal séparément lors d’une partie de jeu avec plus de 2 joueurs. 3. Le Botball se déplace à l’aide de 8 mouvements. Consultez l’illustration ci-dessous. Plus vous vous exercerez, plus aisément vous réussirez à manœuvrer le Botball. KSR9 - 12 - VELLEMAN... -
Page 13: Problèmes Et Solutions
AA de 1.5V (no incl.). Salvo las pilas, necesitará unos alicates de punta plana larga, unos alicates de corte en diagonal y un destornillador. 2. El mando a distancia a. Introducción Este mando a distancia 4 canales permite manejar el KSR9. Es posible alinear máx. 4 KSR9 al seleccionar un canal para cada Botball. KSR9 - 13 - VELLEMAN... - Page 14 6. Descripción del mando a distancia (véase fig. 4 en la p. 8) 1. Emisor IR 2. Botón de patada 3. Botones de control 4. Interruptor de alimentación 5. Indicador luminoso de alimentación 6. Selección de canal KSR9 - 14 - VELLEMAN...
-
Page 15: Solución De Problemas
Danke für Ihren Ankauf! Lesen Sie diese Bedienungsanleitung vor der Inbetriebnahme sorgfältig durch. Überprüfen Sie, ob Transportschäden vorliegen. Sollte dies der Fall sein, verwenden Sie das Gerät nicht und wenden Sie sich an Ihren Händler. KSR9 - 15 - VELLEMAN... -
Page 16: Die Fernbedienung
Sie die Konturen auf ein Stück Pappe. Schneiden Sie danach die Formen aus der Pappe und dekorieren Sie die beiden Seiten des Trikots. Kleiden Sie Ihren Botball gemäß Abbildung 1 auf Seite 6 an. Bewahren Sie die Formen auf, sodass Sie später mehr Trikots machen können. KSR9 - 16 - VELLEMAN... -
Page 17: Bedienung
• Wenn der Botball nicht auf die Befehle reagiert, überprüfen Sie, ob die Verkabelung von M1, M2 und M3 nicht umgekehrt ist. • Wenn der Botball keine Geräusche macht, müssen Sie die BZ-Verkabelung überprüfen. Alle Änderungen vorbehalten. KSR9 - 17 - VELLEMAN...
Need help?
Do you have a question about the Botball Kit KSR9 and is the answer not in the manual?
Questions and answers