Table of Contents
Advertisement
Quick Links
Advertisement
Table of Contents

Related Manuals for Accora Configura Advance SC3


Summary of Contents for Accora Configura Advance SC3
- Page 1 Configura Advance Chair Instruction Manual IFU-SC3-001US Rev 02 March 2021...
-
Page 2: Table Of Contents
Ltd unless otherwise stated. As our policy is one of Accora shall not be liable for any injury or continuous improvement, we reserve the right to damage. Please ensure that the manual is modify designs without prior notice. -
Page 3: General Warnings
It is essential to consult Accora in advance if 21. The chair may not be used where there is a you wish to use the chair for any purpose danger of explosion or in the presence of outside the use detailed in this manual. -
Page 4: Means Of Delivery
Any missing parts, faults or damage must be reported Patients using the chair may also have declining immediately to the carrier and Accora in writing. cognitive awareness, with symptoms ranging from mild forgetfulness and poor concentration through 2. Safety instructions to end-stage dementia. -
Page 5: Accessories
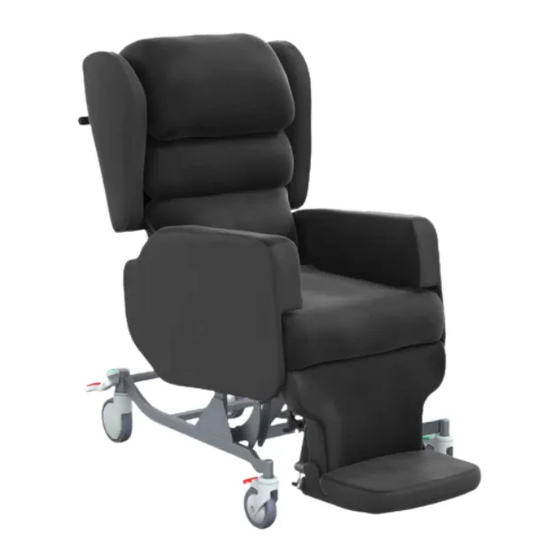
(18-22”), narrow, set of 2 EXTLAT-0-SC1-060 External laterals, set of 2 TRAY-0-SC1-000 Tray For more information, refer to the relevant instruction manual or contact Accora. Forward tilt position setting Key parts of the chair: Seat Leg Rest Foot Plate Right Sidepiece... -
Page 6: Assembly
6. Assembly WARNING Assembly MUST be carried out by suitably trained and qualified personnel. All functions MUST be tested and approved after assembly by suitably trained and qualified personnel. Assembly MUST take place in a clear, uncluttered area and children and pets should be kept away. - Page 7 Figure 4 There is a cover attached to the bottom of the backrest to cover the backrest hinge. To fit this cover, place the first part of the cover (Fig 5, Item Figure 6 1) over the rear part of the hinge protection plate (Fig 5, Item 2), then pull the front part of the cover (Fig 5, Item 3) down over the hinge.
-
Page 8: Chair Adjustment
7. Chair adjustment WARNING Adjustment MUST be carried out by suitably ① trained and qualified personnel. A clinical assessment and risk assessment MUST be carried out by suitably trained and ② qualified personnel before adjustments are Figure 9 made to the chair. Locate the two sidepiece fixing bars into the chair Do not adjust the width, depth or height of frame. - Page 9 Move the sidepiece in and out to make sure that the plungers have locked the sidepiece in position. Tighten the hand screw. 10. Adjust the opposite sidepiece in a similar manner to match the same measurement on both sides. Figure 14 Armrest height adjustment Make sure a patient is not in the chair.
- Page 10 Footplate Height adjustment hand and right-hand side of base frame (Fig 18; Fig 19, Item 3). Make sure a patient is not in the chair. Move the base frame to the new position. Figure Make sure the brakes on all 3 locking castors are 18 shows the relative positions of the chair supports locked on (See section 10).
-
Page 11: Footplate Operation & Adjustment
High seat height position Figure 21 Low seat height position Figure 20 – Actuator mounting Note: After any of these adjustments a functionality check must be carried out (See section 11). Figure 22 – Plunger Open Figure 23 – Plunger Closed 8. -
Page 12: Controls
Adjustments – Changing the Footplate Angle 9. Controls Locate the footplate angle adjustment plunger underneath the footplate (Fig 25, Item 1). WARNING Check for obstructions around, above and below the chair frame and position the chair so that it can operate through the full adjustment range without any possibility of obstruction or entrapment. - Page 13 Forward Tilt – The chair can tilt forwards from 7 degrees normal tilt to 10 degrees of forward tilt with lock bolts removal. Legrest – The legrest can be adjusted between 75 degrees and 160 degrees; see page 5 for a diagram of this.
-
Page 14: Using The Castor Brakes
10. Using the castor brakes The Configura Advance has the following castor system: Front: One green pedal 125mm castor (directional lock) and one red pedal 125mm castor (normal brake). Rear: Two linked pedal brake 150mm castors (pedal marked green and red to show which end to press). Care must be taken to ensure the castor brakes are always locked when the chair is in use, being assembled or dismantled, so that the chair does not... - Page 15 Centrally Braked 150mm Castor Set Two linked pedal brake 150mm castors (pedal marked green and red to show which end to press). The two rear 150mm castors of the chair can be braked at the same time using the foot lever. To lock the central brake, press the rear red part of the foot lever down until the brake locks.
-
Page 16: Functionality Check
Accora cannot be liable for any damage or risk of Check for obstructions around, above and damage if inappropriate cleaning or disinfectant below the chair frame and position the chair agents are used. -
Page 17: Daily Inspection
15. Daily inspection 17. Guarantee Model Configura Advance chair Daily visual inspection is strongly recommended and may be carried out by carer, user or another person. Warranty period 2 years The following checks must be carried out: 18. Disposal 1. Does the chair operate as per its intended purpose without unexpected noise or motion? In the event of the disposal of materials from the chair, 2. -
Page 18: Table Of Symbols
For indoor use only Medical Device in accordance with EU Medical Device Regulation 2017/745. EC Representative 20. Contact details UK and Rest of World Accora Ltd. Accora Inc. Charter House, Barrington Road 9210 Corporate Blvd. Suite 120 Address Orwell, Cambridge... - Page 19 This page intentionally left blank...
- Page 20 IFU-SC3-001US REV 02...
Need help?
Do you have a question about the Configura Advance SC3 and is the answer not in the manual?
Questions and answers