Advertisement
Quick Links
Advertisement

Related Manuals for Wali CM2665XL


Summary of Contents for Wali CM2665XL
- Page 1 support@walielectric.com...
- Page 3 Supplied Parts List Monitor Mount Pole Ceiling Mount Pole Extension Pole Extension Pole D(x1) A(x1) B(x1) C(x2) VESA Plate M8x60 Bolt M8x55 Bolt Wrench E(x1) F(x6) G(x2) H(x8) I(x1) Allen Key Marking Center Finder M4x14 Bolt M5x14 Bolt M6x14 Bolt J(x1) K(x1) M-A(x4)
- Page 4 Step 1 Option A Wood Joist Ceiling If you install this product on wood stud wall, mark the position with provided Marking Center Finder and pencil on the wall.Drill 3/16"(4.5mm) diameter x 2.2"(55mm) length hole at the marked position, attach the Ceiling Mount Pole to wall and tighten using 4pcs Bolt &...
- Page 5 Step 1 Option B Concrete Ceiling If you install this product on concrete wall,mark the position with provided Marking Center Finder and pencil on the wall.Drill 1/2"(12mm) diameter x 1.8"(45mm) length hole at the marked position,attach the Ceiling Mount Pole to wall and tighten using 4pcs Concrete Anchor with provided Wrench .
- Page 6 Step 2 Guide the cable through the opening cable slot on Ceiling Mount Pole , attach the Extension Pole ,2 pcs Extension Pole and Extension Pole one by one and tighten using 6pcs M8x60 Bolt & Nut on the top three joint connection with provided Allen Key and Wrench as image shown, tighten the bottom joint...
- Page 7 Step 3 Step 3.1 Step 3.2a Select M4x14 Bolt or M5x14 Bolt according to your TV/Monitor,bolt VESA Plate together with D5 Washer into the mouting holes on the back of TV/Monitor, tighten with screwdriver; If select M6x14 Bolt or M8x20 Bolt according to your TV/Monitor, bolt VESA Plate together with D8 Washer...
- Page 8 Step 3 Step 3.2b Bolt VESA Plate using M8x20 Bolt , D8 Washer together with Spacer into the mounting holes on the back of TV/Monitor with screwdriver to tighten. (Screwdriver needed but not included) Step 3.2c Bolt Adapter onto the VESA Plate using Bolt and Nut with provided Wrench...
- Page 9 Step 3 Step 3.2c Four bolt methods available for multiple TV/Monitor specification. 1) Bolt M6x30 Bolt or M8x30 Bolt together with D8 Washer ,Spacer ,Spacer with screwdriver to tighten; 2) Bolt M6x30 Bolt or M8x30 Bolt together with D8 Washer ,Spacer with screwdriver to tighten;...
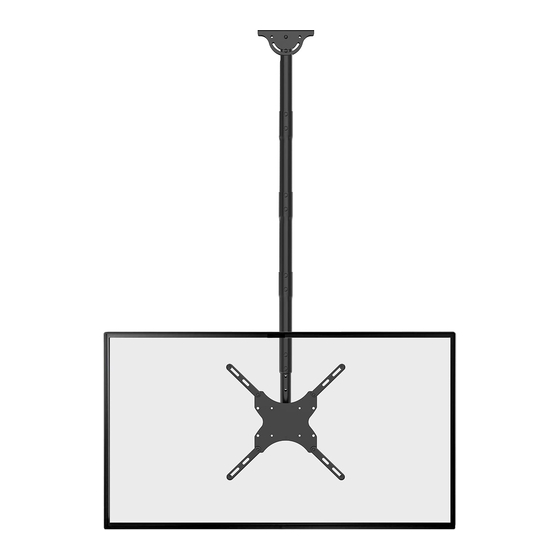
- Page 10 Step 5 Hang the assembled TV/Monitor onto the assembled Monitor Mount Pole , twist clockwise to tighten the three nuts on the VESA Plate for stability as image shown.
- Page 11 Step 6 Use provided Allen Key to loosen the nut on the back of Monitor Mount Pole as image shown to left/right swivel 360° of the TV/Monitor; Use provided Wrench to loosen the bottom nut on the side of Monitor Mount Pole image shown to tilt down 25°;...
- Page 12 We support the technology that brings your home to life. We offer high quality products, professional customer service, and extensive technical support. If you have any questions,please contact us. support@walielectric.com 1-844-SATTLER (18447288537)
Need help?
Do you have a question about the CM2665XL and is the answer not in the manual?
Questions and answers