Table of Contents
Advertisement
Available languages
Available languages
Quick Links
Advertisement
Chapters
Table of Contents

Related Manuals for CORBERO CCIM3000FZ


Summary of Contents for CORBERO CCIM3000FZ
- Page 1 Instruction Manual CCIM3000FZ PLACA INDUCCIÓN FLEX ZONE CCIM3000FZ...
-
Page 3: Table Of Contents
Í ndice 1. Introducció n ................... 4 1.1 Advertencias de seguridad ............4 1.2 Instalació n ................. 4 1.2.1 Riesgo de descarga elé ctrica ........... 4 1.2.2 Riesgo de cortes ............4 1.2.3 Instrucciones relevantes en materia de seguridad ....4 1.3 Uso y mantenimiento .............. - Page 4 9.5 Ajuste de la posició n del soporte ..........28 9.6 Avisos ..................29 9.7 Conexió n de la hornilla con la red de suministro elé ctrico ....29...
-
Page 5: Introducció N
1. Introducció n 1.1 Advertencias de seguridad Nos preocupa su seguridad. Por tanto, le rogamos que lea esta informació n antes de usar su hornilla. 1.2 Instalació n 1.2.1 Riesgo de descarga elé ctrica Antes de realizar cualquier trabajo o mantenimiento, desconecte el aparato de la red de suministro elé... - Page 6 El equipo debe ir conectado a un circuito con un interruptor de aislamiento que ofrezca una desconexió n absoluta de la fuente de alimentació n. De no instalar el equipo de la manera adecuada, se podrí a ver invalidado cualquier reclamo por garantí a u obligaciones.
-
Page 7: Uso Y Mantenimiento
Riesgo de incendio: no deje ningú n objeto colocado sobre las superficies de cocció n. ADVERTENCIA: El proceso de cocció n debe ser supervisado. Cualquier proceso de cocció n que sea breve deberá ser supervisado de forma continua. ADVERTENCIA: el aparato y sus partes accesibles se calientan durante el uso. -
Page 8: Riesgo Para La Salud
descarga elé ctrica o incluso la muerte. 1.3.2 Riesgo para la salud Este equipo cumple con los está ndares en materia de seguridad electromagné tica. No obstante, aquellas personas con marcapasos u otros implantes elé ctricos (tales como las bombas de insulina) deberá... - Page 9 ningú n fin de almacenamiento. Nunca deje ningú n objeto ni utensilio sobre el equipo. No coloque ni deje ningú n objeto magnetizable (por ejemplo, tarjeta de cré dito, tarjeta de memoria) ni dispositivo electró nico (por ejemplo, computadora, reproductor MP3) cerca del equipo, ya que aquellos podrí...
-
Page 10: Inducció N Del Producto
limpieza a fin de limpiar su hornilla, puesto que ellos pueden rayar el vidrio de inducció n. Este equipo está pensado para ser utilizado para fines domé sticos y otras aplicaciones similares tales como: - á reas de cocina del personal en tiendas, oficinas y otros ambientes de trabajo;... -
Page 11: Panel De Control
Lea esta guí a y preste especial atenció n a la secció n 'Advertencias de seguridad'. Retire cualquier pelí cula protectora que haya podido quedar sobre su hornilla de inducció n. 2.5 Especificaciones té cnicas Placa de inducció n CCIM3000FZ Zonas de cocció n 4 zonas Tensió n alimentació n 220-240V~ 50Hz o 60Hz Potencia elé... -
Page 12: Uso Del Producto
aviso. 3. Uso del producto 3.1 Controles tá ctiles Los controles responden al tacto, por lo tanto no es necesario ejercer ninguna presió n sobre ellos. Utilice la yema y no la punta del dedo. Cada vez que se registre un toque, usted oirá un pitido. ... -
Page 13: Có Mo Utilizar
Levante siempre la sarté n de la hornilla de inducció n: no la arrastre pues podrí a rayar el vidrio. ó 3.3 C mo utilizar 3.3.1 Comienzo de la cocció n Toque el control ON/OFF durante tres segundos. Una vez haya encendido, el equipo emite un pitido y todas las pantallas muestran "-"... -
Page 14: Finalizació N De La Cocció N
Ello significa que: • usted no ha colocado una sartén en la zona correcta de cocción o, • la sartén que usted emplea no es adecuada para la cocció n por inducció n o, • la sartén es demasiado pequeña o no está centrada apropiadamente sobre la zona de cocción. A menos que haya una sarté... -
Page 15: Zona Flexible
Al tocar el control de Boost , el indicador de zona muestra "P" y la potencia alcanza má xima Cancelació n de la funció n Boost Al tocar el control de selecció n de la zona de calentamiento, indica que desea cancelar la funció n de refuerzo Al tocar el control “Boost”... -
Page 16: Bloqueo De Controles
No recomendamos otras operaciones, excepto las tres operaciones mencionadas anteriormente, ya que podrí a afectar el calentamiento del electrodomé stico Como dos zonas independientes Para utilizar el á rea flexible como dos zonas diferentes, puede tener dos opciones de calentamiento. (a) Coloque un recipiente en el lado derecho hacia arriba o el lado derecho hacia abajo de la zona flexible. -
Page 17: Control Por Temporizador
Para bloquear los controles Toque el control de bloqueo El indicador del temporizador mostrará "Lo" Para desbloquear los controles Toque y mantenga pulsado el control de bloqueo. Cuando la hornilla está en el modo de bloqueo, todos los controles son desactivados, excepto por el ON/OFF para que usted pueda apagar la hornilla de inducció... - Page 18 Cuando se establezca el tiempo, comenzará la cuenta regresiva inmediatamente. La pantalla mostrará el tiempo restante. El timbre sonará durante 30 segundos y el indicador del temporizador mostrará "- -" cuando finalice el tiempo de configuració n. b) Configuració n del temporizador para que apague una zona de cocció...
- Page 19 Cuando expira el temporizador de cocció n, la zona de cocció n correspondiente se apagará automá ticamente. Toda otra zona de cocció n seguirá funcionando normalmente, si se le hubiera encendido previamente. Las imá genes que se muestran arriba son solo para referencia y prevalecerá el producto final.
-
Page 20: Perí Odos Predeterminados De Operació N
3.3.7 Perí odos predeterminados de operació n El apagado automá tico es una funcionalidad que le brinda seguridad y protecció n a su hornilla de inducció n. Apaga el equipo de manera automá tica si usted alguna vez se olvida de apagarlo. Los perí... -
Page 21: Salteado
aproximadamente. Presione el bistec a fin de averiguar qué tan cocido está ; cuanto má s firme se sienta, má s "cocido" está . 5. Deje reposar al bistec en un plato tibio durante unos pocos minutos a fin de que se vuelva má s tierno antes de servirlo. -
Page 22: Cuidado Y Limpieza
6. Cuidado y limpieza ¿ Qué ? ¿ Có mo? ¡ Importante! Toda suciedad 1. Apague y desconecte la hornilla • Cuando se desconecte la hornilla de la depositada a de la electricidad. electricidad, no recibirá ninguna diario sobre el 2. -
Page 23: Trucos Y Consejos
7. Trucos y consejos Problema Posibles motivos Qué hacer La hornilla de inducció n No se recibe corriente. Asegú rese de que la hornilla de no enciende. inducció n esté conectada a la red elé ctrica y encendida. Compruebe si no hay un corte elé... -
Page 24: Notificació N E Inspecció N De Fallos
Las sartenes no La hornilla de inducció n no puede Emplee utensilios de cocina calientan y no aparece detectar la sarté n porque la apropiados para la cocció n por nada en la pantalla. misma no es apropiada para la inducció... - Page 25 --circuito abierto Sensor de temperatura del fallo del IGBT --cortocircuito Espere a que la temperatura del IGBT vuelva a la normalidad. Toque el botó n "ON/OFF" para reiniciar la unidad. Compruebe si el ventilador funciona sin problemas. Alta temperatura de IGBT. En caso contrario, reemplace el ventilador.
-
Page 26: Instalació N
pantalla LED no funciona normalmente. El indicador del modo de Temperatura Puede que la cocció n se enciende, pero demasiado alta de la temperatura ambiente no comienza la cocció n. hornilla. sea demasiado alta. Puede que la entrada de aire o la ventilació n esté... - Page 27 Para la instalació n y el uso, se debe mantener un espacio mí nimo de 5 cm alrededor del orificio. Asegú rese de que el espesor de la superficie de trabajo sea de por lo menos 30 mm. Seleccione un material para la superficie de trabajo que sea resistente al calor y que cuente con aislamiento (la madera y otros materiales fibrosos o higroscó...
-
Page 28: Antes De Instalar La Hornilla, Asegú Rese De Que
Asegú rese siempre de que la hornilla de inducció n cuente con una buena ventilació n y de que tanto la entrada como la salida de aire nunca queden obstruidas. A fin de evitar cualquier contacto accidental con el fondo de la hornilla cuando el mismo esté muy caliente, así como cualquier descarga elé... -
Page 29: Tras Instalar La Hornilla, Asegú Rese De Que
instalada. • Consultar con las autoridades -así como todos los estatutos- locales en materia de construcció n en caso de duda acerca de la instalació n. • Utilizar acabados resistentes al calor y fá ciles de limpiar (tales como azulejos de cerá mica) en la superficie de las paredes de alrededor de la hornilla. - Page 30 Hornilla Mesa Soporte Bajo ninguna circunstancia podrá n los soportes entrar en contacto con las superficies internas de la hornilla tras la instalació n (vea la ilustració n). 9.6 Avisos 1. La hornilla de inducció n deberá ser instalada por un té cnico o bien por personal calificado. Contamos con profesionales a su servicio.
- Page 31 La fuente de alimentació n debe ser conectada en cumplimiento del está ndar pertinente, o bien con un disyuntor unipolar. El mé todo de conexió n es segú n se ilustra a continuació n. Amarillo/Verde Negro Marrón Azul N2 1 Si la cantidad total de unidades de cocció...
- Page 32 La parte inferior y el cable de alimentació n de la hornilla no quedará n accesibles tras la instalació n. Este sí mbolo en el producto, o en su empaque, indica que este producto no puede ser tratado como desperdicio domé stico. En su lugar, debe llevarse al punto de recogida de residuos apropiado para el reciclaje de equipos elé...
- Page 33 Content 1. Foreword ..................4 1.1 Safety Warnings ................. 4 1.2 Installation ................4 1.2.1 Electrical Shock Hazard ..........4 1.2.2 Cut Hazard ..............4 1.2.3 Important safety instructions .......... 4 1.3 Operation and maintenance ............6 1.3.1 Electrical Shock Hazard ..........6 1.3.2 Health Hazard ..............
- Page 34 9.5 Adjusting the bracket position ............. 25 9.6 Cautions ................... 26 9.7 Connecting the hob to the mains power supply ......26...
-
Page 35: Foreword
1. Foreword 1.1 Safety Warnings Your safety is important to us. Please read this information before using your cooktop. 1.2 Installation 1.2.1 Electrical Shock Hazard Disconnect the appliance from the mains electricity supply before carrying out any work or maintenance on it. ... - Page 36 Failure to install the appliance correctly could invalidate any warranty or liability claims. This appliance is not intended for use by persons(including children) with reduced physical, sensory or mental capabilities, or lack of experience and knowledge, unless they have been given supervision or instruction concerning use of the appliance by a person responsible for their safety.
-
Page 37: Operation And Maintenance
WARNING: Unattended cooking on a hob with fat or oil can be dangerous and may result in a fire. WARNING: The appliance and its accessible parts become hot during use. Care should be taken to avoid touching heating elements. Children less than 8 years of age shall be kept away unless continuously supervised. -
Page 38: Hot Surface Hazard
with their doctor or implant manufacturer before using this appliance to make sure that their implants will not be affected by the electromagnetic field. Failure to follow this advice may result in death. 1.3.3 Hot Surface Hazard During use, accessible parts of this appliance will become hot enough to cause burns. - Page 39 stand, or climb on it. Do not store items of interest to children in cabinets above the appliance. Children climbing on the cooktop could be seriously injured. Do not leave children alone or unattended in the area where the appliance is in use. ...
-
Page 40: Product Introduction
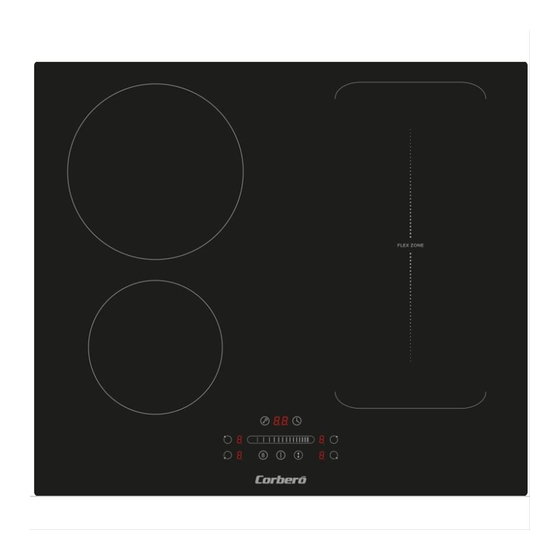
2. Product Introduction 2.1 Top View 1. Max. 1400/1500W zone 160mm 2. Max. 2400/2600W zone 210mm 3. Max. 1800/2000W zone 180mm 4. Max. 1800/2000W zone 180mm 5. Max. 3000/3600W zone 180x386mm 6. Glass plate 7. Control panel 2.2 Control Panel 1. -
Page 41: Before Using Your New Induction Hob
Read this guide, taking special note of the ‘Safety Warnings’ section. Remove any protective film that may still be on your Induction hob. 2.5 Technical Specification Cooking Hob CCIM3000FZ Cooking Zones 4 Zones Supply Voltage 220-240V~ 50Hz or 60Hz... -
Page 42: How To Use
Do not use cookware with jagged edges or a curved base. Make sure that the base of your pan is smooth, sits flat against the glass, and is the same size as the cooking zone. Use pans whose diameter is as large as the graphic of the zone selected. Using a pot a slightly wider energy will be used at its maximum efficiency. -
Page 43: Finish Cooking
Touching the heating zone selection control, and an indicator next to the key will flash Select a heat setting by touching the slider control • If you don’t choose a heat setting within 1 minute, the Induction hob will automatically switch off. You will need to start again at step 1. -
Page 44: Using The Boost Function
3.3.3 Using the Boost function Activate the boost function Touching the heating zone selection control. Touching the boost control , the zone indicator show “P” and the power reach Max. Cancel the Boost function Touching the heating zone selection control that you wish to cancel the boost function Touching the "Boost"... -
Page 45: Locking The Controls
We don’t recommend other operations except for above mentioned three operations because it might effect the heating of appliance As two independent zones To use the flexible area as two different zones, you can have two choices of heating. (a) Put a pan on the right up side or the right down side of the flexible zone. (b)Put two pans on both sides of the flexible zone. -
Page 46: Timer Control
To unlock the controls Touch and hold the lock control for a while. When the hob is in the lock mode, all the controls are disable except the ON/OFF you can always turn the induction hob off with the ON/OFF control in an emergency, but you shall unlock the hob first in the next operation. - Page 47 Set one zone Touching the heating zone selection control that you want to set the timer for. In short time, touch timer control, the “10” will show in the timer display and the “0” flashes. Set the time by touching the slider control. (e.g. 5) Touch timer control again, the “1”...
-
Page 48: Default Working Times
set more zones: The steps for setting more zones are similar to the steps of setting one zone; When you set the time for several cooking zones simultaneously, decimal dots of the relevant cooking zones are on. The minute display shows the min. timer. The dot of the corresponding zone flashes. The shown as below: (set to 15 minutes) (set to 45 minutes) -
Page 49: Cooking Tips
4.1 Cooking Tips When food comes to the boil, reduce the temperature setting. Using a lid will reduce cooking times and save energy by retaining the heat. Minimize the amount of liquid or fat to reduce cooking times. ... -
Page 50: Heat Settings
5. Heat Settings The settings below are guidelines only. The exact setting will depend on several factors, including your cookware and the amount you are cooking. Experiment with the induction hob to find the settings that best suit you. Heat setting Suitability •... -
Page 51: Hints And Tips
Boilovers, melts, Remove these immediately with a • Remove stains left by melts and fish slice, palette knife or razor blade sugary food or spillovers as soon hot sugary spills scraper suitable for Induction glass as possible. If left to cool on the cooktops, but beware of hot cooking glass, they may be difficult to the glass... -
Page 52: Failure Display And Inspection
Some pans make This may be caused by the This is normal for cookware and crackling or clicking construction of your cookware does not indicate a fault. noises. (layers of different metals vibrating differently). The induction hob This is caused by the technology This is normal, but the noise should makes a low humming of induction cooking. - Page 53 Touch “ON/OFF” button to restart unit. Temperature sensor of the IGBT failure --open circuit. Replace the power board. Temperature sensor of the IGBT failure --short circuit Wait for the temperature of IGBT return to normal. High temperature of IGBT. Touch “ON/OFF” button to restart unit. Check whether the fan runs smoothly;...
-
Page 54: Installation
Heating stops suddenly Pan Type is wrong. Use the proper pot Pan detection during operation and the Pot diameter is too (refer to the instruction circuit is damaged, display flashes “u”. manual.) replace the power small. board. Cooker has Unit is overheated. Wait overheated;... - Page 55 L(mm) W(mm) H(mm) D(mm) A(mm) B(mm) X(mm) F(mm) 560+4 490+4 50 min. 3 min. Under any circumstances, make sure the Induction cooker hob is well ventilated and the air inlet and outlet are not blocked. Ensure the induction cooker hob is in good work state. As shown below Note: The safety distance between the hotplate and the cupboard above the hotplate should be at least 760 mm.
-
Page 56: Before Installing The Hob, Make Sure That
Be aware that the glue that join the plastic or wooden material to the furniture, has to resist to temperature not below 150℃, to avoid the unstuck of the paneling. The rear wall, adjacent and surrounding surfaces must therefore be able to ... - Page 57 TABLE BRACKET Under any circumstances, the brackets cannot touch with the inner surfaces of the worktop after installation (see picture) 9.6 Cautions 1. The induction hotplate must be installed by qualified personnel or technicians. We have professionals at your service. Please never conduct the operation by yourself. 2.
- Page 58 3. The power supply cable sections can withstand the load specified on the rating plate. To connect the hob to the mains power supply, do not use adapters, reducers, or branching devices, as they can cause overheating and fire. The power supply cable must not touch any hot parts and must be positioned so that its temperature will not exceed 75˚C at any point.
- Page 59 The bottom surface and the power cord of the hob are not accessible after installation. The symbol on the product, or in its packaging, indicates that this product may not be treated as household wasted, Instead, it should be taken to the appropriate waste collection point for the recycling of electrical and electronic equipment.
- Page 60 CERTIFICADO DE GARANTÍA Imprescindible la presentación de la factura de compra acompañada del presente certi cado de garantía. Riesgos cubiertos. Este aparato está garantizado contra cualquier defecto de funcionamiento, siempre que se destine a uso doméstico, procediéndose a su reparación dentro del plazo de garantía y sólo por la red de SAT autorizados. Excepciones de garantía.
Need help?
Do you have a question about the CCIM3000FZ and is the answer not in the manual?
Questions and answers