Table of Contents
Advertisement
Quick Links
Advertisement
Table of Contents

Related Manuals for Reolink Argus 2E


Summary of Contents for Reolink Argus 2E
- Page 1 August 2020 QSG1_A_EN Reolink Argus 2E Quick Start Guide...
-
Page 2: What's In The Box
Contents What’s in the Box What’s in the Box Camera Introduction Set up the Camera Reolink Argus 2E Micro USB Cable Camera Bracket Magnetic Bracket Mounting Charge the Battery (with Strap) Hole Template Install the Camera Notes on PIR Motion Sensor... -
Page 3: Camera Introduction
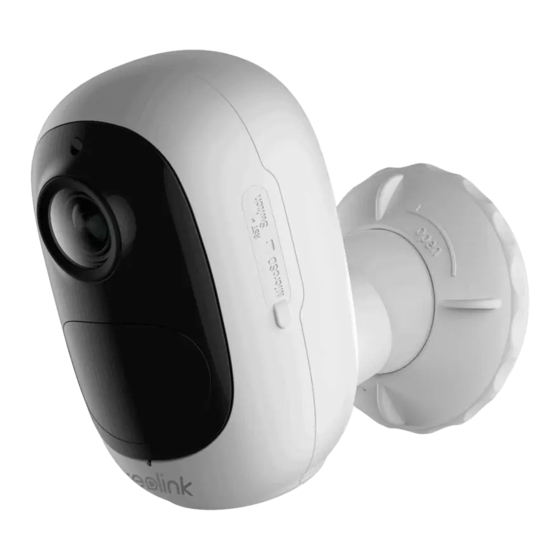
Camera Introduction Set up the Camera Micro USB Port Speaker • On Smartphone 6 Pcs IR LEDs Daylight Sensor Lens Available on the Status LED Built-in PIR Motion Sensor Built-in Mic Outdoor Security Mount Reset Button • On PC Micro SD Card Slot Red Light: WiFi connection Faild Blinking: Standby status Blue Light: WiFi connection succeeded... -
Page 4: Charge The Battery
Charge the Battery Install the Camera • Install the camera 2-3 meters (7-10 ft) above • Charge the battery with a Charge the battery with the NOTE: Mounting Height: 2-3 Meters keep the USB charging port covered with the PIR Detection Distance: 2-10 Meters Charging indicator: NOTE:... - Page 5 Install the Camera Outdoors Screw the camera to Secure the camera by turning the part on the Drill holes in accordance with the mounting hole NOTE: NOTE: Use the drywall anchors included in the English English...
- Page 6 Install the Camera Indoors NOTE: Install the Camera with Loop Strap Thread the loop strap through the slots and most recommended Screw the hook provided in the Hang the wall mount on to the plan to set up the camera Screw the magnetic to the Attach the camera to the wall mount and twist the camera...
- Page 7 Notes on PIR Motion Sensor Important Notes on Reducing Detection Distance of PIR Sensor False Alarms Detection Distance Sensitivity Value (For moving and living objects) 0 - 50 Up to 5 meters (16ft) 51 - 80 Up to 8 meters (26ft) High 81 - 100 Up to 10 meters (33ft)
-
Page 8: Troubleshooting
Important Notes on Rechargeable Battery Usage Troubleshooting • Vary the distance between your cameraand the mobile phone so that the camera Camera Is Not Powering on https://support.reolink.com/hc/en-us/articles/360006991893 Failed to Connect to WiFi During Initial Setup Process Support Failed to Scan QR Code on the Phone •... - Page 9 Conformity interference that may cause undesired operation. minimum distance 20cm between Reolink declares that this device is in the radiator & your body. Any Changes or modifications not expressly approved by PIR Detection & Alerts the party responsible for compliance could void the user's authority to operate the equipment.
- Page 10 Terms and Privacy OPERATING FREQUENCY (the maximum transmitted power) responsibly to promote the sustainable reuse Privacy Policy at Technical Support systems or contact the retailer where the End User License Agreement Limited Warranty This product comes with a 2-year limited ISED Radiation Exposure Statement NOTE: should be installed and operated with...
- Page 11 IC Caution: This device complies with Industry Canada s licence-exempt RSSs. Operation is subject to the following two conditions: (1) This device may not cause interference; and (2) This device must accept any interference, including interference that may cause undesired operation of the device.
Need help?
Do you have a question about the Argus 2E and is the answer not in the manual?
Questions and answers