Table of Contents
Advertisement
Quick Links
Advertisement
Table of Contents

Related Manuals for Vax U86-PC Series


Summary of Contents for Vax U86-PC Series
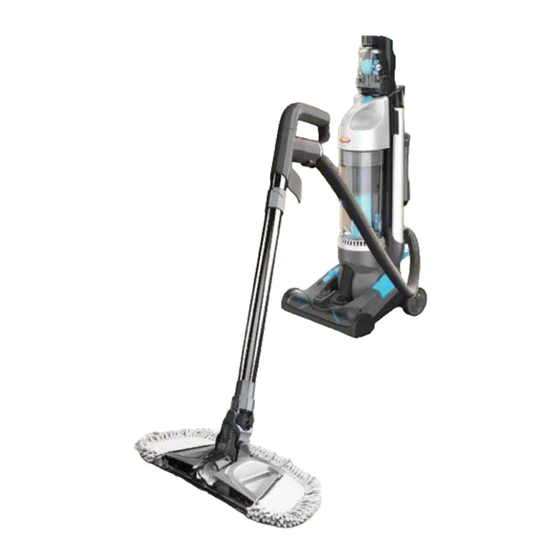
- Page 1 Performance Floor & Dust Let’s get started vax.co.uk U86-PC Series...
-
Page 2: Let's Talk Safety
• Keep fingers, hair and loose clothing from moving parts and openings whilst using the vacuum cleaner • Only Vax recommend tools should be used with this vacuum cleaner Don’ts Don’t use this vacuum cleaner if it has been dropped, damaged Don’t vacuum up any flammable or combustible materials... - Page 3 Calls are charged at the UK local rate. Before you call we’ll need you to have the following information to hand: Your Machine, Your Proof of Purchase or Warranty registration code. Alternatively, you can write to us at: Vax Ltd., Kingswood Road, Hampton Lovett, Droitwich, Worcestershire, WR9 0QH, UK @VaxUK Let us know what you think...
-
Page 4: Table Of Contents
Performance Floor & Dust Contents Pets and Family Included with your machine Let’s talk safety 2 in 1 tool Getting to know your machine Getting started Microfibre Grab Pad Using your machine Pre-motor filter Taking care of your machine Post-motor filter Let’s talk technical What to do if it goes wrong TurboTool... -
Page 5: Getting To Know Your Machine
Belt Kit (Type 1)* 1-1-131393-00 1-1-130669-01 Cord length 8/10m 2 in 1 Tool (Type 3) Pro Cleaning Kit (Type 2) Weight 7.5kg 1-9-132115-00 1-1-133326-00 Turbo Tool (Type 1) 1-1-126261-00 To purchase consumables and accessories, please visit vax.co.uk Subject to technical change without notice. -
Page 6: Getting Started
Getting started PLEASE READ ‘LEt’S tALk SAFEtY’ At tHE BEGINNING BEFORE USE Assembling your upright Insert the back The back panel will Insert the screw into Place the post motor filter panel into the click into place when the back panel near onto the filter housing. -
Page 7: Using Your Machine
Using your machine Before you begin cleaning • Always switch off and unplug the vacuum cleaner before connecting or disconnecting the hose/attachments, or removing and emptying the dirt container • The vacuum cleaner is equipped with a thermal cut-out. If for any reason the vacuum cleaner does overheat the thermostat will automatically turn the vacuum cleaner off. -
Page 8: Taking Care Of Your Machine
Taking care of your machine Emptying and cleaning the dirt container Press dirt container release Hold dirt container over a bin When attaching the dirt container Don’t over fill the button to remove the and unclip the lock on the back onto the vacuum, align the base container to avoid dirt container. - Page 9 Taking care of your machine Cleaning the shroud 40˚C Turn the dirt container lid To gain access to the shroud, Tap the shroud over a bin Wash shroud under running anti-clockwise and lift use the tab on the filter to pull to remove dirt and debris water and leave for a minimum of to remove...
-
Page 10: Let's Talk Technical
Let’s talk technical Removing debris from the brushbar Switch off you vacuum cleaner at the main socket. Using a pair of scissors, WARNING cut any hair or debris free from around the brushbar. Always switch off and unplug the vacuum cleaner from the electrical socket before assembling, opening or emptying the dirt container, or before... - Page 11 Let’s talk technical Changing the belt Remove 9 screws from the Remove the floor plate. bottom of the floorhead. Remove the belt from the spindle Remove the brush bar starting To reassemble, recline the from the right side, opposite the vacuum and lay it on its front.
-
Page 12: What To Do If It Goes Wrong
What to do if it goes wrong Problem Solution • Check the ‘This pack contains’ panel on the box to make sure the part is included with your machine There is an accessory missing? • The plug may not be fully pushed into the electrical socket •... -
Page 13: Getting In Touch
Getting in touch * Calls are charged at the UK local rate. Please make a note of the serial number and model number of the vacuum cleaner before calling. -
Page 14: In 1 Tool
Accessories Don’t forget your accessories! Order at: www.vax.co.uk/spares-and-solutions TurboTool 1-1-126261-00 Use the TurboTool for vacuuming your stairs, upholstery and car interiors. It’s great for picking up stubborn pet hair. 2 in 1 Tool 1-1-132115-00 2-in-1 tool includes crevice tool for awkward areas and corners and a dusting brush for areas such as skirting. - Page 15 Notes...
- Page 16 Version 1.0 EEC Statement of Compliance: Manufacturer/EEC importer: Vax Limited, hereby on our own responsibility, declare that the U87-PC series is manufactured in compliance with the following Directives: Safety: 2006/95/EC Low Voltage Directive. EMC: 2004/108/EC Electromagnetic Compatibility Directive.
Need help?
Do you have a question about the U86-PC Series and is the answer not in the manual?
Questions and answers