Nibe Contura Ci50 Installation Instructions Manual
Wood burning insert
Hide thumbs
Also See for Contura Ci50:
- Operation instructions manual (16 pages) ,
- Service manual (20 pages)
Advertisement
Quick Links
Advertisement

Subscribe to Our Youtube Channel
Related Manuals for Nibe Contura Ci50


Summary of Contents for Nibe Contura Ci50
- Page 1 Installation instructions Ci50 contura.eu...
- Page 2 Efficiency 80,0% Flue gas temperature at nominal output 278°C Flue gas temperature in flue spigot 334°C The undersigned is responsible for the manufacture and conformity with the declared performance. Niklas Gunnarsson, Business area manager NIBE STOVES Markaryd, December 19, 2019...
-
Page 3: Table Of Contents
CONTENTS A warm welcome to Contura. Welcome to the Contura family. We hope you will get a great deal of pleasure from your new insert. Congratulations on your purchase of a Contura insert. You have acquired a reliable quality product with a timeless design and long service life. -
Page 4: Technical Specifications
FACTS Technical General information Hearth plate This manual contains instructions on how To protect the floor in front of the hearth specifications to install the Contura i50. We recommend from falling embers, a non-combustible the insert be installed by a qualified floor covering must be placed at least 300 Model tradesperson to ensure it functions safely... -
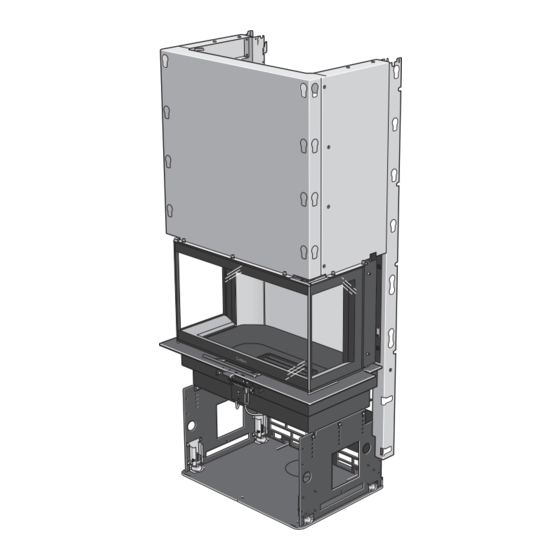
Page 5: Important Dimensions
IMPORTANT DIMENSIONS/PRIOR TO INSTALLATION Important dimensions Ci50 * The insert can be lowered 80 mm (at 16 mm intervals). Prior to installation Opening a side glass panel... - Page 6 PRIOR TO INSTALLATION...
- Page 7 PRIOR TO INSTALLATION 10 mm...
- Page 8 PRIOR TO INSTALLATION Performance check Check the performance of the insert as follows: Use the adjustable feet to level the insert. Check that the door can be opened and closed. Check that the damper knob can be moved back and forth to the max.
- Page 9 PRIOR TO INSTALLATION Heat deflector Install the heat deflector according to separate instructions. Note that Contura’s protective screen is used instead of the heat deflector for all Ci51 installations. For installation in the UK and in smoke control areas Mandatory for smoke control areas The Contura i50 and i51, 8 kW woodburning stoves has been recommended as suitable for use in smoke control areas.
- Page 10 PRIOR TO INSTALLATION Installation of metal ba± e plate...
- Page 11 PRIOR TO INSTALLATION Removing the hearth cladding...
- Page 12 OPTION Installing Powerstone Option...
-
Page 13: Installation
INSTALLATION Installation Make sure that the installation complies with national and regional regulations. The installation must be approved by an authorised inspector. Combustion air supply Supply of combustion must be provided. Combustion air can be drawn directly via a duct from outside, or indirectly via a vent in the outer wall of the room where the stove is placed. -
Page 14: Chimney
CHIMNEY/SELF-CLOSING DOOR Chimney The insert is approved for connection to a chimney designed to Note that sharp bends and horizontal lengths in a flue pipe reduce withstand flue gas temperatures of up to 350°C. The external the draft in the chimney. The maximum horizontal length of flue diameter of the connection sleeve is Ø... -
Page 15: Recessing The Insert
RECESSING THE INSERT Recessing the insert When recessing the insert, adjacent walls that are not classed When connecting a steel flue, please refer to the particular as fire walls or are considered unsuitable for heat loads must manufacturer's installation instructions. Observe the safety be protected by non-combustible material according to the distance to combustible material required by the steel flue Heat specification below. -
Page 16: Recess Example
RECESSING THE INSERT Recess example Unless otherwise stated, these Wall of combustible material are the minimum dimensions. Wall of non-combustible material, made of 100 mm aerated concrete in the recess example. Chimney breast Wall of non-combustible material that is not in contact with combustible material and therefore has no minimum thickness requirement. - Page 17 RECESSING THE INSERT Sealing Avtätning Area out 600 cm Area ut 600 cm Area out 600 cm Area ut 600 cm Area in 600 cm Area in 600 cm Area in 600 cm Area in 600 cm Area out 600 cm Area ut 600 cm Area out 600 cm Area ut 600 cm...
- Page 20 NIBE AB · Box 134 · 285 23 · Markaryd · Sweden contura.eu Contura reserves the right to change dimensions and procedures specified in these instructions without prior 811436 IAV SE-EX Ci50-1 notice. Access the latest version at contura.eu 2021-09-14...
Need help?
Do you have a question about the Contura Ci50 and is the answer not in the manual?
Questions and answers