Table of Contents
Advertisement
Quick Links
Advertisement
Table of Contents

Related Manuals for Rangevision NEO


Summary of Contents for Rangevision NEO
- Page 1 RANGEVISION Setup and calibration...
-
Page 2: Table Of Contents
Contents Contents Introduction Technical specifications System requirements Preparing for work Package contents Installing software and drivers Setting up your computer for work with the scanner Connecting projector Configuring computer parameters Scanner assembly Calibrating the scanner Calibration plate Full calibration Fast calibration (orientation) Automatic calibration... -
Page 3: Introduction
Introduction Thank you for choosing RаngeVisiоn NEO 3D scanner! Please read this manual before using RangeVision 3D scanner. Here are described the procedures for preparing the scanner, installing the required drivers, calibration procedure, scanning procedure, and tips for acquiring high-quality three-dimensional object model. Information may be amended from time to time. These changes will be inserted into the new versions of the manual, or in the additional documents and publications. -
Page 4: Technical Specifications
Technical specifications Model Camera resolution 2 Mpix Diagonal of the matrix 1/3” Texture scanning 300х240х240 mm 3D point accuracy 0.06 mm 3D resolution 0.18 mm Working distance 45 cm System requirements operating system - Windows 7/8/10 64bit, ● processor - Intel Core i3/i5 1.8 GHz and better, ● graphics card with HDMI output, ● RAM - Not less than 8 GB, ● 2 USB-ports. ●... -
Page 5: Preparing For Work
Preparing for work Package contents RangeVision NEO 3D scanner is supplied in a protective hard road case. FOV is represented by calibration plate and stand for the calibration plate, which are used to calibrate the scanner. № Name qty. Scanning module: Mounting structure with projector... -
Page 6: Installing Software And Drivers
Installing software and drivers Get the RаngeVisiоn software (equipped with the scanner) and run the installer RаngeVisiоn SсаnCenter setup. Following the prompts, select the desired language, type and path for installation. After the files have been copied install drivers and graphics libraries, necessary for the correct operation of RangeVision 3D scanner. If you have access to the Internet RangeVision ScanCenter NG will automatically notify you when updates are available. You can check for updates manually by clicking About → Check for Updates... -
Page 7: Setting Up Your Computer For Work With The Scanner
Setting up your computer for work with the scanner For the correct operation of Rаngevisiоn 3D scanner you will need to setup your computer. This procedure is performed once before the first use of the scanner . Connecting projector First, connect the USB to power up the projector and then connect it to the HDMI-port of your video card. After connecting the projector, it should be displayed in the system. If the computer has several video outputs, define the one to be used. 1. -
Page 8: Configuring Computer Parameters
Configuring computer parameters To avoid a recurrence of the problems during the scanner operation, you must turn off the screensaver and sleep mode. to Screen Saver Settings menu and turn off the screen saver, disable turning off the display and putting the computer in sleep mode. -
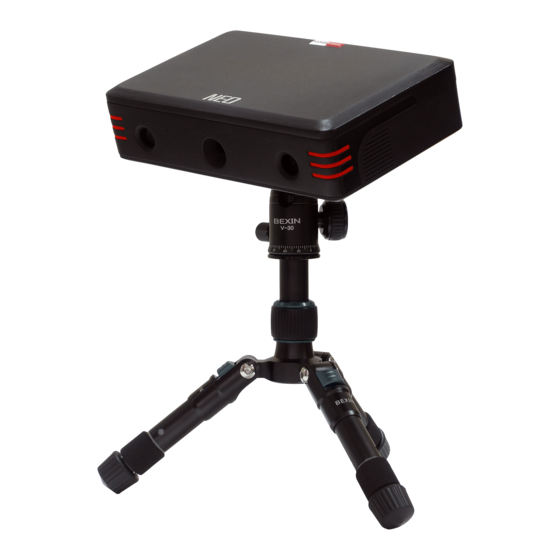
Page 9: Scanner Assembly
Scanner assembly Install the scanning module onto the tripod. Connect USB cable to your PC. Connect HDMI cable to your PC. When using the turntable, connect it to the power source, then connect the USB cable to your PC and turn the table on using the power switch. -
Page 10: Calibrating The Scanner
Calibrating the scanner You need to perform calibration in order to ensure the work of the scanner after the adjustment of lenses. Specifically for this purpose we use the calibration plate, which is pre-measured with high accuracy . Scanning software analyzes the image of the plate, obtained from the cameras and compares it with the mathematical model, marked by the algorithm. There are 3 types of calibration: Full calibration, automatic calibration, fast calibration (orientation) Calibration of turntable (finding the table axis). Full and automatic calibrations are used: before work with the scanner, ● after transporting the scanner. -
Page 11: Full Calibration
Full calibration The full calibration dialogue can be accessed from Calibration → Calibrate menu. Calibration procedure: In the drop-down list choose the correct calibration plate size, specified on the back side of the plate, or add a new one. It is possible that camera images in the software will be swapped or flipped from the start. - Page 12 2. In accordance with the text prompt and symbol image install the calibration plate in the desired position. The brightness of the images of calibration plate can be adjusted with exposure slider. You should not allow very dark images or images with excessive brightness areas. Press the Capture button. Original plate position - the position at the working distance from the scanner (marking on the view from cameras matches the markers on the plate), the cross is projected on the central marker.
-
Page 13: Fast Calibration (Orientation)
After all the necessary snapshots are taken, wait for the result of calibration procedure. From now on the resulting accuracy of calibration will be specified on the home screen in pixels. A good result is accuracy no worse (not higher) than 0.2 pix. If you get a higher result, repeat the calibration, carefully checking the plates position and brightness. If is is necessary, repeat calibration without blue light and filters. -
Page 14: Automatic Calibration
The orientation can be started from the Calibration window on the Start screen. ● place the calibration plate at the working distance to the scanner (the first calibration position), ● press the Capture button, next, following the steps, make two more ● shots. after this the accuracy of orientation will be ● shown. It should be approximately equal to the accuracy value of the last calibration. If the accuracy during orienting starts to be very different from the original one, you need to re-calibrate the equipment. - Page 15 Waste Electrical and Electronic Equipment Directive 2002/96/EC (WEEE). The mark indicates the requirement NOT to dispose the equipment as unsorted municipal waste, but use the return and collection systems according to local law. RangeVision, 2021...
Need help?
Do you have a question about the NEO and is the answer not in the manual?
Questions and answers