Table of Contents
Advertisement
Available languages
Available languages
Advertisement
Table of Contents

Related Manuals for Simplicity SPORT


Summary of Contents for Simplicity SPORT
- Page 1 Owner’s Manual...
-
Page 3: Table Of Contents
Micro Tool Kit and Angle Adapter Maintenance and Care Replacing the Vacuum Bag When to Change the Filter Replacing the Charcoal Filter Problem Solving Guide Troubleshooting Visit Simplicity Vacuums Online How to Contact Your Authorized Retailer Key Replacement Parts For Best Performance Warranty... -
Page 4: Important Safety Instructions
IMPORTANT SAFETY INSTRUCTIONS When using an electrical appliance, basic precautions should always be followed, including the following: READ ALL INSTRUCTIONS BEFORE USING THIS APPLIANCE. IMPORTANT: The manufacturer cannot accept responsibility for damage caused when the appliance is not used according to the instructions, or for uses other than those for which it was intended. -
Page 5: Polarization Instructions
POLARIZATION INSTRUCTIONS Power Cord, 2-Wire Polarized Cord To reduce the risk of electric shock, this product is equipped with a polarized alternating current line plug (a plug having one blade wider than the other). This plug will fit into the power outlet only one way. This is a safety feature. If you are unable to insert the plug fully into the outlet, try reversing the plug. -
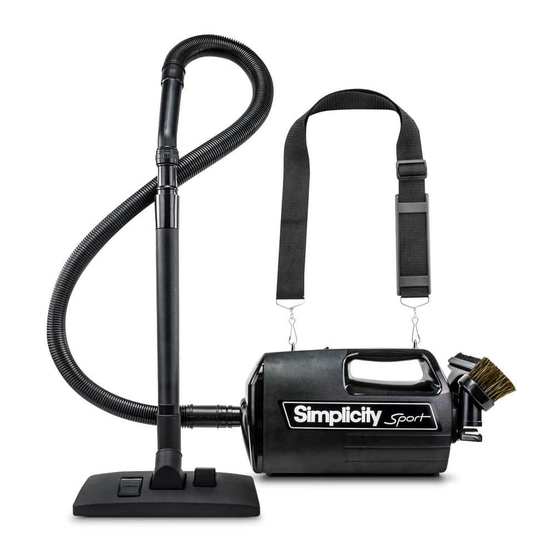
Page 6: Description Of The Vacuum
DESCRIPTION OF THE VACUUM... - Page 7 DESCRIPTION OF THE VACUUM Carrying Handle Crevice Tool Deluxe Dusting Brush Shoulder Strap Upholstery Tool Bag Compartment Cover and Retaining Latch Suction Intake Port Suction Relief Ring Hose Assembly Cleaning Tools Holder Blower Exhaust Port Main On/Off Power Switch Extension Wands Rug/Floor Tool Micro Tool Kit Adjustable Angle Adapter...
-
Page 8: Operation
OPERATION Turning the Vacuum On/Off (Fig. 1) • To start the vacuum cleaner, flip the “On/Off” switch located on the handle to the “On” (I) position. • To stop the vacuum cleaner, flip the “On/Off” switch to the “Off” (O) position. •... - Page 9 OPERATION Vacuuming Floors With the cleaning tools and vacuum wands, your vacuum is a comprehensive cleaning system. • Attach the vacuum hose to the suction intake port and twist to lock into place (Fig. 3). • Attach the extension wand(s) to the curved handle end of the hose (Fig.
-
Page 10: Attachment Cleaning
ATTACHMENT CLEANING Cleaning Tools Your vacuum is equipped with a deluxe dusting brush, upholstery tool and crevice tool. • Attach the vacuum hose to the suction intake port and twist to lock into place (Pg. 7, Fig. 3). • Attach the extension wand(s) to Fig. -
Page 11: Adjusting The Suction Power For Tool Cleaning
ATTACHMENT CLEANING Adjusting the Suction Power for Tool Cleaning (Fig. 10) On the hose handle, locate the suction relief ring and turn it to the desired position. This reduces the suction power coming through the hose. Close the suction relief ring when finished to restore full suction power. -
Page 12: Micro Tool Kit And Angle Adapter
ATTACHMENT CLEANING Additional Cleaning Tools The micro tool kit and adjustable angle adapter are standard accessories with your vacuum. Micro Tool Kit (Fig. 13) All the tools needed for cleaning delicate collectibles, computer keyboards or inflating an air mattress. Adjustable Angle Adapter (Fig. 14) Attach the angle adapter onto the end Fig. -
Page 13: Maintenance And Care
MAINTENANCE AND CARE Replacing the Vacuum Bag • Turn the vacuum over. Lift up the cover retaining clip to remove the cover (Fig. 15). • Remove and discard the used bag. • Install a new bag with the arrow on the cardboard pointing to the top of the vacuum (Fig. -
Page 14: When To Change The Filter
MAINTENANCE AND CARE When to Change the Filter At a minimum, it’s recommended to replace the filters once a year or after using 12 vacuum bags, whichever comes first. If someone in your household is sensitive to airborne allergens, it is recommended to change the filter after every six vacuum bags. -
Page 15: Problem Solving Guide
• Vacuum bag not installed • Review bag installation correctly (page 11) Any other service should be performed by an Authorized Simplicity Vacuum Retailer. To locate your nearest Authorized Retailer, visit our website at SimplicityVac.com or call 888-974-6759. Key Replacement Parts •... -
Page 16: Warranty
This warranty covers any defects in material and workmanship in the vacuum. How Long Coverage Lasts: Warranty coverage for the Simplicity Sport vacuum lasts one year. Domestic models used commercially are only guaranteed for 90 days. What is Not Covered: •... - Page 17 Maintenance et entretien Remplacement du sac sous vide Quand changer le filtre Remplacement du filtre à charbon Guide de résolution de problèmes Dépannage Visitez Simplicity Vacuums Online Comment contacter votre revendeur agréé Pièces de rechange clés Pour une meilleure performance Garantie...
- Page 18 CONSIGNES DE SÉCURITÉ IMPORTANTES Lors de l’utilisation d’un appareil électrique, il est toujours important de prendre des mesures de précaution, dont les suivantes : LISEZ TOUTES LES INSTRUCTIONS AVANT D’UTILISER CET APPAREIL IMPORTANT: Le fabricant ne pourra être tenu responsable en cas de dommage provoqué...
- Page 19 CÂBLE POLARISÉ À DEUX CONDUCTEURS CORDON D’ALIMENTATION, CORDON POLARISÉ À 2 FILS Afin de réduire le risque de choc électrique, ce produit est équipé d’une fiche à courant alternatif polarisé (une fiche ayant une broche plus large que l’autre). Cette fiche entre dans la prise uniquement dans un sens.
- Page 20 L’IDENTIFICATION DES PIECES...
- Page 21 L’IDENTIFICATION DES PIECES Poignée de transport Suceur plat Brosse dépoussiérante Bretelles Interrupteur principal Marche/Arrêt Couvercle du compartiment à sac et loquet de rétention. Port d’entrée d’aspiration Cordon d’alimentation / cordon de rangement Anneau de relâchement d’aspiration Tuyau Support d’accessoires de nettoyage Port de ventilation Brosse pour tapisseries/glisse sur brosse L’outil de sol tapis...
- Page 22 OPÉRATION Allumer/éteindre l’aspirateur (Fig. 1) • Pour allumer l’aspirateur, appuyez sur l’interrupteur Allumé/Éteint situé sur la poignée à la position « Marche » (I). • Pour éteindre l’aspirateur, appuyez sur l’interrupteur marche/arrêt à la position « Éteint » (O). • Éteignez l’aspirateur avant de débrancher de la prise électrique.
- Page 23 OPÉRATION Nettoyez les planchers Avec les accessoires de nettoyage et le tube d’aspiration, votre aspirateur constitue un système de nettoyage intégral. • Raccordez le tuyau à l’entrée du port d’aspiration et tournez le loquet en place (Fig. 3) • Raccordez le tube-rallonge au bout de la poignée courbée du tuyau (Fig.
- Page 24 Votre aspirateur est équipé d’une brosse dépoussiérante, d’un accessoire pour tapisserie et d’un suceur plat. D’autres accessoires sont disponibles au centre de service Simplicity. • Raccordez le tuyau au port d’entrée d’aspiration et tournez le loquet en place. Fig. 6 •...
- Page 25 NETTOYAGE DES ACCESSOIRES Régler la puissance d’aspiration selon L’accessoire de nettoyage (Fig. 10) Sur la poignée du tuyau, localisez l’anneau de détente d’aspiration et tournez-le à la position désirée. Cela permet de réduire la puissance d’aspiration du tuyau. Refermez la valve de contrôle de la puissance d’aspiration lorsque vous avez terminé...
- Page 26 NETTOYAGE DES ACCESSOIRES Outils de nettoyage supplémentaires La trousse d’outils de micro et angle ajustable adaptateur sont les accessoires standards de votre aspirateur. Kit outil Micro (Fig. 13) Tous les outils nécessaires pour le nettoyage de vos accessoires de délicates, les claviers d’ordinateurs ou de gonfler un matelas d’air.
- Page 27 MAINTENANCE ET ENTRETIEN Remplacez le sac de l’aspirateur Soulevez la pince de rétention du couvercle pour enlevez le couvercle (Fig. 15). • Retirez et jetez le sac usagé. • Installez un nouveau sac avec la flèche du carton pointant vers le haut de l’aspirateur (Fig.
- Page 28 MAINTENANCE ET ENTRETIEN Quand remplacer les filtres Il est recommandé de remplacer au minimum les filtres une fois par an ou après l’utilisation de 12 sacs. Si l’un des membres de votre foyer est sensible aux allergènes en suspension dans l’air, nous vous conseillons de changer les filtres tous les six sacs d’aspirateur.
- Page 29 (pages 10) installé Tout autre service doit être effectué par un aspirateur Simplicity agréé. Détaillant. Pour localiser votre revendeur agréé le plus proche, visitez notre site Web à SimplicityVac.com ou appelez le 888-974-6759. Pièces de rechange clés •...
- Page 30 Le service de garantie ne peut être obtenu qu’en présentant l’aspirateur à un détaillant Simplicity agréé. Un justificatif d’achat et un numéro de série du produit seront requis avant que le service ne soit rendu. Pour localiser votre centre de service le plus proche, appelez le 888-974-6759 ou visitez SimplicityVac.com.
- Page 32 888-974-6759 1760 Gilsinn Lane Fenton, MO 63026 ©2018 Tacony Corporation...
Need help?
Do you have a question about the SPORT and is the answer not in the manual?
Questions and answers