
Related Manuals for Simplicity S40


Summary of Contents for Simplicity S40
- Page 1 Description of the vacuum S Y N E R G Y (The chances are you’ r e never going to read me) Owner’s Manual Models S40 & S40P www.SimplicityVac.com...
-
Page 3: Table Of Contents
Jammed Brushroll ........................Cleaning the Dirt Sensor Eye ....................Thermal Motor Protection ......................Problem Solving Guide Troubleshooting ........................... Visit Simplicity Vacuums Online ....................How to Contact Your Authorized Retailer ................Key Replacement Parts ......................For Best Performance ........................ Warranty ............................ -
Page 4: Important Safety Instructions
• Do not use without a vacuum bag and/or filters in place. outdoors, or dropped into water, return it to your Authorized Simplicity Retailer for service. • Turn off all controls before unplugging. • Do not pull or carry by the cord, use the •... -
Page 5: Polarization Instructions
PolARIzAtIon InstRUCtIons Power Cord, 2-Wire Polarized Cord To reduce the risk of electric shock, this product is equipped with a polarized alternating current line plug (a plug having one blade wider than the other). This plug will fit into the power outlet only one way. -
Page 6: Description Of The Vacuum
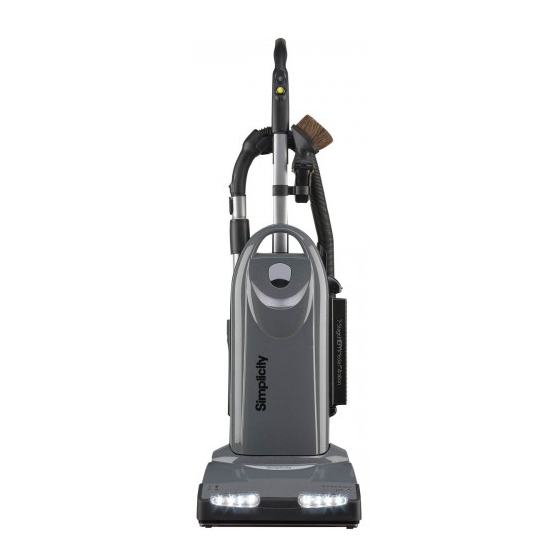
DesCRIPtIon oF tHe VACUUM... - Page 7 DesCRIPtIon oF tHe VACUUM ComfortGrip Handle ™ Main On/Off Power Switch Carpet/Hardwood Floor Switch 40' Power Cord Carrying Handle Bag Compartment Latch (to Replace Vacuum Bag) HEPA Media Filter Vacuum Nozzle Change Filter Indicator Full Bag/Clog Indicator LED Headlamp Furniture Guard Brushroll Jam Indicator Quick Release Cord Hook Deluxe Dusting Brush...
-
Page 8: Assembling The Vacuum
AsseMBlInG tHe VACUUM Attaching the Handle to the Vacuum NOTE: Do not plug in the vacuum until it is completely assembled. The vacuum cleaner and the handle are packed separately and require assembly. • Remove the handle screw located on the back of the vacuum (Fig. -
Page 9: Operation
oPeRAtIon This vacuum is intended for household use only. Reclining the Handle Press the Handle Release Pedal with your foot to recline the handle. Vacuuming Carpet For carpet cleaning, push the On/Off Switch to the “On” position. The Carpet Button will Press illuminate indicating the carpet cleaning setting is on (Fig. -
Page 10: Dirt Sensing Display
oPeRAtIon Dirt Sensing Display (S40P model only) The Premium Synergy is equipped with two amber lights that illuminate the edges of the cleaning path when your vacuum detects that dirt is being picked up by the machine (while in the carpet cleaning mode). -
Page 11: Vacuuming Under Furniture
oPeRAtIon Vacuuming Under Furniture Your vacuum will lay flat on the floor for effective cleaning under beds and tables. • Press the Handle Release Pedal once for normal vacuuming (Fig. 1). • Press the Handle Release Pedal a second time to enable the vacuum to lay flat on the floor (Fig. -
Page 12: Attachment Cleaning
AttACHMent CleAnInG Wand Cleaning Your vacuum is a comprehensive cleaning system equipped with an upholstery tool, dusting brush, crevice tool, telescopic wand and a stretch hose. • Remove the Telescopic Wand from the body of the vacuum by pulling it up and Fig. -
Page 13: Cleaning Tools
AttACHMent CleAnInG Cleaning Tools Your vacuum is equipped with a dusting brush, upholstery tool and crevice tool. • Remove the cleaning wand from the vacuum and turn the Tool Activation Dial to the “Tools On” setting (See page 10). • Attach any of the tools onto the end of the telescopic wand. -
Page 14: Adjusting The Suction Power
AttACHMent CleAnInG Cleaning Tools (continued) Cleaning tools can also be attached to the curved handle for tasks where the wand is not needed. • Disconnect the wand from the curved handle by pressing the Wand Release Button (Fig. 1). Fig. 1 •... -
Page 15: Maintenance And Care
MAIntenAnCe AnD CARe Annual Checkup To keep your vacuum in peak operating condition, it is recommended you bring your vacuum to an Authorized Simplicity Vacuum Retailer for an annual Filter checkup. The Retailer will conduct a comprehensive examination to ensure Full Bag your vacuum is in top operating condition. -
Page 16: Replacing The Vacuum Bag
MAIntenAnCe AnD CARe Replacing the Vacuum Bag NOTE: Unplug the vacuum cleaner from the electrical outlet before changing the bag. • To access the vacuum bag lift the bag compartment latch. • Remove the used vacuum bag by pulling the yellow bag collar tab away from the Fig. -
Page 17: When To Change The Filters
MAIntenAnCe AnD CARe When to Change the Filters The filters on your Synergy vacuum should be replaced after 25 hours of operation. The Synergy is equipped with a filter clock to monitor the actual hours of operation and will Filter illuminate the change filter indicator light on the nozzle of your vacuum when 25 hours of Full Bag... -
Page 18: Replacing The Charcoal Filter
MAIntenAnCe AnD CARe Replacing the Charcoal Filter (S40 model only) • Remove the bag compartment cover and locate the filter on the left side of the bag compartment. • Pull the front tab away from the vacuum to remove the filter holder (Fig. 1). -
Page 19: Replacing The Direct Air Motor Filter
• Return vacuum handle to its upright position. Lifetime Belt Your vacuum belt is covered with a lifetime warranty. Should the vacuum belt break, simply bring your vacuum to your Authorized Simplicity Vacuum Retailer for a free replacement. Fig. 2... -
Page 20: Jammed Brushroll
Brushroll Jam Indicator is still lit, it’s likely the clogged condition is located in the vacuum motor fan. If so, please take your vacuum to an Authorized Simplicity Vacuum Retailer for service. Cleaning the Dirt Sensor Eye (S40P model only) -
Page 21: Thermal Motor Protection
• Inspect the vacuum for a full bag condition or a hose clog and correct the problem. • Locate the Thermal Motor Protection Reset Button on the back of the vacuum. Press the button and resume vacuuming. If problem continues, contact your Authorized Simplicity Vacuum Retailer. -
Page 22: Problem Solving Guide Troubleshooting
Change the vacuum bag once a month or when the full bag light is illuminated to maximize cleaning performance. • Always use genuine Simplicity vacuum bags and replacement parts. Use of other products may result in poor cleaning performance, potential vacuum cleaner damage and may void vacuum warranty. Genuine products are designed for maximum cleaning performance. -
Page 23: Warranty
How Long Coverage Lasts: Warranty coverage for your S40P model lasts seven years. Warranty coverage for your S40 model vacuum lasts six years. Household models used commercially are only warranted for 90 days. - Page 24 oWneR’s WARRAntY InFoRMAtIon keep this for your records… Date of purchase Serial number Model number Purchased from: Store name Address City, State, Zip Telephone...
- Page 25 notes notes...
- Page 26 notes...
- Page 28 www.SimplicityVac.com ©2015 Tacony Corporation B503-8100 6.15...
Need help?
Do you have a question about the S40 and is the answer not in the manual?
Questions and answers