
Related Manuals for WOLFF HIRA-TO


Summary of Contents for WOLFF HIRA-TO
- Page 1 SCISSORS SHARPENING SYSTEM Operators Manual CUSTOMER SERVICE (800) 888-3832 Wolff Industries, Inc. developed and manufactured in the USA by for creating the world’s finest convex edge. 2/18/2019...
-
Page 2: History
History of Wolff Industries, Inc. In 1957 Lee Wolff, Inventor of the Twice As Sharp® started a sewing machine sales and service business. Fabrics and a complete line of sewing needs were added in 1963, and the number of employees grew to 25 to handle the volume. During those years Lee did a great deal of scissors sharpening and repair and made important modifications on the available scissors sharpening equipment. -
Page 3: Table Of Contents
Parts Included with the Hira-To®........26... -
Page 4: Parts Names For The Hira-To
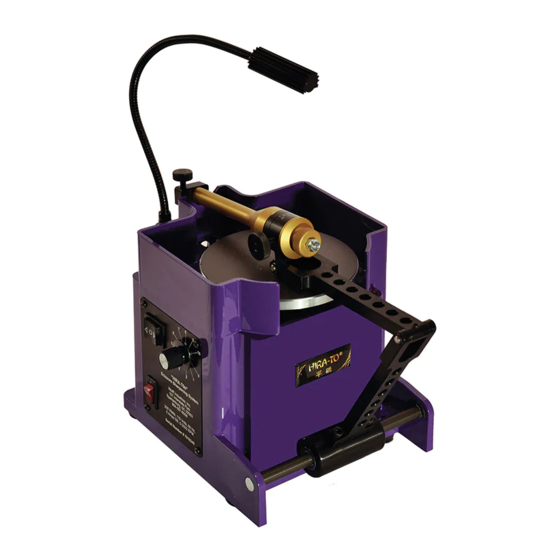
Part Names for the Hira-To ® Convexing Grip Fixture Head Magnetic Head Plate Forward/Reverse Switch Counter Clockwise Indicator Light Speed Control Knob Angle Adjustment On/Off Switch Knob Angle Lock Pivot Arm Knob Arm Shaft Arm Slide Attaching abrasive Disc’s on the metal plates a. -
Page 5: Set Up And Safety
LED will flash. Attaching the Hira-To ® Arm Assembly a. Lay the Arm in front of the Hira-To as pictured b. Attach the arm assembly to the arm slide using the two allen screws and the 3/16” allen wrench. -
Page 6: Analyze The Shear
® Hira-To Sharpening System 1. Analyze the shear A. Check to see if the shear has been sharpened before and that it has been sharpened properly, whether it is a convexed or beveled edged shear. B. Check for knicks visually on the edge. Then slowly close the shear to feel if there are any knicks along the edge as you close. -
Page 7: Setting The Angle For A Right Hand Shears
Setting the Angle for a Right Hand Shear A. Loosen the angle lock knob. B. Turn the angle adjustment knob on the rear of the fixture while applying light counter pressure to the convexing grip until the right hand angle mark (R) is about 42º. C. -
Page 8: Setting The Angle For A Left Hand Shears
Setting the angle for a True Left Hand Shear The blades are reversed on a true left hand shears A. Loosen the angle lock knob. B. Rotate the angle adjustment knob on the rear of the fixure counter-clockwise while applying light pressure to the counter pressure to the convexing grip until the left hand angle mark (L) is at about 42º. -
Page 9: Clamping The Blade
3. Clamping the blade A. Hold the fixture with your left hand as shown. Inside of the blade B. Holding the blade with your thumb insert the blade into the clamp. The inside of the blade should be facing up. Screw hole C. -
Page 10: Matching Your Angle
30 micron disc on the head of the machine. While holding the fixture at the set angle- stop position, set the Hira-To® speed to 2 and turn the machine on so the disc is spinning clockwise. Holding your blade against the 45º... -
Page 11: Machine Controls
5. Machine controls Reverse - counter clockwise Neutarl position Forward - clockwise Speed control Power switch Reverse LED Counter Clockwise True left hand scissors Arm rest position... -
Page 12: Bringing Up The Edge With A 30 Micron Disc
30 micron disc. Note: For true left hand scissors turn motor on counter-clockwise. Set the Hira-To® speed to 5 (50%) and turn the machine on so the disc is spinning clockwise. Lay the blade on the disc and gently rotate the blade back and forth in the fixture while watching for a burr to come up. -
Page 13: Smoothing The Convex Surface With A 15 Micron Disc
30 micron disc, and replace it with a 15. Note: For true left hand scissors turn motor on counter-clockwise. B. Set the Hira-To® speed set to 6 and turn the machine on so the machine is spinning clockwise. -
Page 14: Smoothing The Convex Surface With A 9 Micron Disc
9. Note: For true left hand scissors turn motor on counter-clockwise. B. Set the Hira-To® speed at 8 and turn the machine on so the machine is spinning clockwise. C. Lay the blade on the disc and gently rotate the blade back and forth in the fixture.Be careful to... -
Page 15: Working The Inside Line
9. Working the Inside Ride Line A. Remove the blade from the Hira-To® fixture and set it aside. Wet your Shapton 6,000 grit water-stone and clean and flaten the stone with a DMT W8 water stone sharpener or similar flattening stone as shown. - Page 16 9. Working the Inside Ride Line - continued E. Place the blade on the water-stone at 45º as shown. F. Place your fingers on the blade as shown, With about 10 - 12 lbs of pressure on the screw hole work the blade back and forth until a consistent ride-line is achieved.
-
Page 17: Applying Diamond Paste On New Felt Pad
11A. Applying diamond paste on new felt pad A. Place your felt disc on the head of the Hira-To®. Apply six lines of paste to the disc in a pie shaped pattern. Between the pie wedges apply 2 lines of paste. -
Page 18: Reapplying Diamond Paste On Used Felt Pad
11B. Applying diamond paste on used felt pad A. Place your felt disc on the head of the Hira-To®. Run your finger across the felt disc, do you feel the diamond polishing compound on your finger. If you have compound move to step 12. -
Page 19: Polishing The Blade
Note - if you are sharpening - polishing a true left hand shears start the machine with the head turning in the counter clockwise direction. The red counter clockwise indicator light will be flashing. A. Set the Hira-To® speed at 10 and turn the machine on so the machine is spinning clockwise. - Page 20 Polishing the Blade - continued D. Place your blade on the spinning disc and gently rotate the blade back and forth in the fixture E. Be sure to rotate your fixture to the full stop position on every rotation to ensure proper polishing of the cutting edge.
-
Page 21: Reassembling A Shear
13A. Reassembling a Spring Tension-Clicker Shear **Make sure you keep the shear in the open position while you put it together. A. If your shear has a tension-adjusting assembly, take the threaded stud of the assembly and washer, and place it into the recessed hole in the thumb blade. - Page 22 13B. Reassembling a Split Screw Shear **Make sure you keep the shear in the open position while you put it together. Split screw A. Now that both of your blades have been polished, put your shear back together. B. Make sure the washer is installed on the screw. C.
-
Page 23: Removing The Burr
Removing the Burr A. With the shear in the open position, hold them in your right hand. B. Remove the burr by slowly cutting through a piece of paper towel or a two ply facial tissue. This will help to ease the burrs off of the blades. Balance the Shears A. -
Page 24: Testing The Shears
Testing the Shears A. To test how your shear cuts, take a 2-ply facial tissue and separate it into two separate ply’s. B. Using one ply, hold the facial tissue in front of you with your left hand. With your right hand, close the shear on the single ply of facial tissue all the way to the tip and then pull straight down. -
Page 25: Consumables For The Hira-To
Consumables for the Hira-To® Part Number Description FH-PSA-9 9 micron 3M disc - PSA FH-HL-9 9 micron 3M disc - Hook and Loop FH-PSA-15 15 micron 3M disc - PSA FH-HL-15 15 micron 3M disc - Hook and Loop FH-PSA-30... -
Page 26: Parts Included With The Hira-To
Parts included with the Hira-To® Comes with: • 30 micron discs • Water stone holder • 15 micron discs • Practice shears • 9 micron discs • Shear lube • Metal plates • Training DVD • Deluxe pliers kit • Owner’s manual •... -
Page 27: Notes
NOTES:... -
Page 28: Limited Warranty, Disclaimer, Guarantee
There is no expressed warranty other than limited warranty stated above. There is no im- plied warranty for the merchantability of for fitness for a particular purpose. Wolff Indus- tries, Inc., will not be responsible for any consequential damages. Damages are limited to the replacement of defective parts.
Need help?
Do you have a question about the HIRA-TO and is the answer not in the manual?
Questions and answers