Table of Contents
Advertisement
Quick Links
ALESIS
DEQ830 (ME4)
Service Manual
P/N: 8-31-0117-A
ATTENTION!
THIS DOCUMENT CONTAINS SENSITIVE
PROPRIETARY INFORMATION. ALL
RECIPIENTS MUST HAVE A CURRENT NON-
DISCLOSURE AGREEMENT ON FILE WITH
ALESIS DISTRIBUTION, LLC.
DO NOT DISTRIBUTE THIS DOCUMENT IN
ELECTRONIC FORM
The information in this document contains privileged and confidential information. It is
intended only for the use of those authorized by Alesis. If you are not the authorized,
intended recipient, you are hereby notified that any review, dissemination, distribution or
duplication of this document is strictly prohibited. If you are not authorized, please
contact Alesis and destroy all copies of this document. You may contact Alesis at
support@Alesis.com.
Copyright © 2002 Alesis Distribution, LLC
Confidential
Alesis ME4 Service Manual
8-31-0117-A
Advertisement
Table of Contents

Subscribe to Our Youtube Channel
Related Manuals for Alesis DEQ830


Summary of Contents for Alesis DEQ830
- Page 1 The information in this document contains privileged and confidential information. It is intended only for the use of those authorized by Alesis. If you are not the authorized, intended recipient, you are hereby notified that any review, dissemination, distribution or duplication of this document is strictly prohibited.
- Page 2 Only Service Centers authorized by Alesis in writing are authorized to perform service and repairs covered by an Alesis warranty (if any), and transfer of the Manual to you does not authorize you to be an authorized Service Center. Therefore, if you perform, or if the Manual is used to perform, any service or repairs...
- Page 3 ALL REPAIRS DONE BY ANY ENTITY OTHER THAN AN AUTHORIZED ALESIS SERVICE CENTER SHALL BE SOLELY THE RESPONSIBILITY OF THAT ENTITY, AND ALESIS SHALL HAVE NO LIABILITY TO THAT ENTITY OR TO ANY OTHER PARTY FOR ANY REPAIRS BY THAT ENTITY.
- Page 4 The product is exposed to water or excessive moisture, The AC power supply plug or cord is damaged, d. The product shows an inappropriate change in performance or does not operate normally, or The enclosure of the product has been damaged. Confidential Alesis ME4 Service Manual 8-31-0117-A...
- Page 5 ° Self Test - Alesis products that utilize microprocessor control contain built in test software which exercises many of the units' primary circuit functions. Self test should always be done following any repair to ensure basic functionality.
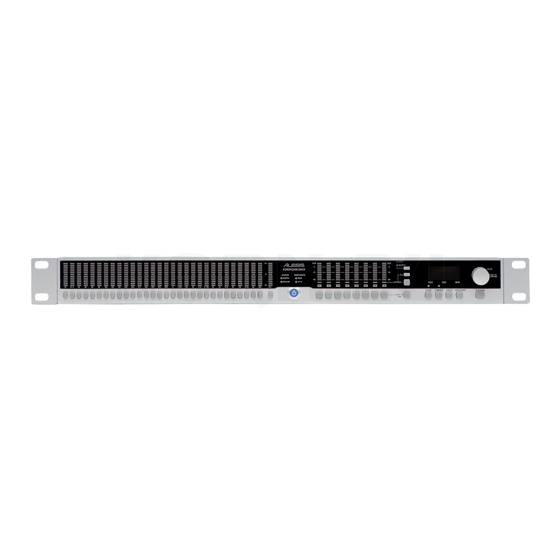
- Page 6 Not all features are labeled, so you may want to reference Maximum Output Level: +19dBu (6.9 Vrms) the diagram of the DEQ830 on page 18 as you read this section. Switch set to –10: Band Select Nominal input level:...
- Page 7 Press [SAVE CURVE] to save a channel’s EQ curve to the ranges passing through the DEQ830. DEQ830’s curve bank so that it can be retrieved at a later time. We’ve provided 100 locations (00-99) in which to save curves. Channel Select Curves 00-49 contain factory presets, and curves 50-99 are blank.
- Page 8 DISASSEMBLY PROCEDURES 1. REMOVAL OF TOP COVER / FRONT PANEL (Fig1) (A) TAKE OUT THE 3PC SCREWS FROM WHICH THE REAR PANEL. (B) TAKE OUT THE 3PC SCREWS FROM WHICH THE TOP PANEL. (C) TAKE OUT THE 3PC SCREWS FROM WHICH THE BOTTOM CHASSIS.
- Page 9 DISASSEMBLY PROCEDURES 3.REMOVAL OF FRONT PAREL P.C.B (Fig.3) (A.) REMOVE THE 3PC OF SUB-PANEL. Fig.3...
- Page 10 WIRING DIAGRAM (US/EU/UK/AUS NZ)
- Page 11 PACKING DIAGRAM (US/EU/UK/AUS NZ)
- Page 12 EXPLODE DIAGRAM (US/EU/UK/AUS NZ) SEQUENCIAL NO OF EXPLODE DIAGRAM WILL BE MARKED ON REF. COLUMM OF BOM LIST...
- Page 13 BOX SHIPPING FREIGHT (5 UNITS PER) 7-51-0138-A MANUAL REFERENCE 7-90-0609 POLYBAG 0.14 7-93-1126 BAG FOAM 7-51-1219 SHEET "WELCOME TO ALESIS FAMILY" 5 x 8" 7-91-1002 GEL SILICA 5G PACKET 7-07-0056-A INSULATOR SHEET 9-15-1099 CAP SWITCH 5 x 5mm 9-15-0323-A KNOB VALUE...
- Page 14 D1~6,8~19,21~32,34~45,47~58,60~71,73~84,86~97,99~110 ,112~123,125~136,138~149,151~162,164~175,177~188,190 ~201,203~214,216~227,229~240,242~253,255~266,268~27 3-20-0010 LED YELLOW 9,281~292,294~305,307~318,320~331,333~344,346~357,35 9~370,372~383,385~396,398~403,409~411,419,422~424,43 2,435~437,445,448~450,458,461~463,471,474~476,484,487 ~489,497,500~502,510 D408,418,421,431,434,444,447,457,460,470,473,483,486,49 3-20-0011 LED RED 6,499,509 4-20-1002 10PIN CONNECTOR CN1,CN2 4-20-0242 HEADER DIL 24-PIN 6-02-0055 SWITCH TACT S1~17,26~49,SS17~25 7-01-0040 RESONATOR 18MHz 9-40-0283 FUNCTION PCB 9-15-0295 FRAME LED 6-COLUMNS x 13 LEDS 9-15-0373-A FRAME LED 2 COLUMN CHANNEL METER 9-15-0372-A...
- Page 15 5-02-0009 HEATSTNK (U5,7) 6-02-0014 SWITCH 9-40-0284 I/O PCB 7-13-0036-A HEATSINK ALUM 23.5mm x 16mm 5-04-0061-A INSULATOR 4.1mm x 18mm PLASTIC SC0308RBZI SCREW SC0308RIZI SCREW 5-01-0029 WASHER 9-79-0296 SENSOR PCB ASSY ME4 3-04-0014 LED DISP 7-SEG D527 6-00-0009 ENCODER 15-DETENT 5-04-0063-A LCD FRAME 9-79-BB01 ASSY BB01 POWER SUPPLY...
- Page 16 Changed analog tests to work at -10dBV nom. Changed analog test label in diagnostics menu. Moved to version 1.00 Peter Maresh Questions or Comments Contact Peter Maresh Design Engineer, Alesis Studio Electronics, Los Angeles pmaresh@alesis.com Taiho Yamada ME4 Project Manager, Alesis Studio Electronics, Los Angeles tyamada@alesis.com...
-
Page 17: Table Of Contents
Contents 1) QC Test Overview............3 1a) Diagnostic Menus............. 4 DIAG..............4 EEPROM..............4 COL..............4 ROW..............4 ALL..............4 MIDI..............4 A..............4 DIG A..............4 RESET..............4 DONE..............4 2) Rear Panel Sub Assembly Test - Digital........ 5 Items Required............ -
Page 18: Qc Test Overview
1) QC Test Overview QC tests are performed at two primary stages, sub-assembly level, and final assembly level. Although several of the procedures are repeated during both stages, the sub-assembly level tests are designed to test all functionality of the electronic sub-assemblies, while the final assembly tests are designed to catch assembly errors. -
Page 19: 1A) Diagnostic Menus
1a) Diagnostic Menus When entering diagnostic mode, pressing PROGRAM will advance to the next test. The test order is as follows: DIAG -> EEPROM -> COL -> ROW -> ALL -> MIDI -> A. -> DIG A. ->RESET -> DONE DIAG Message Informs user “Prepare for tests.”. -
Page 20: Rear Panel Sub Assembly Test - Digital
2) Rear Panel Sub Assembly Test - Digital Items Required 1 ME4 Rear Panel (DUT) 1 Known Good ME4 Front Panel Sub-Assembly (Front Panel) This front panel should have been reset as described in Section 7 “RESET.” 1 Known Good BB01 Power Supply with internal 4-pin power cable 1 IEC power cable 1 ADAT Optical cable 1 24 pin DIL cable for Rear Panel to Front Panel connection. -
Page 21: Power Test
Plug the IEC Power Cable into a power source and BB01. Verify that the front panel LEDs show normal power up message, “DEQ830” on the left side. Verify that the LEDs do not flicker and are of a consistent brightness. -
Page 22: Digital And Midi Test
Section 1b on the Diagnostic Mode. Plug the IEC Power Cable into a power source and BB01. Verify that the front panel LEDs show normal power up message, “DEQ830” on the left side.. After this message “DIAG: <version>” should display on the left side. - Page 23 Rear Panel Sub Assembly Test – DIGITAL CON’T Press PROGRAM. This runs the MIDI test. Verify that the front panel LEDs shows test “MIDI” for 1 second. Verify that display shows “MIDI PASS”. Problems with this inspection indicate that there is a MIDI electrical or cabling problem.
- Page 24 Failure of this test indicates that this sub-assembly cannot continue further testing. Unplug the IEC Power Cable to the BB01 Power Supply. Then unplug all other cabling to the DUT. This is the end of the Rear Panel Sub- Assembly Analog test. Proceed to the Rear Panel Sub-Assembly Digital test.
-
Page 25: Rear Panel Sub Assembly Test - Analog
3) Rear Panel Sub Assembly Test - Analog Items Required 1 ME4 Rear Panel (DUT) 1 Known Good ME4 Front Panel Sub-Assembly (Front Panel) This front panel should have been reset as described in Section 6 “RESET.” 1 Known Good BB01 Power Supply with internal 4-pin power cable 1 IEC power cable 1 Computer with AP test equipment, s1_210k software, and ME4 test procedure installed in directory “C:\ME4\”. -
Page 26: Power Test
Plug the IEC Power Cable into a power source and BB01. Verify that the front panel LEDs show normal power up message, “DEQ830” on the left side. Verify that the LEDs do not flicker and are of a consistent brightness. -
Page 27: Audio Fidelity Test
Section 1b on the Diagnostic Mode. Plug the IEC Power Cable into a power source and BB01. Verify that the front panel LEDs show normal power up message, “DEQ830” on the left side.. After this message “DIAG: <version>” should display on the left side. - Page 28 Rear Panel Sub Assembly Test – ANALOG CON’T Press PROGRAM until unit displays “A.” Verify that the front panel LEDs shows test messages: EEPROM -> COL -> ROW -> ALL -> SWITCH -> MIDI STOP here. IGNORE any messages regarding MIDI, since we are not testing this feature and have not attached the MIDI loopback cable.
-
Page 29: Front Panel Sub Assembly Test
Plug the IEC Power Cable into a power source and BB01. Verify that the front panel LEDs show normal power up message, “DEQ830” on the left side. Verify that the LEDs do not flicker and are of a consistent brightness. -
Page 30: Front Panel Test
Section 1b on the Diagnostic Mode. Plug the IEC Power Cable into a power source and BB01. Verify that the front panel LEDs show normal power up message, “DEQ830” on the left side.. After this message “DIAG: <version>” should display on the left side. - Page 31 Front Panel Sub Assembly Test CON’T Turn VALUE knob clockwise. Repeat for left columns 2 through 30 (LVL). Stop this test when the last column on the left side (label: LVL) is displayed. Verify that the front panel LEDs shows the selected column. Verify that all the LEDs are on, that they have a consistent brightness and that they are not flickering.
- Page 32 Front Panel Sub Assembly Test CON’T Turn VALUE knob clockwise, one position. Verify that INPUT and OUTPUT indicators are on. Verify that the FIRST 7- segment digit is on. Verify that all the LEDs are on, that they have a consistent ightness and that they are not flickering.
- Page 33 Front Panel Sub Assembly Test CON’T Turn VALUE knob clockwise, one position. This is the last column. Verify that PROG, CURVE and DB indicators are on. Verify that the THIRD digit is on. Verify that all the LEDs are on, that they have a consistent ightness and that they are not flickering.
- Page 34 Front Panel Sub Assembly Test CON’T Turn VALUE knob clockwise, one position. Verify that the front panel LEDs shows THIRD row for the left hand side, and that the color is ORANGE. Verify that the front panel LEDs shows SECOND row for the right hand side, and that the color is RED.
- Page 35 Front Panel Sub Assembly Test CON’T Turn VALUE knob clockwise, one position. Verify that the front panel LEDs shows SIXTH row for the left hand side, and that the color is ORANGE. Verify that the front panel LEDs shows FIFTH row for the right hand side, and that the color is GREEN.
- Page 36 Front Panel Sub Assembly Test CON’T Turn VALUE knob clockwise, one position. Verify that the front panel LEDs shows EIGHTH row for the left hand side, and that the color is ORANGE. Verify that the front panel LEDs shows SEVENTH row for the right hand side, and that the color is GREEN.
- Page 37 Front Panel Sub Assembly Test CON’T Turn VALUE knob clockwise, one position. Verify that the front panel LEDs shows TENTH row for the left hand side, and that the color is ORANGE. Verify that the front panel LEDs shows NINTH row for the right hand side, and that the color is ORANGE.
- Page 38 Front Panel Sub Assembly Test CON’T Turn VALUE knob clockwise, one position. Verify that the front panel LEDs shows TWELFTH row for the left hand side, and that the color is ORANGE. Verify that the front panel LEDs shows ELEVENTH row for the right hand side, and that the color is ORANGE.
- Page 39 Front Panel Sub Assembly Test CON’T Press PROGRAM. This goes to the ALL led test. DO NOT RUN THIS TEST FOR MORE THAN ONE MINUTE. EXCESSIVE POWER USAGE WILL CAUSE POWER SUPPLY TO OVERHEAT. Verify that the front panel LEDs shows “ALL” for 1 second. Verify that all the LEDs are on, that they have a consistent brightness and that they are not flickering.
- Page 40 Front Panel Sub Assembly Test CON’T Press REAL TIME ANALYZER, INPUT/OUTPUT, ALL, BYPASS, LINK, STORE, COMPARE, UTILITY, SAVE CURVE, and PUSH TO ENTER Buttons. Verify that while the button is the display shows its name or an abbreviated name. Verify that the display does NOT show “ERROR” or “COMBO” Problems with this inspection indicates that the unit has problems with its switches, and that the DUT has FAILED.
- Page 41 Front Panel Sub Assembly Test CON’T Press Press “PUSH TO ENTER” encoder button. This starts the reset process. Verify that the front panel seven segment displays count from “00” to “99.” When the display reaches “99” the reset procedure is done. Problems with the display not starting to count indicate failure of the encoder button, and that the DUT has failed.
-
Page 42: Assembly Qc
Make sure that all artwork is clear and correctly aligned. Quickly plug the unit into an Alesis P3 type power supply to ensure LEDs light and proper startup screen appears. While the LEDs are on, check to make sure that the front lens is clear and working as anticipated. -
Page 43: Final Assembly Qc
Plug the IEC Power Cable into a power source and DUT IEC Power In connector. Verify that the front panel LEDs show normal power up message, “DEQ830” on the left side. Verify that the LEDs do not flicker and are of a consistent brightness. - Page 44 Final Assembly System Test CON’T Plug the IEC Power Cable into a power source and BB01. Verify that the front panel LEDs show normal power up message, “DEQ830” on the left side.. After this message “DIAG: <version>” should display on the left side.
- Page 45 Final Assembly System Test CON’T Turn VALUE knob clockwise. Repeat for left columns 2 through 30 (LVL). Stop this test when the last column on the left side (label: LVL) is displayed. Verify that the front panel LEDs shows the selected column. Verify that all the LEDs are on, that they have a consistent brightness and that they are not flickering.
- Page 46 Final Assembly System Test CON’T Turn VALUE knob clockwise, one position. Verify that INPUT and OUTPUT indicators are on. Verify that the FIRST 7- segment digit is on. Verify that all the LEDs are on, that they have a consistent ightness and that they are not flickering.
- Page 47 Final Assembly System Test CON’T Turn VALUE knob clockwise, one position. This is the last column. Verify that PROG, CURVE and DB indicators are on. Verify that the THIRD digit is on. Verify that all the LEDs are on, that they have a consistent ightness and that they are not flickering.
- Page 48 Final Assembly System Test CON’T Turn VALUE knob clockwise, one position. Verify that the front panel LEDs shows THIRD row for the left hand side, and that the color is ORANGE. Verify that the front panel LEDs shows SECOND row for the right hand side, and that the color is RED.
- Page 49 Final Assembly System Test CON’T Turn VALUE knob clockwise, one position. Verify that the front panel LEDs shows SIXTH row for the left hand side, and that the color is ORANGE. Verify that the front panel LEDs shows FIFTH row for the right hand side, and that the color is GREEN.
- Page 50 Final Assembly System Test CON’T Turn VALUE knob clockwise, one position. Verify that the front panel LEDs shows EIGHTH row for the left hand side, and that the color is ORANGE. Verify that the front panel LEDs shows SEVENTH row for the right hand side, and that the color is GREEN.
- Page 51 Final Assembly System Test CON’T Turn VALUE knob clockwise, one position. Verify that the front panel LEDs shows TENTH row for the left hand side, and that the color is ORANGE. Verify that the front panel LEDs shows NINTH row for the right hand side, and that the color is ORANGE.
- Page 52 Final Assembly System Test CON’T Turn VALUE knob clockwise, one position. Verify that the front panel LEDs shows TWELFTH row for the left hand side, and that the color is ORANGE. Verify that the front panel LEDs shows ELEVENTH row for the right hand side, and that the color is ORANGE.
- Page 53 Final Assembly System Test CON’T Press PROGRAM. This goes to the ALL led test. DO NOT RUN THIS TEST FOR MORE THAN ONE MINUTE. EXCESSIVE POWER USAGE WILL CAUSE POWER SUPPLY TO OVERHEAT. Verify that the front panel LEDs shows “ALL” for 1 second. Verify that all the LEDs are on, that they have a consistent brightness and that they are not flickering.
- Page 54 Final Assembly System Test CON’T Press REAL TIME ANALYZER, INPUT/OUTPUT, ALL, BYPASS, LINK, STORE, COMPARE, UTILITY, SAVE CURVE, and PUSH TO ENTER Buttons. Verify that while the button is the display shows its name or an abbreviated name. Verify that the display does NOT show “ERROR” or “COMBO” Problems with this inspection indicates that the unit has problems with its switches, and that the DUT has FAILED.
- Page 55 Final Assembly System Test CON’T Press PROGRAM once to advance to the DIG AUDIO test. The analog audio test is not essential for this test. Verify that the front panel LEDs shows test messages: MIDI -> A. -> DIG A. Stop here.
-
Page 56: Reset
Plug the IEC Power Cable into a power source and DUT IEC Power In. Verify that the front panel LEDs show normal power up message, “DEQ830” on the left side. After this message “DIAG” should splay on the left side.
Need help?
Do you have a question about the DEQ830 and is the answer not in the manual?
Questions and answers