Table of Contents
Advertisement
Advertisement
Table of Contents

Related Manuals for Alesis PEQ-450


Summary of Contents for Alesis PEQ-450
- Page 1 Five-Band Parametric Equalizer Reference Manual 2001 PEQ-450 Reference Manual...
- Page 2 PEQ-450 Manual PEQ-450 Reference Manual...
-
Page 3: Table Of Contents
Dual Channel Operation ...25 About Audio Cables...26 Basics of Equalization...27 What is equalization?...27 Description of Controls ...28 Gain...28 Frequency...28 Q ...29 HPF ...30 LPF ...30 Input...31 Output ...31 Equalization Artifiacts ...32 Distortion ...32 Noise ...32 Phasing ...32 PEQ-450 Reference Manual PEQ-450 Manual Contents... - Page 4 Tape hiss removal...34 Eliminating feedback ...34 Troubleshooting...37 Troubleshooting Index ...37 Avoiding ground loop noise ...38 Line Conditioners and Protectors ...39 Care and Maintenance...40 Cleaning ...40 Refer All Servicing to Alesis...40 Obtaining Repair Service ...40 Specifications...42 Alesis Limited Warranty...43 PEQ-450 Reference Manual...
- Page 5 PEQ-450 Manual PEQ-450 Reference Manual...
-
Page 6: Welcome
PEQ-450 Manual Welcome! Thank you for making the Alesis PEQ-450™ a part of your studio. Since 1984, we've been designing and building creative tools for the audio community. We believe in our products, because we've heard the results that creative people like you have achieved with them. -
Page 7: How To Use This Manual
Chapter 1: Quick Start. If you're already familiar with recording, this will get you started using the PEQ-450 right away. It's a short guide to the essential elements of connections and operation. -
Page 8: Important Safety Instructions
A polarized plug has two blades with one wider than the other. A grounding-type plug has two blades and a third grounding prong. provided for your safety. When the provided plug does not fit The wide blade or the third prong are PEQ-450 Reference Manual... - Page 9 17. Do not expose the apparatus to dripping or splashing. Do not place objects filled with liquids (flower vases, softdrink cans, coffee cups) on the apparatus. 18. WARNING: To reduce the risk of fire or electric shock, do not expose this apparatus to rain or moisture. PEQ-450 Reference Manual PEQ-450 Manual...
-
Page 10: Instructions De Sécurité Importantes (French)
à la terre. Cette dernière est présente pour votre sécurité. Si le cordon secteur ne rentre pas dans la prise de courant, demandez à un électricien qualifié de remplacer la prise. autre appareils PEQ-450 Reference Manual (don’t les... -
Page 11: Beim Benutzen Dieses Produktes Beachten Sie Bitte Die Folgenden Sicherheitshinweise: (German)
Beim Benutzen dieses Produktes beachten Sie bitte die folgenden Sicherheitshinweise: (German) 1. Lesen Sie die Hinweise. Halten Sie sich an die Anleitung. Beachten Sie alle Warnungen. Beachten Sie alle Hinweise. Bringen Sie das Gerät nie mit Wasser in Berührung. PEQ-450 Reference Manual PEQ-450 Manual... - Page 12 über längere Zeit mit hoher Lautstärke oder einem Pegel, der Ihnen unangenehm is. Wenn Sie ein Nachlassen des Gehörs oder ein Klingeln in den Ohren feststellen, sollten Sie einen Ohrenarzt aufsuchen. dieser nicht Die Wartung wird notwendig, wenn das Gerät umkippt, um Verletzungen PEQ-450 Reference Manual...
-
Page 13: Ce Declaration Of Conformity
PEQ-450 Manual CE Declaration of Conformity See the Internet site: www.alesis.com PEQ-450 Reference Manual... -
Page 14: Instructions To The User (Fcc Notice)
TV reception. The user is cautioned that changes and modifications made to the equipment without the approval of manufacturer could void the user’s authority to operate this equipment. PEQ-450 Reference Manual... -
Page 15: Quick Start Guide
If you're experienced with signal processors, this chapter is a "shorthand" guide for those who want to start using the PEQ-450 right away. If you have questions about any of the features, don’t worry – later chapters will unveil the mysteries of the PEQ-450's special features. -
Page 16: Step 2: Try Some Equalization
BAND 5 GAIN button to hear your signal without the I N P U T . Adjust the HIGH SHELF knobs to hear the effects of PEQ-450 Reference Manual knob INPUT... -
Page 17: Step 3: Try Some Filtering
A popular vocal effect is to filter the voice to a small frequency band. This "telephone" effect is also called "futzing" and can be used on any instrument or mix. Here’s how to get that sound on the PEQ-450: Begin playing your source material. Turn the clockwise until the average level is around –15 on the... -
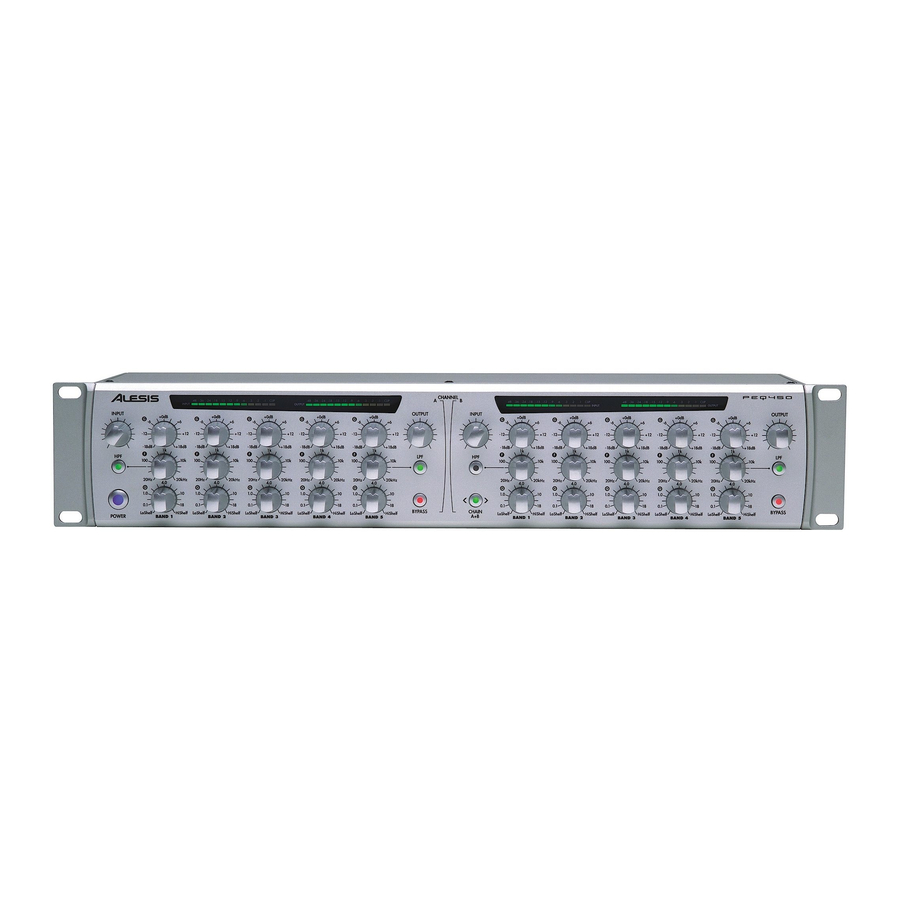
Page 18: Front Panel Diagram
• chapter 1 Front Panel Diagram 4.5k 4.5k 0.25 0.25 0.25 Rear Panel Diagram 4.5k 4.5k 4.5k 0.25 0.25 4.5k 4.5k 4.5k 4.5k 0.25 0.25 0.25 0.25 0.25 PEQ-450 Reference Manual 4.5k... -
Page 19: Connections
• Power Cable • This instruction manual Installing in a Rack The PEQ-450 may be simply set on a table, or installed in a standard 19" audio equipment rack. The rack ears are integral to the unit. Thermal Considerations in Rack Mounting The PEQ-450 can be mounted in an equipment rack (taking up 3 rack spaces) or placed on a table or shelf. -
Page 20: Power
INPUT AC power source of the proper rating. Tip: It’s good practice to not turn on the PEQ-450 until all other audio cables are hooked up as well. Make sure your amplifier or powered speakers are switched off when turning the PEQ- 450 on or off to avoid damage. - Page 21 • For 100-120 VAC 50/60 Hz operation in the US, Canada and/or Japan, use Alesis UL/CSA power cord #7-41-0001. • For 230 VAC 50 Hz operation in England, use Alesis Power cord #7-41-0004. • For 220 VAC 50 Hz operation in Europe and Scandinavia, use Alesis EU power cord #7-41-0002.
-
Page 22: Connecting Inputs And Outputs
Most recording consoles have a jack near the mic and line inputs labeled "Insert". This is typically a TRS jack with the send and return on the same jack. To use the PEQ-450 as a channel insert, you will need an insert cable (not included). -
Page 23: Connecting To The Main Inserts Of A Mixing Console
You can use insert cables to connect the PEQ-450 to the main L/R bus the same way you connect it to a pair of channels. Simply connect one insert cable to the left main insert of the mixer, and connect the two mono jacks to the left of the PEQ-450. -
Page 24: Connecting To The Inserts On An Instrument Amplifier
You can also simply connect the balanced main outputs of the mixer to the inputs of the PEQ-450, then connect the outputs of the equalizer to the inputs of your mixdown recorder, monitor system, etc. -
Page 25: Connecting To Equipment With Xlr Inputs And Outputs
Connecting to equipment with XLR inputs and outputs: If you are connecting the PEQ-450 to a product with XLR balanced inputs and outputs, you will need to convert this signal to a TRS balanced connector. Make sure that Pin 2 of the XLR connector is connected to the Tip of the TRS adapter, and Pin 3 is connected to the Sleeve. -
Page 26: About Audio Cables
The PEQ-450 is wired according to the modern standard of "Pin 2 (tip) = Hot". Some older equipment was wired with Pin 3 hot; check to make sure correct polarity is maintained throughout your system. -
Page 27: Basics Of Equalization
PEQ-450’s controls. What is equalization? An equalizer boosts or cuts a frequency range. The PEQ-450 is a parametric equalizer, which means that you can sweep the frequency bands and adjust the range of boost or cut. The other type of equalizer, a graphic equalizer, has many fixed frequency bands which can be boosted or cut. -
Page 28: Description Of Controls
• chapter 3 Description of Controls There are five groups of knobs in vertical rows on each channel of the PEQ-450. These are labeled BAND 1 through BAND 5. Their function is as follows: Gain knob specifies the amount of boost or cut for that band. - Page 29 A setting of 0.25 is even narrower and is typically used for notching a small frequency due to reduce noise. The Q control of the PEQ-450 has a range of 0.25 to 16. 40Hz LOW SHELF frequency.
-
Page 30: Hpf
TV or computer monitor whine, and other high- frequency noises. +12dB +9dB +6dB +3dB -3dB -6dB -9dB -12dB knobs for Band 1. When this function is on, knobs for Band 5. When this function is on, Frequency 40Hz 200Hz 1kHz 10kHz 20kHz PEQ-450 Reference Manual... -
Page 31: Input
PEQ-230. It should be set so that the average level is around –15dB, but not so high so that the hits the red light. The OUTPUT METER CLIP output control is useful for compensating for overall gain changes due to extreme EQ settings. PEQ-450 Reference Manual... -
Page 32: Equalization Artifiacts
Tip: When possible, always try cutting before boosting. Instruments usually sound better when you cut the problem frequencies instead of boosting the frequencies you want to feature. knob. Better yet, try OUTPUT PEQ-450 Reference Manual... -
Page 33: Applications
Chapter 4 Applications This section is designed to get you started with the PEQ-450 by giving some sample settings. These are merely suggested settings, experiment and find your own once you begin to hear what the PEQ-450 does to your sound. -
Page 34: Hum Removal
You can "ring out" the monitor by using EQ to cut the frequency that’s feeding back. This is best to try when there is not a band and audience present: on Band 1, centered around 60Hz, PEQ-450 Reference Manual... - Page 35 Once you hear feedback, cut that frequency as much as you can. If you don’t hear feedback at any frequency using this method, try boosting the gain a little more or raise the monitor level. PEQ-450 Reference Manual chapter 4 • applications...
- Page 36 • chapter 4 PEQ-450 Reference Manual...
-
Page 37: Troubleshooting
Troubleshooting Index If you experience problems while operating your PEQ-450, please use the following table to locate possible causes and solutions before contacting Alesis Product Support for assistance. Symptom No audio from outputs Buzz from outputs AC hum PEQ-450 Reference Manual... -
Page 38: Avoiding Ground Loop Noise
If it’s not possible to separate the audio and AC wiring in some instances, make sure that the audio wires don’t run parallel to any AC wire (they should only cross at right angles, if possible). PEQ-450 Reference Manual... -
Page 39: Line Conditioners And Protectors
TO ELIMINATE HUM IF THE ABOVE HAS FAILED: A) Disconnect the power from all outboard devices and tape machines except for the PEQ-450, the mixer and control room monitor power amp. B) Plug in each tape machine and outboard effects device one at a time. -
Page 40: Care And Maintenance
SWITCHES AND CONTROLS! Spray onto a cloth, then use cloth to clean the unit. Refer All Servicing to Alesis We believe that the PEQ-450 is one of the best signal processors that can be made using current technology, and should provide years of trouble-free use. - Page 41 5 • troubleshooting Tape a note to the top of the unit describing the problem, include your name and a phone number where Alesis can contact you if necessary, as well as instructions on where you want the product returned.
-
Page 42: Specifications
22-22 kHz ±0.50 dB, Analog In to Analog Out 7 Watts Max (90-230 VAC / 50- 60 Hz) 3.5" H x 19.0" W x 6" D (89mm H x 483mm W x 152mm 2 spaces 5 lbs (2.27 kg) PEQ-450 Reference Manual... -
Page 43: Alesis Limited Warranty
During the warranty period ALESIS shall, at its sole and absolute option, either repair or replace free of charge any product that proves to be defective on inspection by ALESIS or its authorized service representative. In all cases disputes concerning this warranty shall be resolved as prescribed by law. - Page 44 Alesis under this warranty shall apply only within the country of sale. Without limiting the foregoing, repairs under this warranty shall be made only by a duly authorized Alesis service representative in the country of sale.
Need help?
Do you have a question about the PEQ-450 and is the answer not in the manual?
Questions and answers